While I’m keeping Debian 13 Trixie on my media center computer, I’ve decided to fallback to Debian 12 Bookworm on my laptop and workstation. The more that I used Trixie on those machines, the more I realized some things that I relied on just weren’t working right. Once that software gets updated, I’ll try Trixie again, but for now, especially while I’m frantically getting things ready for classes to begin next Tuesday, I’ll rely on tried-and-true Bookworm.
Category: Computers
-
Debian 13 Trixie Full Install Notes
Last week, I upgraded the Debian 12 Bookworm installation on my workstation to Debian 13 Trixie. After updating my sources file and running apt update and apt full-upgrade, the installation went painlessly and quickly. However, I noticed some glitches with video playback (audio stutter) and listing directory contents on a hard disk drive (prolonged delays even though the drive was in active use and not waking from sleep). I wasn’t that interested in spending time to track down the source of these particular problems, so I decided to do a nuke-and-pave full reinstall of Debian 13.
That led to three days of frustration and reinstalling Debian 13 five times. I now have a stable installation that does what I want, but it took a lot of bashing my forehead into the desk to get here.
To be fair, some of the problems were created by me trying to configure software that I don’t have a deep understanding of using shared knowledge online that might be years old and applicable to older versions of those programs.
The one problem that caused the most headaches wasn’t my fault as far as I can suss out. The installer seemed to alternate assigning the “zero” nvme drive between my two identical 2TB nvme drives. This strange behavior led to me wiping both drives and installing Debian 13 on both during the multiple installations. When it comes to partitioning, I’m super cautious, because even though my data was backed up, I still didn’t want to wipe a drive unless it was what I wanted to do.
Besides the Debian 13 installer’s partitioning software, I wondered if it could have something to do with my motherboard’s bios. I am a few versions behind the latest release, but none of the bios’ change logs mention anything to do with code for handling the nvme drives.
I didn’t document my experience like I should, because I got to a point where I just wanted a stable system so that I could get some work done. I accomplished that at least. Though, I wanted to put this up as a potential warning in case anyone else experiences something similar.
-
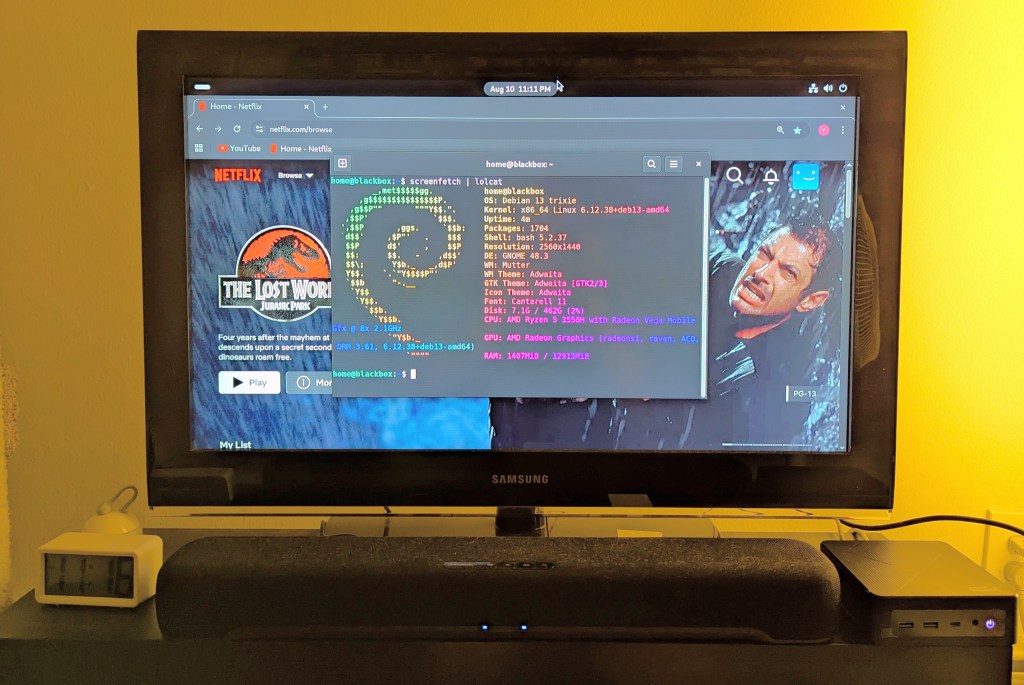
Ditched Roku for a Discounted Origimagic Ryzen 5 Mini PC
I’ve been unhappy with Roku’s increasing advertising through images and now full-motion video and their lack of support for a variety of codecs in their media player app. So, I’ve been looking for awhile for a good deal on a mini pc that could replace the Roku for playing media and also support some light gaming. Also, considering the impending tariffs (i.e., a tax on Americans), I hoped to find something as soon as possible.
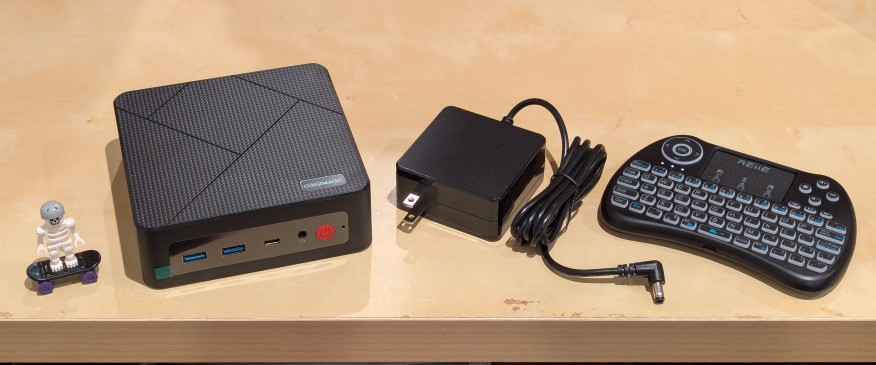
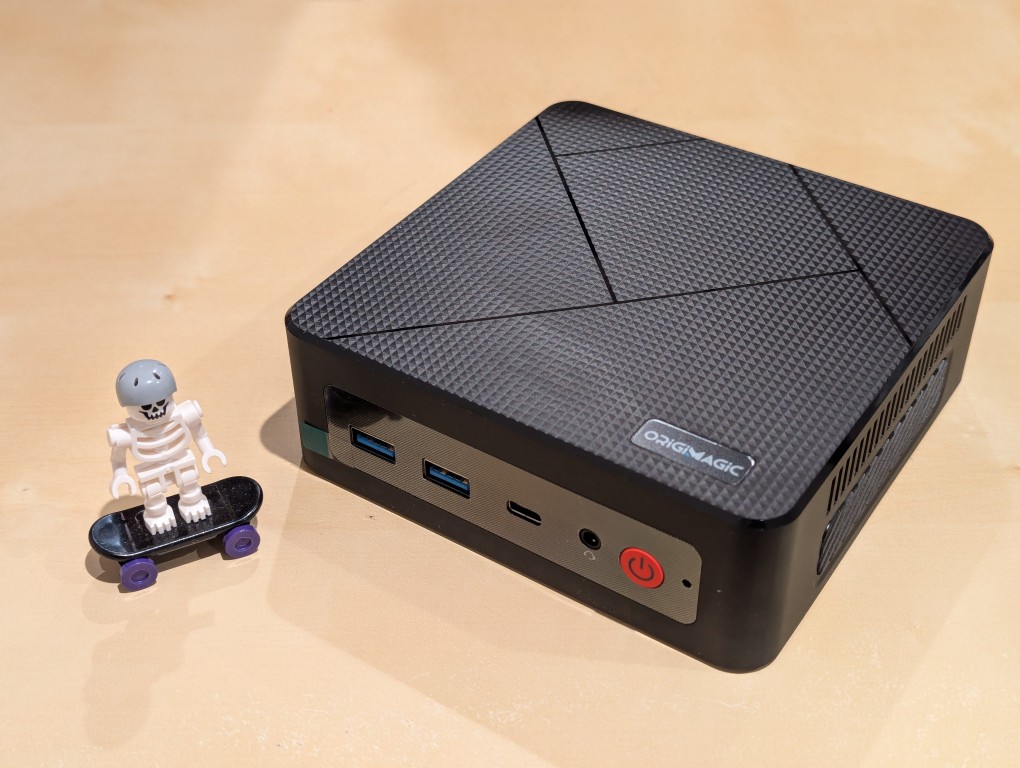
After tracking several mini pcs on Amazon and eBay for a few weeks, I finally pulled the trigger when Amazon offered the Origimagic C4 Mini PC with a Ryzen 5 3550H (4 core, 8 threads) on sale for $153. It’s CPU has a lot more horsepower while using 25 watts of power than Intel’s similarly priced mini pc processors. It came stock with 16GB DDR4 RAM, 512GB PCIe SSD, 1 x Type-C USB, 4 x Type-A USB (3 are USB 3 and 1 is USB 2), headphone jack, HDMI, DisplayPort, and dual ethernet.
To operate it from the sofa, I got a $10 reiie H9+ Mini Keyboard with Touchpad that uses a wireless USB adapter to connect to the mini pc.
Before setting anything up, I created a flash drive with Debian 13 Trixie, the latest version that was released over the weekend on Saturday.
To do this, I inserted a 16GB flash drive into my workstation, but I didn’t mount the device. I downloaded the network install ISO for Debian 13 from here. Then, I ran
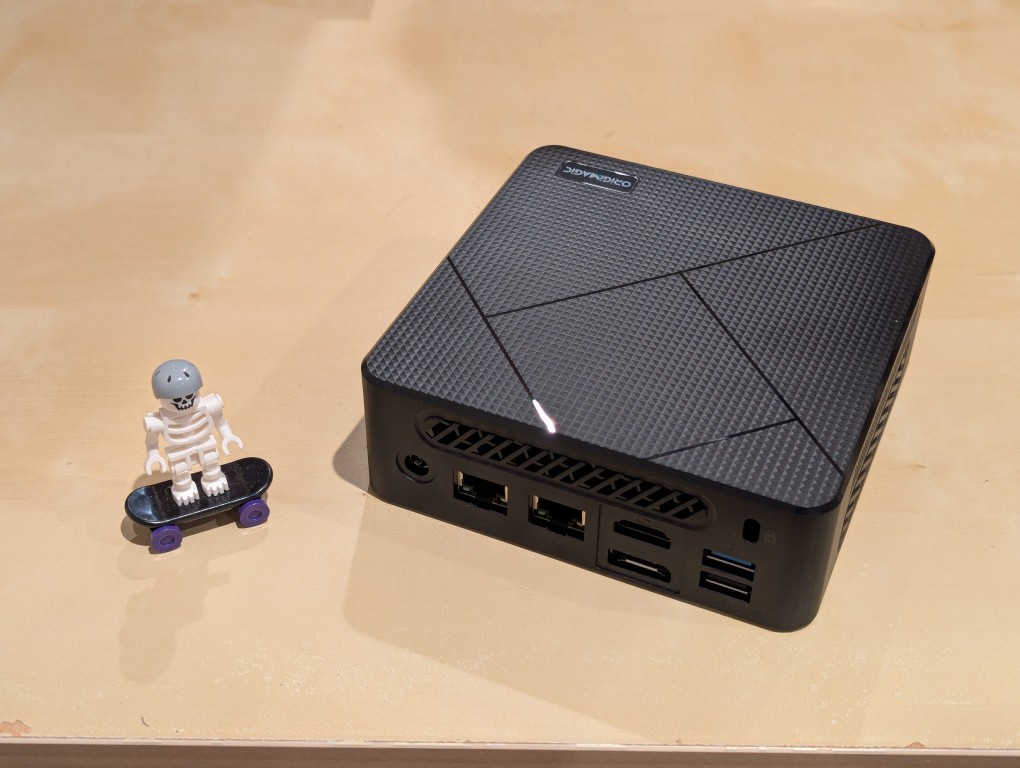
lsblkin a terminal window to see what device address corresponded to the flash drive. It’s important to not make a mistake here, because it’s easy to overwrite another drive using this method.lsblklists the devices, which are all in the “/dev/” folder, so when I saw that my flash drive was assigned the address “sdb”, I knew that its full address was “/dev/sdb”. With that info, I then wrote the downloaded Debian 13 netinstall ISO directly to the flash drive using this command:sudo cp debian-13.0.0-amd64-netinst.iso /dev/sdbAfter the copying to the flash drive had finished, I ejected it from my workstation and took it over to the mini pc. I plugged in the power adapter, ethernet cable (I arbitrarily picked the one furthest from the power plug), HDMI cable to the TV, the keyboard receiver USB, and the Debian 13 installation flash drive.
I did experience some frustration with getting the Debian 13 flash drive to boot the mini pc. As soon as the mini pc booted, I was unable to enter BIOS or open the boot menu. Instead, it kept booting into the Windows 11 setup, which I did not want to use. At first, I thought it might be a problem with the tiny wireless keyboard and trackpad, so I switched to my Logitech keyboard and trackball, which are both tied to one Logitech USB receiver. I tried different USB plugs on the front and rear of the mini pc until I was finally able to enter bios (pushing
DELat boot) when the keyboard USB receiver is in the top-right USB port on the rear of the mini pc as shown below (it is a USB3 port). It might have been bad luck on my part with the other ports, so I can’t say this is a peculiarity with this hardware for certain. Nevertheless, it’s good to exhaust all possibilities like this.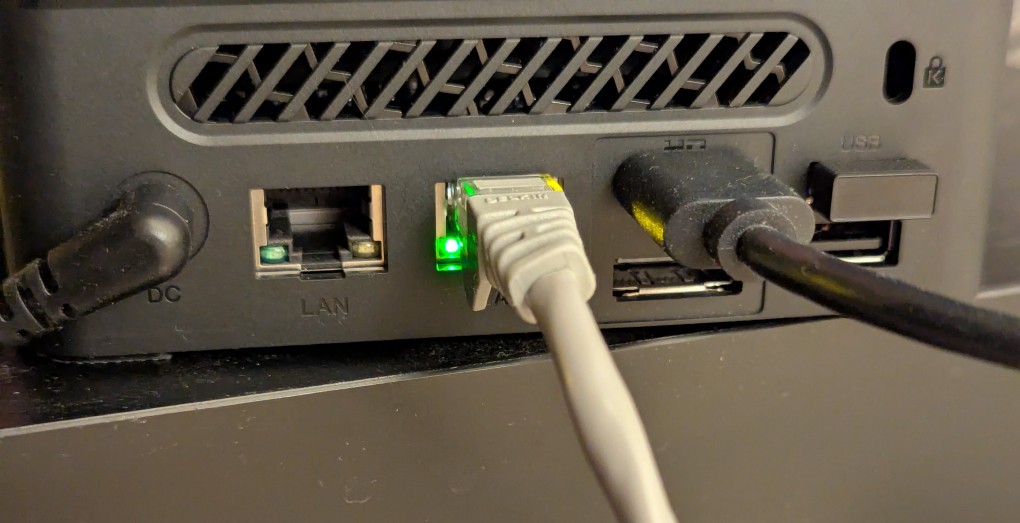
Once in the BIOS, there’s not many options except for disabling hardware (I disabled WiFi), turning off Secure Boot and the Trusted Computing Module, and other odds and ends. I saved the settings, rebooted, and went into the Boot Menu (F7), selected the Debian 13 netinstall flash drive, and began the installation (a full nuke-and-pave: erasing the NVMe drive and setting up Debian 13 as the only operating system).
While I use XFCE on my laptop and workstation, I opted for the GNOME desktop environment on the mini pc, because I thought its screen controls and overall user interface would be easier to see and navigate from across the room. If I don’t like it, I can always install XFCE.
Because two of the main sources of media for us is Netflix and YouTube, I installed Chrome to handle those sites. I have VLC and Kodi for everything else.
-
How to Update Your Linux Kernel on Debian Bookworm 12 to the Latest Available on Backports
![terminal screen with system info: jason@desktop:~$ screenfetch | lolcat
_,met$$$$$gg. jason@desktop
,g$$$$$$$$$$$$$$$P. OS: Debian 12 bookworm
,g$$P"" """Y$$.". Kernel: x86_64 Linux 6.12.32+bpo-amd64
,$$P' `$$$. Uptime: 10h 8m
',$$P ,ggs. `$$b: Packages: 2323
`d$$' ,$P"' . $$$ Shell: bash 5.2.15
$$P d$' , $$P Resolution: 1920x1080
$$: $$. - ,d$$' DE: Xfce
$$\; Y$b._ _,d$P' WM: Xfwm4
Y$$. `.`"Y$$$$P"' WM Theme: Haiku-Alpha
`$$b "-.__ GTK Theme: BeOS-r5-GTK-master [GTK2]
`Y$$ Icon Theme: BeOS-r5-Icons-master
`Y$$. Font: Swis721 BT 9
`$$b. Disk: 7.7T / 11T (75%)
`Y$$b. CPU: AMD Ryzen 7 7700 8-Core @ 16x 5.389GHz
`"Y$b._ GPU: NVIDIA GeForce RTX 3090, NVIDIA RTX A4000, NVIDIA RTX A4000, NVIDIA RTX A4000
`"""" RAM: 9486MiB / 63916MiB](https://dynamicsubspace.net/wp-content/uploads/2025/07/system-info-debian-kernel-612.png?w=832)
If you’re like me, you might have newer computer hardware that isn’t fully supported by Linux kernel 6.1, which is installed with Debian Bookworm 12. Thankfully, Debian offers Backports, or newer software in testing in Trixie, the development name for Debian 13, that will eventually find its way into future Debian releases for use on an otherwise stable release of Bookworm.
Updating to a newer kernel often brings more hardware compatibility. However, it’s important to remember that using a backport kernel can introduce potential compatibility issues with the software officially supported on Bookworm. Even if installing the latest kernel causes some issues, you can choose to boot from one of your older 6.1 kernels on your install as long as you don’t delete them (by using the apt autoremove command).
I wrote this guide based on my experience installing Linux kernel 6.12 from Backports with the non-free firmware that my hardware needs to work. If you are trying to keep your system free from non-free software, you can omit those references in the instructions below.
Before doing any changes to your Debian installation, remember to backup your files first. Saving important files in more than one media and storing it backups in different physical locations is best practice.
After backing up your files, make sure your install is up-to-date with these commands:
sudo apt update
sudo apt upgrade
After those updates complete, it’s a good rule of thumb to do a reboot to begin working with a clean slate.
Next, add Debian Backports to /etc/apt sources.list. I used vi to do this:
sudo vi /etc/apt/sources.listIn vi, arrow down to the bottom line, type a lowercase “o” to add a blank line below the current line, type lowercase “i” to enter input mode, and type the following line into the document:
deb http://deb.debian.org/debian bookworm-backports main contrib non-free non-free-firmwareAfter double checking the added line, press the “Esc” key, and type “:wq” to write the file and quit vi.
Now, you need to update apt again:
sudo apt updateAfter the completes, enter this command to install the latest kernel from backports along with the kernel’s headers and firmware that might be needed for your hardware (such as networking card, video card drivers, etc.).
sudo apt install -t bookworm-backports linux-image-amd64 linux-headers-amd64 firmware-misc-nonfreeIt might take awhile for the installation to complete. If there are no errors, it should return you to your terminal prompt. If it did, reboot your computer to load the new kernel.
After your computer boots up again, you can verify that you are running the latest kernel by entering this command:
uname -rAfter installing the latest kernel, my computer reports this from the uname -r command:
6.12.32+bpo-amd64 -
My Interview with Emily Hockaday, Senior Managing Editor of Asimov’s, Published in New American Notes Online
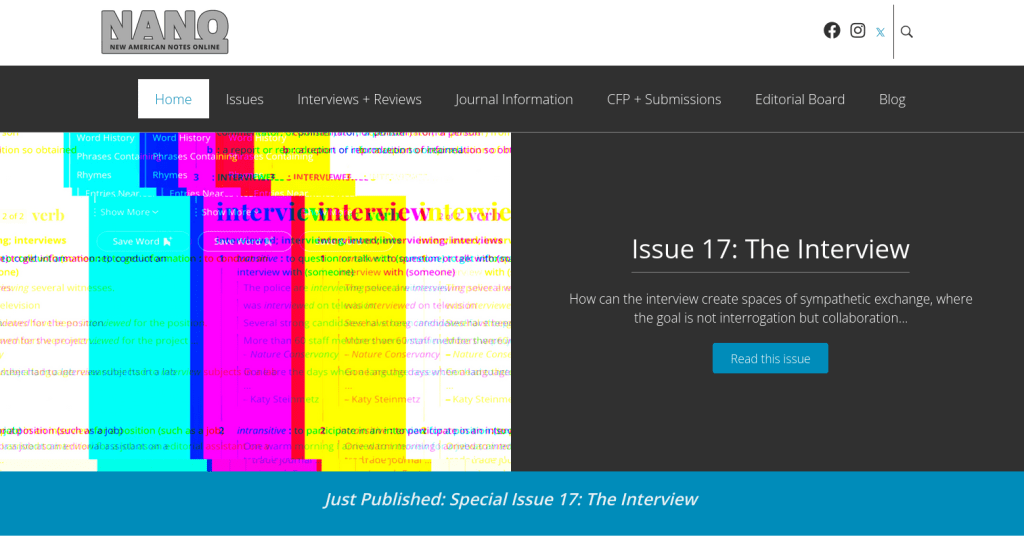
Issue 17 of New American Notes Online (NANO) on “The Interview” was recently published.
My interview with Emily Hockaday, senior managing editor of Asimov’s Science Fiction Magazine, on Artificial Intelligence (AI), Generative AI, and science fiction publishing is a part of the issue.
Click through here to see the other interviewees and topics covered in this special issue.
Editor Sean Scanlan sent out this press release for the issue:
A new issue of NANO: New American Notes Online has been published
Special Issue 17: The Interview
Publication date: June 2025
ISSN: 2160-0104 (Online)
NANO is an indexed, Open Access, and Open Source humanities journal. NANO never charges to submit or to read content. NANO is published by City Tech, part of the City University of New York.
NANO announces its new issue, an exploration of the ways that interviews connect people.
The interview is woven into our hyper-connected world through podcasts, Zooms, magazines, newspapers, social media, and they still occur in private settings. Interviews are ubiquitous. They can be formal and informal, closed or open-ended; they can yield quantitative and qualitative results; they can invoke power and symbolic capital. But, the interview can also be less about gate-keeping and more about the tension inherent in knowledge production and sharing. The eight interviews in this special issue of NANO create spaces of exchange, where the goal is not interrogation but collaboration, curiosity, and mutual understanding.
Two interviews focus on teaching. A multimedia project by Shauna Chung, Naila Butt, Sandy Fougeres, and Khemraj Persaud describe ways that interviews fuse writing and workplace readiness while the scholar Laura Westengard reveals the communal spaces where gothic and queer reinforce each other.
Two interviews focus on visual art. Jennifer Lockard Connerley discusses ways that academia and spirituality enhance portraiture while Bill Saylor reveals how his environmental and natural abstractions arise.
Two interviews focus on translation. Dana Crăciun acknowledges the difficulty of translation while Johannes Göransson eyes translation’s inherent creativity.
Two interviews focus on creativity and theory. The writer and editor Emily Hockaday discusses the challenges of running a science fiction magazine in the age of AI while Marcus Boon reflects on his interdisciplinary practices.
Editor’s Introduction for NANO Special Issue 17: The Interview
by Sean Scanlan
How the Interview Can Become a College Writing Tool for Workplace Readiness
by Shauna Chung, Naila Butt, Sandy Fougeres, Khemraj Persaud
An Interview with Marcus Boon, Author of In Praise of Copying
by David Banash
An Interview with Jennifer Lockard Connerley: Portrait of the Artist as a Young Academic
by Tara Robbins Fee
An Interview with Emily Hockaday, Senior Managing Editor of Asimov’s Science Fiction Magazine
by Jason Ellis
An Interview with Dana Crăciun, the translator of Salman Rushdie’s works into Romanian
by Carmen Neamțu
An Interview with Laura Westengard, Author of Gothic Queer Culture
by Leigh Dara Gold
An Interview with Johannes Göransson
by Matt Miller
https://nanocrit.com/index.php/issues/issue17/An-Interview-with-Johannes-Goransson-by-Matt-Miller
An Interview with Bill Saylor
by Sean Scanlan
https://nanocrit.com/index.php/issues/issue17/An-Interview-with-Bill-Saylor-by-Sean-Scanlan
