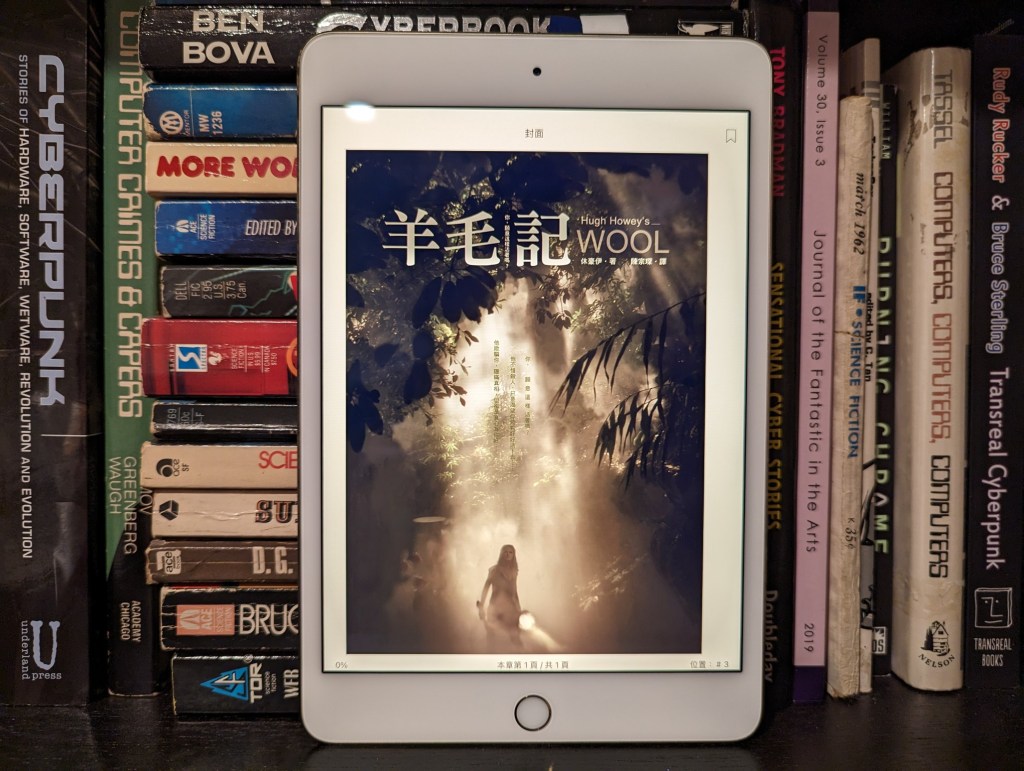
I worked through the first five books, then the prequels First Shift: Legacy, Second Shift: Order, Third Shift: Pact, and the latest novel Dust. Then, I read the tangential short stories, “In the Air,” “In the Mountains,” and “In the Woods” (these latter three stories are tragedies piled upon tragedies).
They are all page-turners. There’s plenty of loss and a little bit of hope. There are some interesting ideas at play in the series, including social and organizational psychology, medical applications of nanotechnology, warfare applications of nanotechnology, dosing of populations with trauma/PTSD drugs to facilitate mass amnesia, human hibernation with cyronics technology, and information technology’s omniscient, omnipotent, and omnipresent role.
I’ve heard good things from others that the Apple TV+ Silo television series based on Howey’s stories, but I haven’t watched it yet. I can say that the books are engaging and worth reading if not for the ideas that they grapple with, then for the characters whose lives are shaped and controlled by those technologies.
An anthropomorphic cat taking notes in a lecture hall. Image created with Stable Diffusion.
I tell my students that I don’t ask them to do anything that I haven’t done or will do myself. A case in point is using the summer months for a learning boost. LinkedIn Learning offers new users a free trial month, which I’m taking advantage of right now.
While I’ve recommended students to use LinkedIn Learning for free via the NYPL, completion certificates for courses don’t include your name and they can only be downloaded as PDFs, meaning you can’t easily link course completion to your LinkedIn Profile. Due to the constraints with how library patron access to LinkedIn Learning works, I opted to try out the paid subscription so that it links to my LinkedIn Profile. However, I wouldn’t let these limitations hold you back from using LinkedIn Learning via the NYPL if that is the best option for you–just be aware that you need to download your certificates and plan how to record your efforts on your LinkedIn Profile, your resume, and professional portfolio.
For those new to online learning, I would make the following recommendations for learning success:
Simulate a classroom environment for your learning. This means find a quiet space to watch the lectures while you are watching them. Don’t listen to music. Turn off your phone’s notifications. LinkedIn courses are densely packed with tons of information. Getting distracted for a second can mean you miss out on something vital to the overall lesson.
Have a notebook and pen to take notes. While watching the course, pause it to write down keywords, sketch charts, and commit other important information to your notes. The act of writing notes by hand has been shown to improve your memory and recall of learned information. Don’t keep notes by typing as this is less information rich learning than writing your notes by hand.
Even though a course lists X hours and minutes to completion, you should budget at least 50% more time in addition to that time for note taking, studying, quizzes, and exams (for those courses that have them).
While not all courses require you to complete quizzes and exams for a completion certificate, you should still take all of the included quizzes and exams. Research shows that challenging ourselves to recall and apply what we’ve learned via a test helps us remember that information better.
After completing a course, you should add the course certificate to your LinkedIn Profile, post about completing the course (others will give you encouragement and your success might encourage others to learn from the same course that you just completed), add the course certificate to your resume, and think about how you can apply what you’ve learned to further integrate your learning into your professional identity. On this last point, you want to apply what you’ve learned in order to demonstrate your mastery over the material as well as to fully integrate what you’ve learned into your mind and professional practices. This also serves to show others–managers, colleagues, and hiring personnel–that you know the material and can use it to solve problems. For example, you might write a blog post that connects what you’ve learned to other things that you know, or you might revise a project in your portfolio based on what you’ve learned.
Bring what you’ve learned into your classes (if you’re still working toward your degree) and your professional work (part-time job, internship, full-time job, etc.). Learning matters most when you can use what you’ve learned to make things, solve problems, fulfill professional responsibilities, and help others.
This weekend, I installed Debian 12 Bookworm with Xfce desktop environment on my desktop computer, because I wanted a pure Xfce installation on top of a distro running a 6.0 or higher kernel to theme as close to BeOS as I can get.
As I’ve written about before here, I have fond memories of using BeOS on my old PowerMacintosh 8500/120. When I used it on that hardware, it felt like the future. Many of its features were ahead of its time for a desktop computing environment. It was also incredibly easy to navigate and interact with due to its colors, icons, and textured UI elements.
I believe that BeOS and Haiku OS have GUIs that are easy to see and interact with, because they aren’t flattened to death like most contemporary operating systems, which have less contrast and textured borders that hinder visual comprehension and interaction.
I tried installing Xubuntu, but after installation, I was greeted by the login prompt, I entered my credentials, received a black screen (NB: not rebooting–for some reason the DE wouldn’t launch and it would kick me back to the login screen), and was greeted again by the login prompt. Since that was a fresh installation, I was concerned about the long-term stability of it on my computer. Hence, I tried out Debian 12, which installed and booted without a hitch!
I describe step-by-step how to make Xfce mimic BeOS in the sections below.
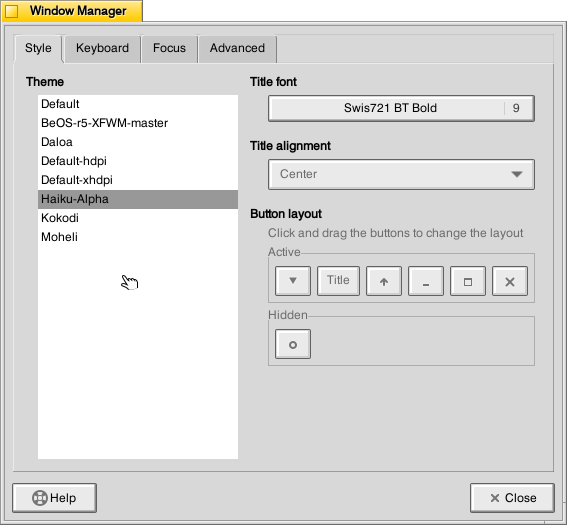
Window Manager Theme
Perhaps the most notable aspect of BeOS/Haiku’s look-and-feel is the yellow, tabbed window title bar. Some tutorials suggest using the BeOS-r5-XFWM theme, but I opted for the Haiku-Alpha theme, because it only keeps the close window tic box and eliminates the other options such as minimize, maximize, etc., which you can still operate by setting one option to title bar double clicks and others from the drop-down right-click menu.
Decompress the downloaded file and move the resulting folder into ~/.themes (remember to turn on “show hidden files and folders” in your file manager, and create the .themes folder if it does not already exist). Then, go to Settings > Window Manager > select Haiku-Alpha. Also, set the font to Swis721 BT Bold size 9 (see font section below for more info).
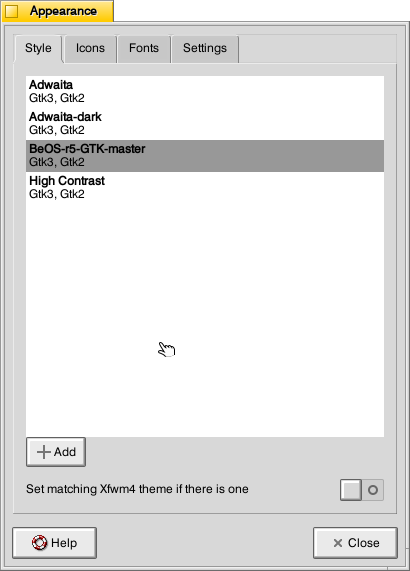
Appearance Theme
To give Xfce the general look-and-feel of BeOS’s relatively high contrast interface (by today’s modern, flat interface standards), I installed the BeOS-r5-GTK theme.
Decompress the downloaded file and move the resulting folder into ~/.themes. Then, go into Settings > Appearance > Style > select BeOS-r5-GTK-master.
Next, click on the Fonts tab. For Default Font, select Swis721 BT Regular size 9, and for Default Monospace Font, select Courier 10 Pitch Regular size 10 (see Font section below for more info).
Fonts
There are two essential fonts, which can be easily found through Google searches: Swis721 BT Roman and Courier 10 Pitch for Powerline.
Once downloaded, move the ttf files into ~/.fonts (remember to turn on “show hidden files and folders” in your file manager, and create the .themes folder if it does not already exist).
There are two main areas where the fonts need to be set. First, go to Settings > Window Manager > Style tab and set the Title font to Swis721 BT Bold size 9. Then, go to Settings > Appearance > Fonts tab and set the Default Font to Swis721 BT Regular size 9 and set the Default Monospace Font to Courier 10 Pitch Regular size 10.
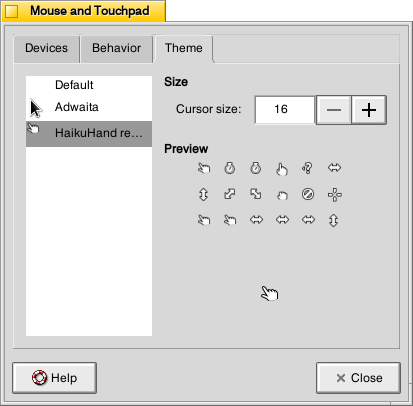
Mouse Cursors
The hand mouse cursor is an integral element of BeOS’s look-and-feel. I opted to use HaikuHand reHash.
Decompress the downloaded file and move its folder into ~/.icons (remember to turn on “show hidden files and folders” in your file manager, and create the .themes folder if it does not already exist). Then, select HaikuHand reHash in Settings > Mouse and Touchpad > Theme.
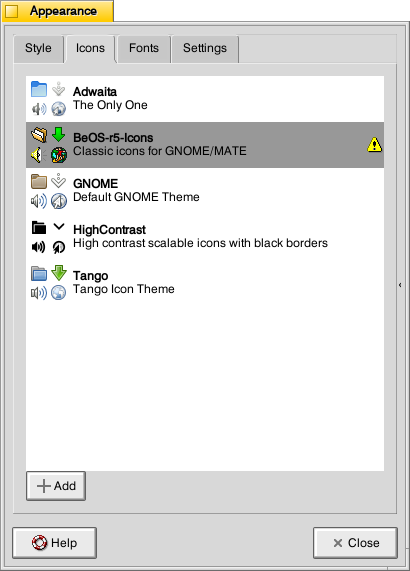
Icons
The isometric view icons for BeOS capture that mid-to-late-1990s era of gesturing towards 3D through 2D designs. Vaporware Mac System 8 Copland exemplified this aesthetic, too (but aspects of it found its way into the eventual MacOS 8 and others incorporated its design elements into shareware like Aaron and the Iconfactory’s innovative icon sets. I created some icons in this style, too.
Decompress the downloaded file and move it into ~/.icons (remember to turn on “show hidden files and folders” in your file manager, and create the .themes folder if it does not already exist). Then, go to Settings > Appearance > Icons tab > select BeOS-r5-Icons.
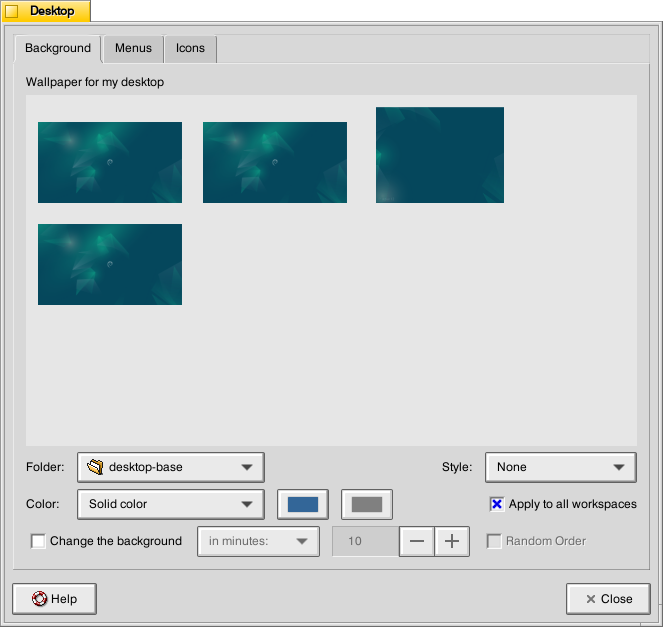
Desktop
There are BeOS desktop wallpaper pictures that you can download and set as your wallpaper. However, I wanted a simpler solid color background. To achieve this, go to Settings > Desktop. Set Style to “None,” and set Color to “Solid color.” Then, click on the color rectangle to the right of Color, and next, click on the “+” under Custom and enter this hex value for the default deep blue BeOS desktop color: #336698.
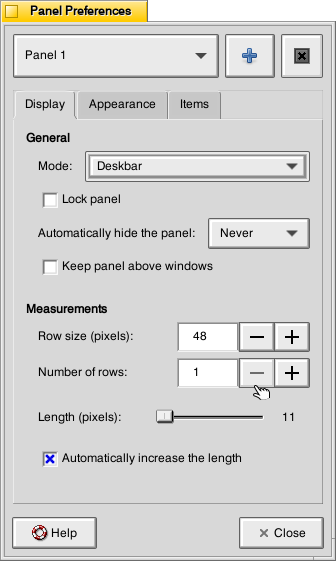
Dock
After a lot of head-hitting-the-desk, I settled on using the Xfce’s Panel instead of a more visually interesting dock that used a BeOS-inspired theme (e.g., BeOS-dr8-DockbarX). I was able to get DockbarX installed from source eventually, but I couldn’t get the Xfce4 DockbarX plugin to work with the Xfce Panel. It wasn’t from a lack of trying! It’s worth trying to get those installed–you might have better luck. For me, I needed to move on, so I settled on customizing the Xfce panel to meet my needs and fit the BeOS aesthetic well enough. I went to Settings > Panel > Display tabl to set Panel 1 in Deskbar Mode, set the Row size to 48 with 1 row and ticked “Automatically increase the length. On the Appearance tab, I set the Fixed icon size to 48.
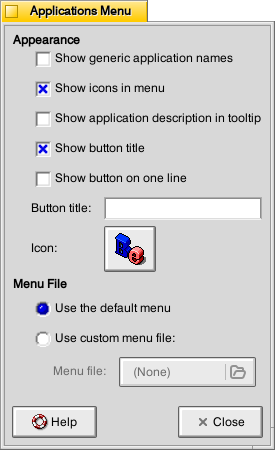
On the Items tab, I clicked the preferences for the Applications Menu, removed the Button title and changed the Icon to the isometric 3D Be logo (this will be an option after you’ve installed the icons pack as described above in the Icons section).
It would be easy to configure the panel to be more like the original Deskbar in BeOS, too. The main changes needed would be to increase the Number of rows to 4 or 5, change the Application menu icon to the flat “BeOS” logo icon (included in the icon pack installation in the Icons section above).
And, it’s important to remember that there was not one, eternal version of BeOS. As with any developed software, it changed over time with its UI and look-and-feel changing with it. For me, the 1996 Developer Release is what I remember most because I ran it on bare metal on my PowerMacintosh 8500/120. It continued to evolve and change after that in ways that I am less familiar with.
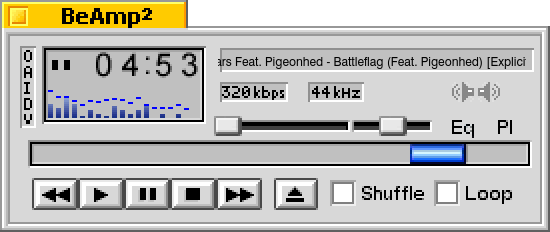
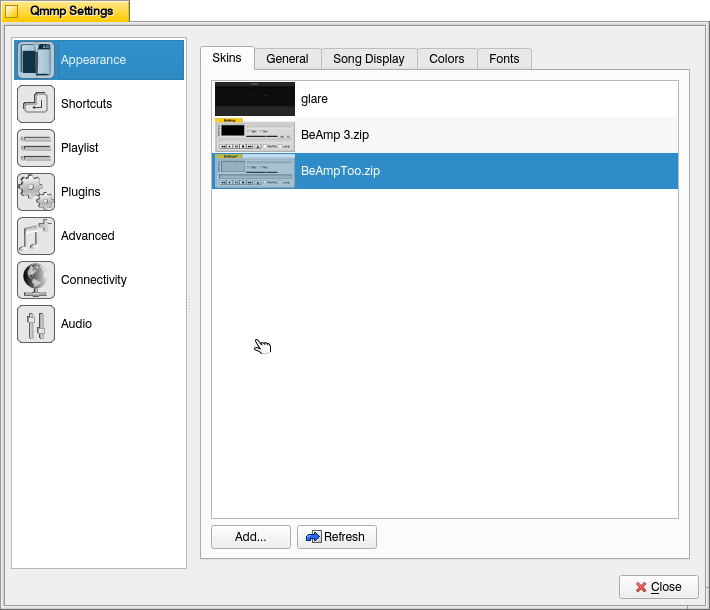
QMMP/Winamp Skin
If you use QMMP for listening to music on your computer, you’ll need to grab a Winamp skin to give it the BeOS look and title bar. BeAmp Too is my favorite. There are a few others available if you search for “beos” on the Winamp Skin Museum.
Whichever one you choose, download the zip file for the theme to your Downloads folder. Then, open QMMP, right click on the title bar and choose Settings, click on the Appearances section on the left, click the Skins tab, and then click on “Add…” at the bottom, navigate to your downloaded theme zip file and select it. QMMP will copy the file into the ~/.qmmp/skins directory for you. Select the theme on the Appearances > Skins tab to activate the theme.
Other Tweaks
The following are other tweaks to Xfce that I prefer for daily use.
Disable overlay/auto hiding scrollbars
Edit /etc/environment and add the line
GTK_OVERLAY_SCROLLING=0
Save the file. Logout and login to see the change take effect.
White font for desktop items
Go to ~/.config/gtk-3.0/ and create a file named gtk.css (edit this file if it already exists). Add these lines to it:
XfdesktopIconView.label {
    color: white;
}
Save the file. Logout and login to see the change take effect.
Consistent Scroll Bar Speed
In folders with many files, I have noticed that if I begin scrolling but slow down a little, the speed of scrolling after that point for the rest of my mouse-down drag will be EXCEEDINGLY slow. This is by design–a feature called zoom scrolling. Well, I don’t like it. If you don’t like it either, you can tame it by setting the trigger time to longer than the default of 500 milliseconds. To do this, go to ~/.config/gtk-3.0/ and create a file named settings.ini (edit this file if it already exists). Add these lines to it:
[Settings]
gtk-long-press-time=5000
Save the file. Logout and login to see the change take effect.
Thanks to:
An unnamed Reddit user (their account has been deleted) posted an excellent write up of their BeOS-r5-XFCE theming of XFCE in r/unixporn that gave me a roadmap for what was possible.
Overall, the page now has a table of contents that helps with understanding and navigating the page’s wealth of information. In the primary source list, I added headings and dividers for decades and years with the titles in each year being alphabetized by author’s last name. Also, the biggest improvement was reformatting each entry in the latest MLA style with information gleaned from my research and the Internet Speculative Fiction Database. Those stories and chapters that I did not have on hand are therefore listed without inclusive page numbers (I will add these as I source each item). In the secondary sources list, I reordered these alphabetically by author’s last name as these are a reference source and chronology isn’t as important as it is for the primary source list.
The number of sources listed in the primary source list increased 61% from 103 to 166. Each includes parenthetical notes about the specific brain-related narrative elements. Many thanks to James Davis Nicoll and the commenters on his “Get Out of My Head: SFF Stories About Sharing Brain-Space With Someone Else” (Tor.com, 8 Nov. 2018) article for contributing some of the new titles to the primary source list.
The number of second sources increased 141% from 17 to 41, which includes a French title that I can’t wait to get my hands on: Laurent Vercueil’s Neuro-Science-Fiction (Le Bélial, 2022).
I’ll continue adding to this bibliography as well as the others that I maintain as a part of my research interests. If you have a useful source that I should add, please send it my way. Also, I’m open to collaboration, so let me know if you’re likewise inclined and would like to discuss a project!
I wanted to make the most of this year’s Spring Recess. Below are a few things that I accomplished during this late semester respite: a computer storage upgrade, installing Mac OS X Leopard on QEMU, finding Star Wars action figures on eBay, beginning a generative AI and pedagogy bibliography, and spending time with Y.
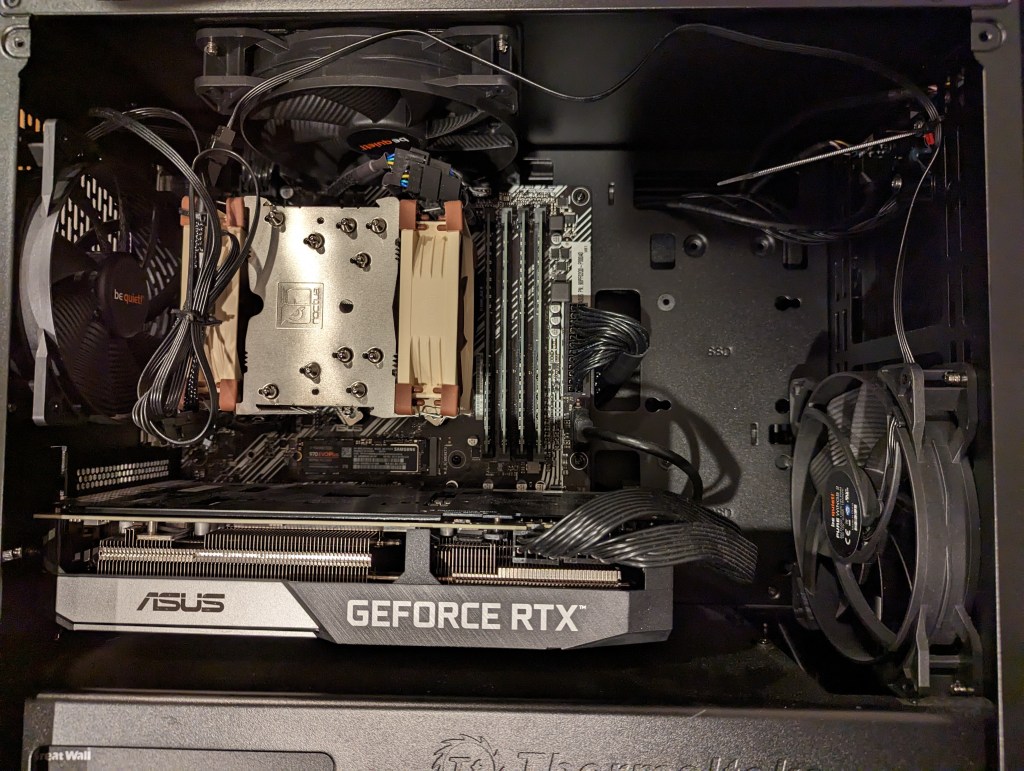
Upgraded My Desktop Computer’s Boot Drive
Inside my desktop computer after installing 2TB NVMe SSD.
I took advantage of a BestBuy deal on 2TB Samsung 970 EVO Plus NVMe SSDs to upgrade my desktop computer’s boot drive. Originally, I had a 512GB NVMe drive installed. I had pulled out the wifi card that was in the secondary M.2 slot awhile back. So, I moved the 512GB to that slot (under the video card as pictured above) and installed the 2TB Samsung drive into the primary M.2 slot (just above the video card as pictured above). With the hardware installation done, I reinstalled Linux Mint 21.1, which I run on my desktop and laptop computers.
Installing Mac OS X 10.5 Leopard on QEMU
Mac OS X 10.5 Leopard running in QEMU.
Since I reinstalled Linux Mint, I thought that it was a good opportunity to play around with QEMU. For most of my Macintosh emulation needs (mostly System 7.5.5 for Apple’s HotSauce and Voyager’s Expanded Books but occasionally earlier versions that best support some Hypercard stacks and other older software), I rely on SheepShaver and Basilisk II. QEMU-System-PPC supports Mac OS 9.x through Mac OS X 10.5. After Mac OS X 10.9 Mavericks, Mac OS X 10.5 Leopard was my favorite version of Mac OS X, so I picked it for QEMU. After grabbing an ISO from archive.org, it was a short order to install and use Leopard. I had hoped to use an older version of OsiriX to look at the MRI that I had at the University of Liverpool (contemporary DICOM viewers have trouble opening the files), but I should have read the documentation first and seen that OpenGL was a non-starter on the regular version of QEMU.
Star Wars Action Figures from eBay
Star Wars Vintage Collection and Kenner/Retro Collection action figures.
At the beginning of Spring Recess, I hit eBay and racked up some good deals with bidding and best offers on 3.75″ Hasbro Vintage Collection action figures, Hasbro Retro Collection action figures, and Kenner action figures. I don’t like to collect action figures in their packages. I like to create scenes with them for display. With these new acquisitions, I plan to create some Empire and Return of the Jedi scenes with my 1979 Kenner Millennium Falcon (not pictured) and 2008 Hasbro Legacy Collection Millennium Falcon (pictured above, aka the Big Falcon).
Compiling a Bibliography of Generative AI Technologies and Pedagogy Resources
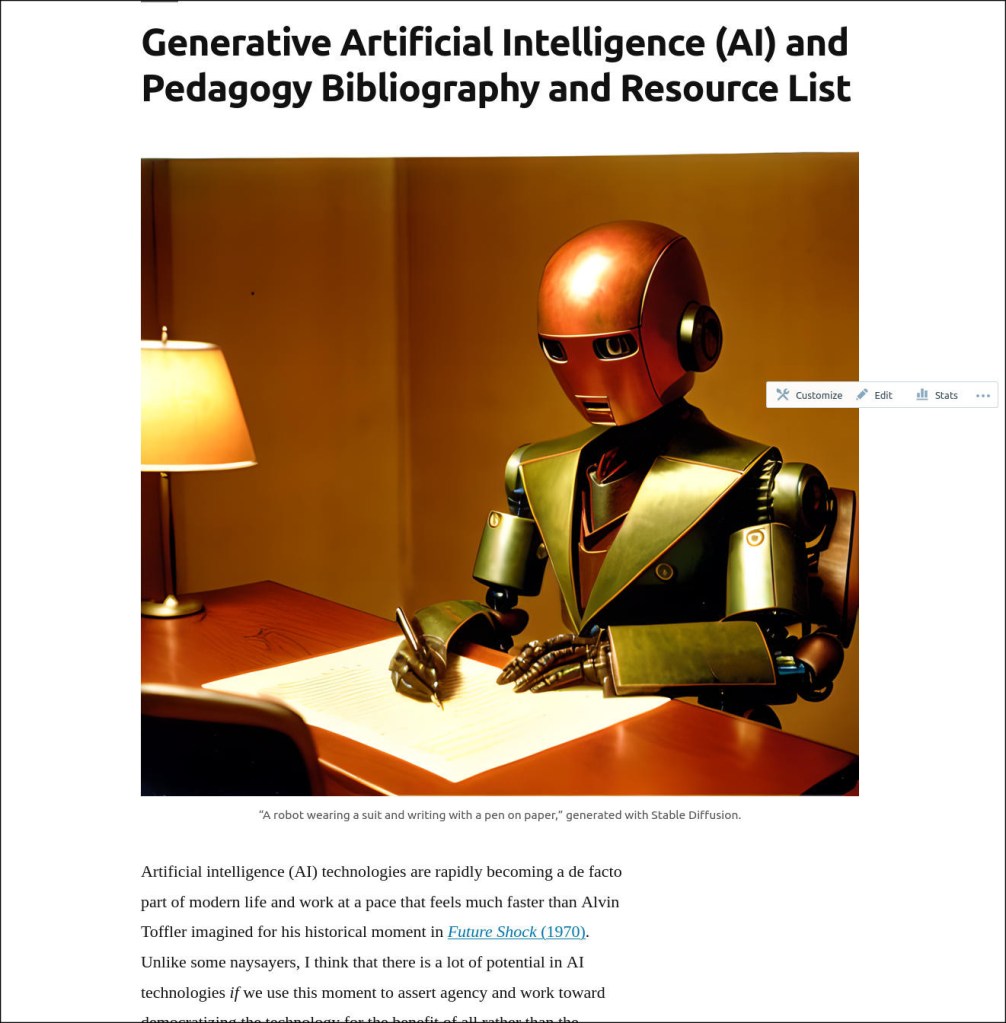
I compiled all of my current research on Generative AI technologies and how they might be used in teaching on this page. It’s not an exhaustive list, but it has a lot of recent publications. It can help someone get up to speed on what’s going on now with ChatGPT, Stable Diffusion, and other AI tools to create text, images, and music from prompts.
Y and I also got to spend time catching up via video chat with my cousin Angie in Maryland and our graduate school friend Masaya in Japan. We enjoyed a walk in Green-Wood Cemetery just before we were awash in tree pollen. And, we watched a lot of Family Guy, too.