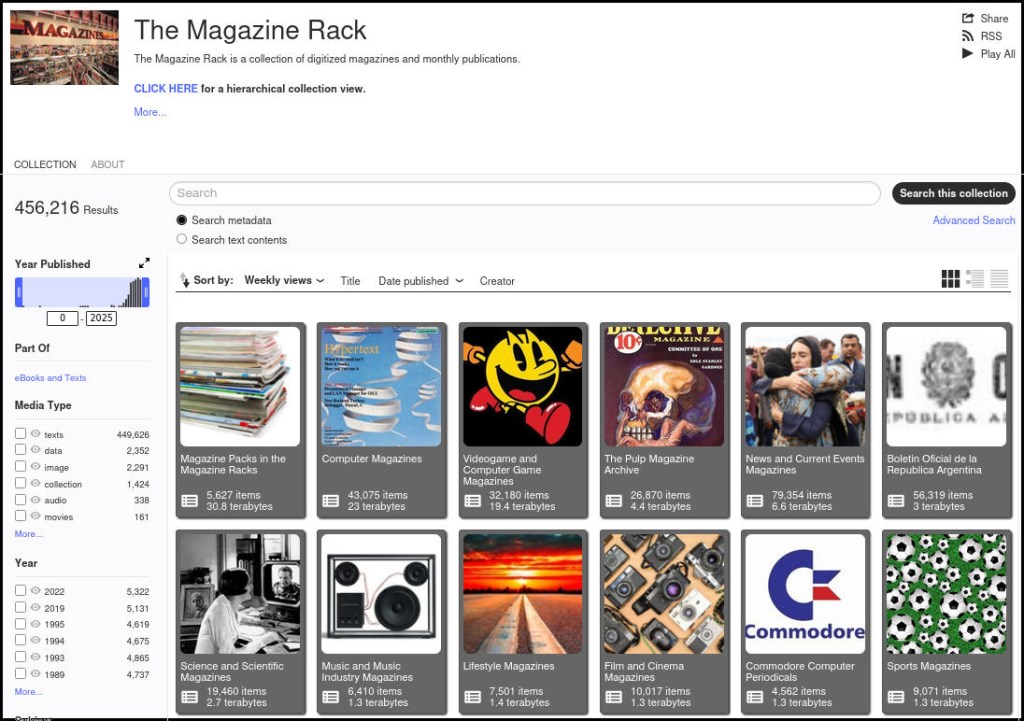
The Internet Archive has a tremendous collection of magazines across all disciplinary possibilities. Most are contained in The Magazine Rack. You can read them online, download them individually, or bulk download them using Jeff Kaplin’s instructions from 2012. Though, I have modified Kaplin’s wget command when files stopped downloading due to changes at archive.org, wget, or both:
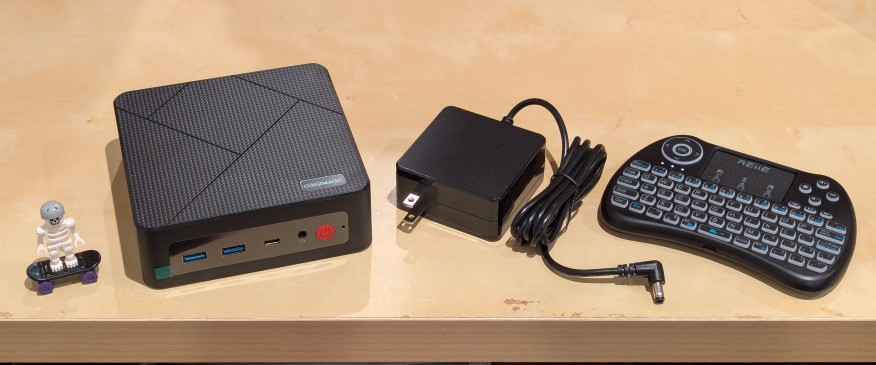
I’ve been unhappy with Roku’s increasing advertising through images and now full-motion video and their lack of support for a variety of codecs in their media player app. So, I’ve been looking for awhile for a good deal on a mini pc that could replace the Roku for playing media and also support some light gaming. Also, considering the impending tariffs (i.e., a tax on Americans), I hoped to find something as soon as possible.
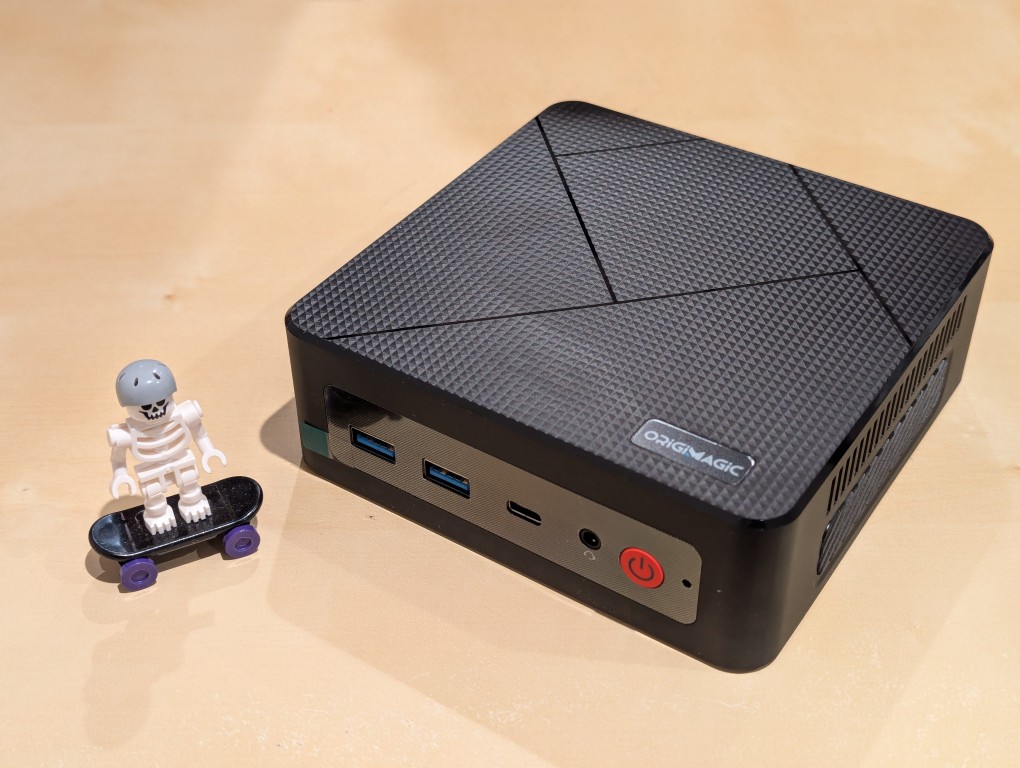
After tracking several mini pcs on Amazon and eBay for a few weeks, I finally pulled the trigger when Amazon offered the Origimagic C4 Mini PC with a Ryzen 5 3550H (4 core, 8 threads) on sale for $153. It’s CPU has a lot more horsepower while using 25 watts of power than Intel’s similarly priced mini pc processors. It came stock with 16GB DDR4 RAM, 512GB PCIe SSD, 1 x Type-C USB, 4 x Type-A USB (3 are USB 3 and 1 is USB 2), headphone jack, HDMI, DisplayPort, and dual ethernet.
To operate it from the sofa, I got a $10 reiie H9+ Mini Keyboard with Touchpad that uses a wireless USB adapter to connect to the mini pc.
Before setting anything up, I created a flash drive with Debian 13 Trixie, the latest version that was released over the weekend on Saturday.
To do this, I inserted a 16GB flash drive into my workstation, but I didn’t mount the device. I downloaded the network install ISO for Debian 13 from here. Then, I ran lsblk in a terminal window to see what device address corresponded to the flash drive. It’s important to not make a mistake here, because it’s easy to overwrite another drive using this method. lsblk lists the devices, which are all in the “/dev/” folder, so when I saw that my flash drive was assigned the address “sdb”, I knew that its full address was “/dev/sdb”. With that info, I then wrote the downloaded Debian 13 netinstall ISO directly to the flash drive using this command:
sudo cp debian-13.0.0-amd64-netinst.iso /dev/sdb
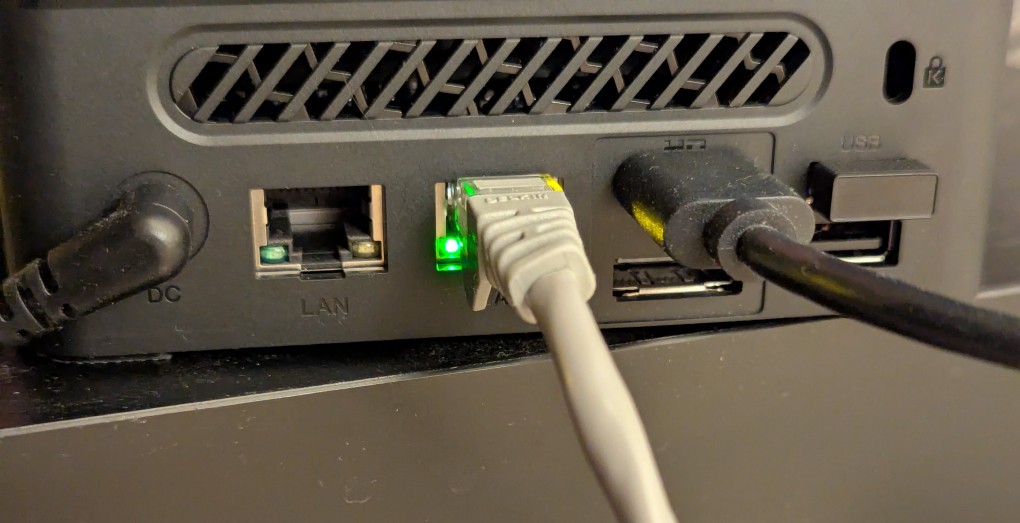
After the copying to the flash drive had finished, I ejected it from my workstation and took it over to the mini pc. I plugged in the power adapter, ethernet cable (I arbitrarily picked the one furthest from the power plug), HDMI cable to the TV, the keyboard receiver USB, and the Debian 13 installation flash drive.
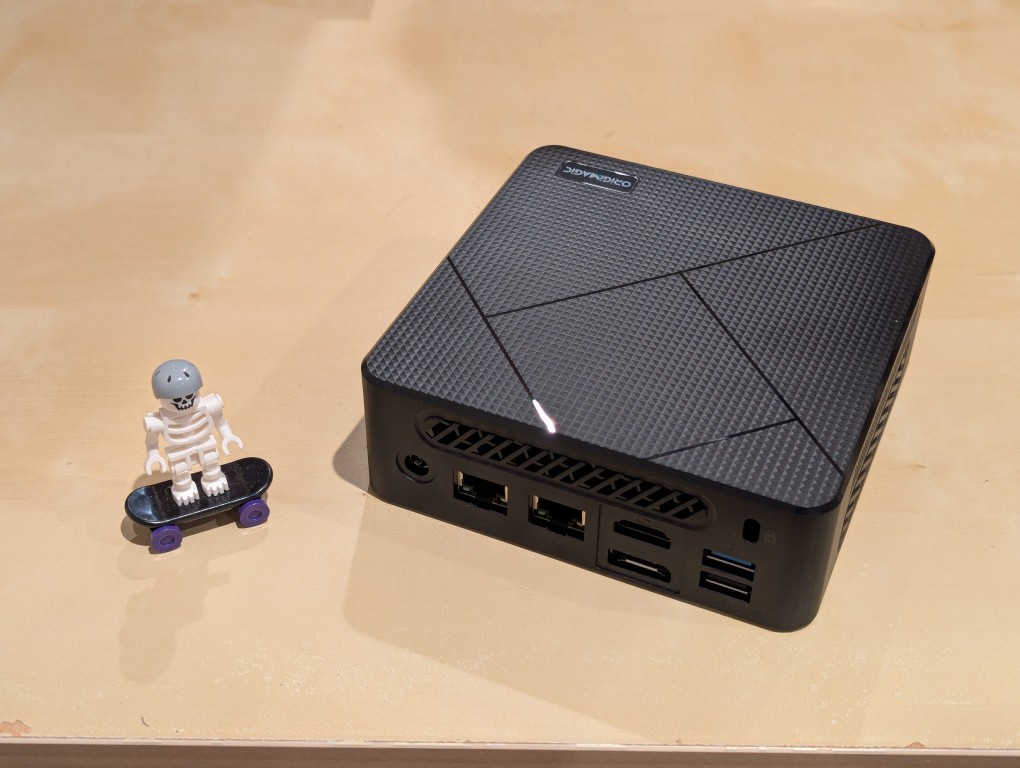
I did experience some frustration with getting the Debian 13 flash drive to boot the mini pc. As soon as the mini pc booted, I was unable to enter BIOS or open the boot menu. Instead, it kept booting into the Windows 11 setup, which I did not want to use. At first, I thought it might be a problem with the tiny wireless keyboard and trackpad, so I switched to my Logitech keyboard and trackball, which are both tied to one Logitech USB receiver. I tried different USB plugs on the front and rear of the mini pc until I was finally able to enter bios (pushing DEL at boot) when the keyboard USB receiver is in the top-right USB port on the rear of the mini pc as shown below (it is a USB3 port). It might have been bad luck on my part with the other ports, so I can’t say this is a peculiarity with this hardware for certain. Nevertheless, it’s good to exhaust all possibilities like this.
Once in the BIOS, there’s not many options except for disabling hardware (I disabled WiFi), turning off Secure Boot and the Trusted Computing Module, and other odds and ends. I saved the settings, rebooted, and went into the Boot Menu (F7), selected the Debian 13 netinstall flash drive, and began the installation (a full nuke-and-pave: erasing the NVMe drive and setting up Debian 13 as the only operating system).
While I use XFCE on my laptop and workstation, I opted for the GNOME desktop environment on the mini pc, because I thought its screen controls and overall user interface would be easier to see and navigate from across the room. If I don’t like it, I can always install XFCE.
Because two of the main sources of media for us is Netflix and YouTube, I installed Chrome to handle those sites. I have VLC and Kodi for everything else.
If you’re like me, you might have newer computer hardware that isn’t fully supported by Linux kernel 6.1, which is installed with Debian Bookworm 12. Thankfully, Debian offers Backports, or newer software in testing in Trixie, the development name for Debian 13, that will eventually find its way into future Debian releases for use on an otherwise stable release of Bookworm.
Updating to a newer kernel often brings more hardware compatibility. However, it’s important to remember that using a backport kernel can introduce potential compatibility issues with the software officially supported on Bookworm. Even if installing the latest kernel causes some issues, you can choose to boot from one of your older 6.1 kernels on your install as long as you don’t delete them (by using the apt autoremove command).
I wrote this guide based on my experience installing Linux kernel 6.12 from Backports with the non-free firmware that my hardware needs to work. If you are trying to keep your system free from non-free software, you can omit those references in the instructions below.
Before doing any changes to your Debian installation, remember to backup your files first. Saving important files in more than one media and storing it backups in different physical locations is best practice.
After backing up your files, make sure your install is up-to-date with these commands:
sudo apt update
sudo apt upgrade
After those updates complete, it’s a good rule of thumb to do a reboot to begin working with a clean slate.
Next, add Debian Backports to /etc/apt sources.list. I used vi to do this:
sudo vi /etc/apt/sources.list
In vi, arrow down to the bottom line, type a lowercase “o” to add a blank line below the current line, type lowercase “i” to enter input mode, and type the following line into the document:
deb http://deb.debian.org/debian bookworm-backports main contrib non-free non-free-firmware
After double checking the added line, press the “Esc” key, and type “:wq” to write the file and quit vi.
Now, you need to update apt again:
sudo apt update
After the completes, enter this command to install the latest kernel from backports along with the kernel’s headers and firmware that might be needed for your hardware (such as networking card, video card drivers, etc.).
It might take awhile for the installation to complete. If there are no errors, it should return you to your terminal prompt. If it did, reboot your computer to load the new kernel.
After your computer boots up again, you can verify that you are running the latest kernel by entering this command:
uname -r
After installing the latest kernel, my computer reports this from the uname -r command:
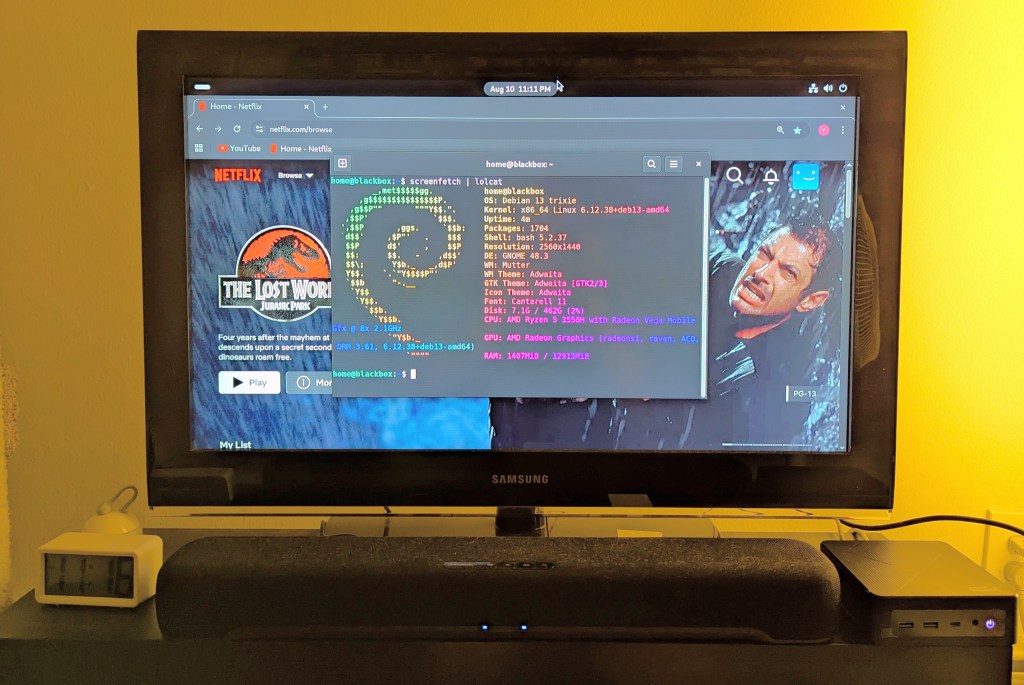
![terminal screen with system info: jason@desktop:~$ screenfetch | lolcat
_,met$$$$$gg. jason@desktop
,g$$$$$$$$$$$$$$$P. OS: Debian 12 bookworm
,g$$P"" """Y$$.". Kernel: x86_64 Linux 6.12.32+bpo-amd64
,$$P' `$$$. Uptime: 10h 8m
',$$P ,ggs. `$$b: Packages: 2323
`d$$' ,$P"' . $$$ Shell: bash 5.2.15
$$P d$' , $$P Resolution: 1920x1080
$$: $$. - ,d$$' DE: Xfce
$$\; Y$b._ _,d$P' WM: Xfwm4
Y$$. `.`"Y$$$$P"' WM Theme: Haiku-Alpha
`$$b "-.__ GTK Theme: BeOS-r5-GTK-master [GTK2]
`Y$$ Icon Theme: BeOS-r5-Icons-master
`Y$$. Font: Swis721 BT 9
`$$b. Disk: 7.7T / 11T (75%)
`Y$$b. CPU: AMD Ryzen 7 7700 8-Core @ 16x 5.389GHz
`"Y$b._ GPU: NVIDIA GeForce RTX 3090, NVIDIA RTX A4000, NVIDIA RTX A4000, NVIDIA RTX A4000
`"""" RAM: 9486MiB / 63916MiB](https://dynamicsubspace.net/wp-content/uploads/2025/07/system-info-debian-kernel-612.png?w=832)
