Tag: digital camera

  • Creating a Digital Signature With Your Phone’s Camera

    cursive text: making your digital signature

    Last week, I showed my students how to create a digital signature that they can insert into letters that they write in their word processor of choice. It’s very easy to do and simplifies things if you need to send a PDF of a letter without having to print, sign, and scan it.

    Follow these steps:

    1. Take a clean, white sheet of paper and sign your name using a black pen or marker.
    2. Lean your paper on a completely flat, inclined surface and avoid a light behind you so that you don’t cast a shadow over your signature.
    3. Take out your phone and enter the camera app. Carefully align your camera so that it takes a photo of your signature straight on (meaning, your camera’s photo sensor should be parallel to the piece of paper with your signature). It can be helpful to zoom in slightly with your camera app so that you don’t have to be very close to the paper with your signature. If there’s any question about focusing, take the time to tap your signature on the screen so that the camera app focuses on your signature.
    4. Open your signature photo in your phone’s image editing app. First, crop the image to just your signature. Then, maximize the brightness and maximize the contrast, which will make the paper appear pure white and your black signature pops. Save this edited version of your photo.
    5. Email your edited version of your signature photo to yourself so that you can download it on your computer.
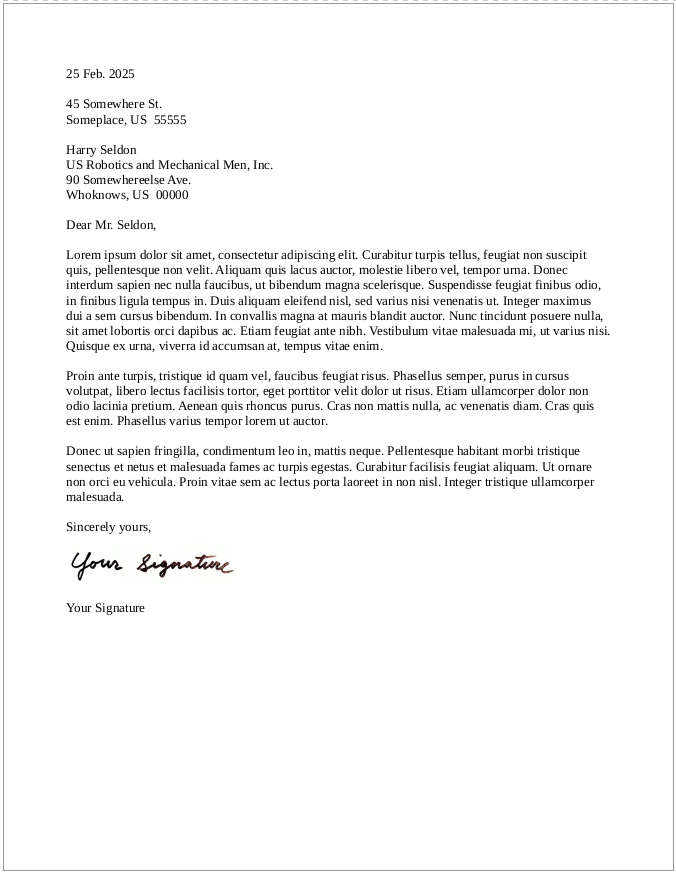
    6. Drag the saved image into your word processor document where you left space between your closing and typed name, or use your word processor’s image insert option. If the image appears very large, click on a corner of the signature image and drag to resize the signature.
    7. Depending on your word processing software, you might need to change the image alignment settings for the signature image (so that it is placed where you want and the typed text of your letter doesn’t fall behind or around it in a strange or unexpected way.
    8. Save your document and export it as a PDF to email to wherever it needs to go.
    9. As a bonus, save your signature image someplace safe so that you can reuse it as needed.
    screenshot of a business letter featuring what appears to be a real signature but is in fact an image of a handwritten signature
  • How to Control a Panasonic Lumix DMC-G85 with a Smartphone

    I’ve had this Panasonic Lumix DMC-G85 camera for awhile, but I’ve never had a reason to setup its Wi-Fi remote control feature until I began thinking about taking photos for the post that I published yesterday comparing the builds of LEGO’s Forestmen’s Hidenout (6054) and Forest Hideout (40567). I didn’t want to have to get up to active the shutter each time I took a picture, and I wanted to be in the photos as the builder. Using my smartphone as a remote control of the camera configured with timed shutter release allowed me to take the photos that I had in mind.

    It’s relatively easy to configure the DMC-G85 to be controlled with Panasonic Image App (available for Android and iOS) via a smartphone (see pages 52-53 of the official manual here).

    The basic version of setting up remote control for the camera is shown in the photos below. First, on the camera, open the menu > setup/wrench > Wi-Fi > Function > New Connection > Remote Shooting.

    After connecting your smartphone to the displayed Wi-Fi network, install and open the Panasonic Image App.

    After agreeing to the terms of service, click on the area on the left for “Remote Operation.” When it attempts to connect, it will prompt you to “Operate the camera to connect.” Back on the camera, click the button on the display to accept the connection.

    Then, you will see what your camera sees on your smartphone’s screen. There are controls for adjusting the camera and activating the shutter.

    So that I could capture my hands working with LEGO, I set my camera’s shutter timer to 2 seconds. This means when I would click the camera icon/shutter release in Panasonic Image App, there would be a 2 second countdown during which I could put my hands back into the scene before the shutter was released.

    When I take night sky photos again, I will definitely use Panasonic Image App to control the camera so that I can avoid vibration induced by my pressing the shutter release button.

  • “My God, It’s Full of Stars”

    Country barn style house in the foreground, night sky full of stars in the background. Cepheus is in the center, Lacerta is in the upper left and Ursa Minor in the lower right.

    While I was visiting my folks the past few weeks, I enjoyed a few clear nights to see and take photos of stars and planets with my Panasonic G85 mirrorless camera. They live in the middle of no where with very little light pollution from their closest neighbors, which permits spectacular views of the night sky.

    In the image above, you can see Cepheus above my parent’s house, half of Lacerta in the upper left, and Ursa Minor peaking out from the tree line on the lower right.

    How I Took the Photos

    I didn’t have a tripod with me, so I used a towel folded in different configurations as a support for the camera. I unfolded the back display so that it was both easy to view and provided further support for the camera to hold its position when aimed in different directions. I rested the camera on a tractor for the shot above that shows my folks’ house, but some of the others below, I placed the camera on the ground or the brick pilasters along the edge of the porches surrounding the house.

    The camera that I used was a Panasonic G85 with a stock 12-60mm telephoto lens. I shot in manual mode setting maximum aperture and multi-second exposure times. I also used manual focus and the 10 second shutter delay to avoid any residual camera shake from pressing the shutter release button.

    Pleiades

    Pleiades constellation in upper middle of image.

    In the center, upper third of the photo above, you can see the Seven Sisters or Pleiades.

    Orion

    Orion constellation above the treeline and barn.

    In the center of the photo above, you can see Orion (his belt is formed by the three vertical, evenly spaced stars, and his shoulders are to the left and his legs to the right).

    Auriga, Taurus, and Orion

    Auriga, Taurus, and Orion constellations.

    In this image, I was able to capture Auriga (upper left), Taurus (middle top), and Orion (middle below).

    Jupiter and Its Moons

    Jupiter in middle of night sky image.

    For this shot of Jupiter, I extended the telephoto lens to 60mm, which reduced the aperture by several stops compared to its 12mm wide angle. I laid the camera on the ground shooting almost vertical. With the telephoto extended, it was difficult to find Jupiter–the slightest camera movement sent it shooting out of view. I took several photos and this one was the sharpest with Jupiter being the brightest object near the center.

    Zoom in on Jupiter and its moons in night sky image.

    When you see the photo at 100%, Jupiter and some of its moons are visible like a mini-solar system.

    If I had easier access to clear night skies with good seeing, it would be nice to have a star tracking tripod to have longer exposures.