    Alas, poor Yorick! I knew him, Horatio: a fellow
    of infinite jest, of most excellent fancy: he hath
    borne me on his back a thousand times; and now, how
    abhorred in my imagination it is! my gorge rims at
    it. Here hung those lips that I have kissed I know
    not how oft. Where be your gibes now? your
    gambols? your songs? your flashes of merriment,
    that were wont to set the table on a roar? Not one
    now, to mock your own grinning? quite chap-fallen?
    Now get you to my lady's chamber, and tell her, let
    her paint an inch thick, to this favour she must
    come; make her laugh at that. -Shakespeare, Hamlet
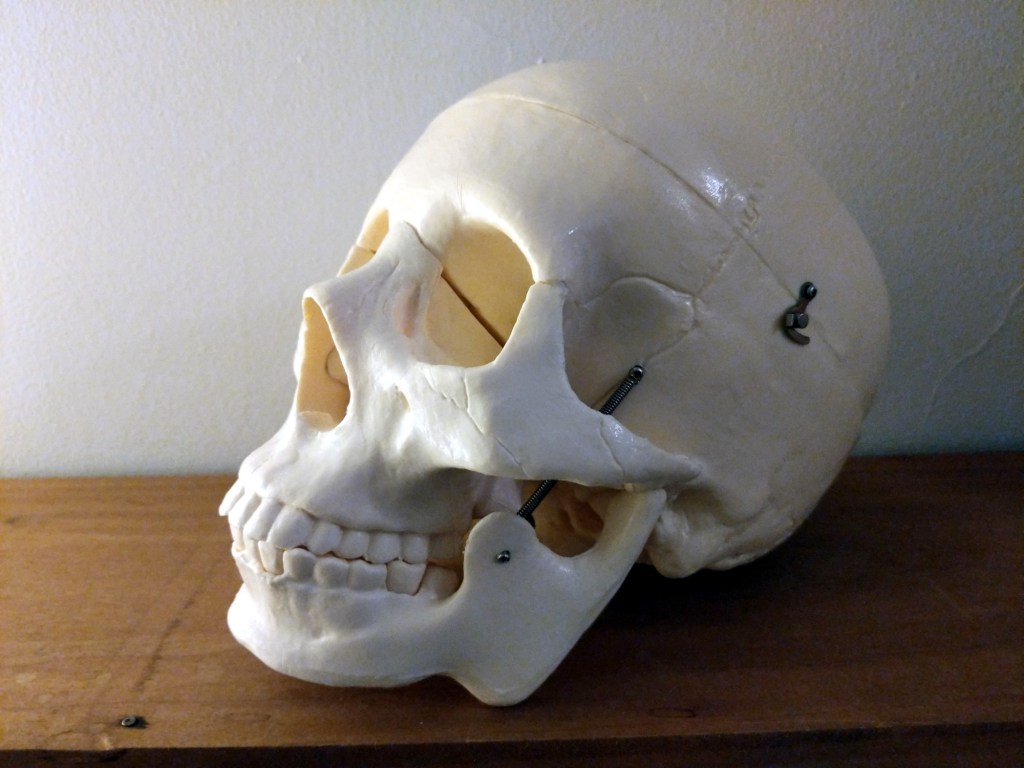
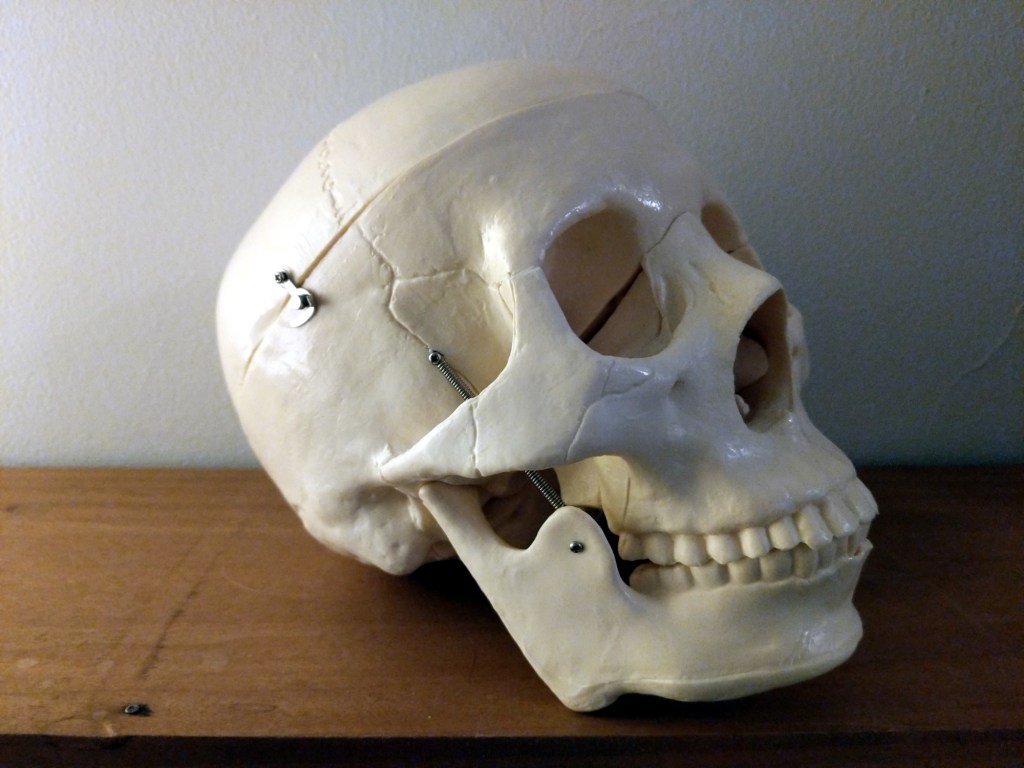
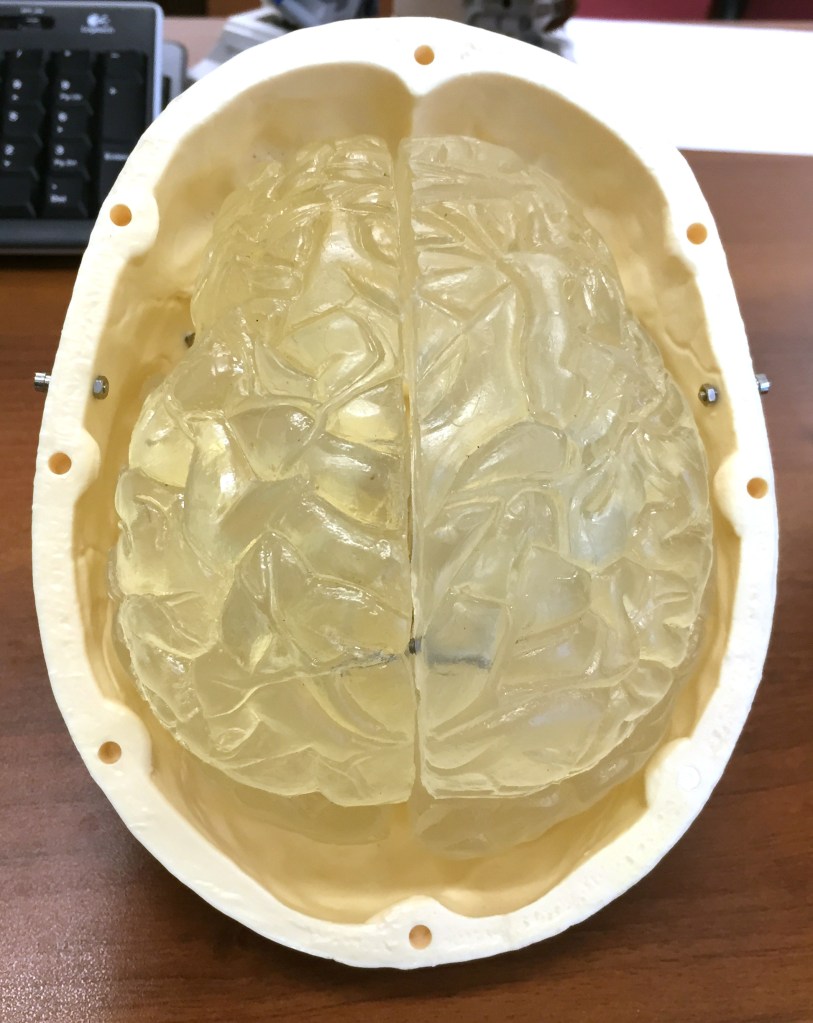
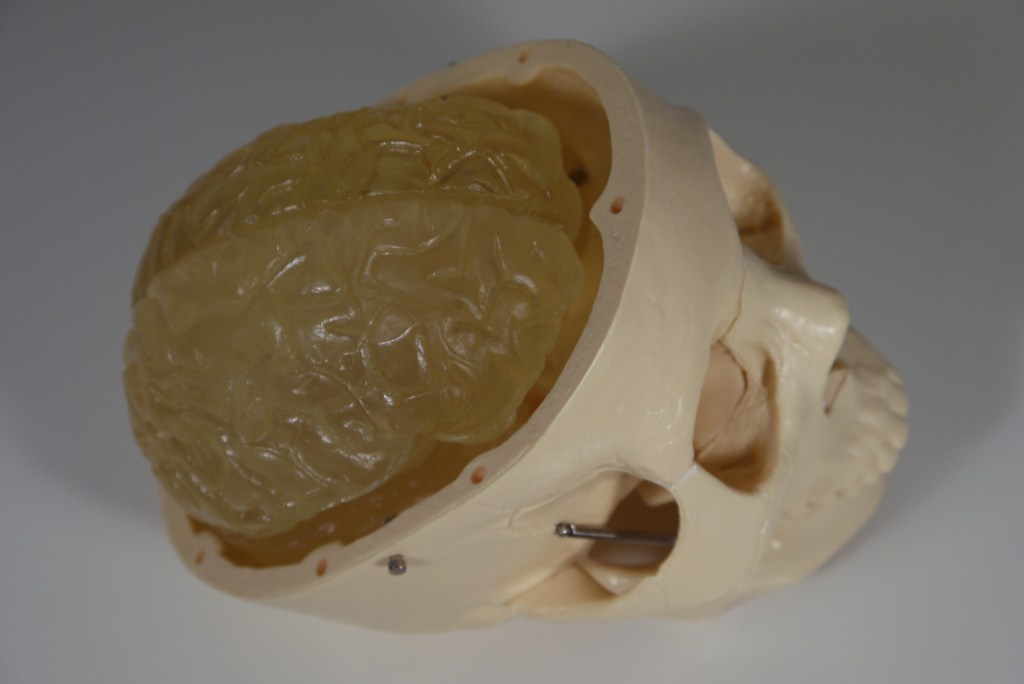
I bring my trusted skull and brain model nicknamed Yorick to my writing and science fiction classes when I want to talk about something related to cognition–e.g., how our attentional focus works, cognitive costs of switching cognitive tasks, time delay from sensory perception to processing to conscious awareness, where are the speech regions–Broca’s area and Wernicke’s area–located, etc. Yorick’s skull and multi-component brain gives students something that they can see and feel and manipulate when it gets passed around the classroom.
And when students leave a hat behind, Yorick gets a treat.
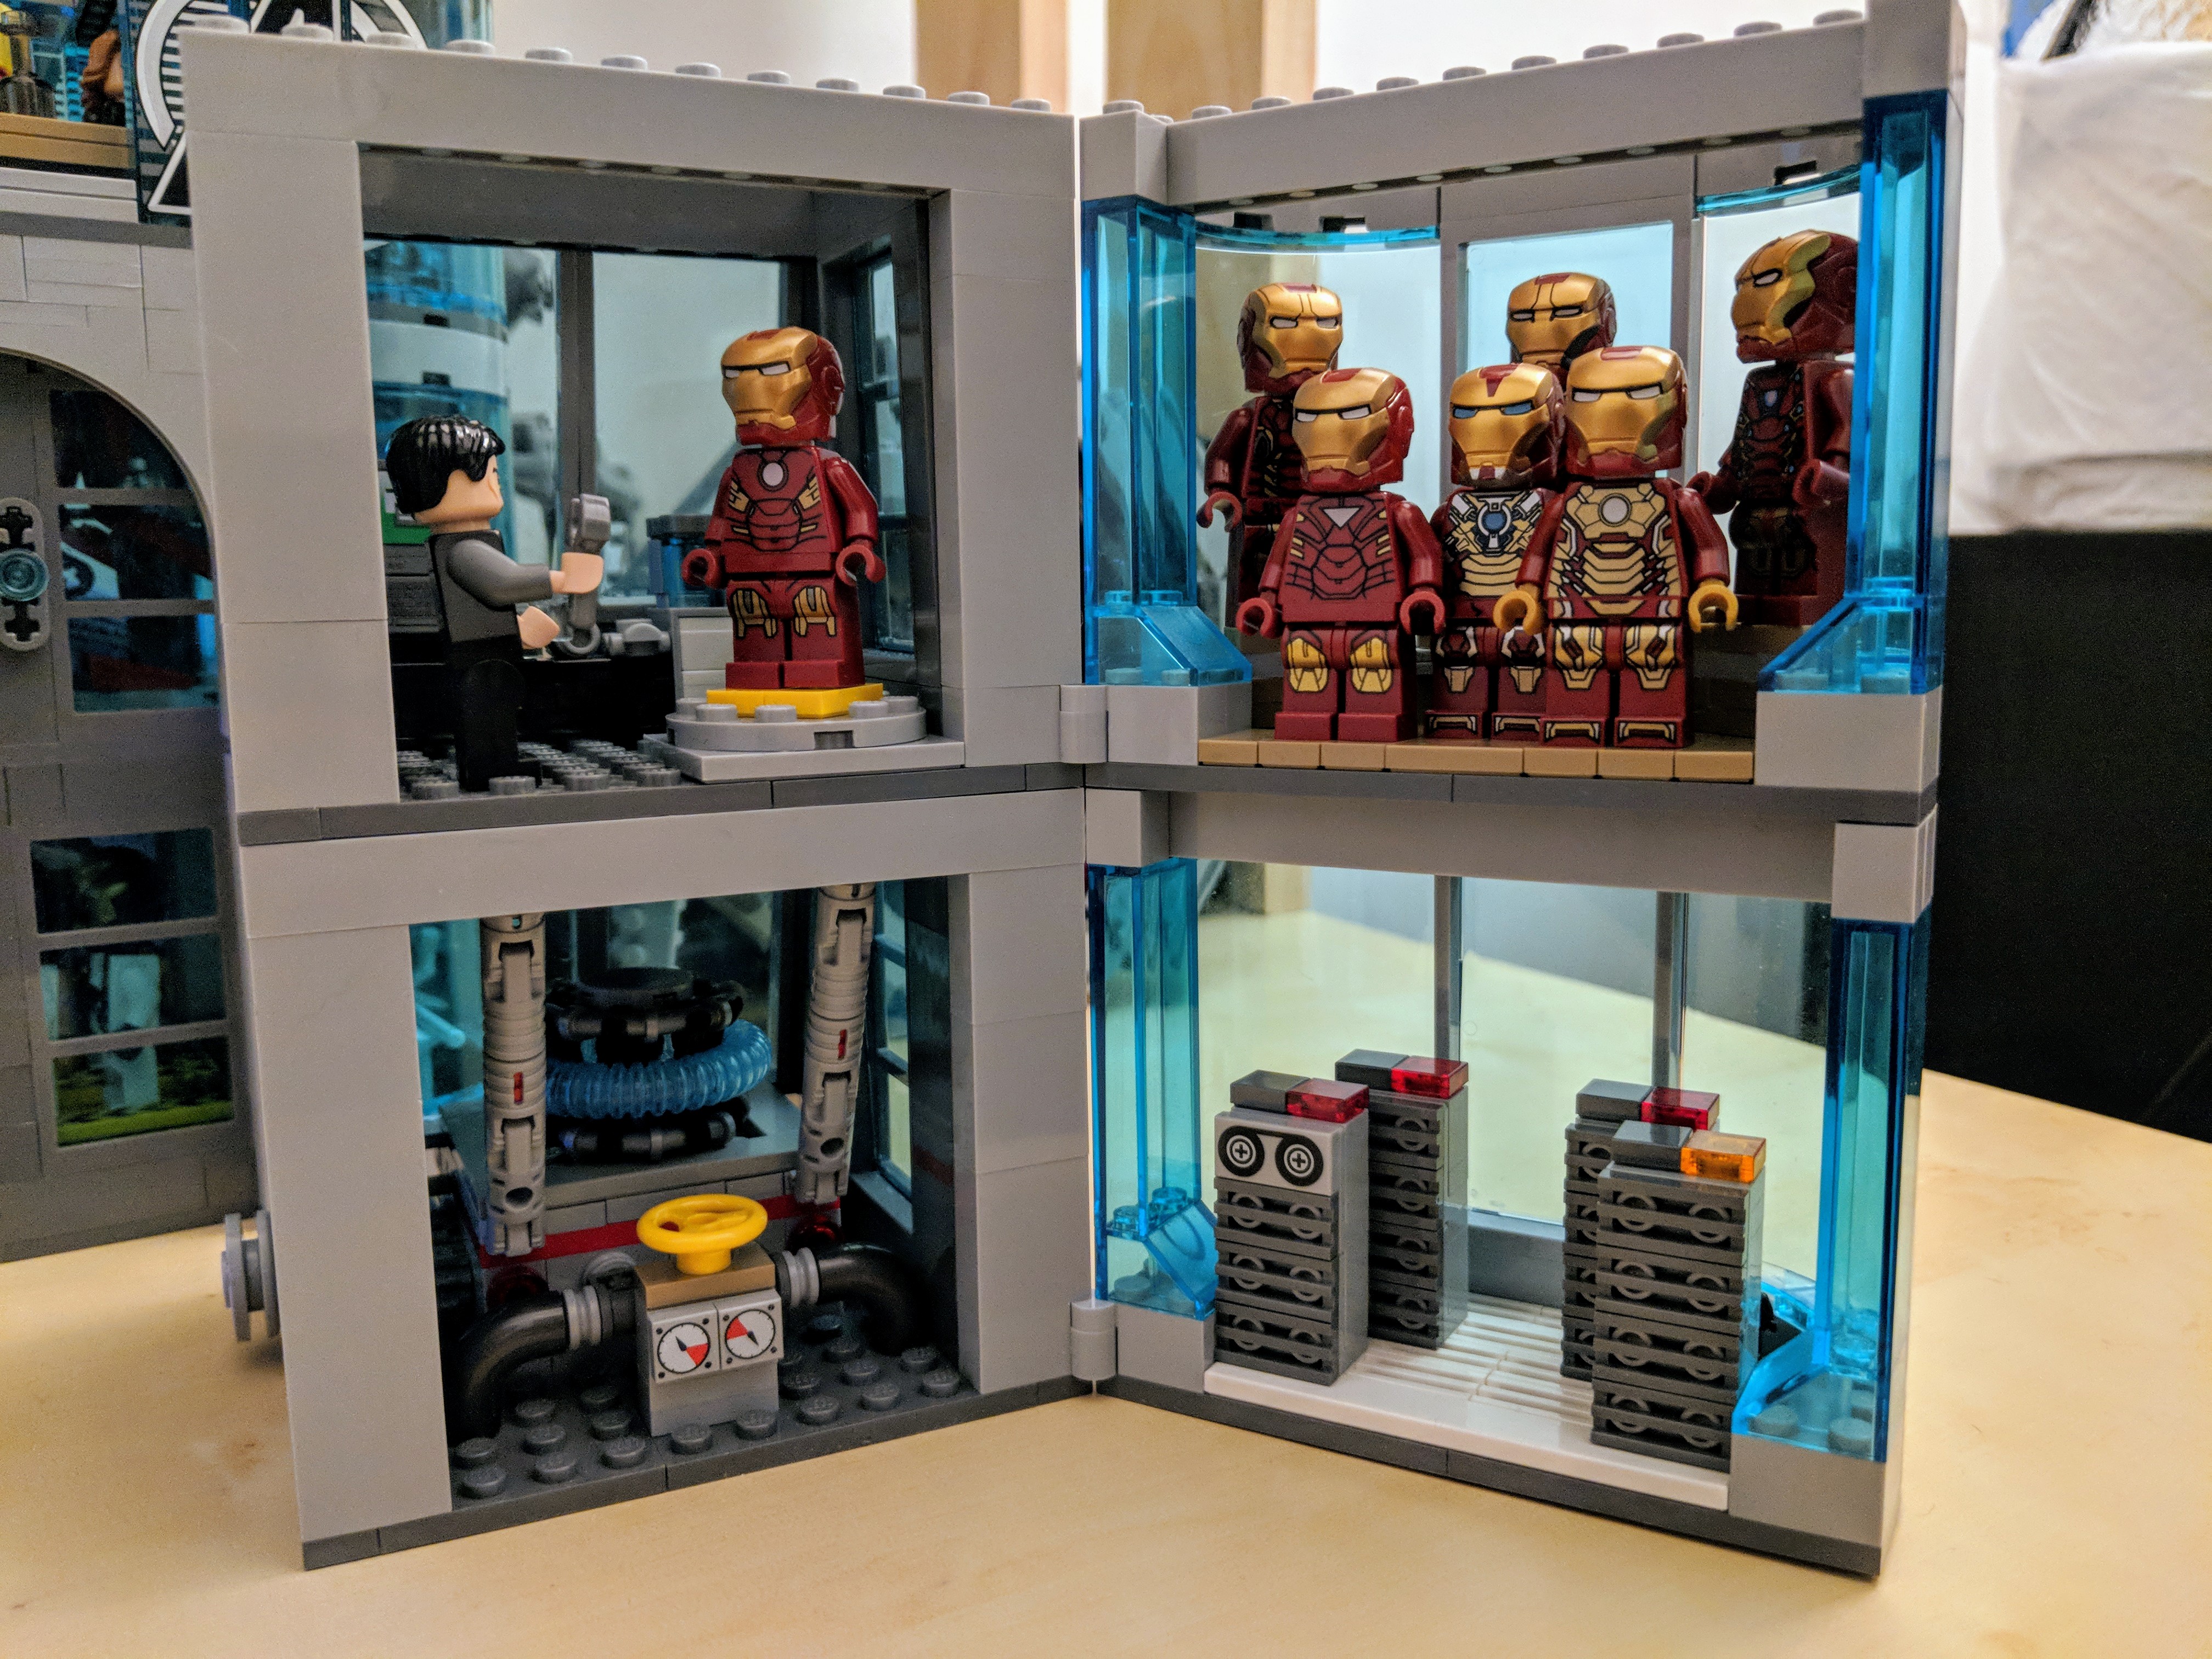
Recently, I decided to rebuild LEGO set 76038 Attack on Avengers Tower from the Avengers 2: Age of Ultra line. The trouble was that the elements for the set were strewn throughout my boxes of bricks and sorted drawers. I used some of the bricks in an Iron Man Hall of Armor MOC, which had to be disassembled for this project. A 511 piece set like this might normally take me a couple of hours to complete. As I had to sort and find the bricks while looking at the downloaded PDF instructions on my computer screen, it took the better part of a day to complete the impressive playset. Then, I started thinking about how to make this good set even better. One aspect that bothered me about it is how short it is. While I understand that LEGO considers cost, playability, and profitability in designing their sets, I thought that Avengers Tower should stand above the Manhattan skyline, which according to the logic of minifigure playsets would put this two or three levels higher. I decided to add two floors, because where the bottom floor extends to–following the slope established in the original set–is about as far out as the edge of platform at the top of the tower. To my mind, this seemed to work out well for a taller and proportionate LEGO Avengers Tower.
LEGO 76038 Attack on Avengers Tower Unmodified
Barring the additional minifigures (and four Iron Legion instead of the stock two), the photo above is of the unmodified LEGO 76038 Attack on Avengers Tower. On the lower level, it has the Iron Legion docking area and medical bay. The middle level has the Iron Legion repair bay/Ultron’s first embodiment and the diagnostic bay with scanner for studying Loki’s scepter. The top level features the platform, entertaining space, and computer station. The tower’s pinnacle is a drone deployment system.
I like the design work that went into the overall design of LEGO 76038. The angular front of the tower and the curve flowing down the side from the platform is spot-on with the design from the film. Of course, LEGO’s designers embellished the design for playability, but the thought that went into what elements should be included such as the Iron Legion bays and the scepter scanner reveal how dedicated their designers are to creating a model that balances play with realism.
Planning Additional Levels
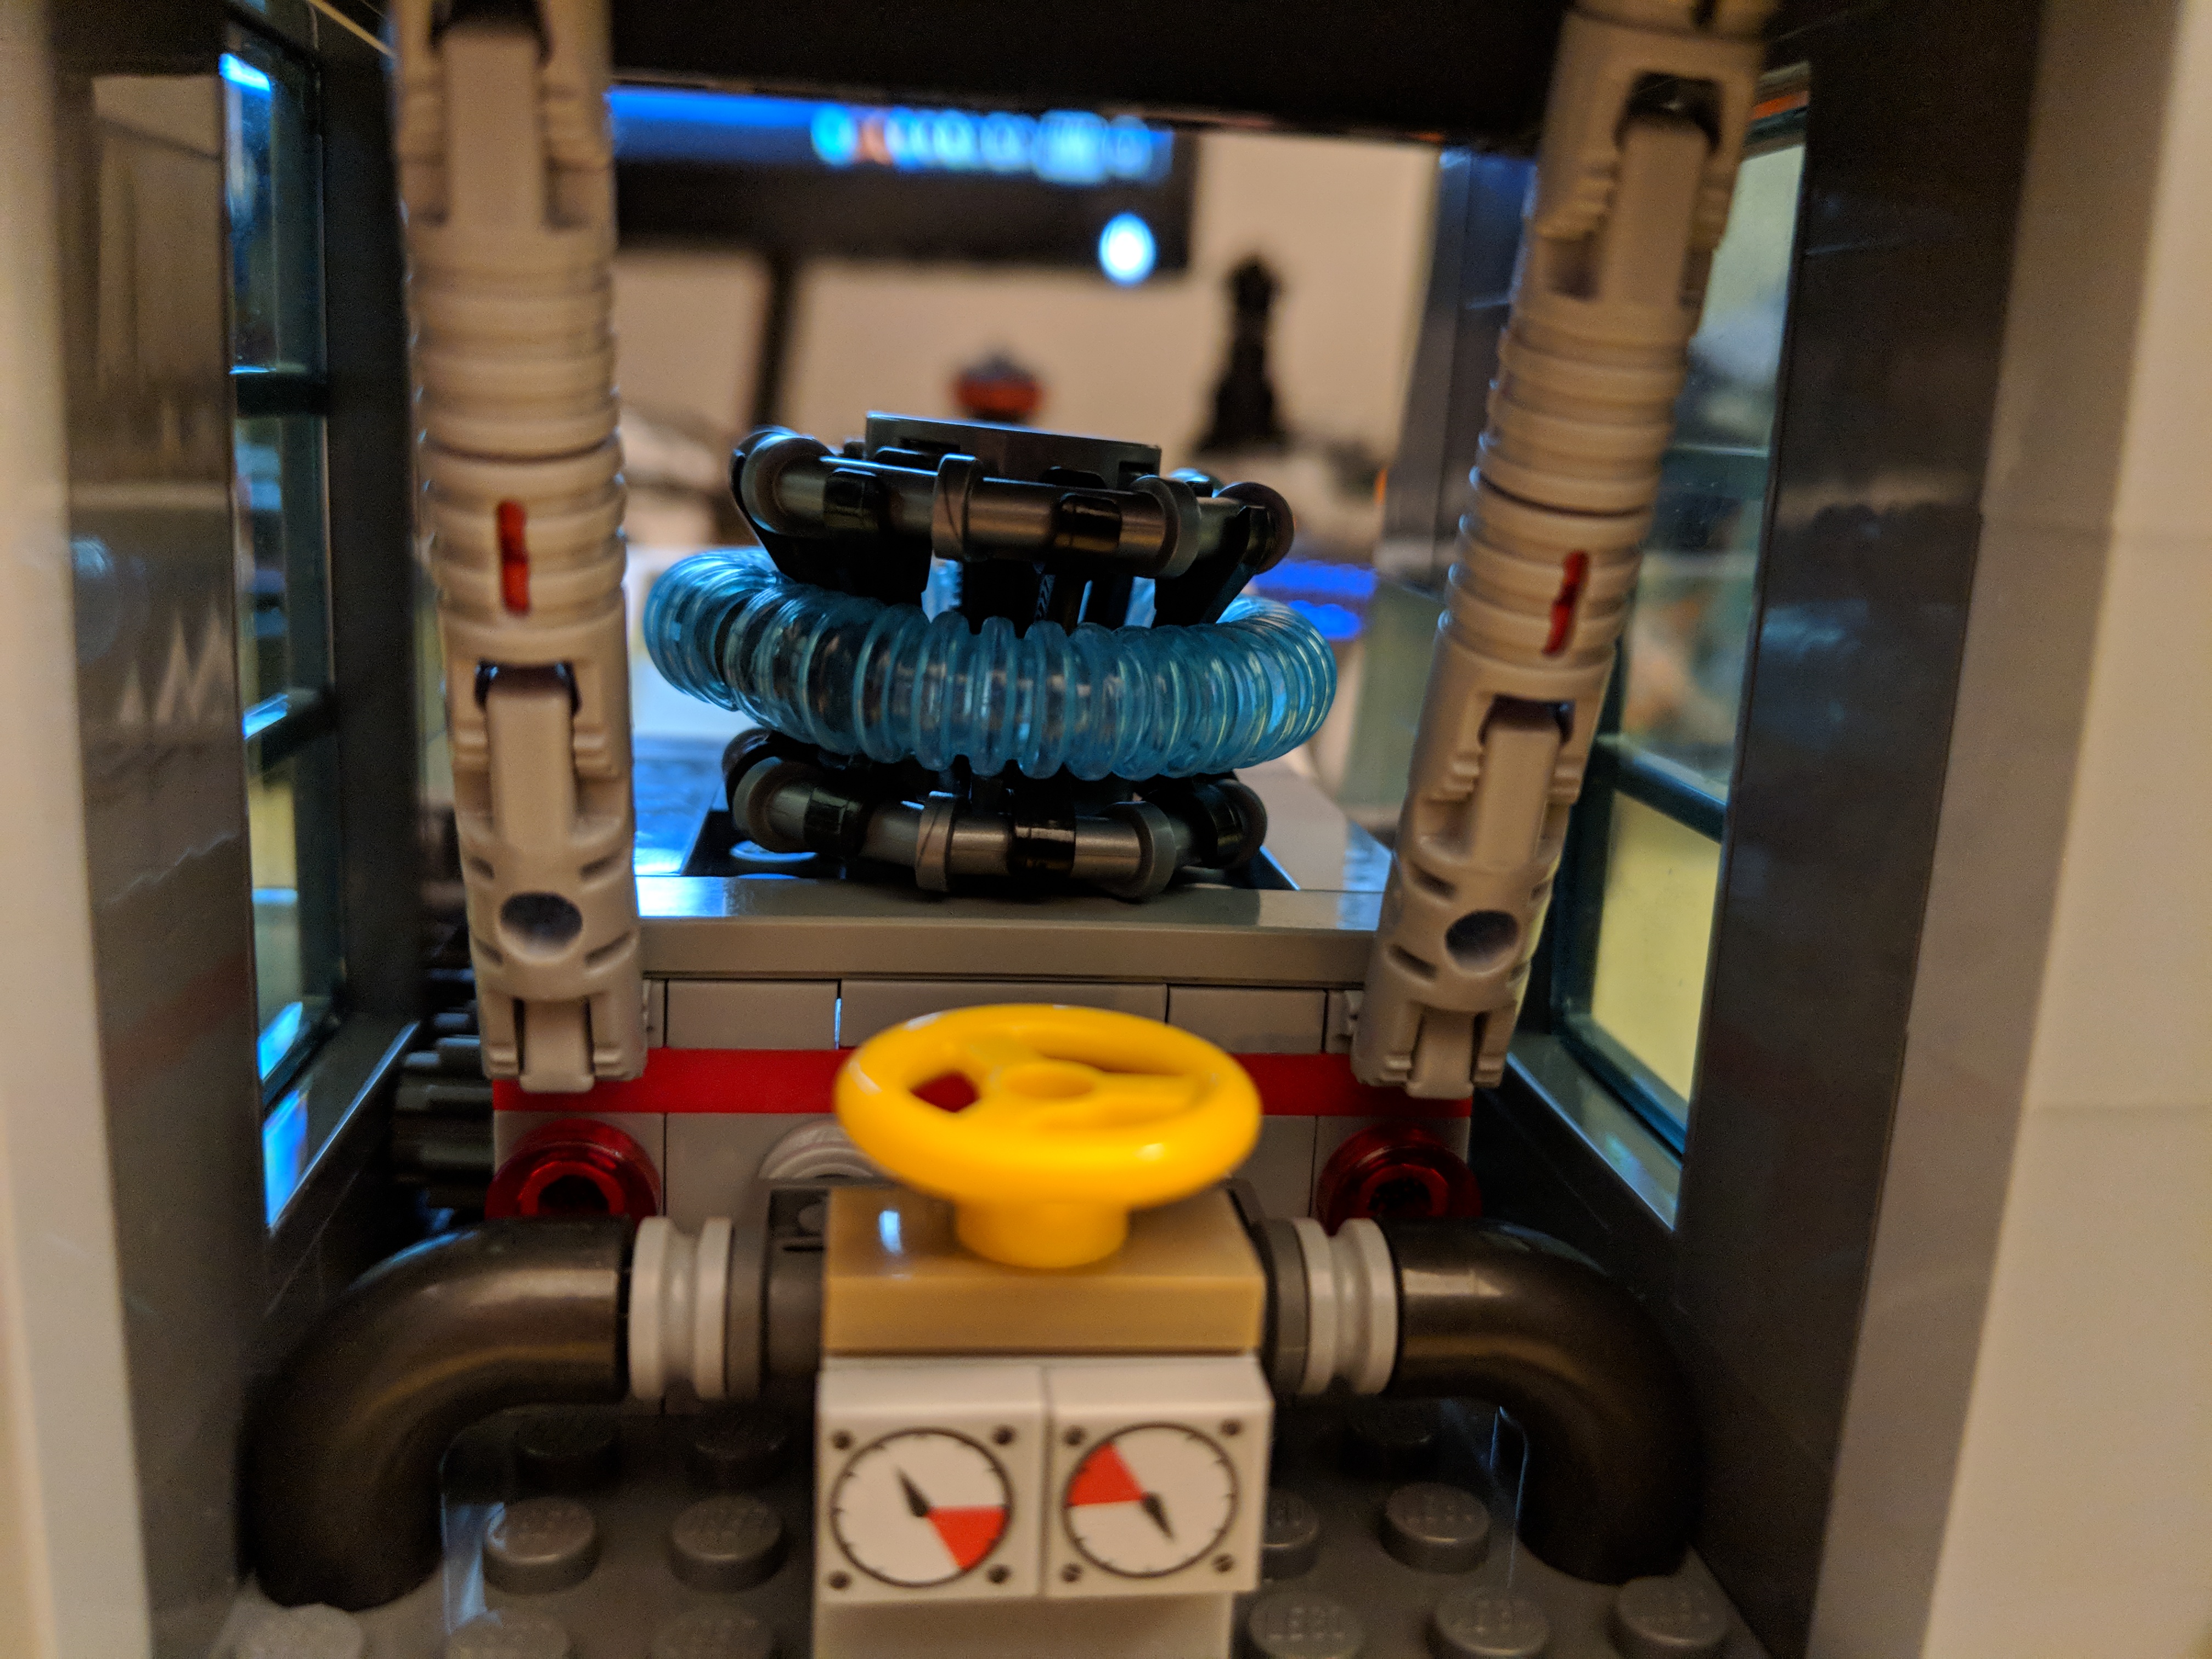
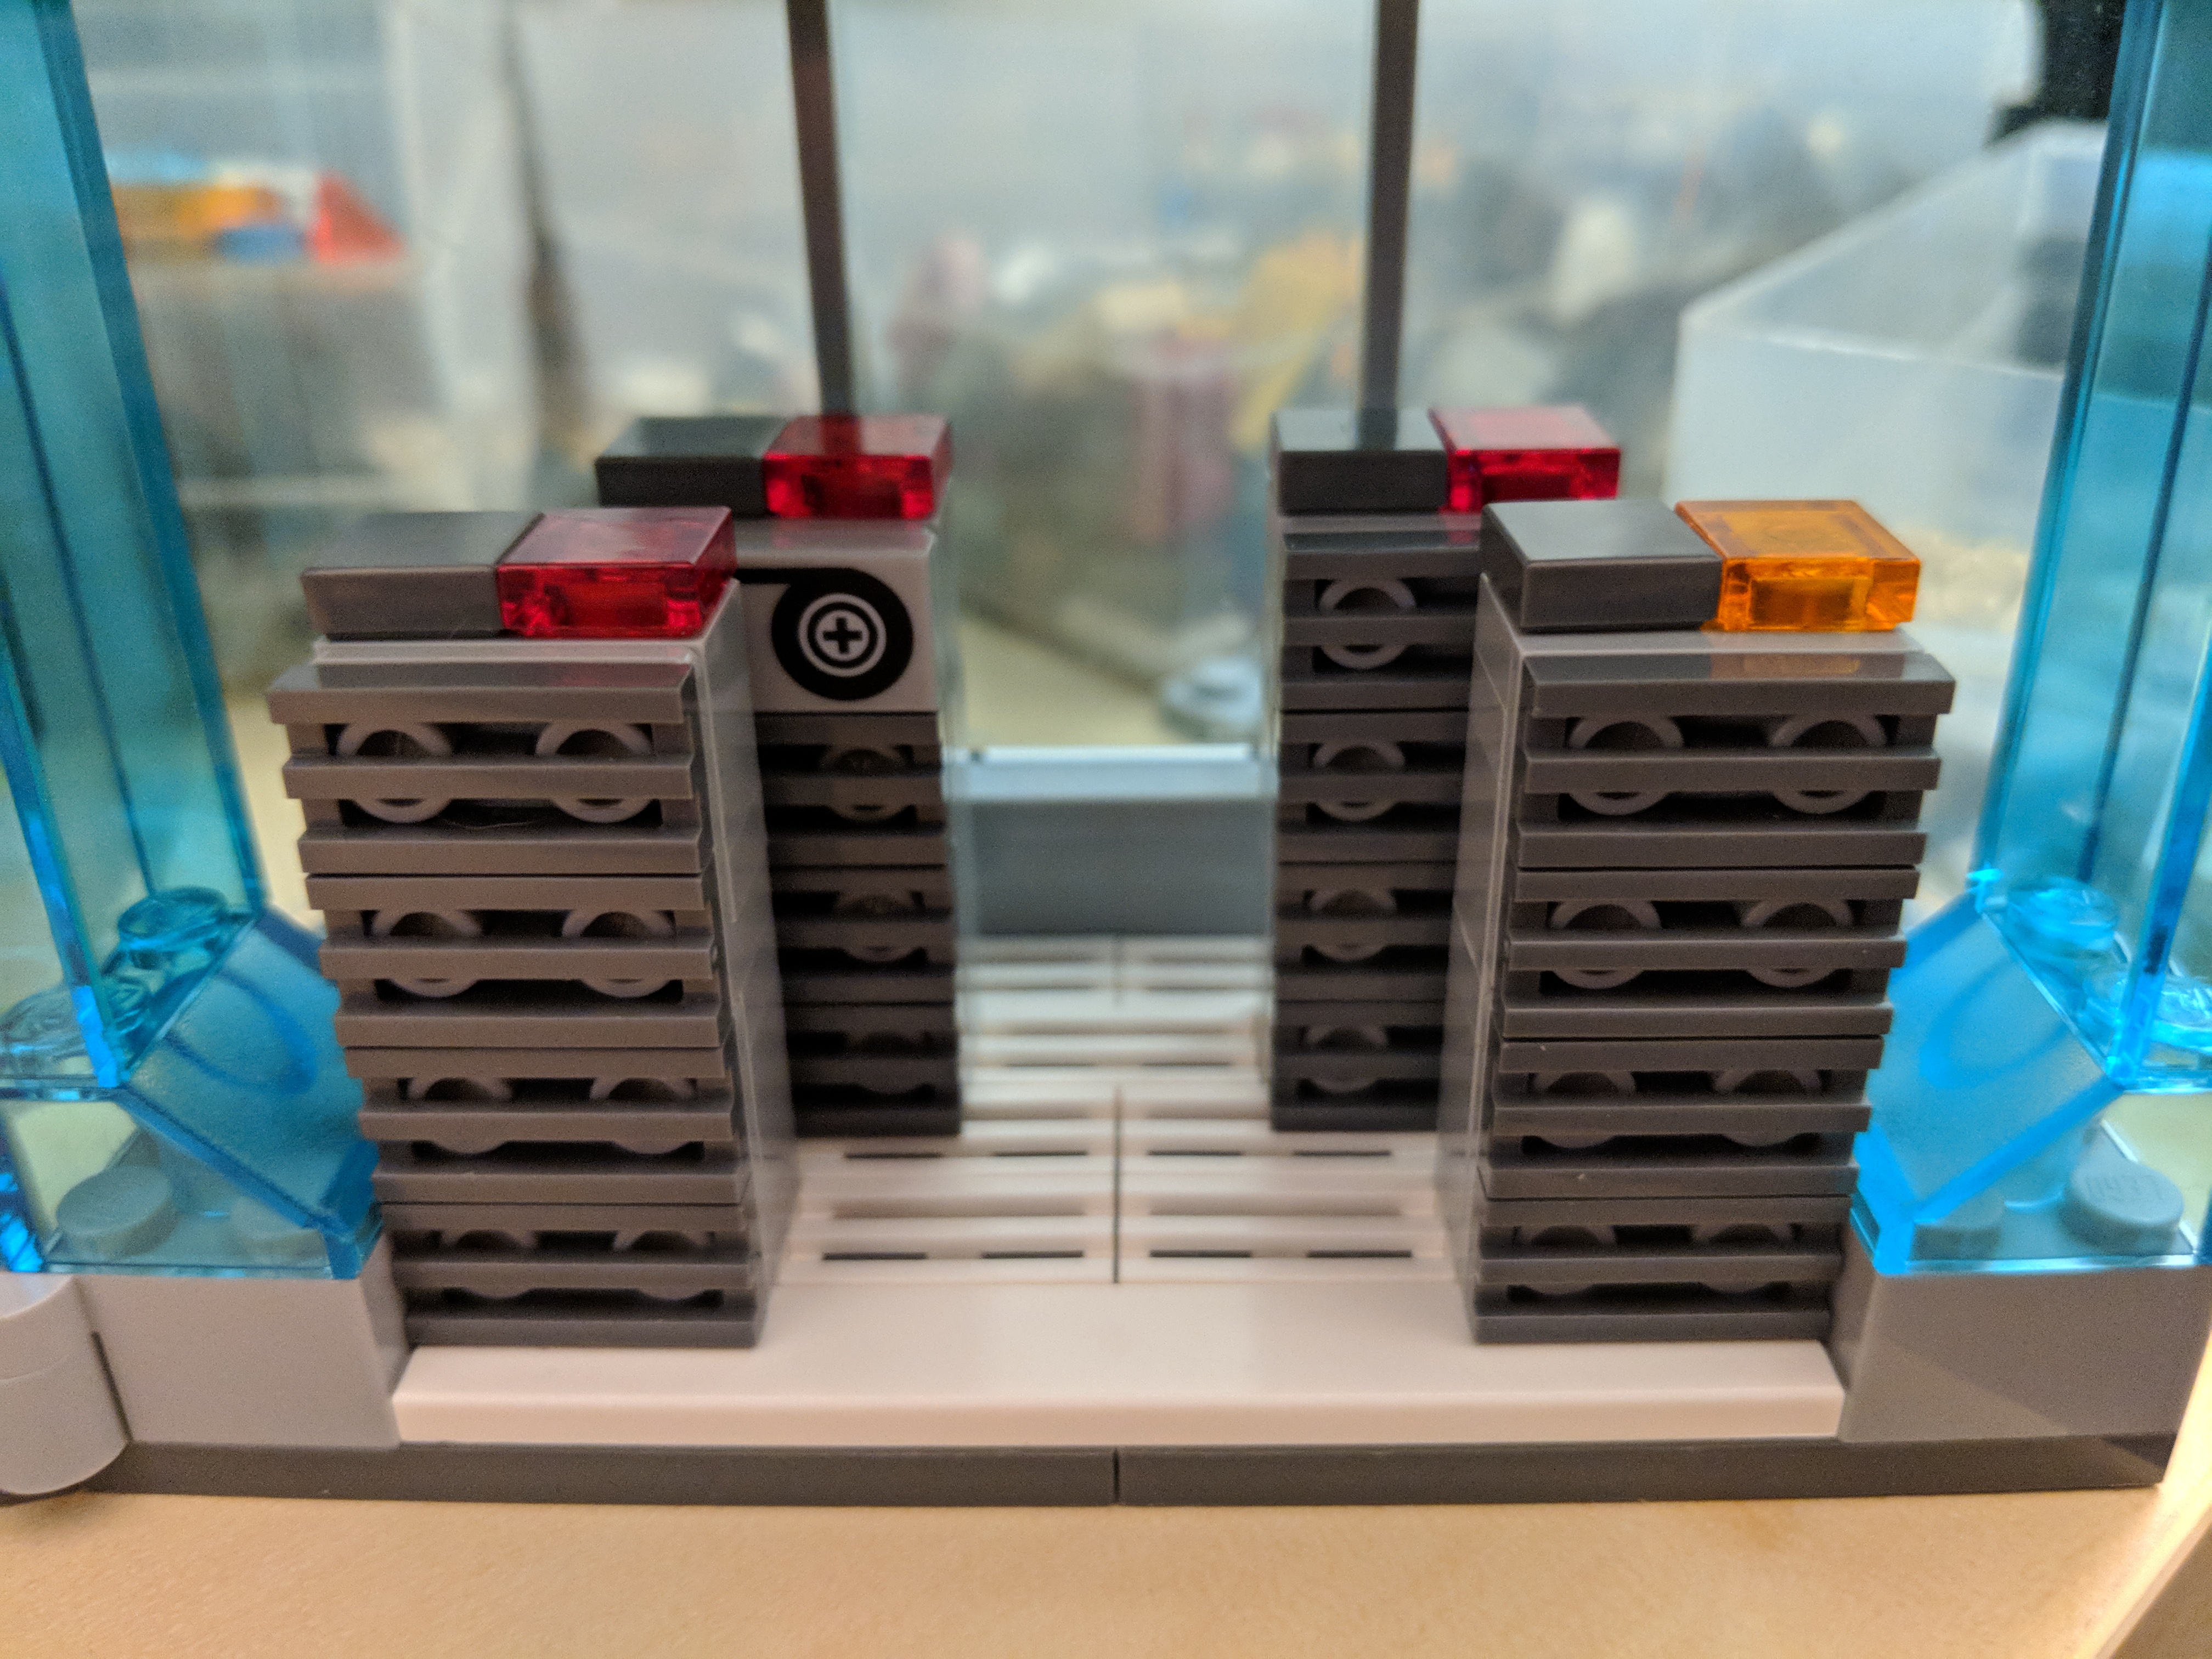
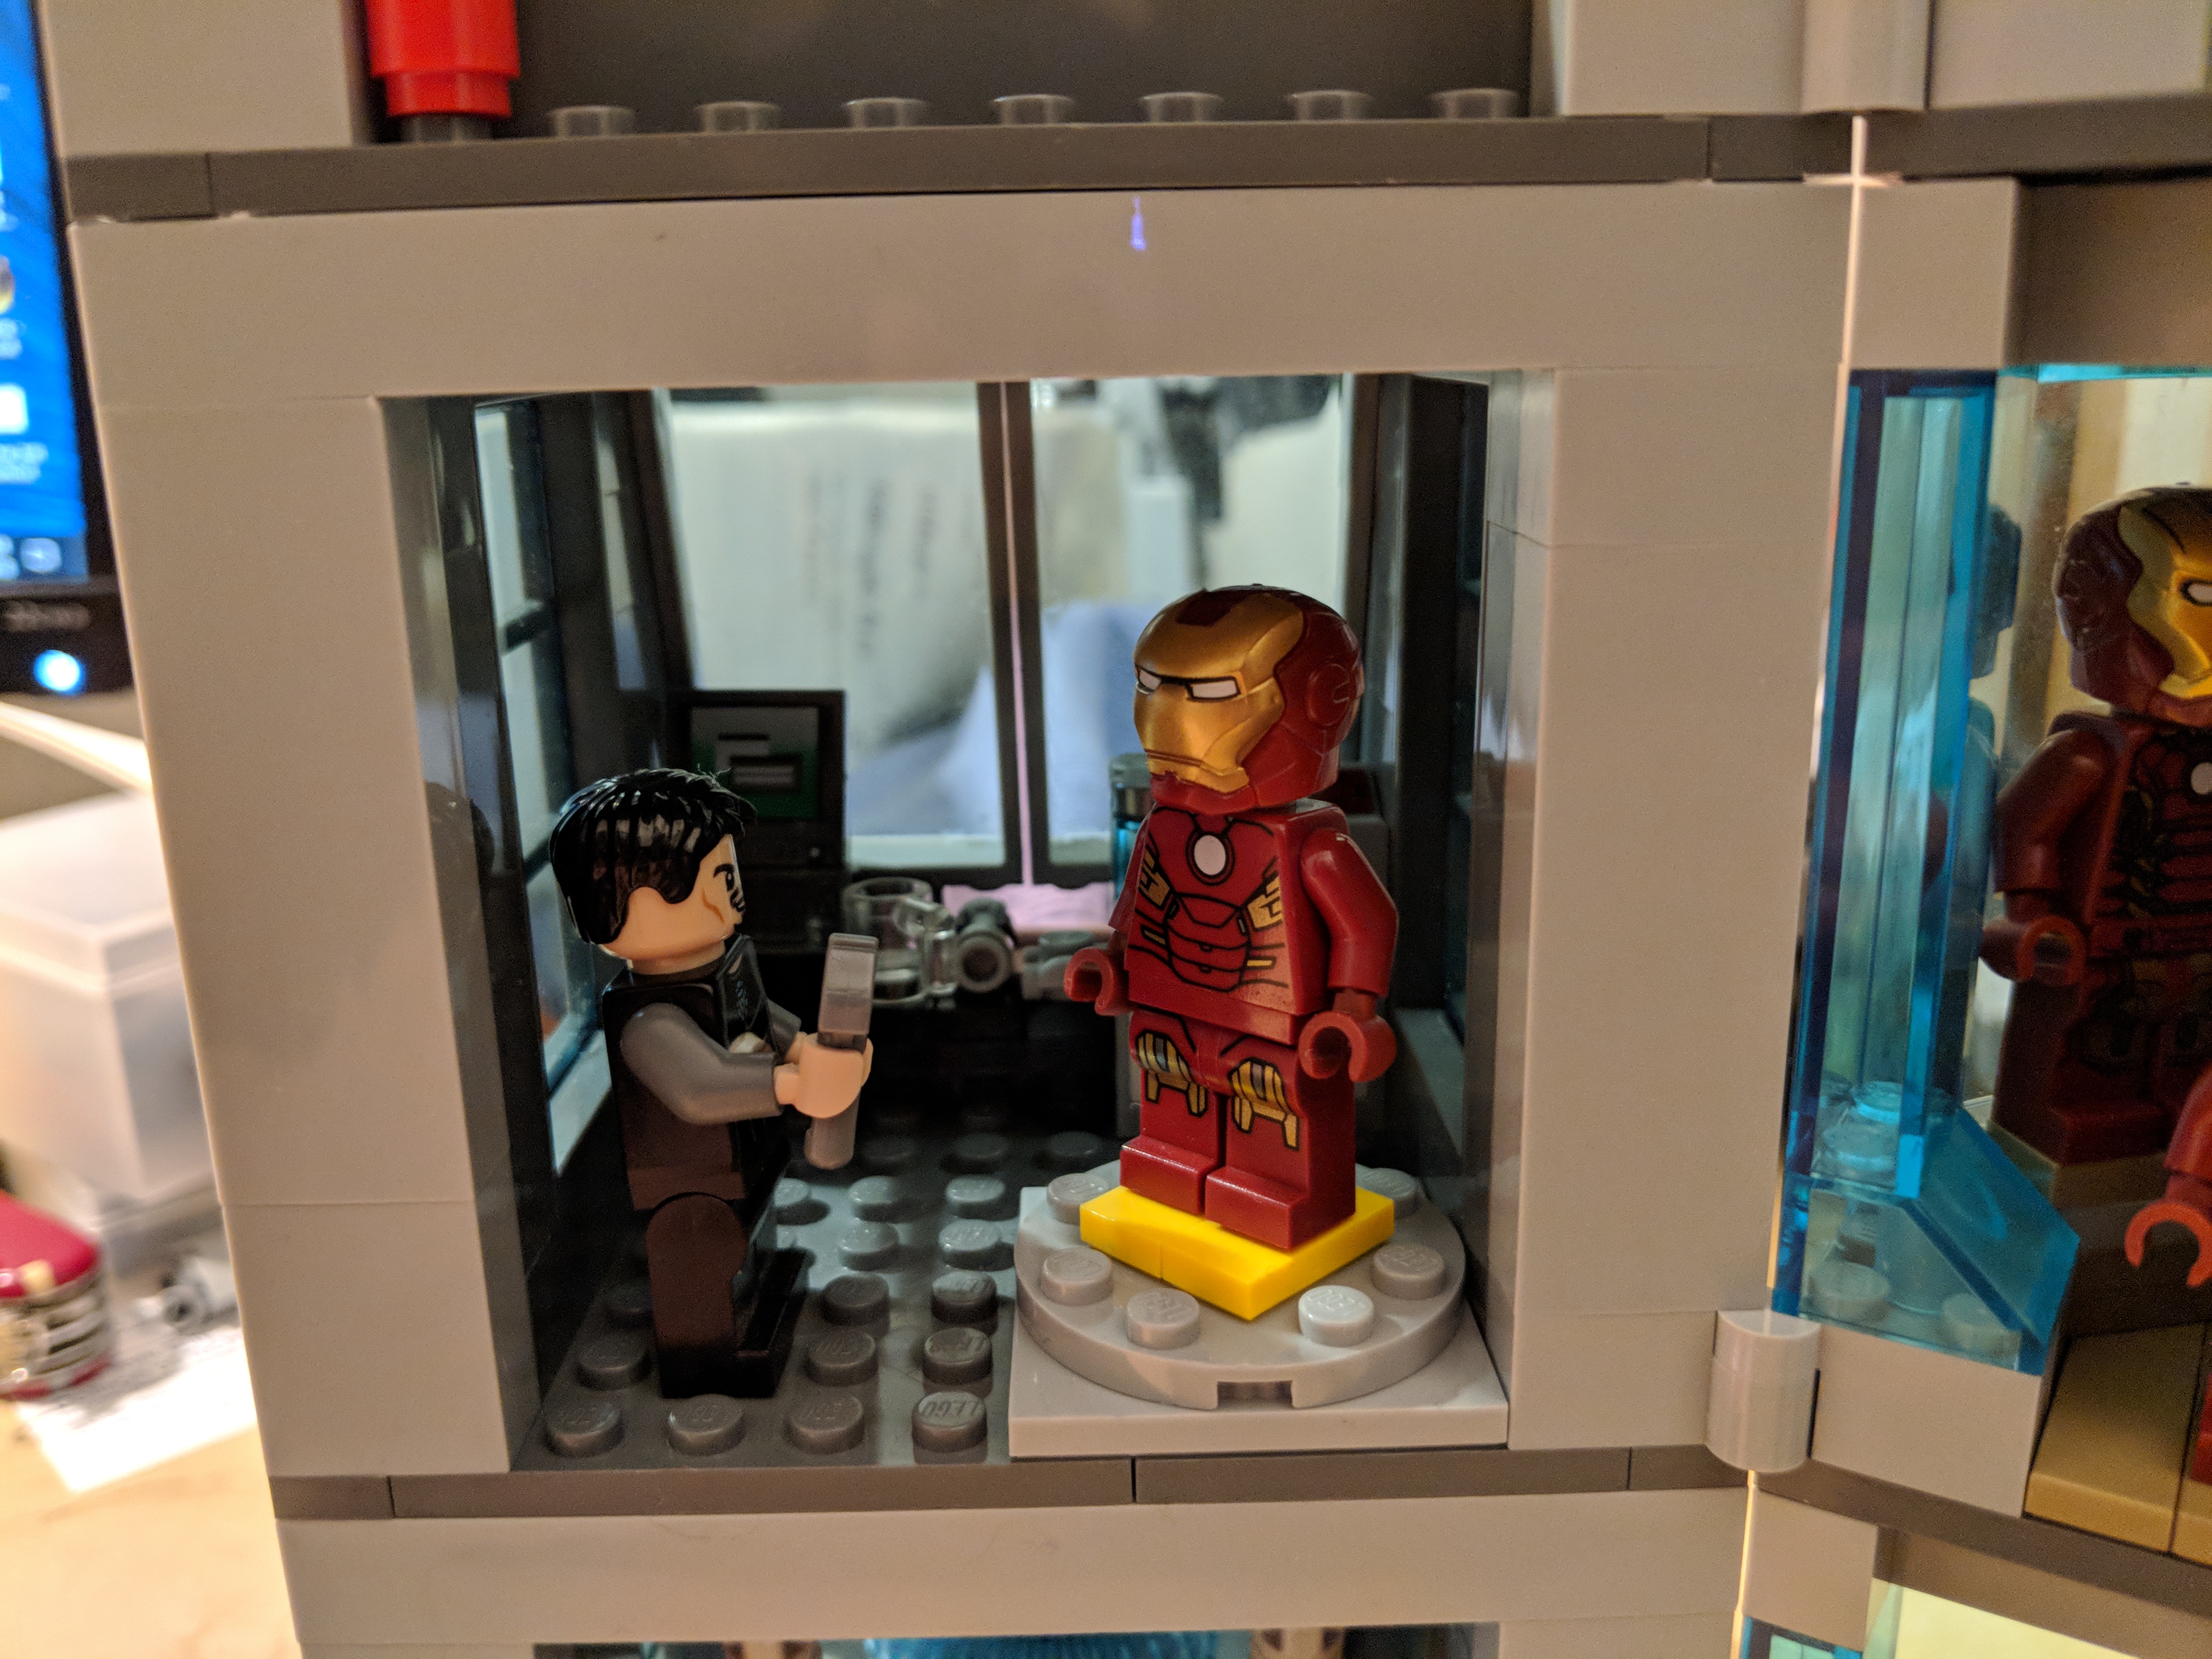
To begin my modification to Avengers Tower, I had to plan out how to extend the slope of the front part of the tower. Following the slope provided in the original model, I saw that the next level–if it were the same height as the previous level–would need to extend two studs past the previous level. This allowed me to plan how much area in studs I would have to work with for the new first or bottom most level, and the new second level. The rear part of each level–with curved, translucent windows would remain the same for the new fourth and fifth levels. The new first level features an interactive Arc Reactor and Computer Server Room. The new second level features Tony Stark’s workshop and the Iron Man Hall of Armor.
Arc Reactor
I started building my addition to Avengers Tower on the bottom most, or new first level. Thinking back to the first Avengers film, I wanted the tower to have its own Arc Reactor. The first challenge was to think about what that would look like as it is only seen in the film as a 3D schematic on Pepper Potts’ computer monitor, and the second challenge was to integrate some interactivity into this part of the model. While the Arc Reactor doesn’t spin (just the plasma within its torus moves within its magnetic confinement rings), I thought a geared spinning mechanism might be fun to engineer. Due to the placement of the window, I added a series of three gears to move the work where it was needed to spin the reactor. A small knob on the right side of the tower is used to spin the reactor. I added gauges, pipes, valves, and supports to frame the Arc Reactor within its space.
Computer Server Room
Opposite the Arc Reactor on the first level is the computer server room. I built the 19″ computer racks four bricks high, but I might make these higher later. I staggered their placement to imply depth to the space. In the back corner, Ant-Man is hiding out to see what Stark might be up to.
Tony’s Workshop
I focused the new second level on Iron Man. In the front, sloped space, I created Tony Stark’s workshop. It has a desk with computer, parts, coffee mug. Next to the desk is a set of drawers with tools, and on top are two containers and Stark’s Mark V or Suitcase Armor from 76007 Iron Man: Malibu Mansion Attack. In the foreground, Tony Stark has a wrench, and a set of Iron Man armor is on the rotating work platform. Below are some false starts that I made while trying out different designs for this space, including a movable robot arm, which looked very nice but overcrowded the small area available.
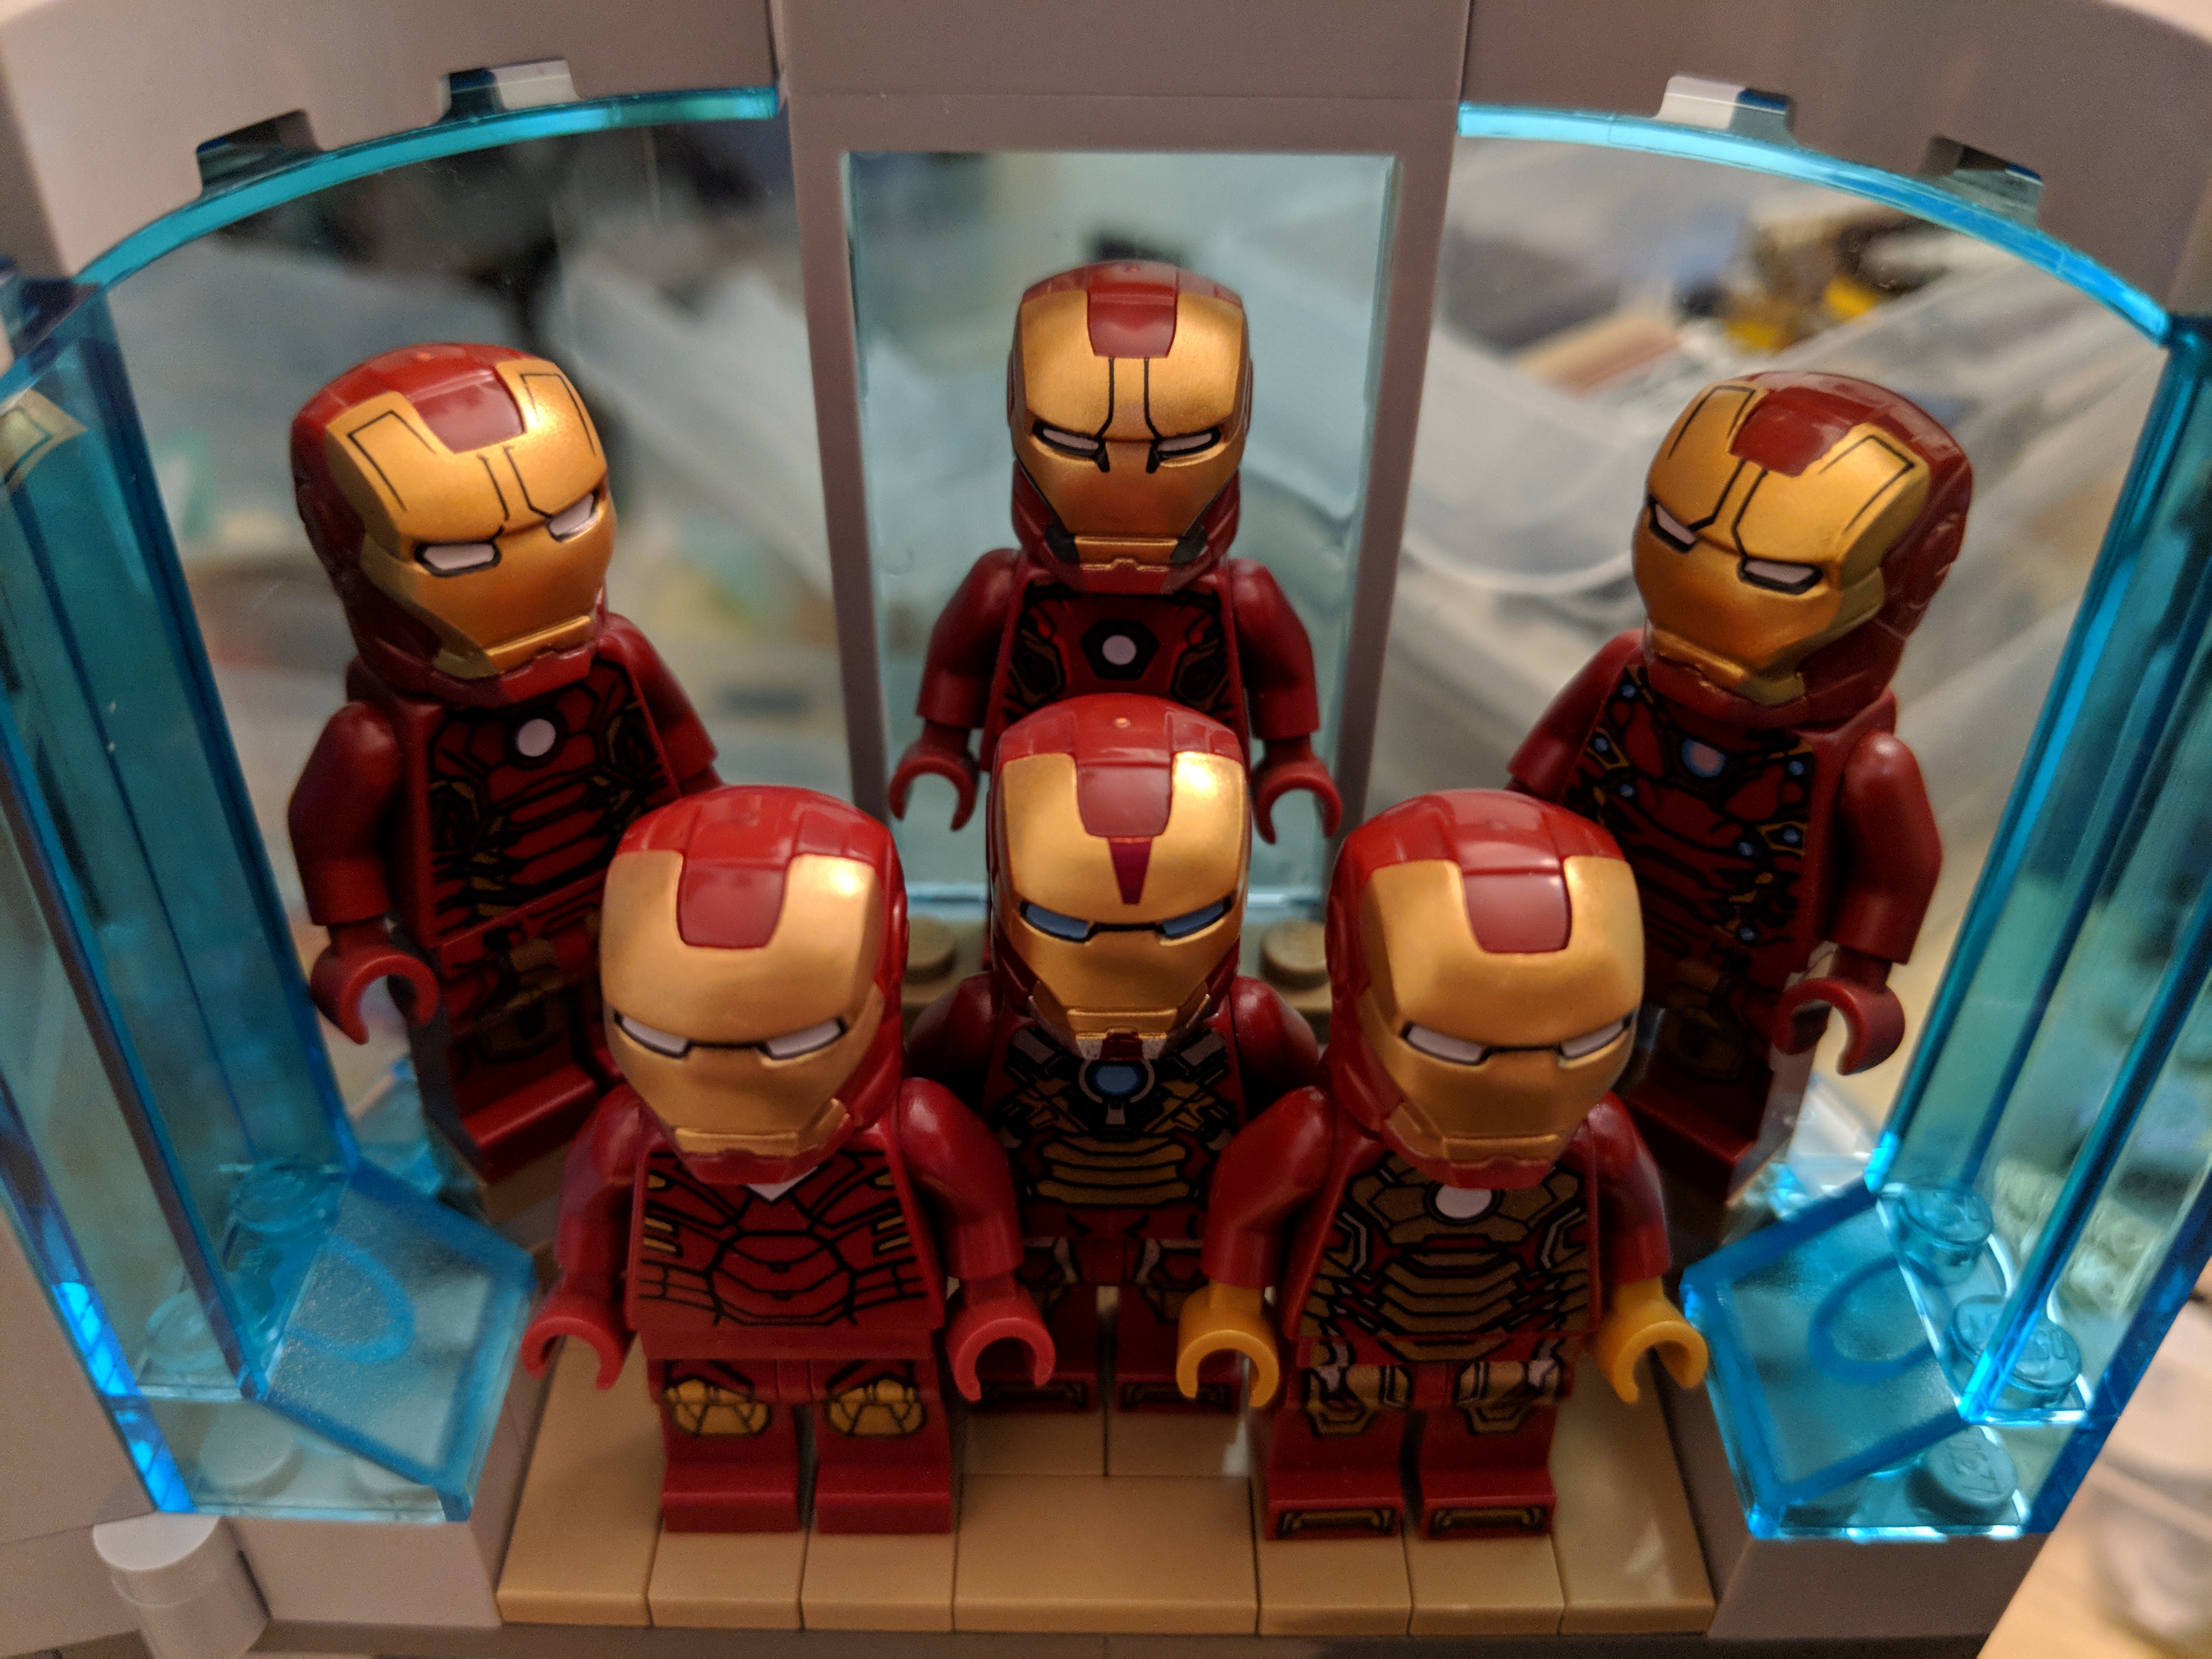
Hall of Armor
On the rear side of the second level is Tony Stark’s Iron Man Hall of Armor. I was able to fit six different Iron Man armors in this tight space by building two tiers for the armor–one lower and in the foreground, and one higher and in the background.
New Avengers Tower Assembled!
After completing the new first and second levels, I connected them to the bottom of the original Avengers Tower model. This took some time and massaging to get full clutch without accidentally breaking the model. I’m happy with the new, taller version of Avengers Tower. I wonder what role, if any, it might play in the upcoming Avengers 4 film.
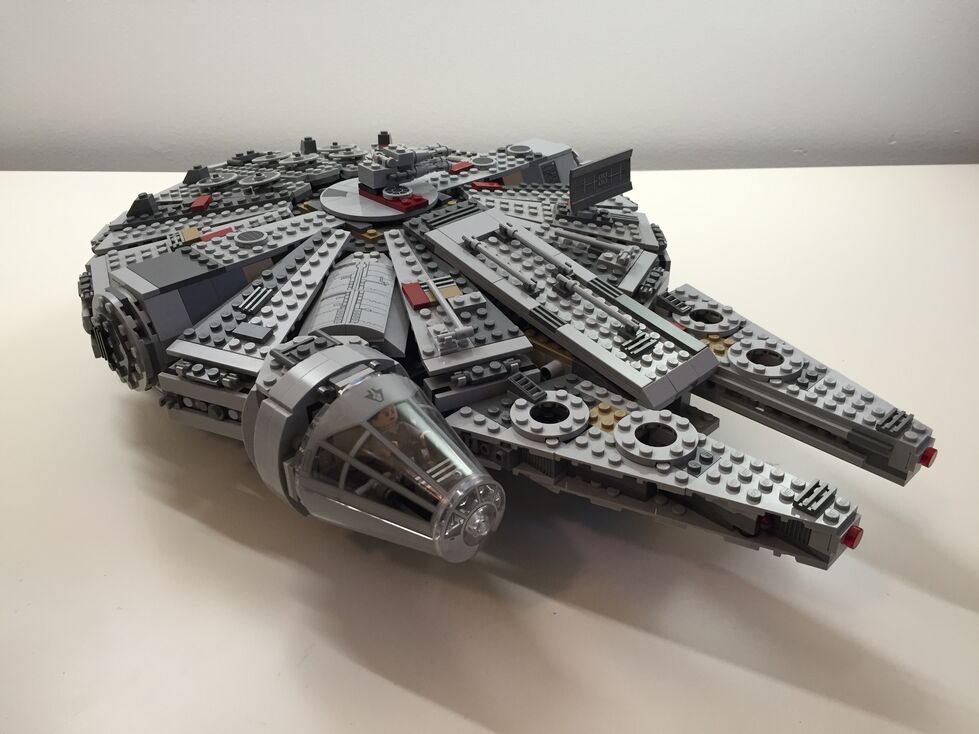
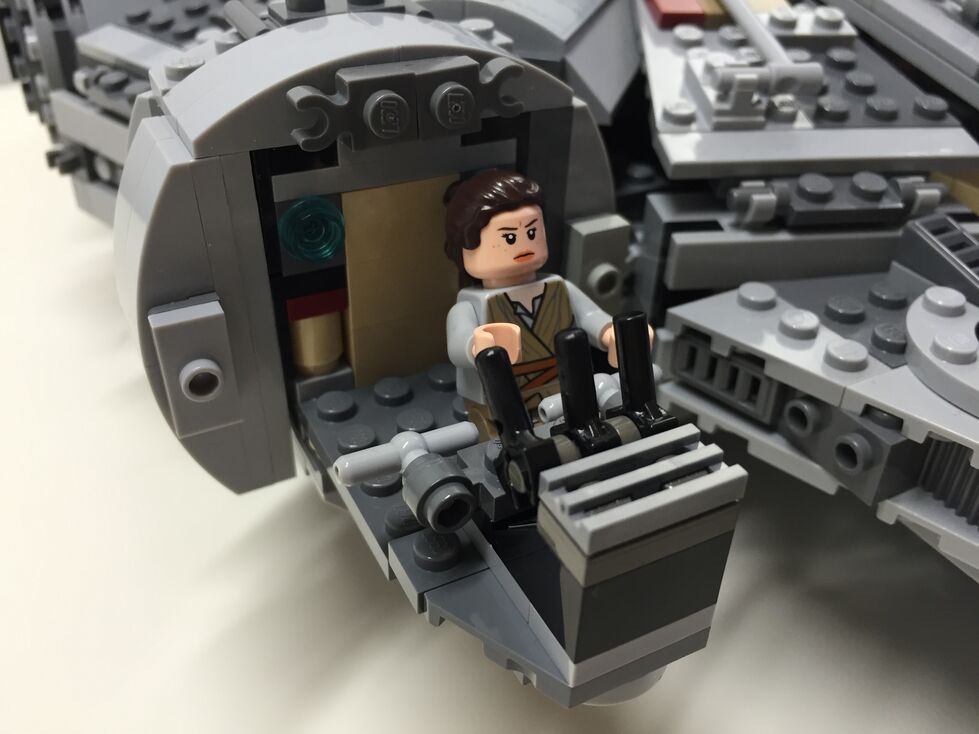
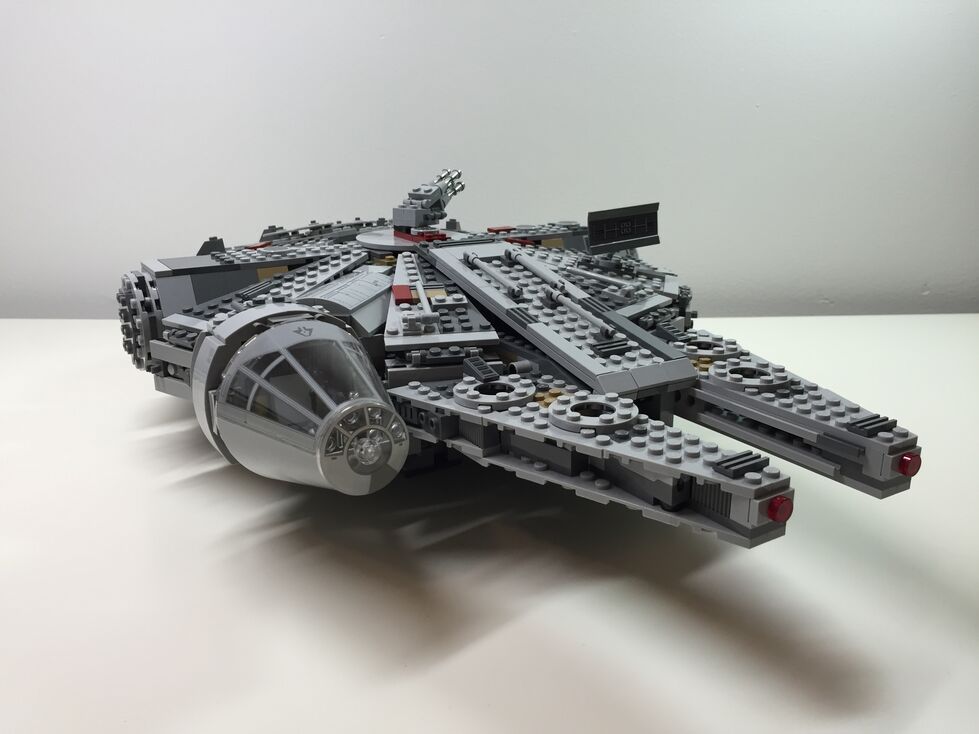
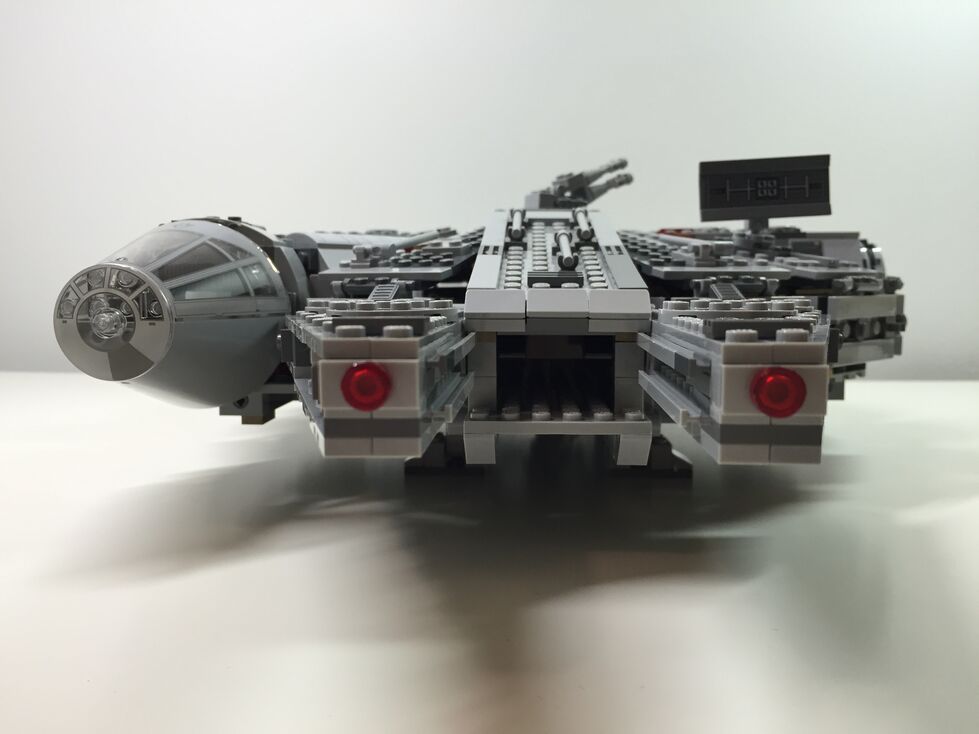
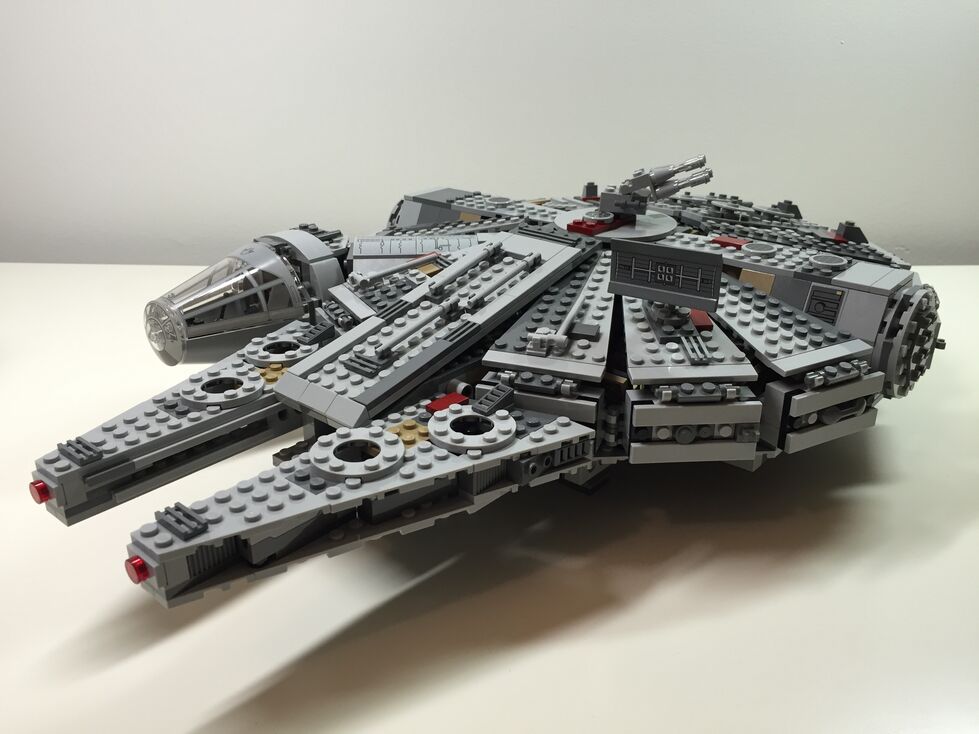
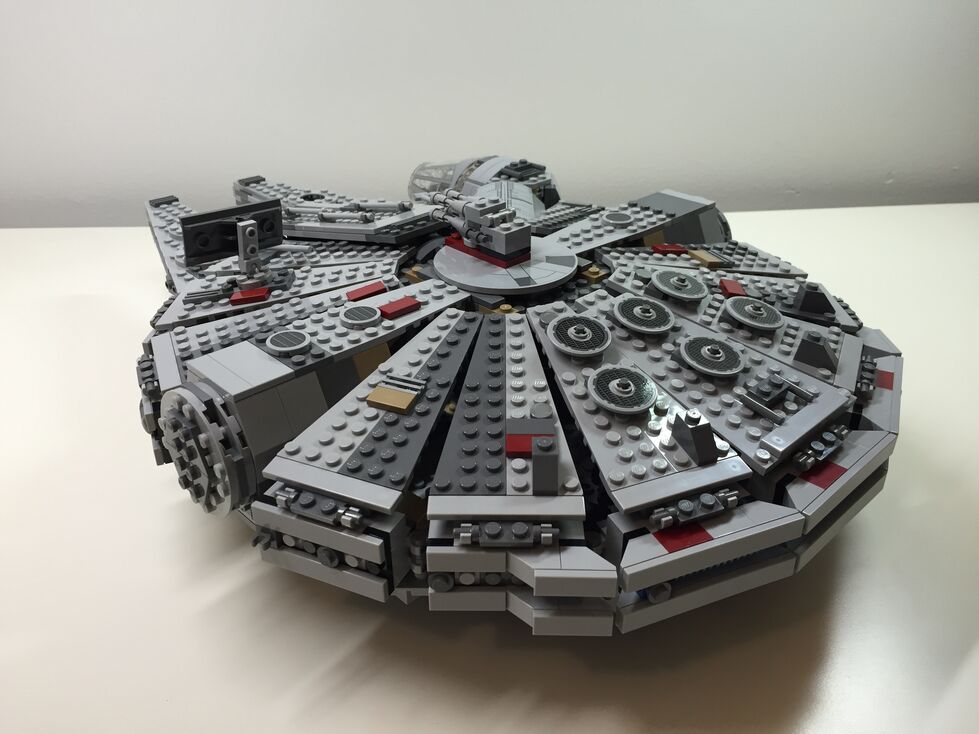
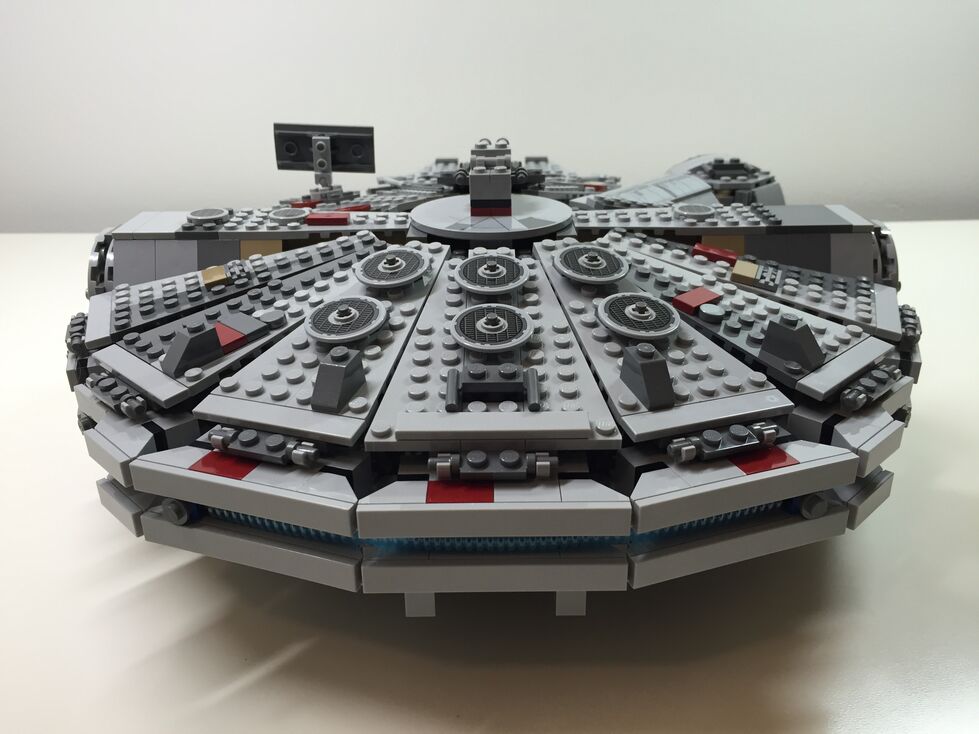
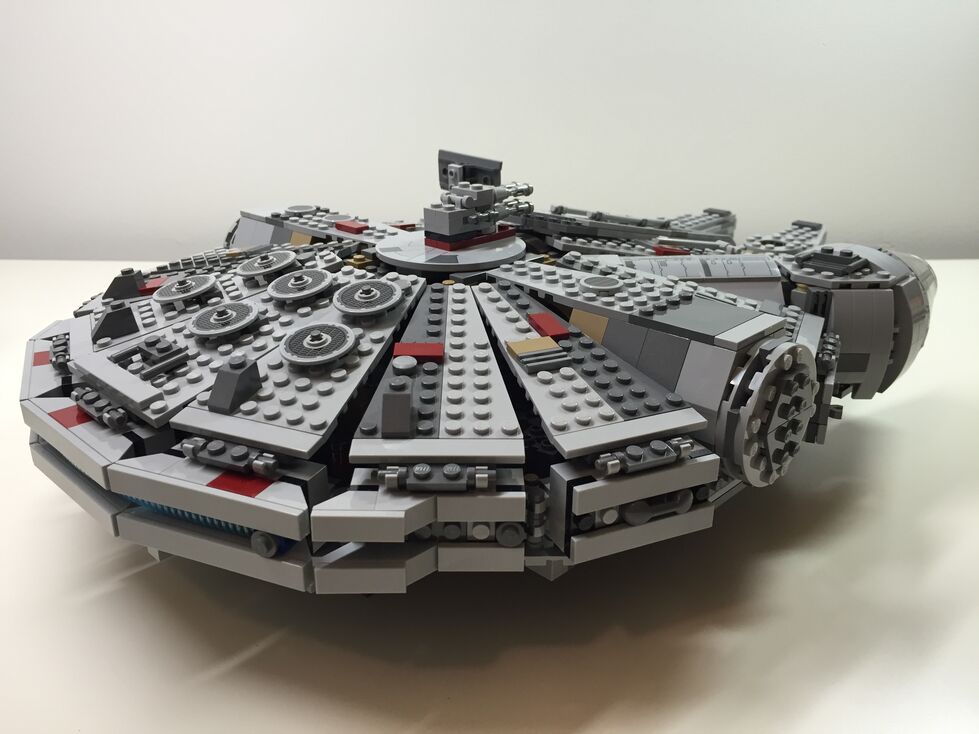
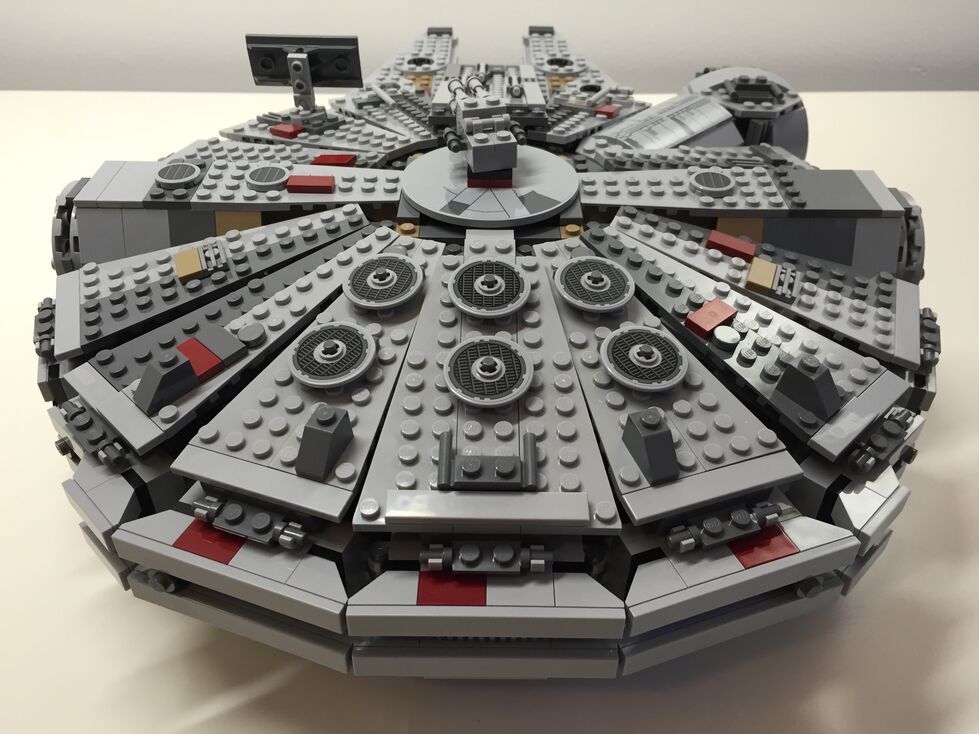
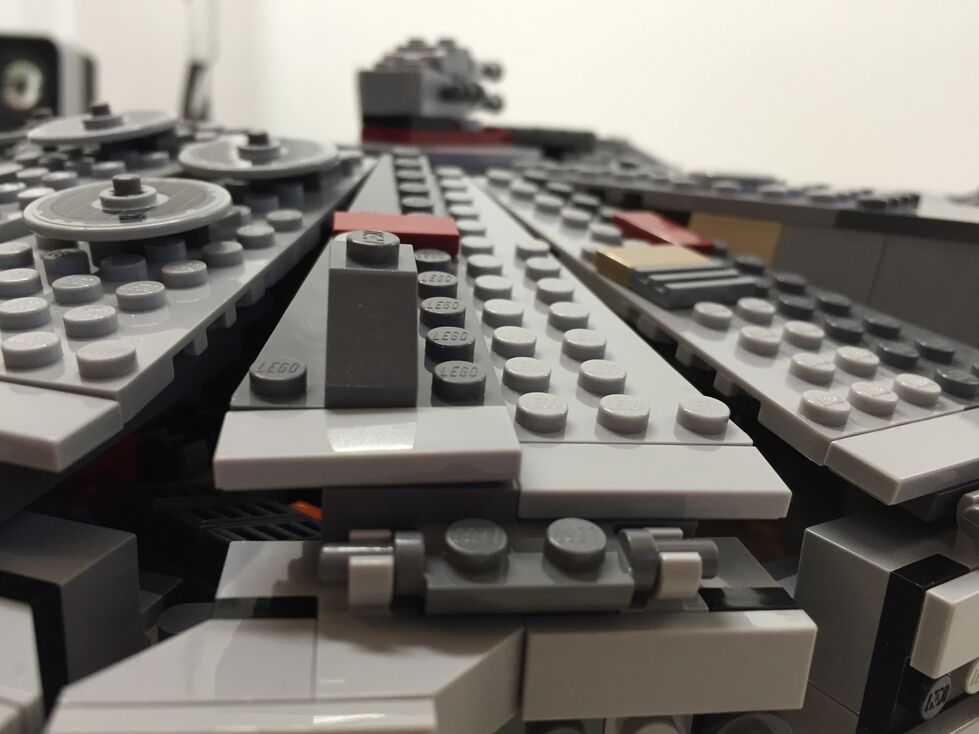
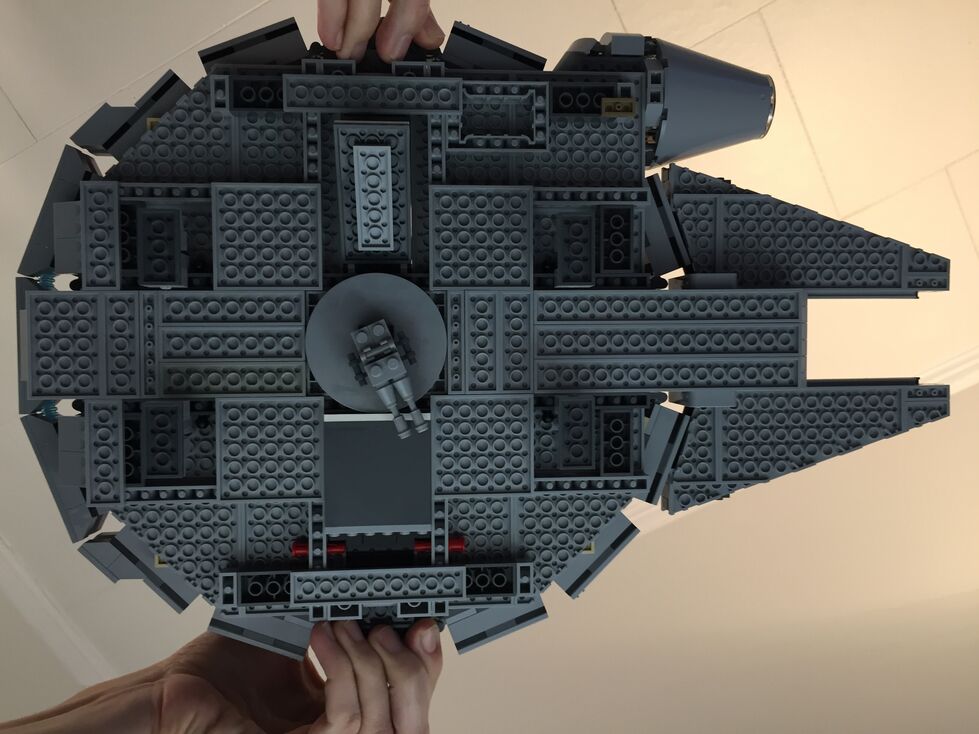
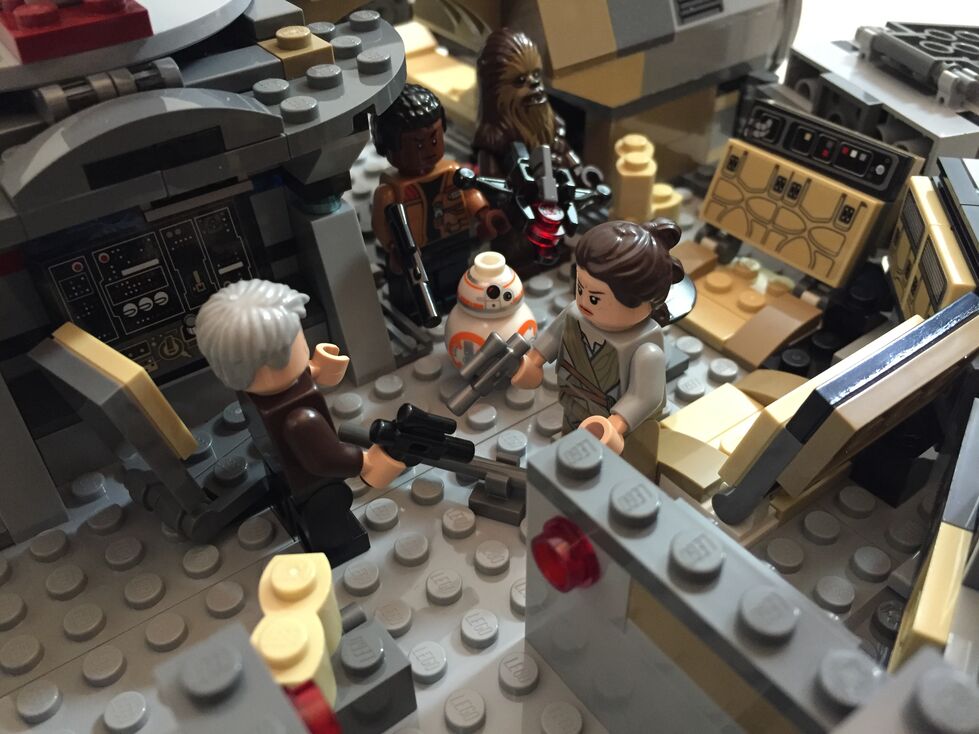
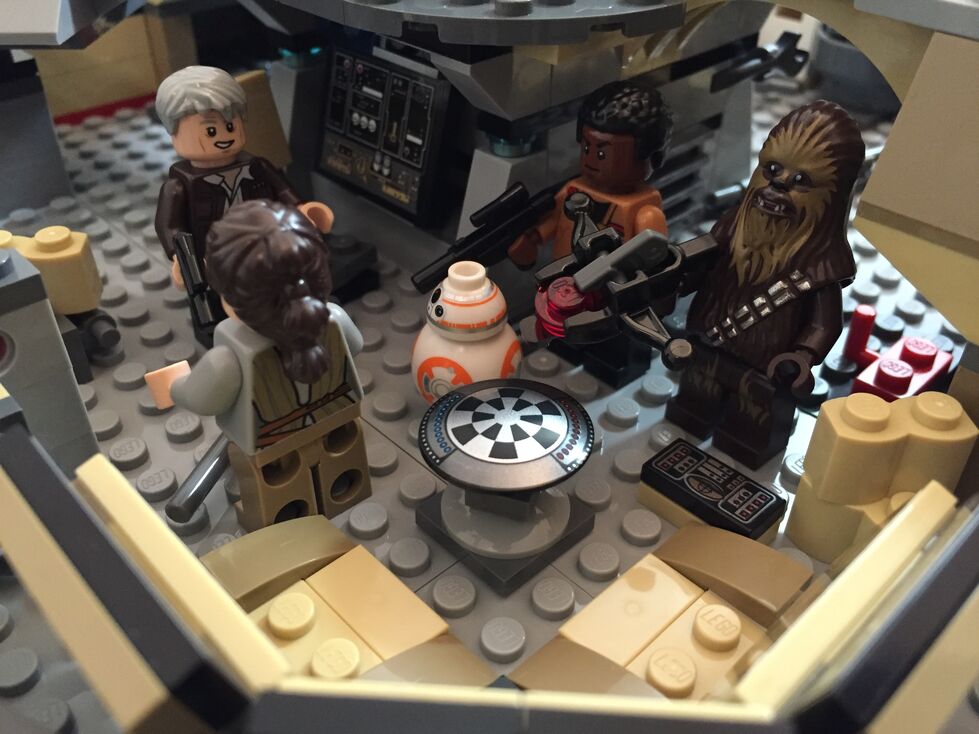
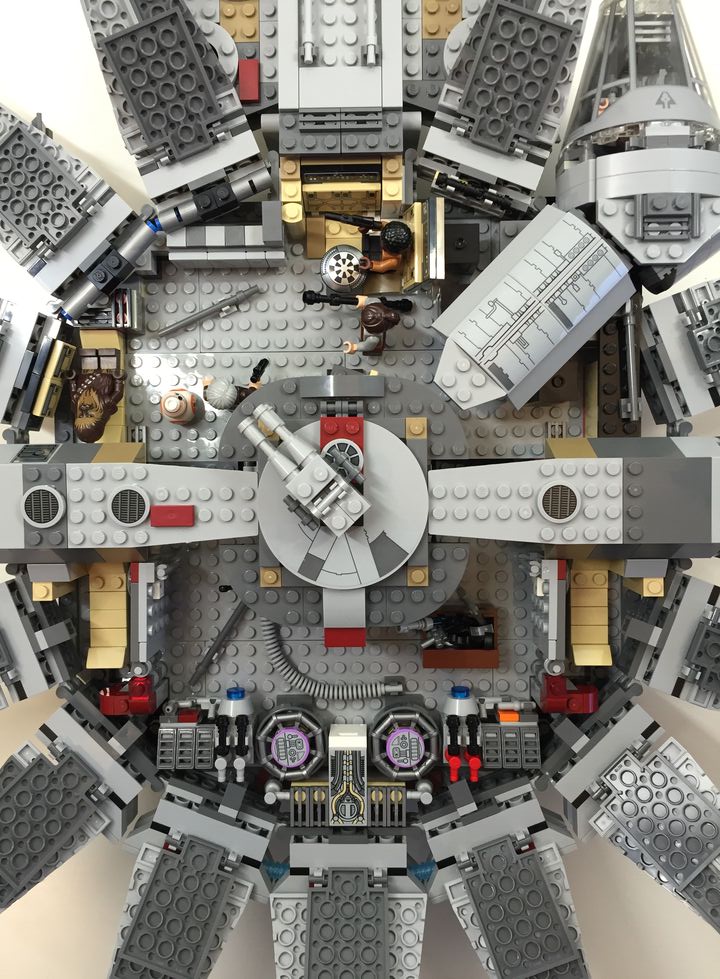
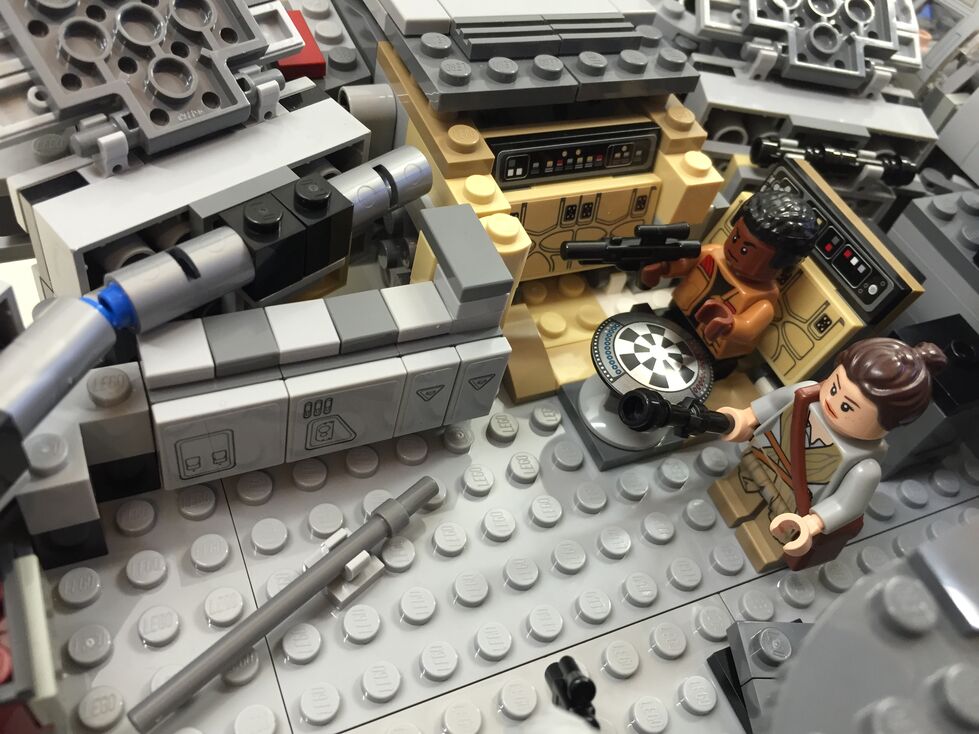
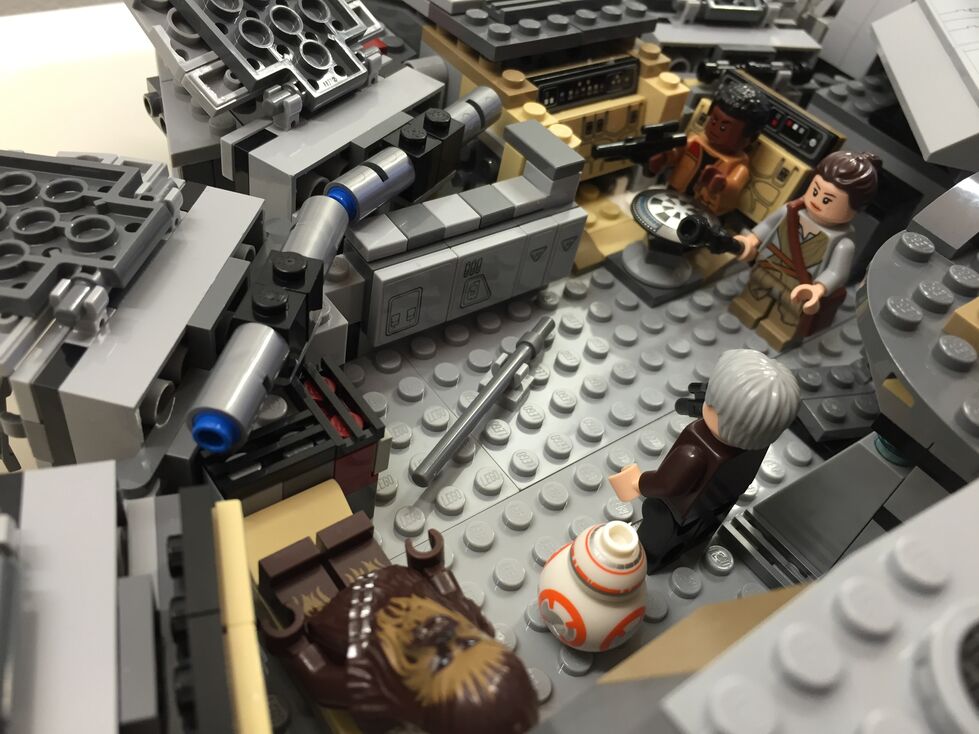
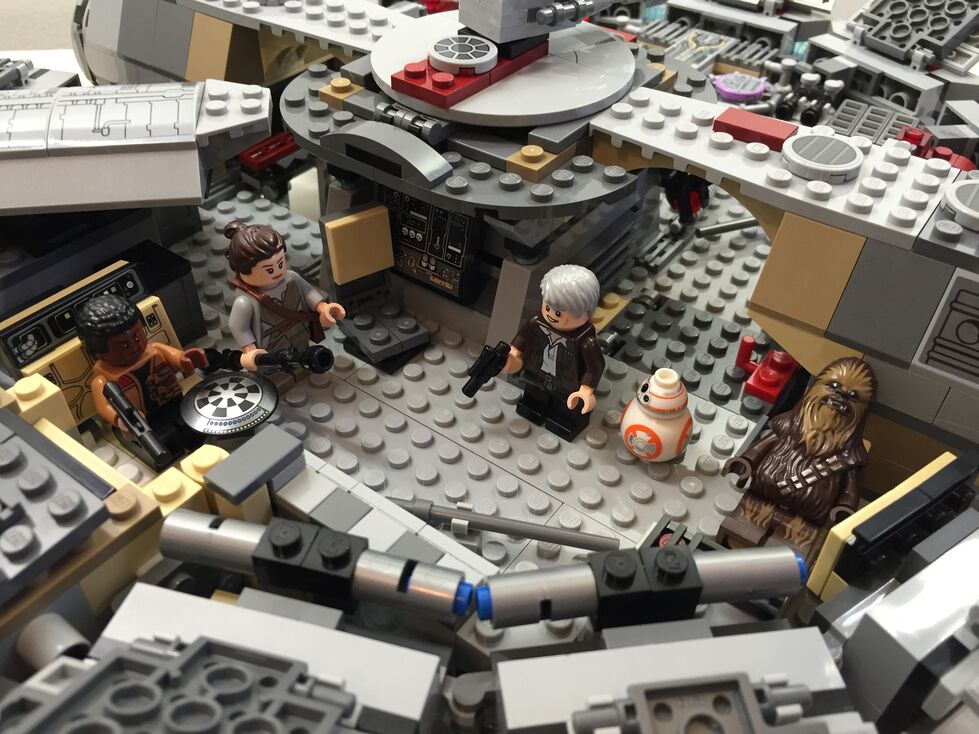
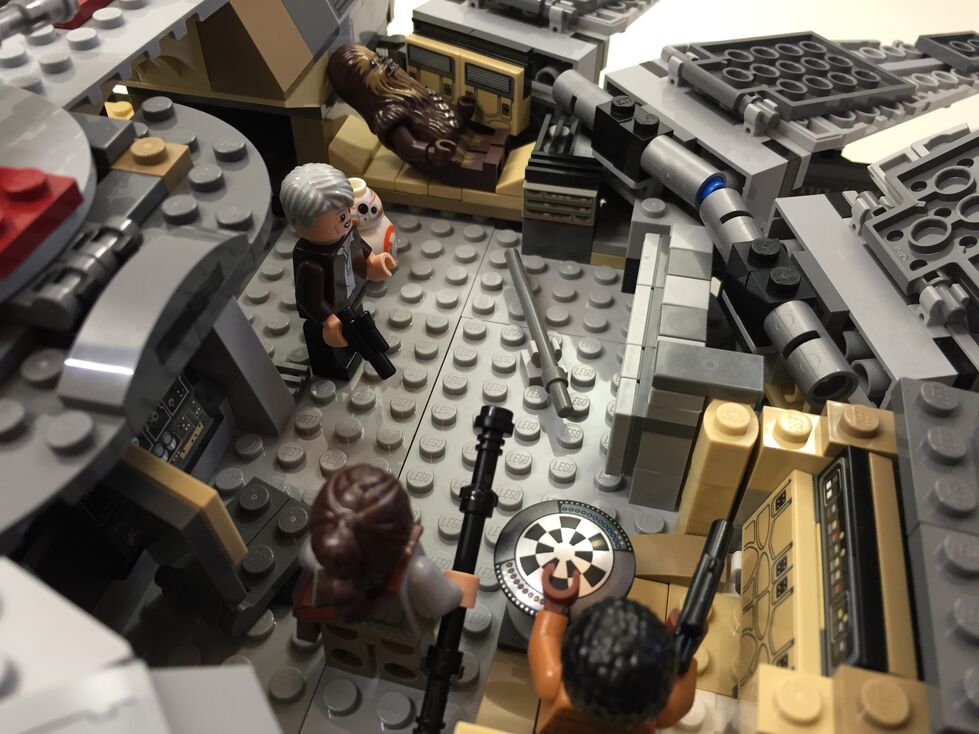
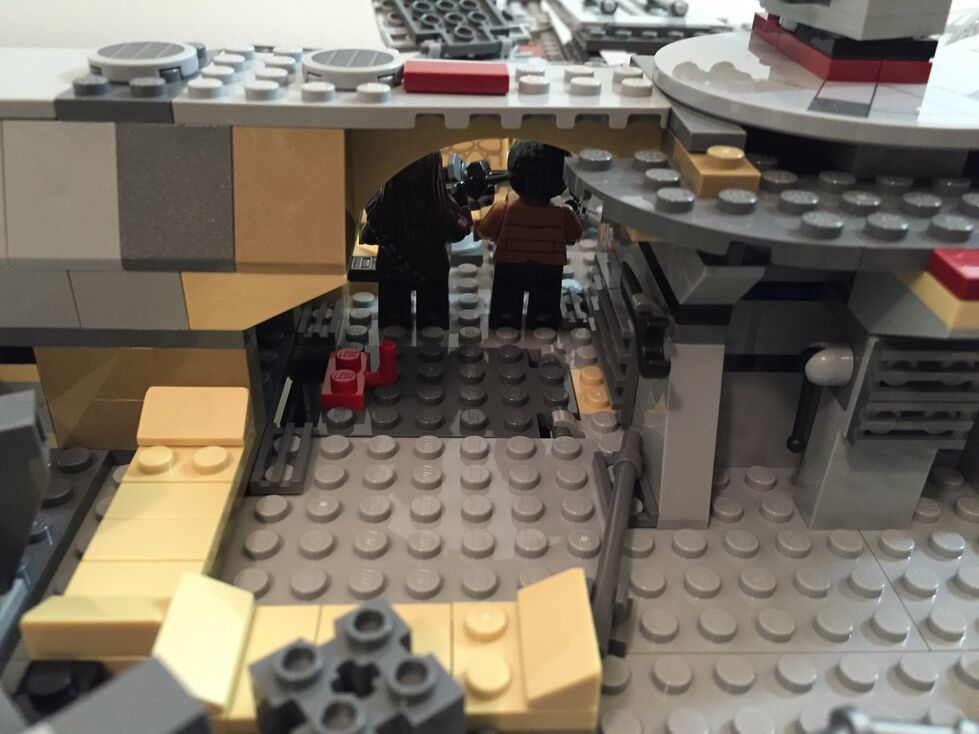
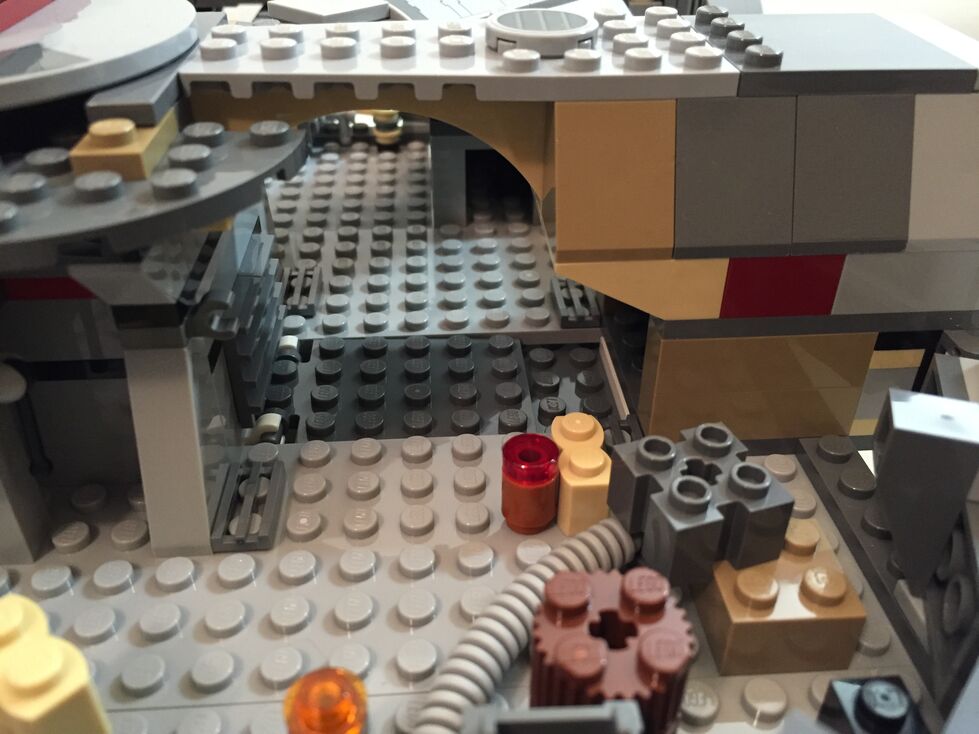
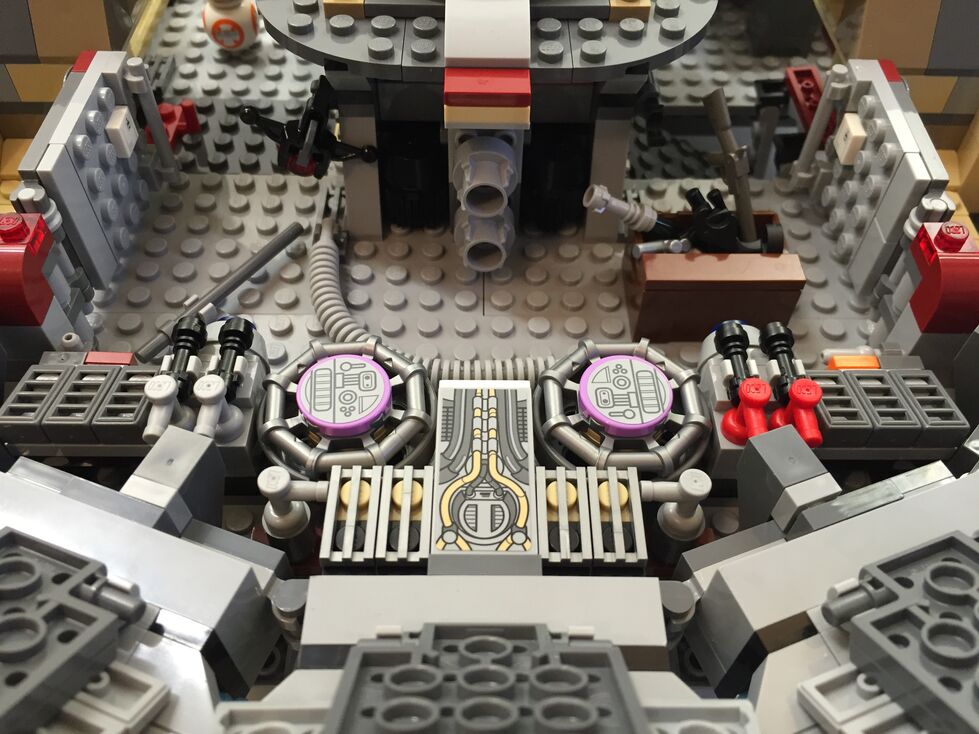
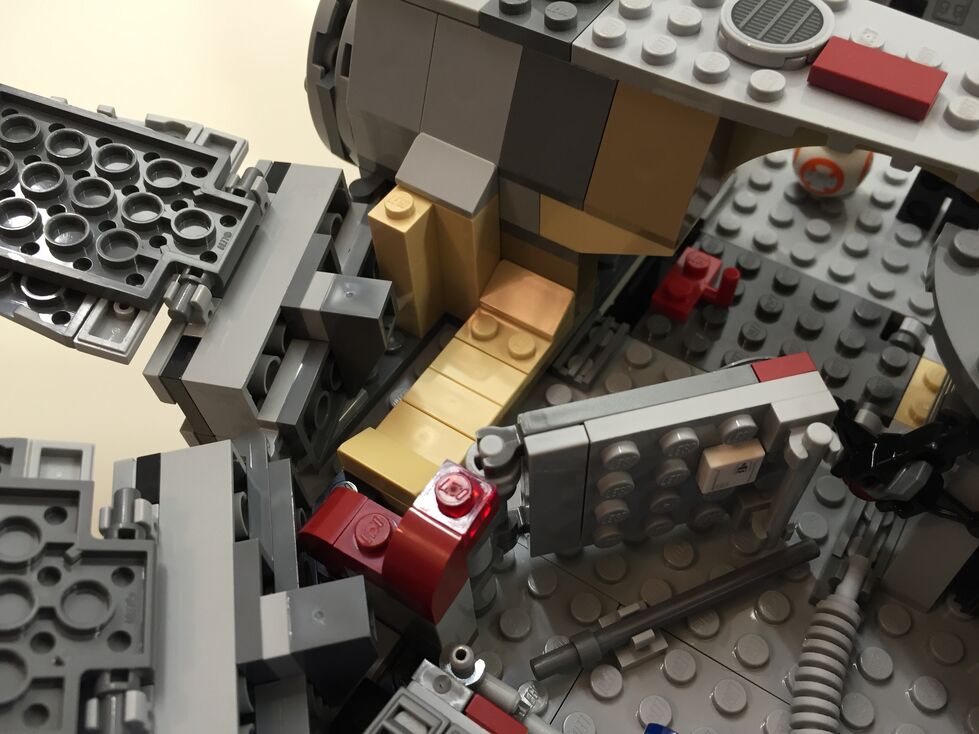
After watching Star Wars Episode VII The Force Awakens for the first of four times (so far), I purchased the new LEGO Millennium Falcon 75105 (LEGO website page and Brickset model page). It is a wonderfully designed model that balances play with detail. This latest Falcon model from LEGO captures how the passage of time and change of hands has affected this storied ship’s appearance in the film. Despite the interior and exterior greebling, the layout of the Falcon is spacious and accommodating for customization by the LEGO builder. It was my intention to customize the Falcon to be more screen accurate in the main hold and cockpit, and more detailed in the engine compartment and rear storage/bunk spaces. Through the process of customization, I worked on the exterior dorsal and ventral sides (including an improvement to the boarding platform. Below, I offer some explanation and photos for each before and after stage of my customization, including the cockpit, exterior dorsal, exterior ventral, interior fore, and interior aft.
Cockpit, Before Customization
The original cockpit accommodates two minifigures–one sitting forward on the right (pilot) and one sitting one row behind on the left (copilot). It comes with a single lever for control and a printed wedge brick with cockpit controls. Due to the conical elements used for the cockpit, space is extremely limited. However, the rear of the cockpit has a strange design that is not evocative of the rear of the cockpit, which would have controls, lights, and a door. I targeted these issues in my customization seen below.
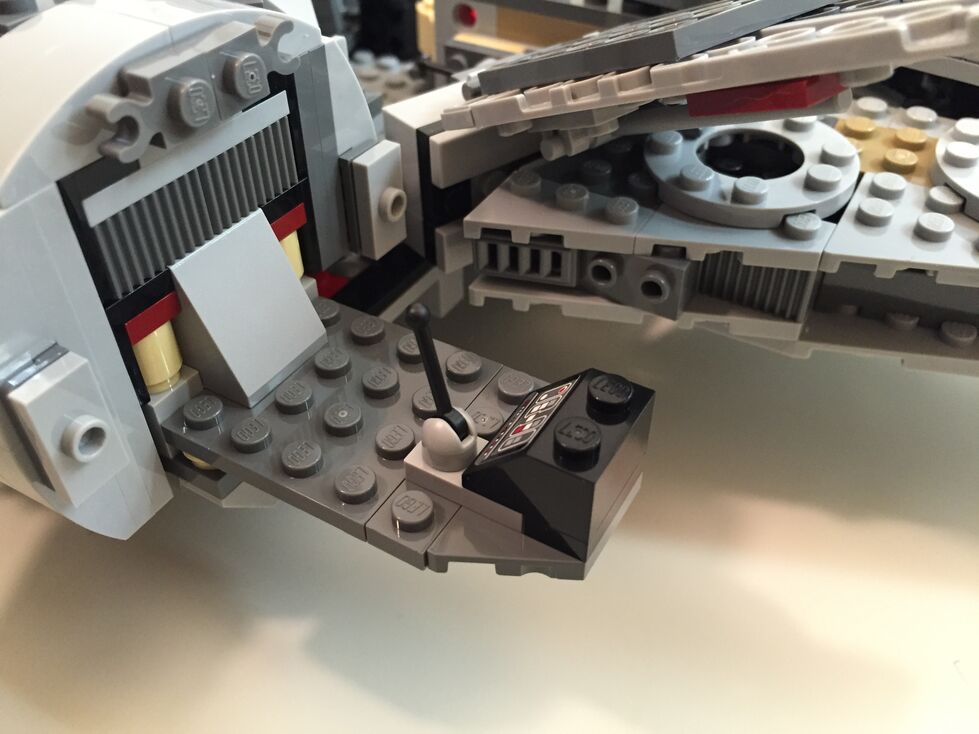
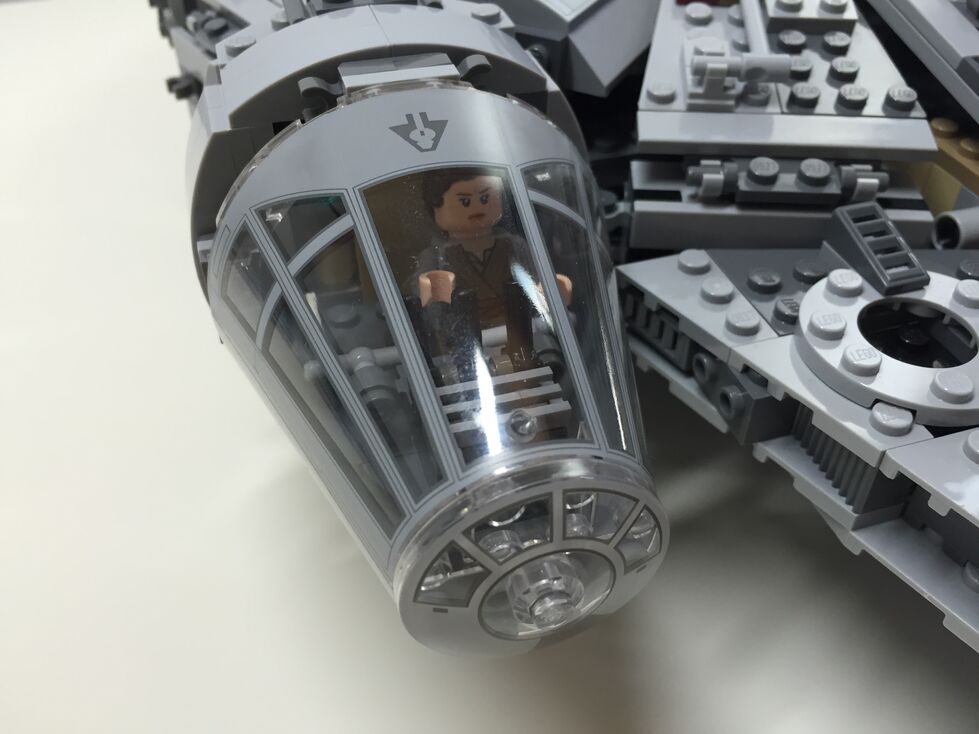
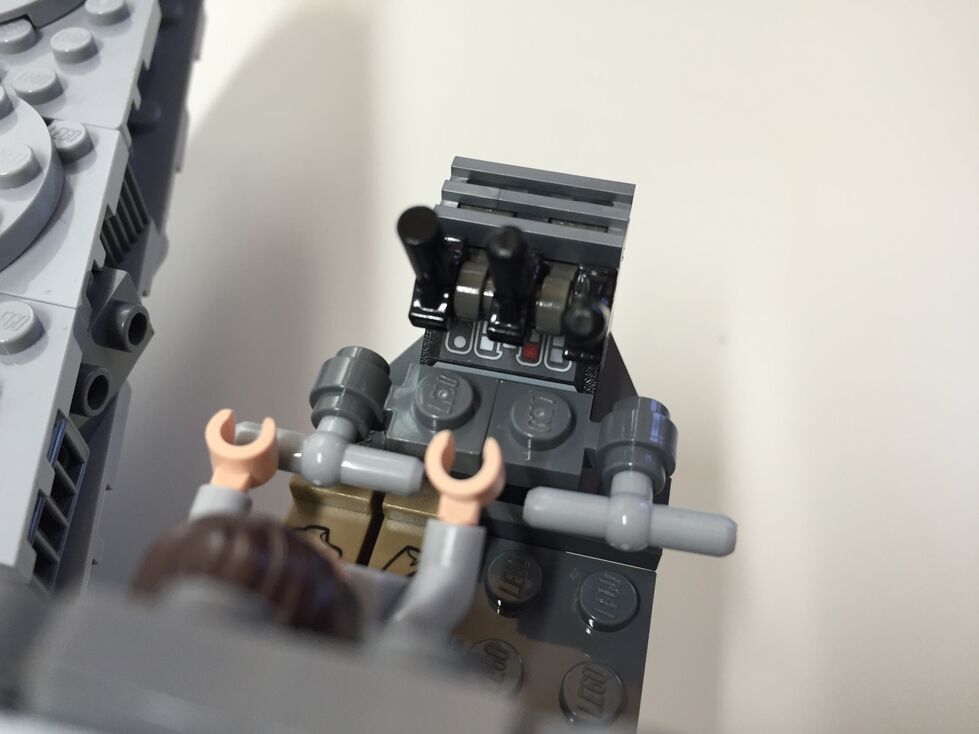
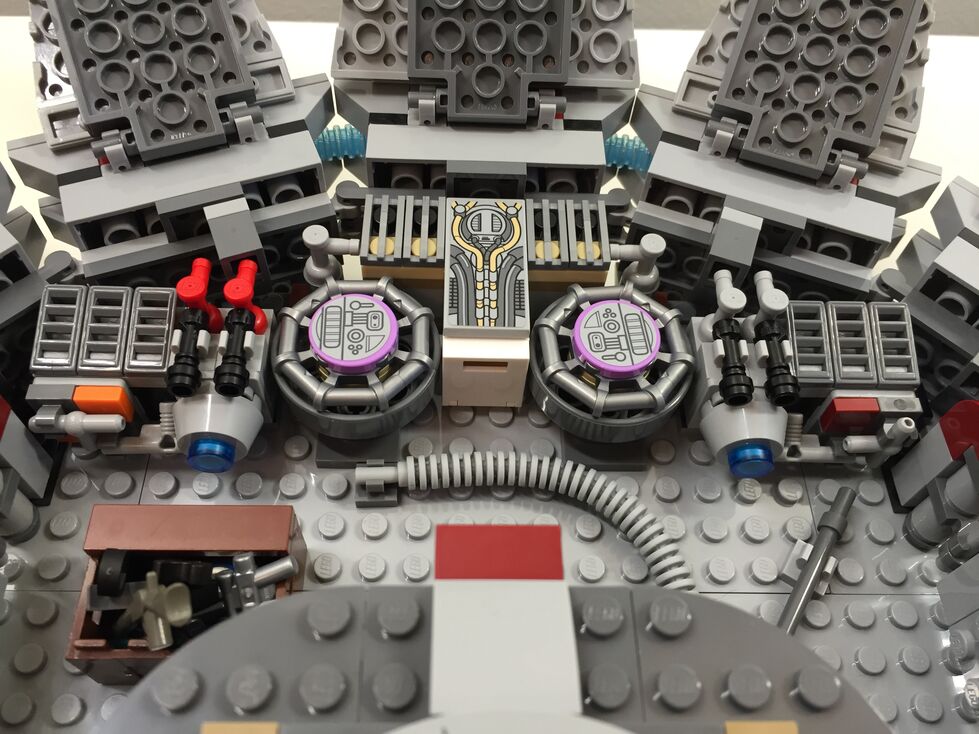
Cockpit, After Customization
In my customization of the cockpit interior, I raised the control panel by one plate and gave the pilot and co-pilot handle-bar controls like in the films. Above the directional control bars, there are three adjustable levels sitting on top of the printed control panel wedge brick for controlling the engines.
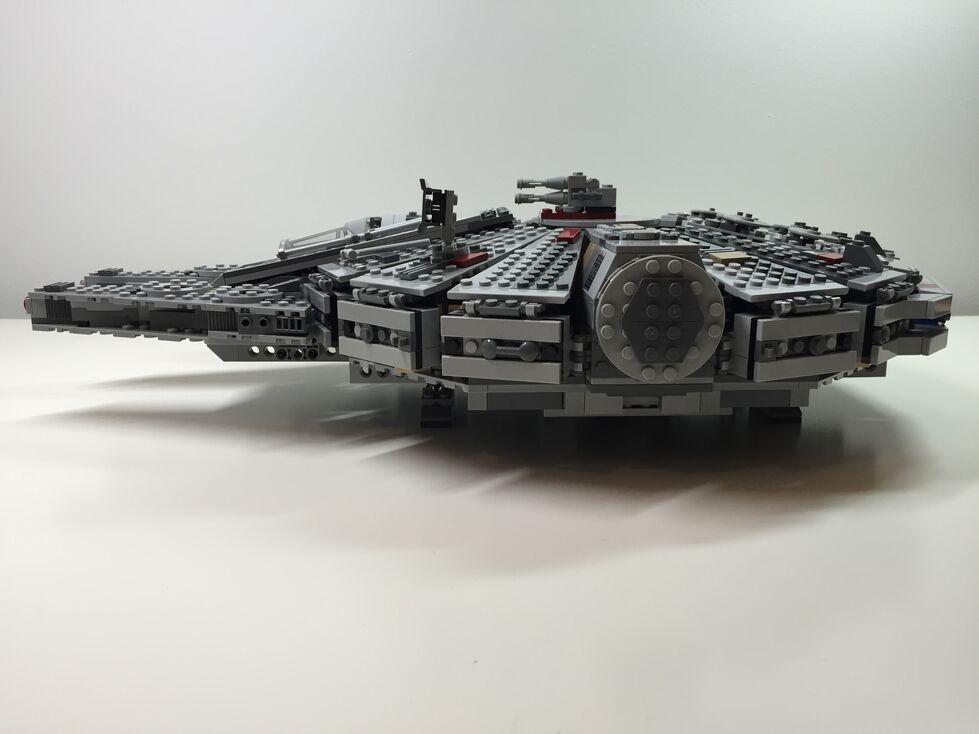
Exterior Dorsal, Before Customization
These images are of the Falcon’s exterior before any customization. Of note, the Millennium Falcon’s fore running lights are red instead of clear (a change depicted in The Force Awakens), and a less clean exterior to illustrate its aging and modifications.
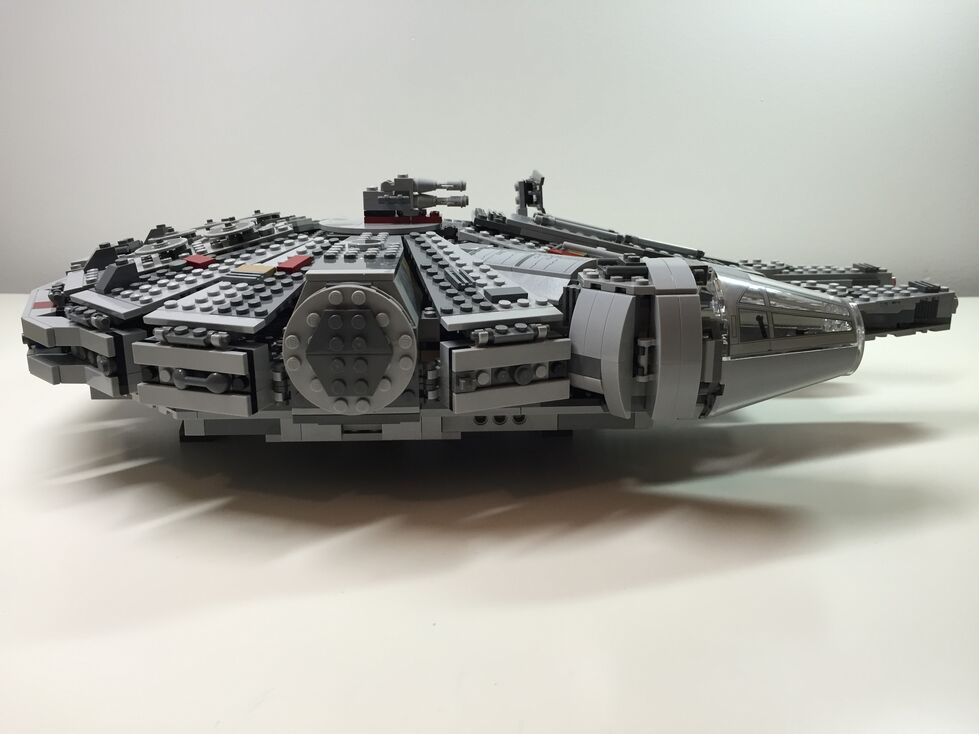
Exterior Dorsal, After Customization
The one external element that I wanted to accentuate as much as possible was the slightly raised panels above the rear quarter over the engines. This was easily accomplished by adding a single plate above the hinge for each sectional panel, and adding a single plate height to half of the bordering panels. The latter, however, also required finding 1×3 flat plates for the segmented panels as seen below.
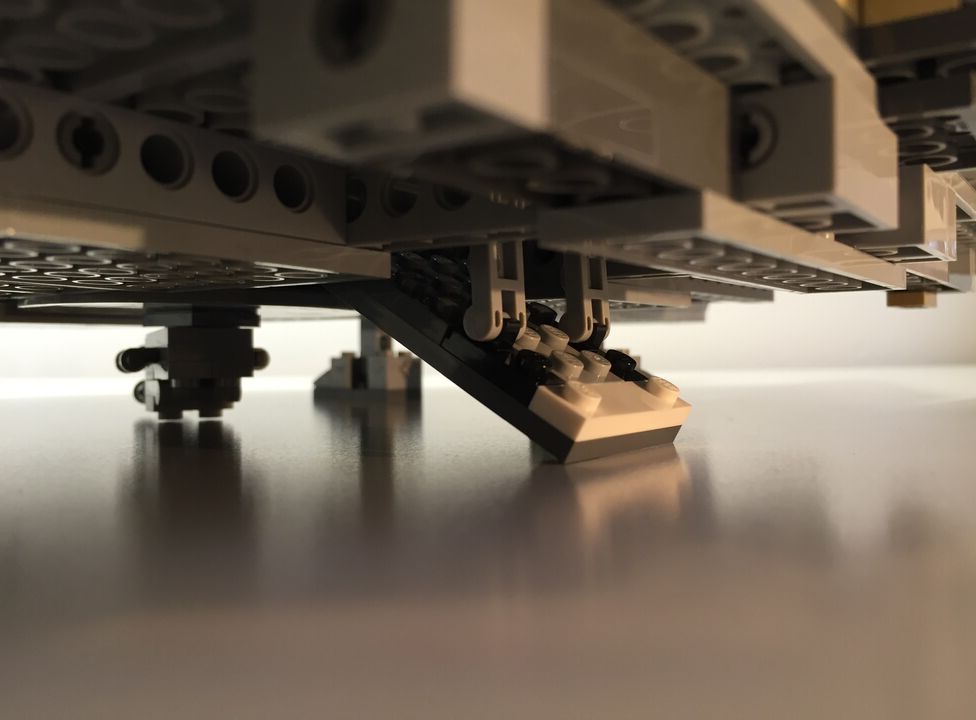
Exterior Ventral, After Customization (no Before photos taken)
Originally, the boarding platform does not have hydraulic lifters and the bottom of the Falcon is largely exposed to the Technic beams that form the support skeleton for the model. I added the lifters and covered much of the bottom (more can be done when I have the bricks available to accomplish a better approximation of the Falcon’s bottom exterior (angled forward pods and rear hold pod beneath the engines).
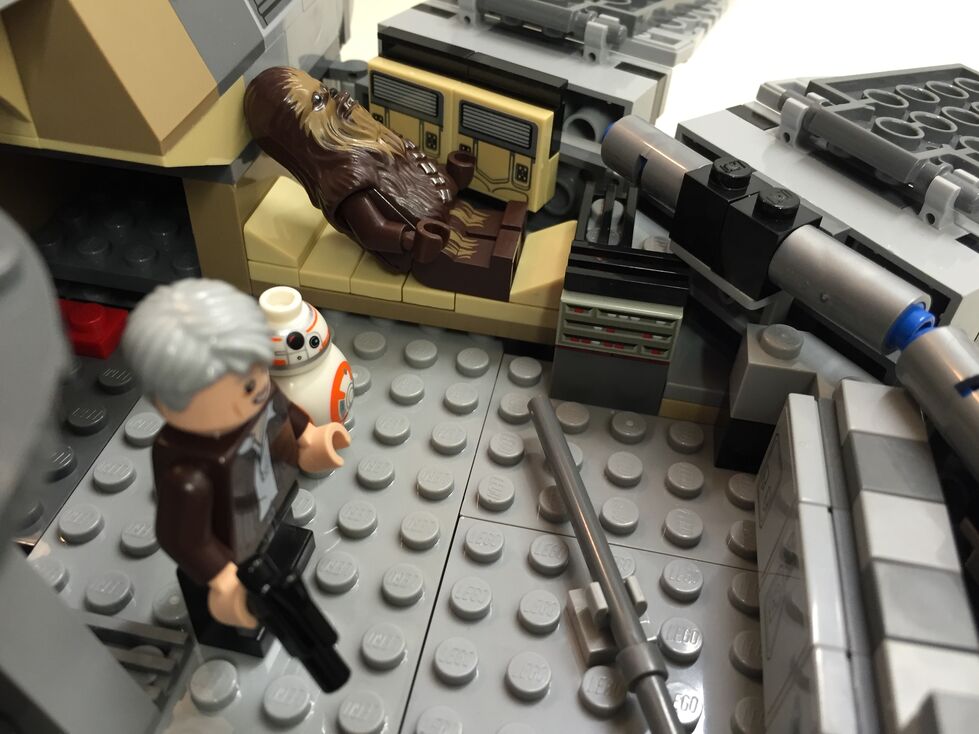
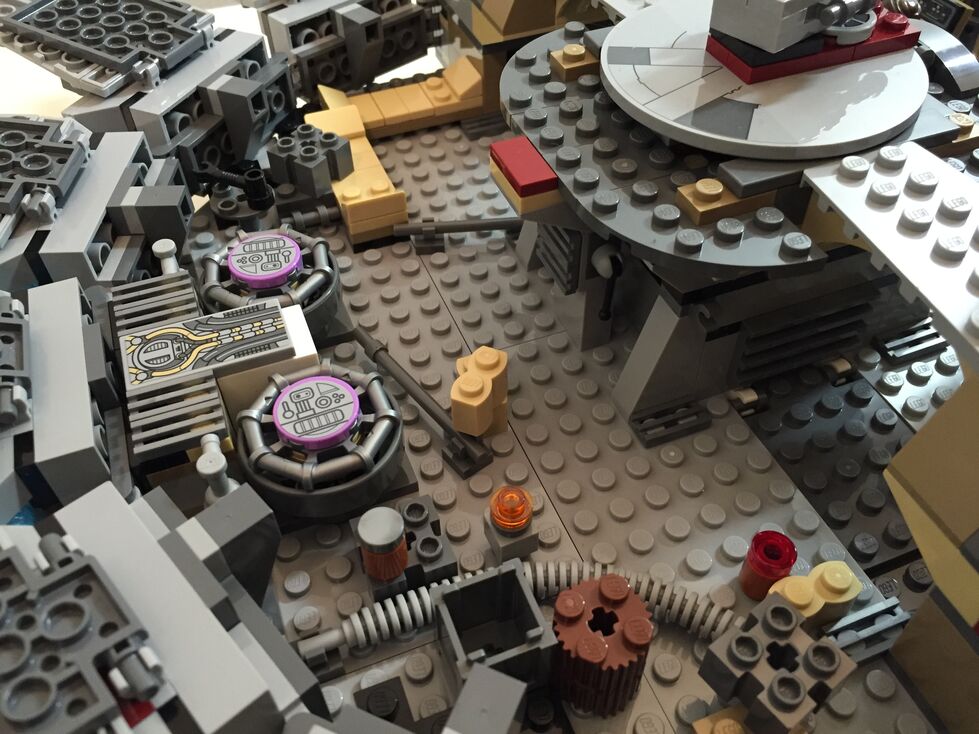
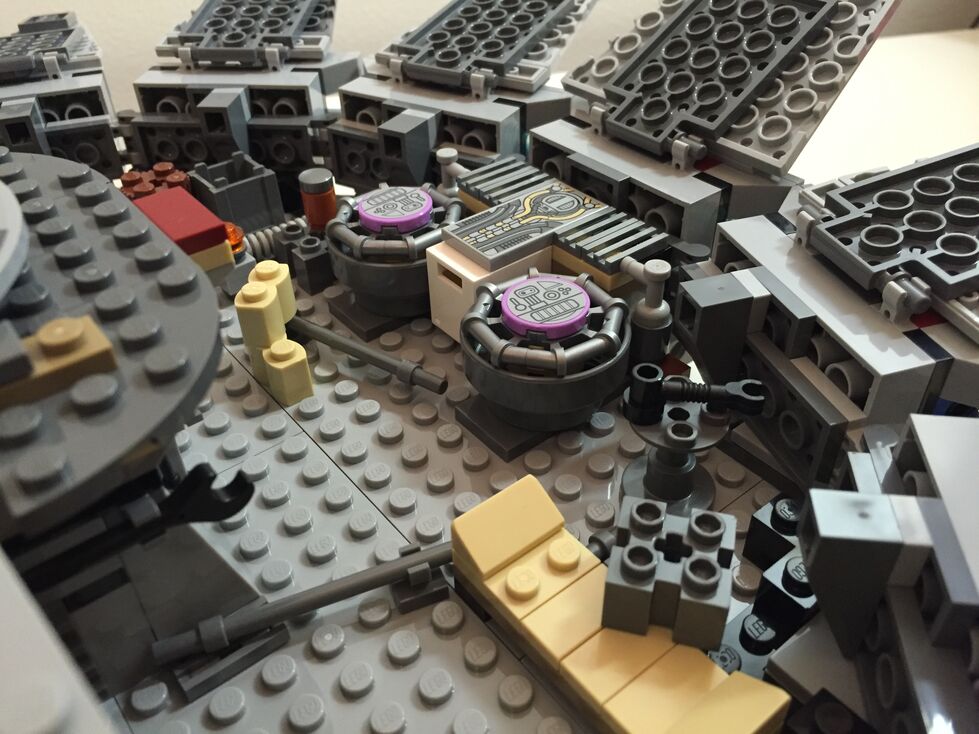
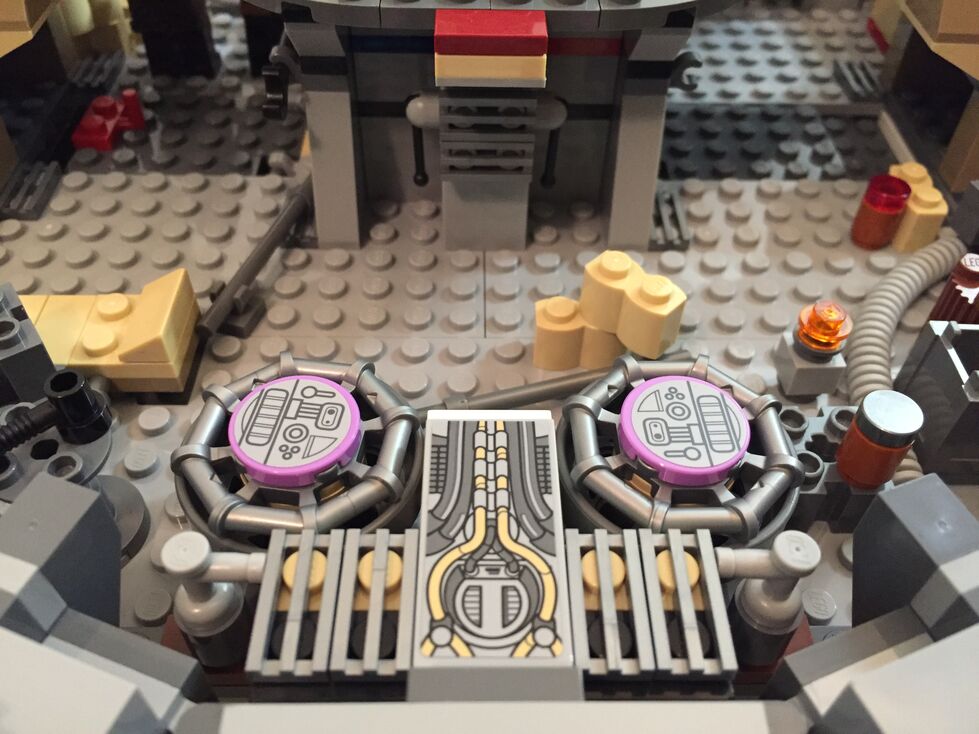
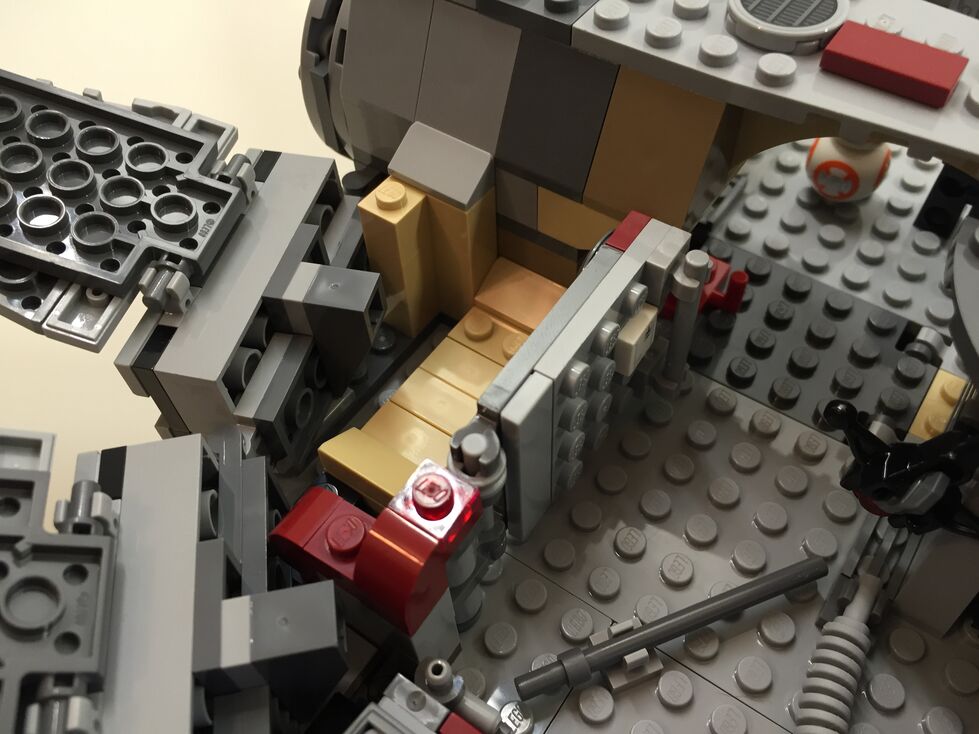
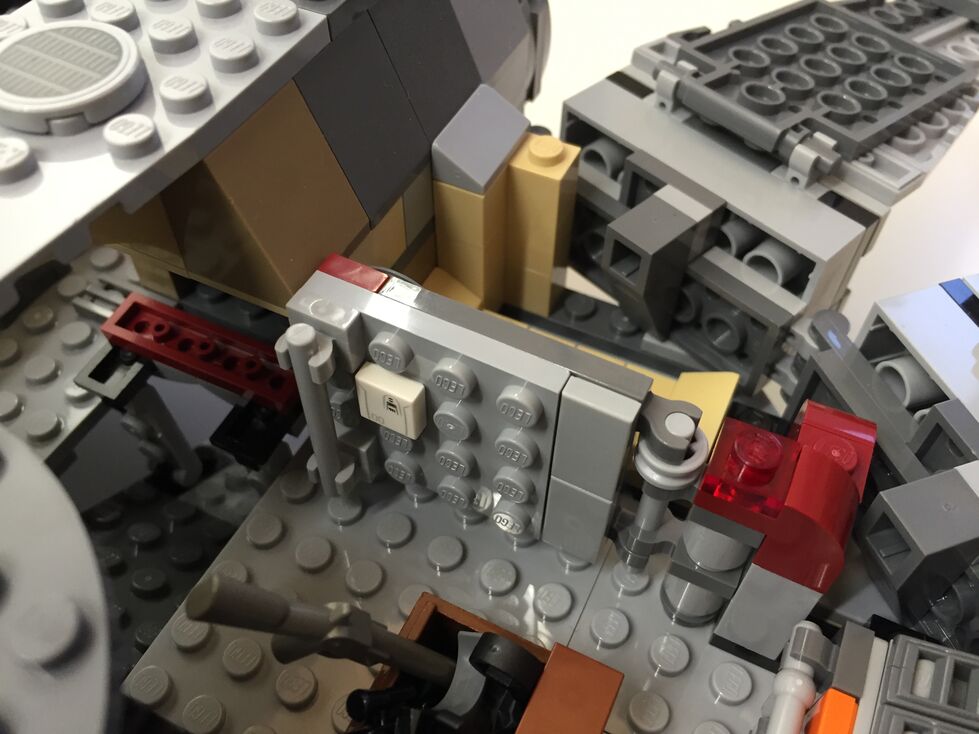
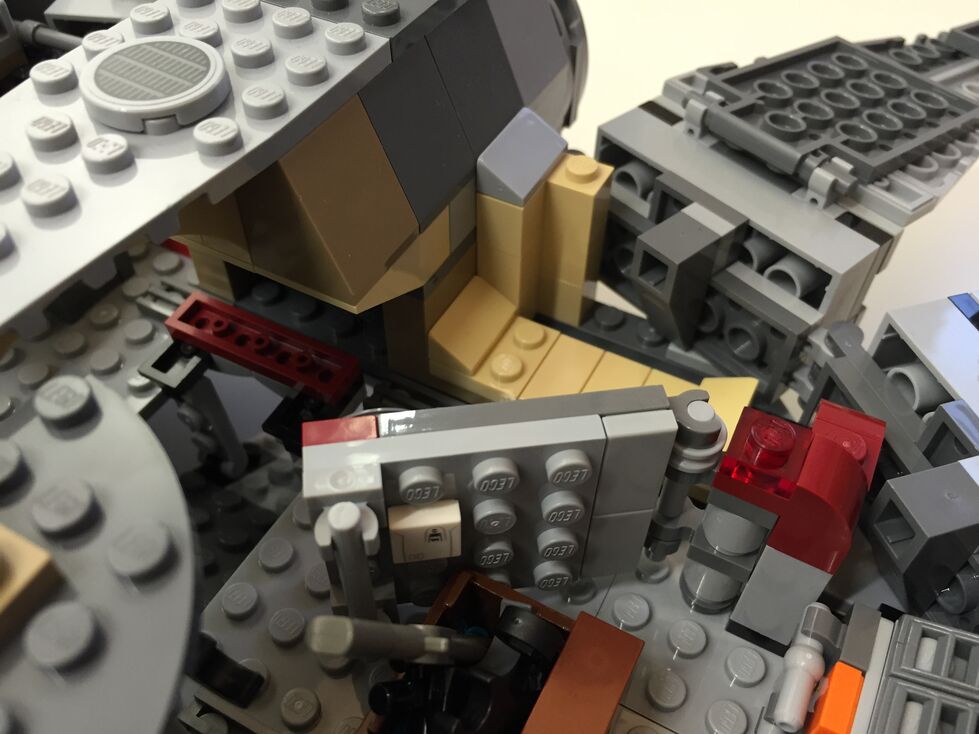
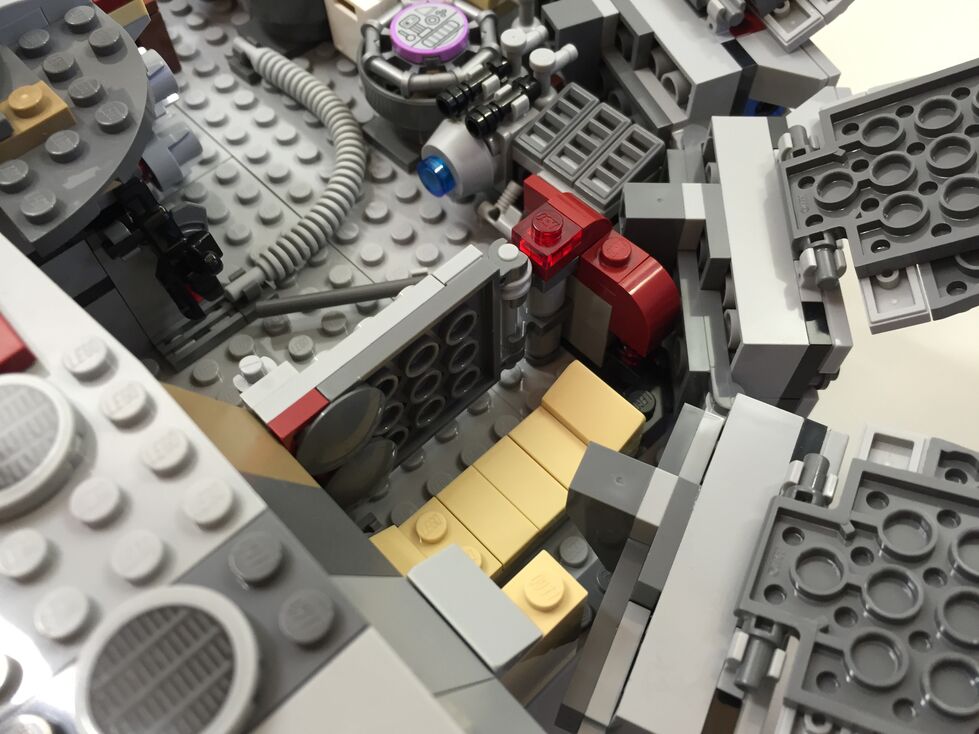
Interior Fore, Before Customization
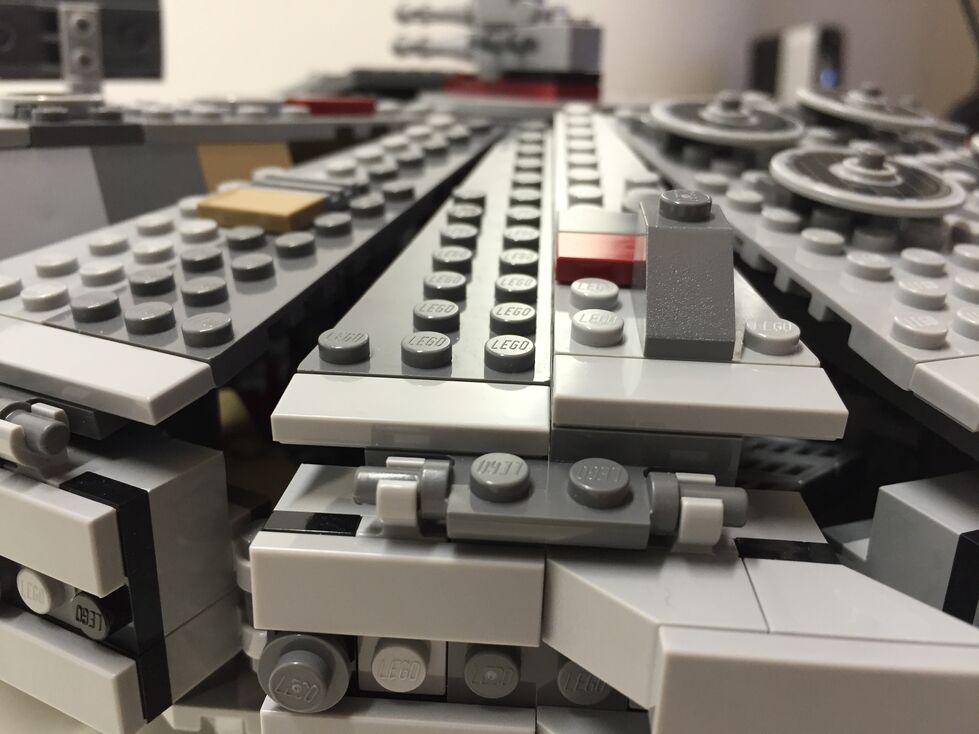
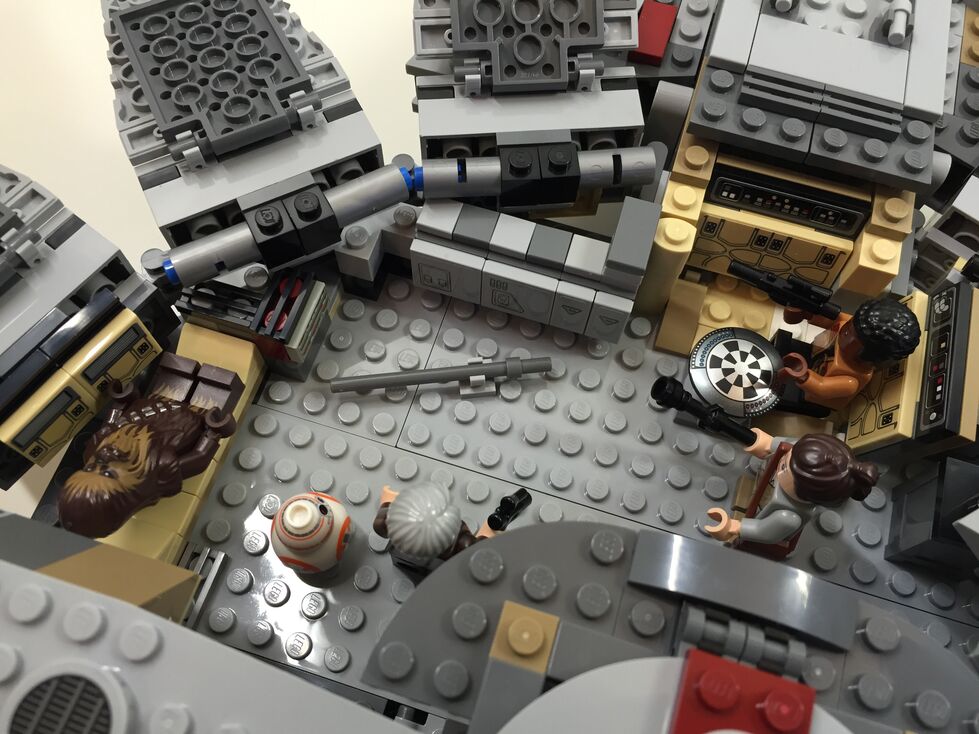
The 75105 Millennium Falcon model continues the innovative “petal” design forming the dorsal fuselage of the spacecraft, which first appeared in the 4504 set and was improved in the 7965 set. The best change from the earlier designs is for the forward bisecting panel leading from the mandibles to the gun turret. Instead of opening up toward the turret (4504) or opening forward toward the mandibles (7965), the panel now swings forward and down between the mandibles thus giving easier access to the builder for play inside the Falcon. The navigational computer is more accurately captured with a sticker applied to a flat plate than printed wedge bricks in 7965, and the Dejarik table is printed on a round shield element. My complaints with the interior design have to do with the inaccuracy of the placement of the Dejarik table/benches and bunks. I focused on this in my customization.
Interior Fore, After Customization
In my customization, I moved the Dejarik table and benches across from the navigation computer, which required rebuilding part of the mandible supports and the swing components for the center panel (to clear the center bench back). I relocated one of the bunks to the end of the hold to create the medibay where Finn bandages Chewbacca’s arm. In the main hold, I constructed a forward wall with panel details taken from the First Order Snowspeeder 75100 set.
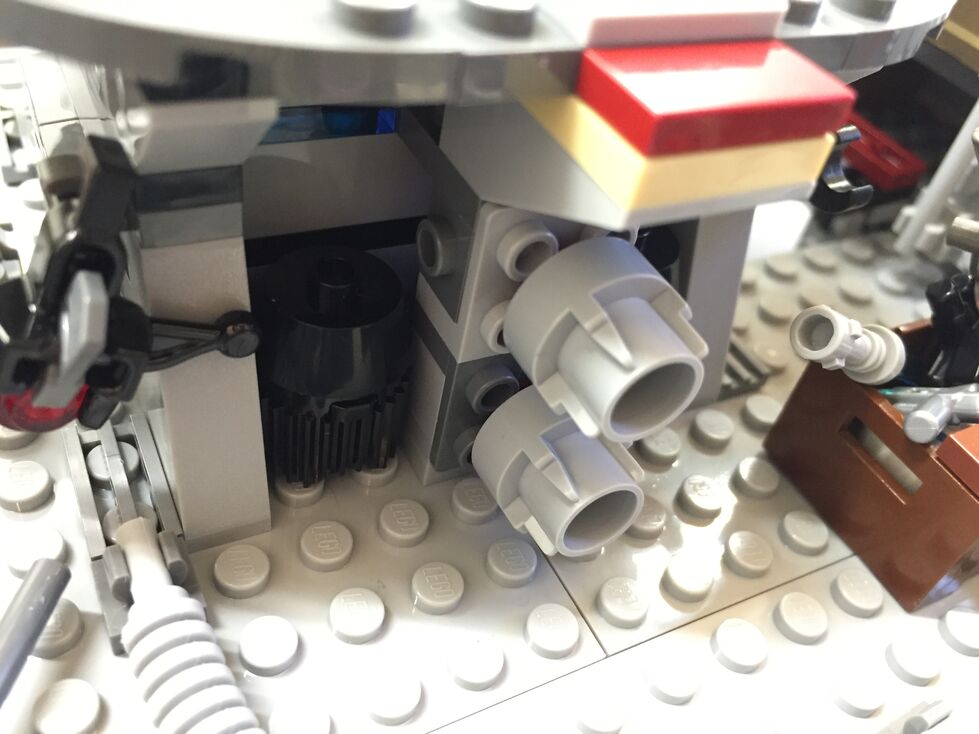
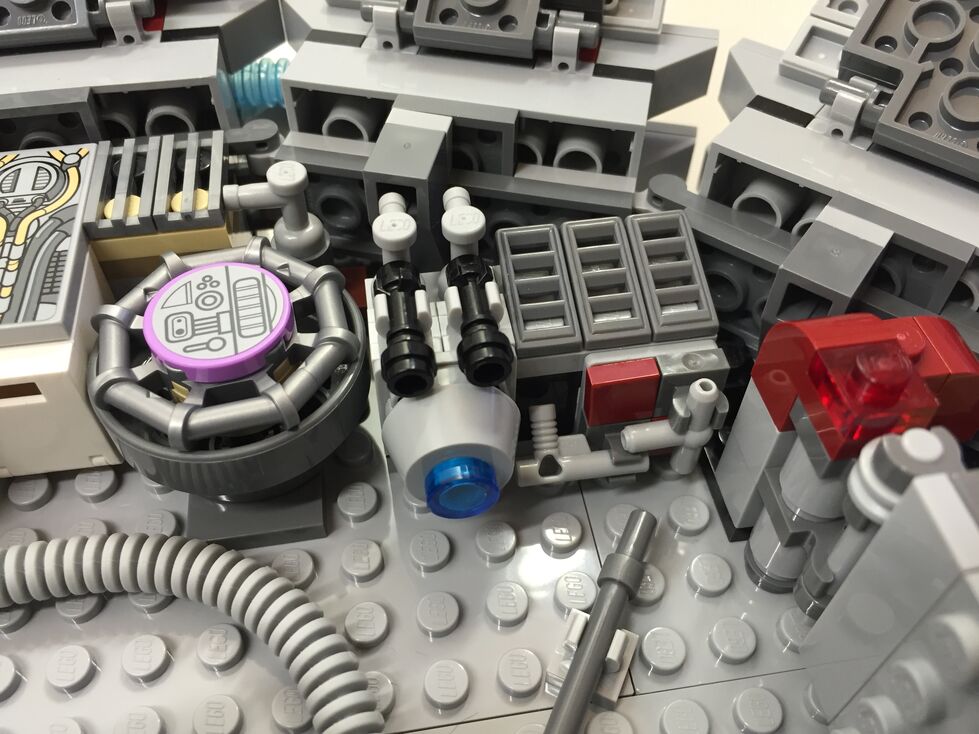
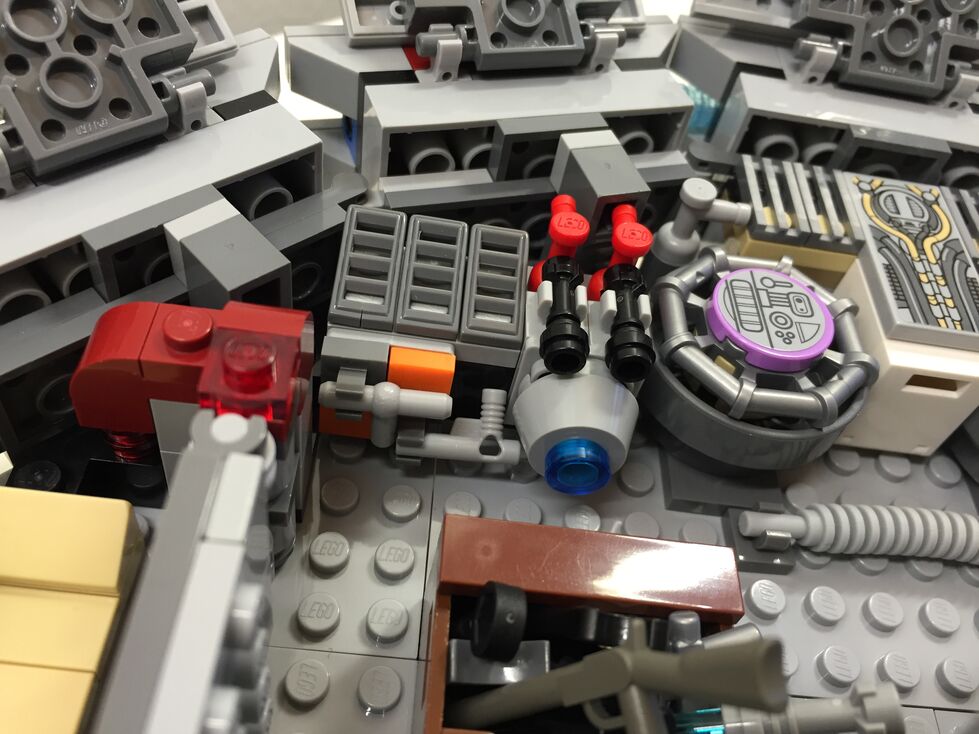
Interior Aft, Before Customization
The engine compartment in the rear of the model is similar to the one in 7965. This part of the Falcon captures the junked essence of the Falcon in general and the effects of the passage of time and unkind handling of the Falcon depicted in The Force Awakens. I wanted to keep its garbage appearance while giving the engine compartment greater substantiality.
Interior Aft, After Customization
In the rear hold/engine compartment, I constructed two storage rooms/bunks with swinging doors (I would have preferred to have sliding doors but I don’t have the elements to do this while conserving the limited space available), and I designed additional mirrored engine modules that go on either end of the original engine included with the set, which I hope makes the engine look more substantial for a spacecraft capable of completing the Kessel Run in 14, er, 12 parsecs!
Conclusion
I hope to further customize the 75105 Millennium Falcon. As I acquire new bricks and elements, I would like to think about how to better integrate the engines into the design and aesthetic of the YT transport. Other goals include, integrate a mechanism for lowering and raising the boarding platform, similar to the 4504 set, design screen accurate landing gear that raise the Falcon by at least one plate higher while on display, and further integrate my customization into the model so that it attains a unity of design instead of a piecemeal added-on quality.
If you have customized the 75105 or other Millennium Falcon sets, please sound off in the comments. Thanks for stopping by!
My cousin Ryan Cox is a longtime practitioner of a variety of martial arts including kung fu and tai chi. Ryan and his two older brothers–Ian and Jarret–grew up learning, sparring, and developing uncanny skill in hand-to-hand combat and weapons sparring. While Ryan and his brothers have developed rhizomic networks to enhance their abilities and pass on what they have learned to others, Ryan has went the most far afield when he traveled to Wudang Mountain to train with the kung fu monks who reside there.
Photo courtesy of Ryan Cox.
When we were younger, I remember myself being the one drawn to the Star Wars mythos more than anyone else in my family, but now Ryan tells me that he was always interested in the Jedi, their mystique, and their lightsabers. In more recent years, he has learned a lot of the backstory of the Star Wars universe from books and video games. His knowledge in those realms far outstrips my own.
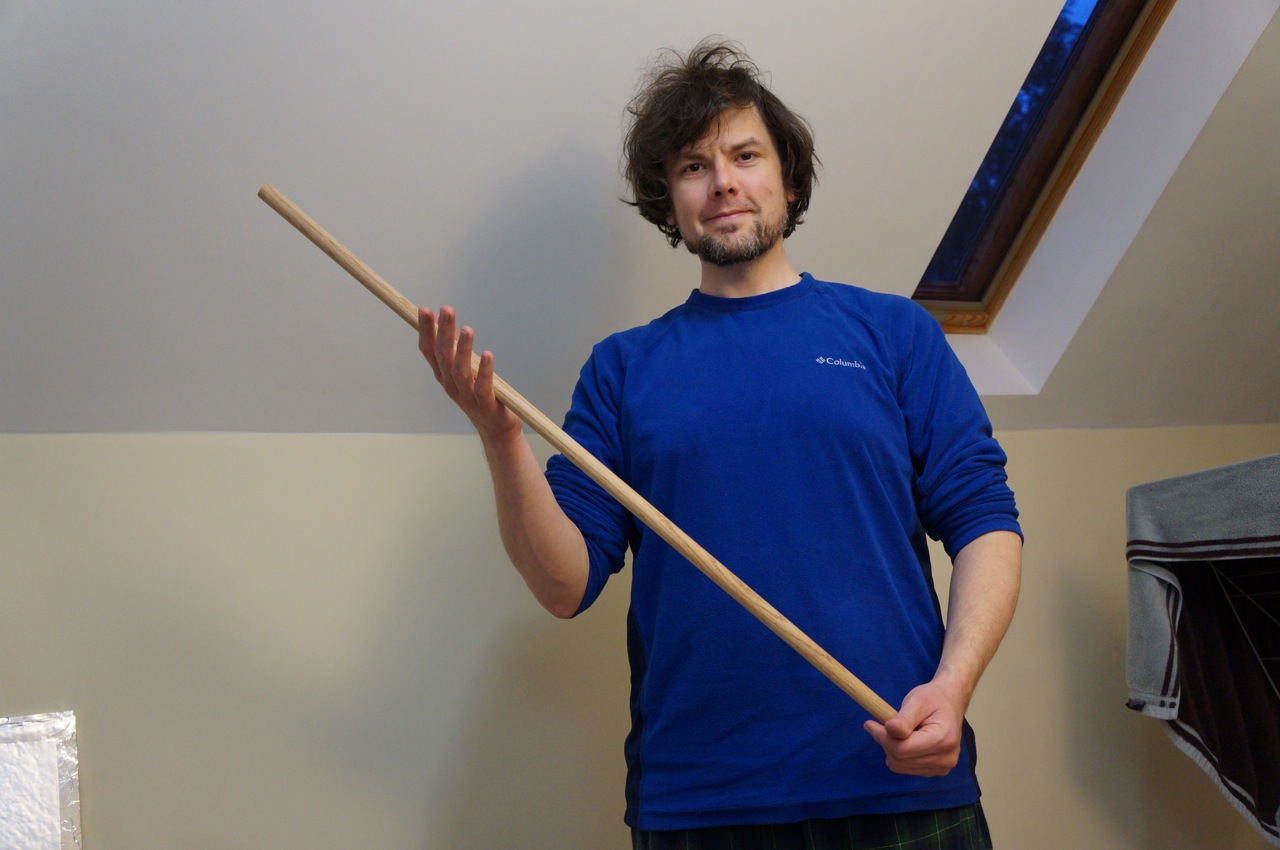
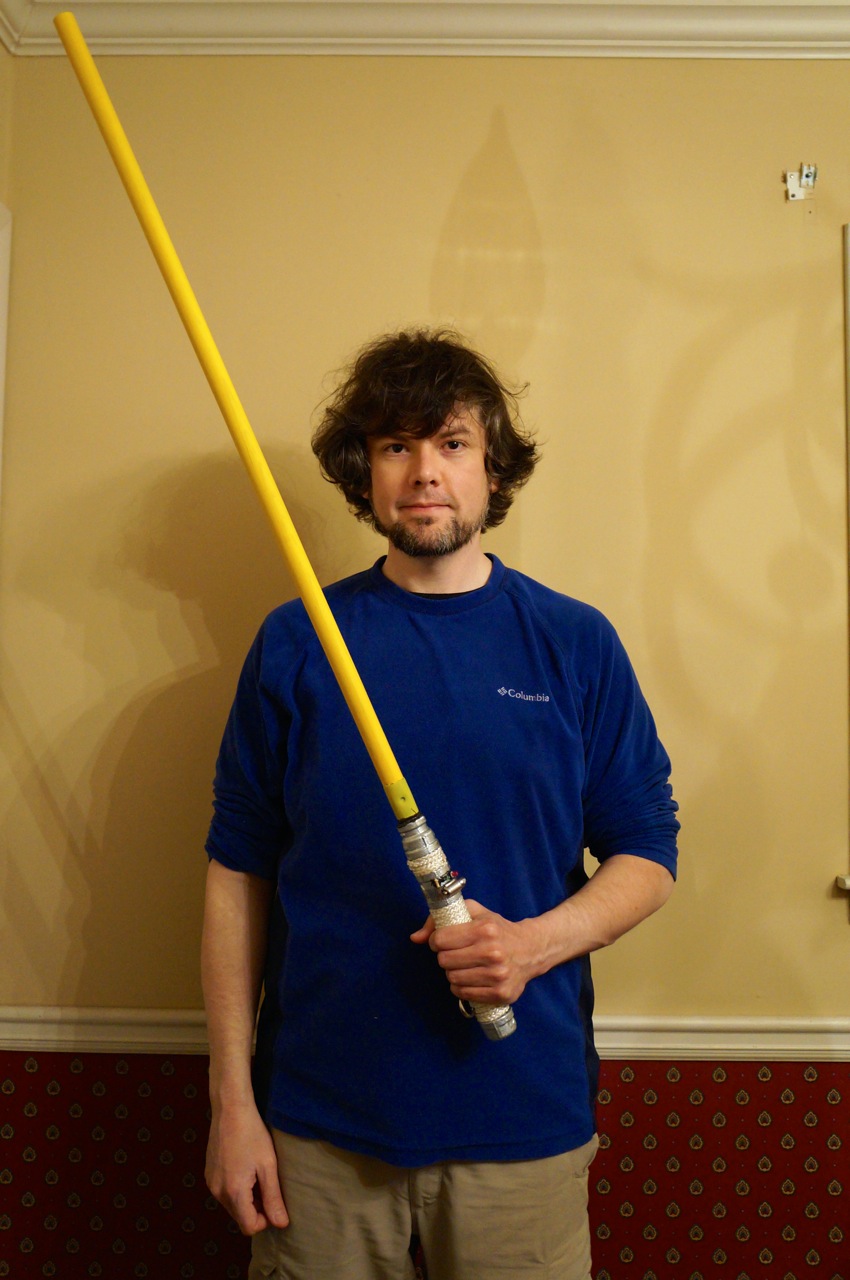
So, I was intrigued when he began talking with me about building his own lightsaber for demonstrating his swordmanship and possibly sparring if the “blade” were strong enough to withstand strikes. The guide that follows illustrates the first lightsaber that I built for Ryan in the fashion of General Rahm Kota’s. I used off-the-shelf parts easily obtained at Home Depot or any hardware store. Since I built this lightsaber, Ryan has modified it more, and I have built two lightsabers for myself–one that resembles Luke Skywalker’s Return of the Jedi lightsaber and one that resembles Darth Maul’s The Phantom Menace double bladed lightsaber. This guide focuses on Ryan’s “Mark I” lightsaber.
Pedagogically, I promote the idea that haptics, building, and making are integral parts to any kind of education. We are embodied beings who do things physically in the world–whether it be in real life or online. I enjoy building things in my own time as another way to think about things–in this case, Star Wars, science fiction, Jedi mythos, world building, canon vs. noncanon, and design considerations: rhetoric of technology, aesthetics, practicality, etc. In Ryan’s case, haptics, proprioception, and movement are integral to his learning and lived experience. I am looking forward to learning from him with this artifact that I designed and built. The modes are the same–physicality, materiality, and haptics–but our efforts converge from different directions for a kind of haptic, learning synergy.
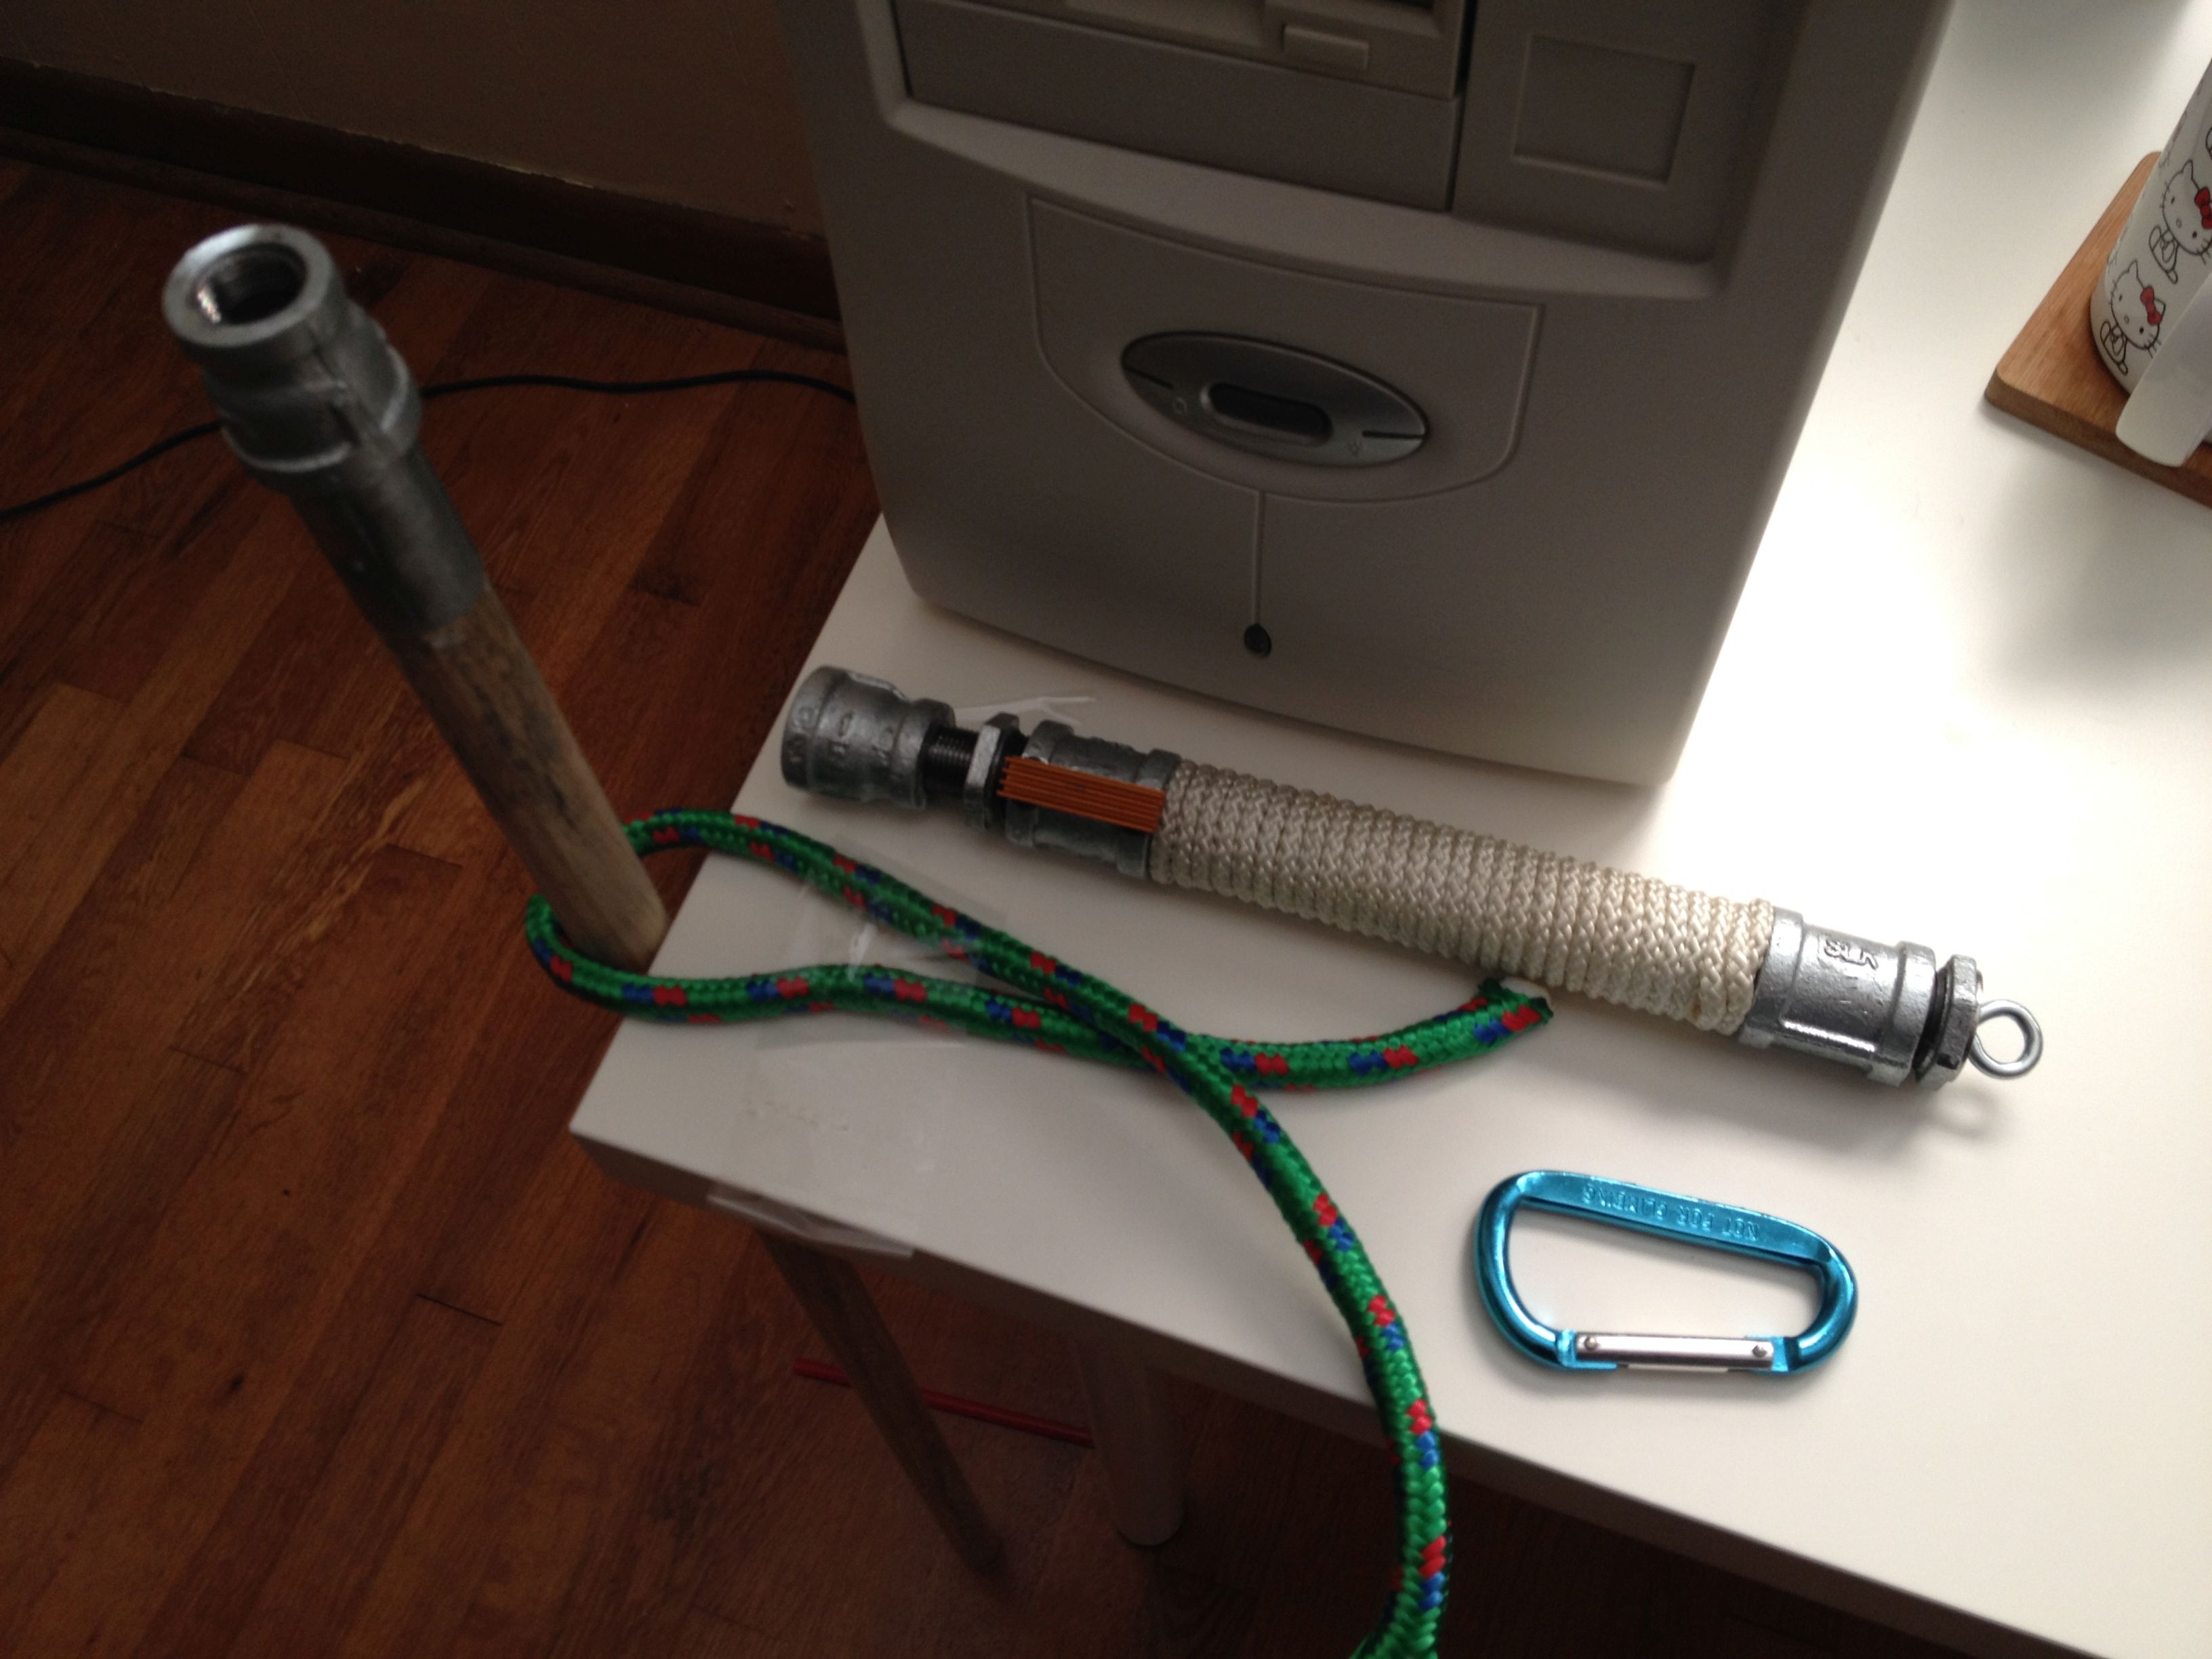
I began the project by assembling the parts that I needed for creating the lightsaber’s hilt and belt clip. I carried an image of Rahm Kota’s lightsaber on my iPhone and went to the plumbing aisle of my local Home Depot.
These parts included:
6″ x 3/4″ galvanized steel pipe
3/4″ coupling
Two 3/4″ to 1/2″ coupling (one for display and one for sparring with permanently installed “blade”–these two couplings are interchangeable)
“Close” 3/4″ pipe (approximately 1 1/2″ long)
3/4″ cap
D-ring
Carabiner
Hose clamps
Roughly, these parts are assembled to create the lightsaber:
Other parts that I used for this build include:
1/4″ white nylon rope (grip wrap)
36″ x 1/2″ oak dowel rod (scrapped due to paint problem)
48″ x 1/2″ paint brush rod (cut to 36″ and replaced the oak dowel rod)
Doorbell button assembly (for parts)
80mm computer case fan (for electromagnet assembly)
JB Weld
Rustoleum Florescent Yellow Paint
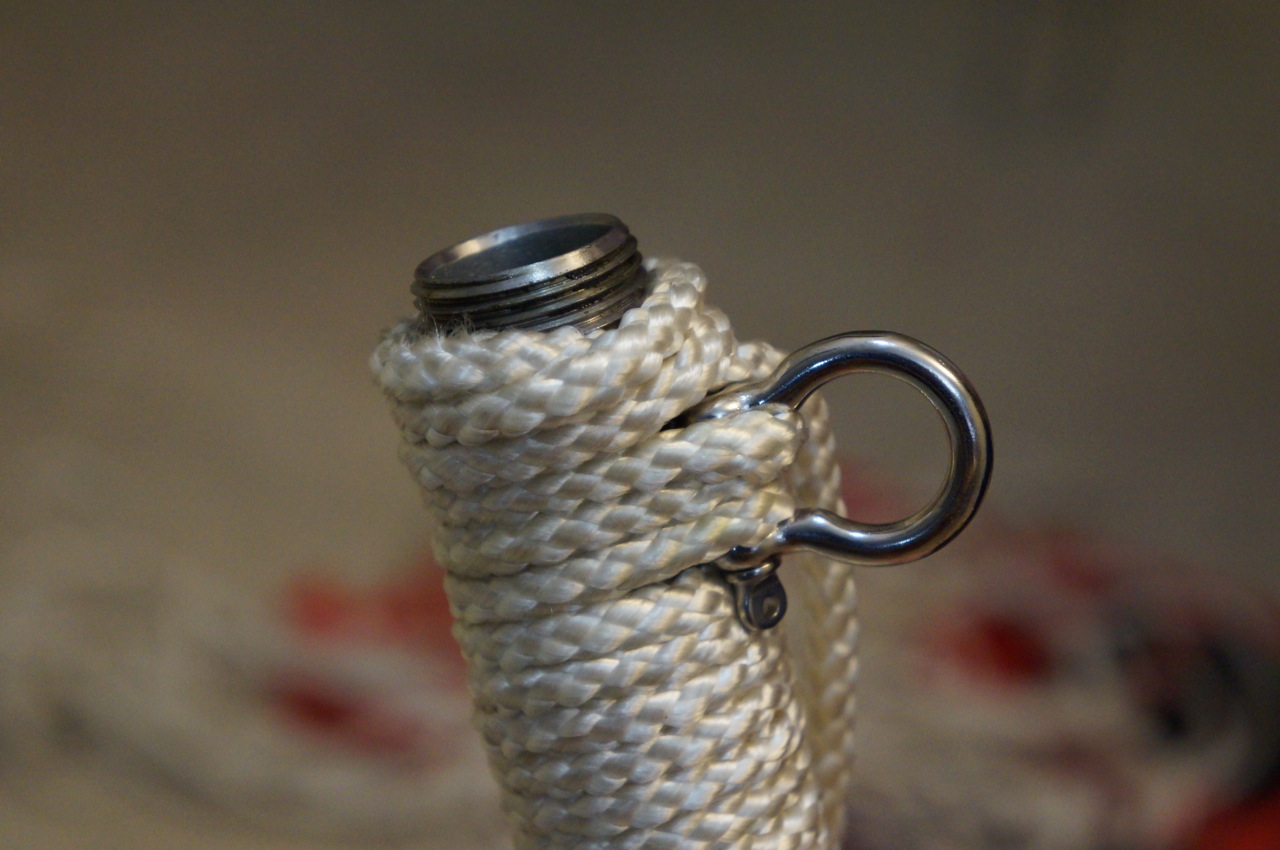
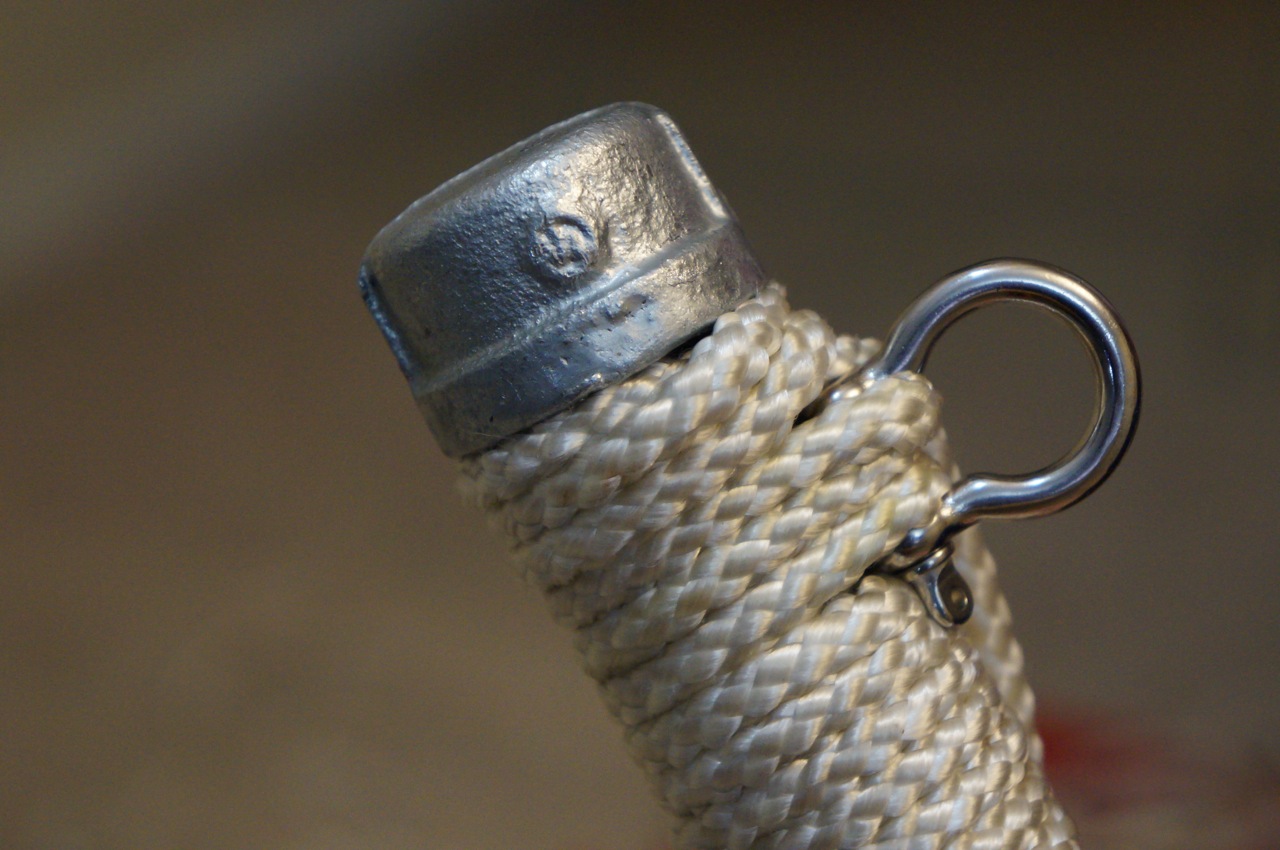
To create the lightsaber’s handle, I screwed all of the handle components together except for the 3/4″ to 1/2″ coupling like this: 3/4″ cap | 6″ x 3/4″ pipe | 3/4″ to 3/4″ coupling | 3/4″ close pipe.
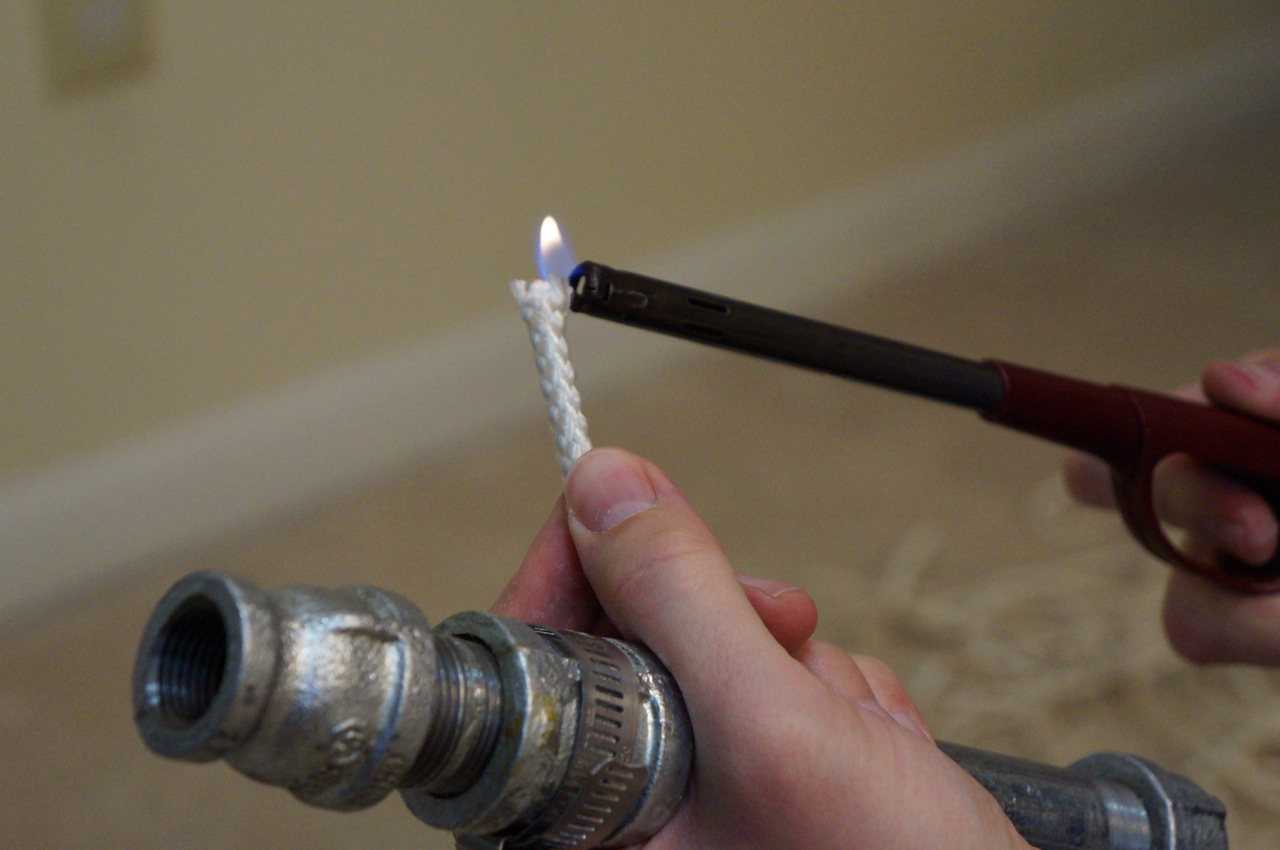
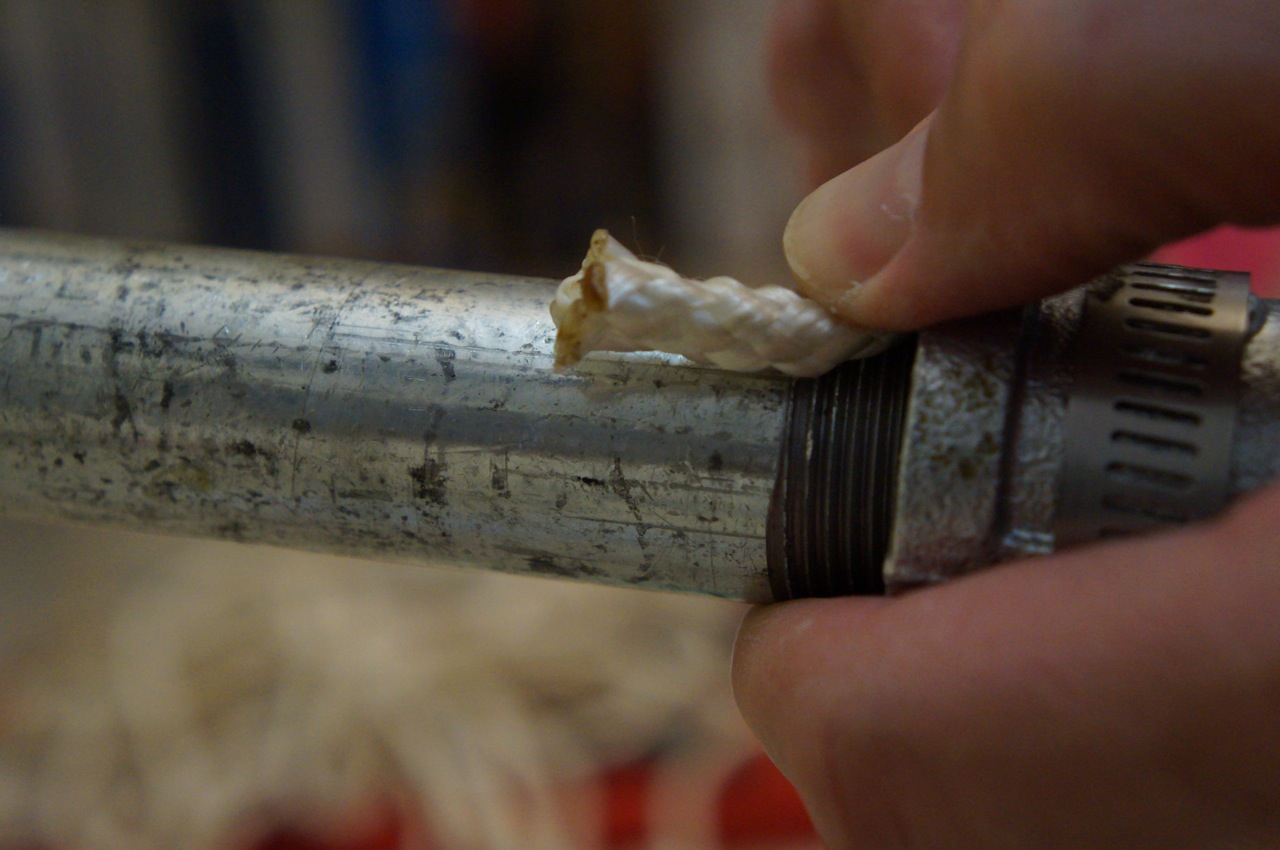
Then, I prepared the nylon rope to create the grip on the two pipe sections (6″ pipe and close pipe) by burning frayed ends to melt the nylon.
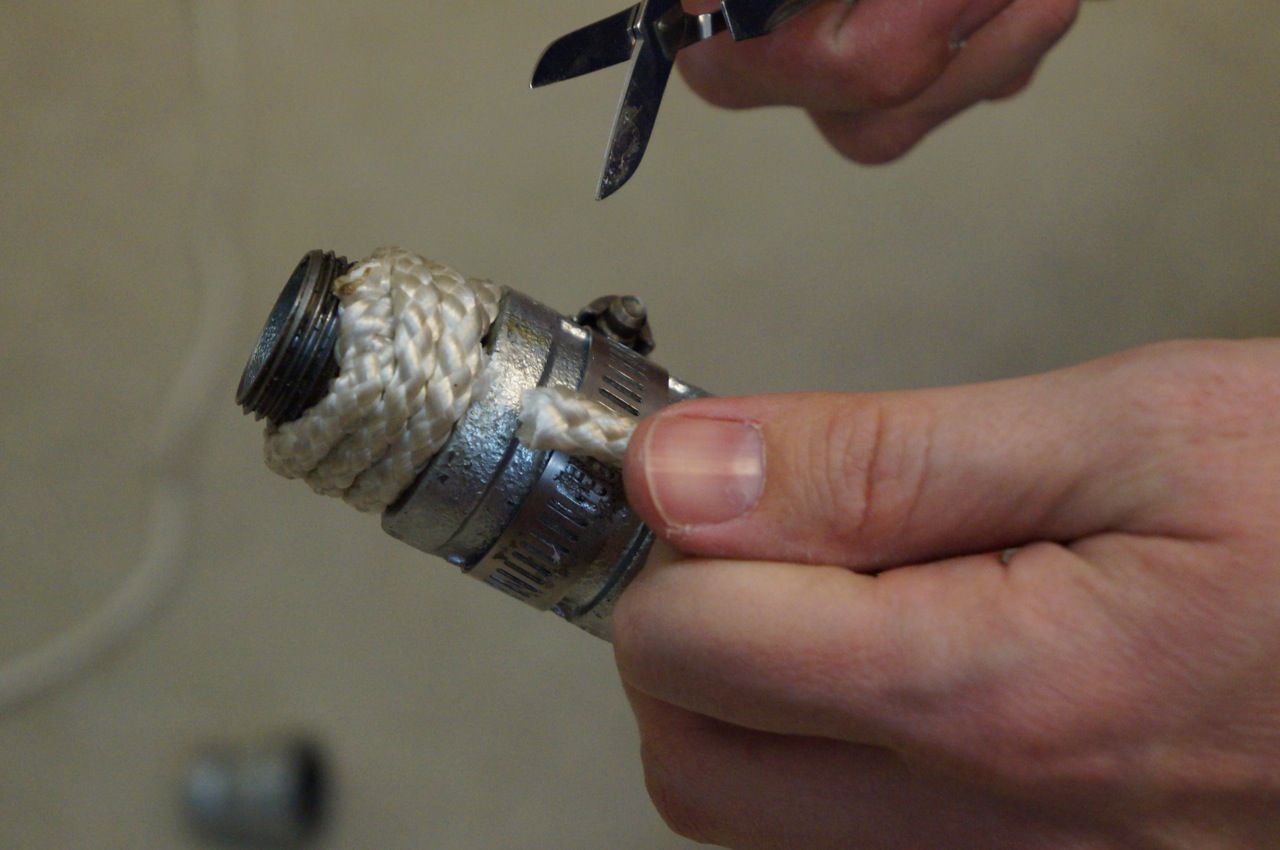
Beginning at the business-end of the lightsaber, I tucked a small piece of rope under the first wrap against the 3/4″ coupling to hold the rope in place and prevent unraveling.
At the top end, close to where the 3/4″ to 1/2″ coupling (or lightsaber emitter/business end), I created a loop with the rope under the last wrap, which I ran the last wrap through and pulled into the wrap, which hid the end of the rope under the wrap.
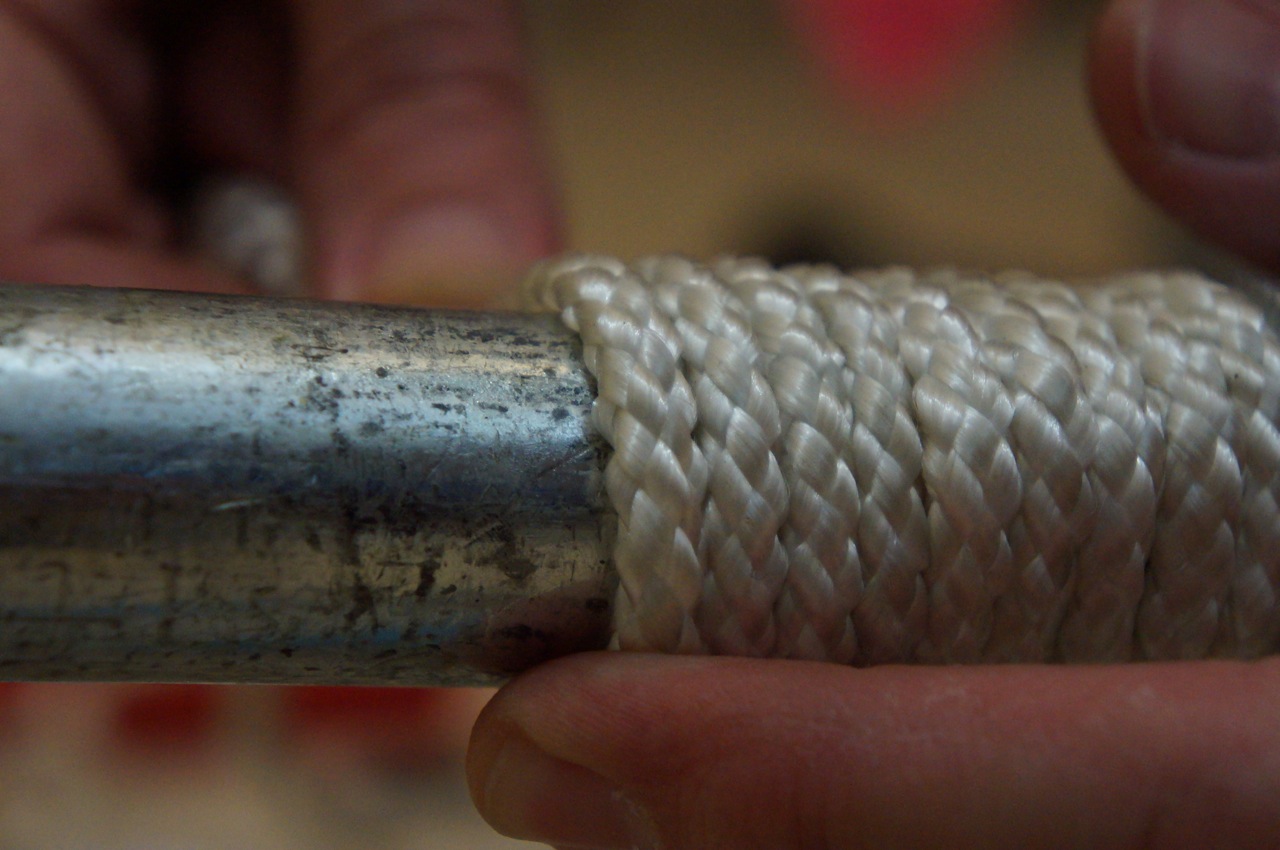
I cut the loose ends. Beginning on the other side of the 3/4″ coupling, I repeated these steps with the longer wrap of the 6″ pipe section. First, a small piece under the first wrap.
I pulled the rope tight around the pipe and pushed each wrap down to keep the grip as tight as possible.
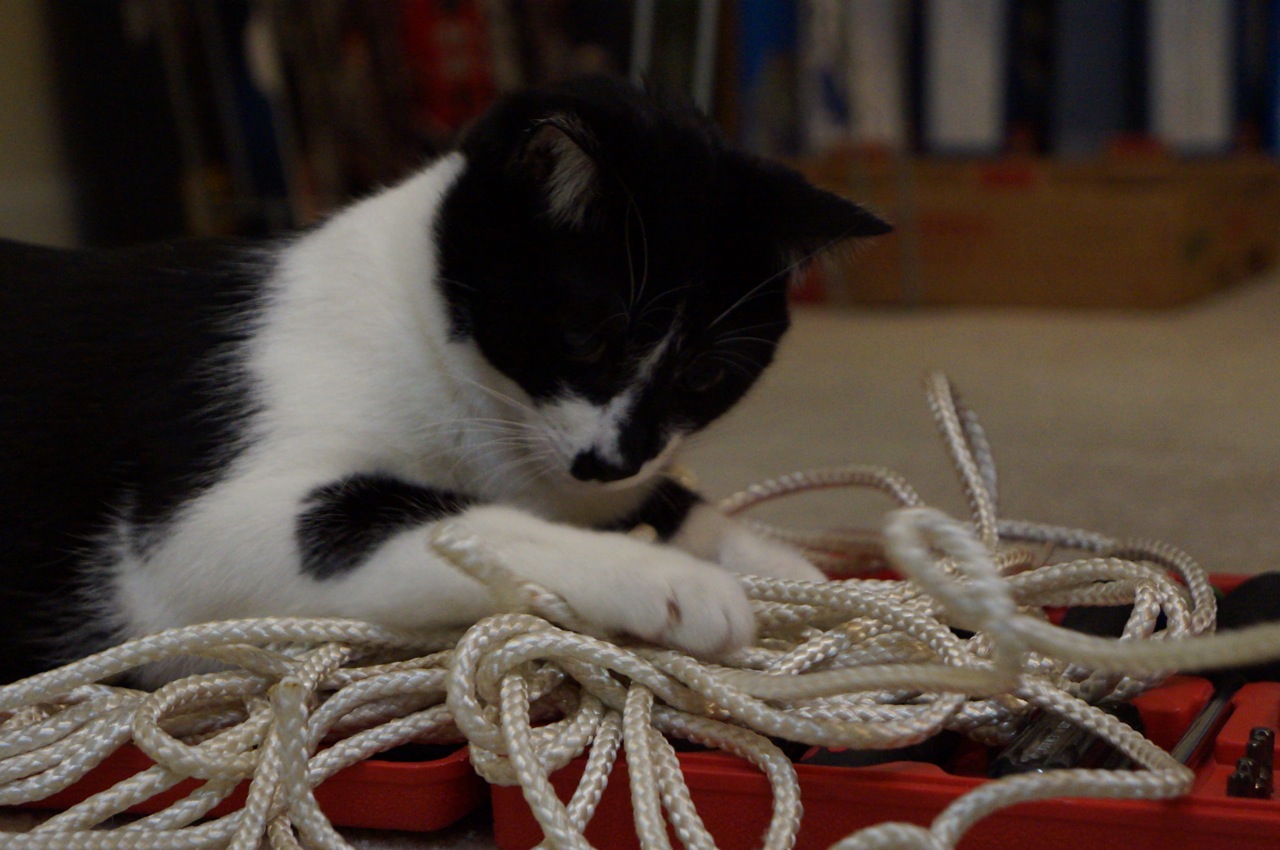
Mose tried to help with the process as much as possible.
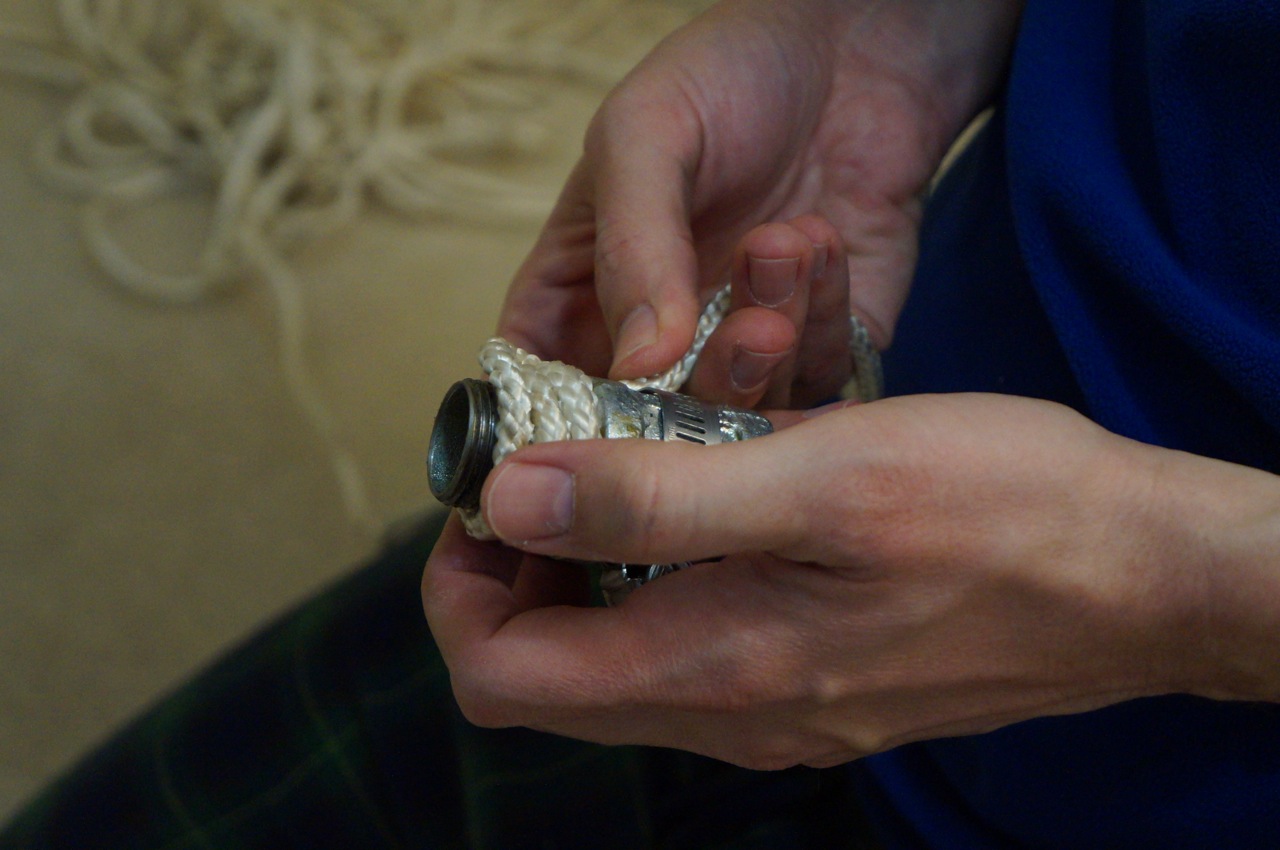
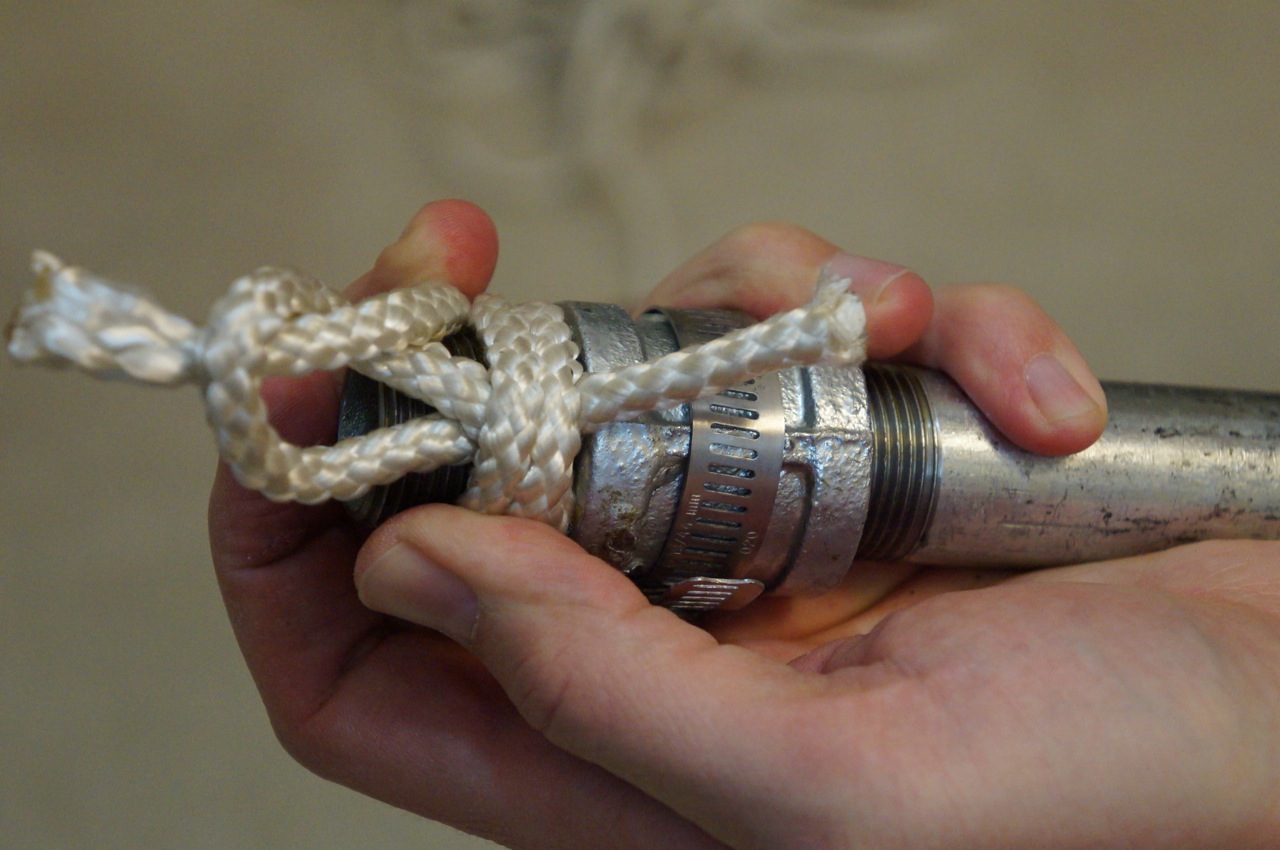
At the end of the 6″ long pipe, close to where the end cap goes, I placed the D-Ring and ran the rope through its eye to connect it to the handle.
As in the shorter section wrap, I created a loop and pulled the end of the rope through and under the last lines of wrap to hide the end and prevent the grip from unraveling.
Finally, I installed the cap. Before doing this, I wrapped the grip higher than necessary so that the the cap would compress the wrap when tightly screwed onto the 6″ pipe.
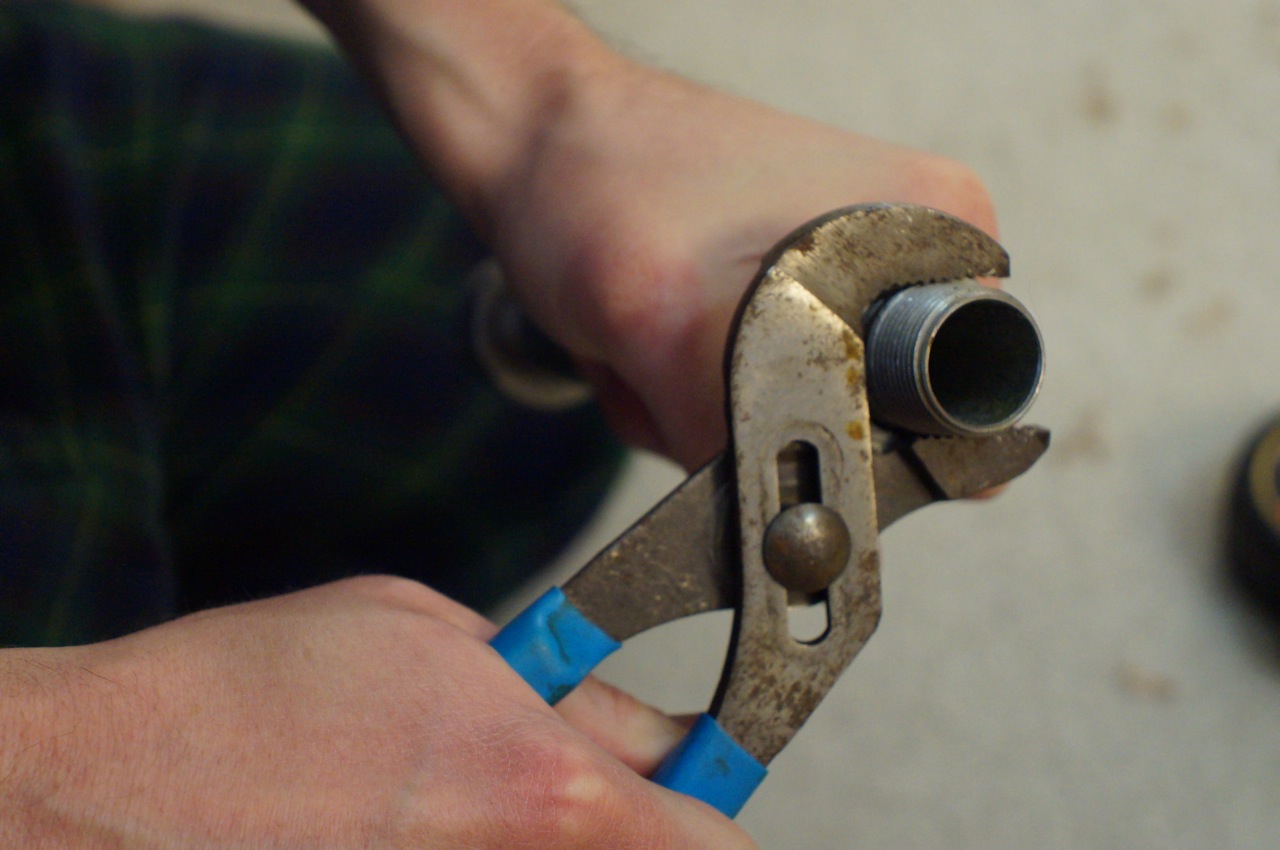
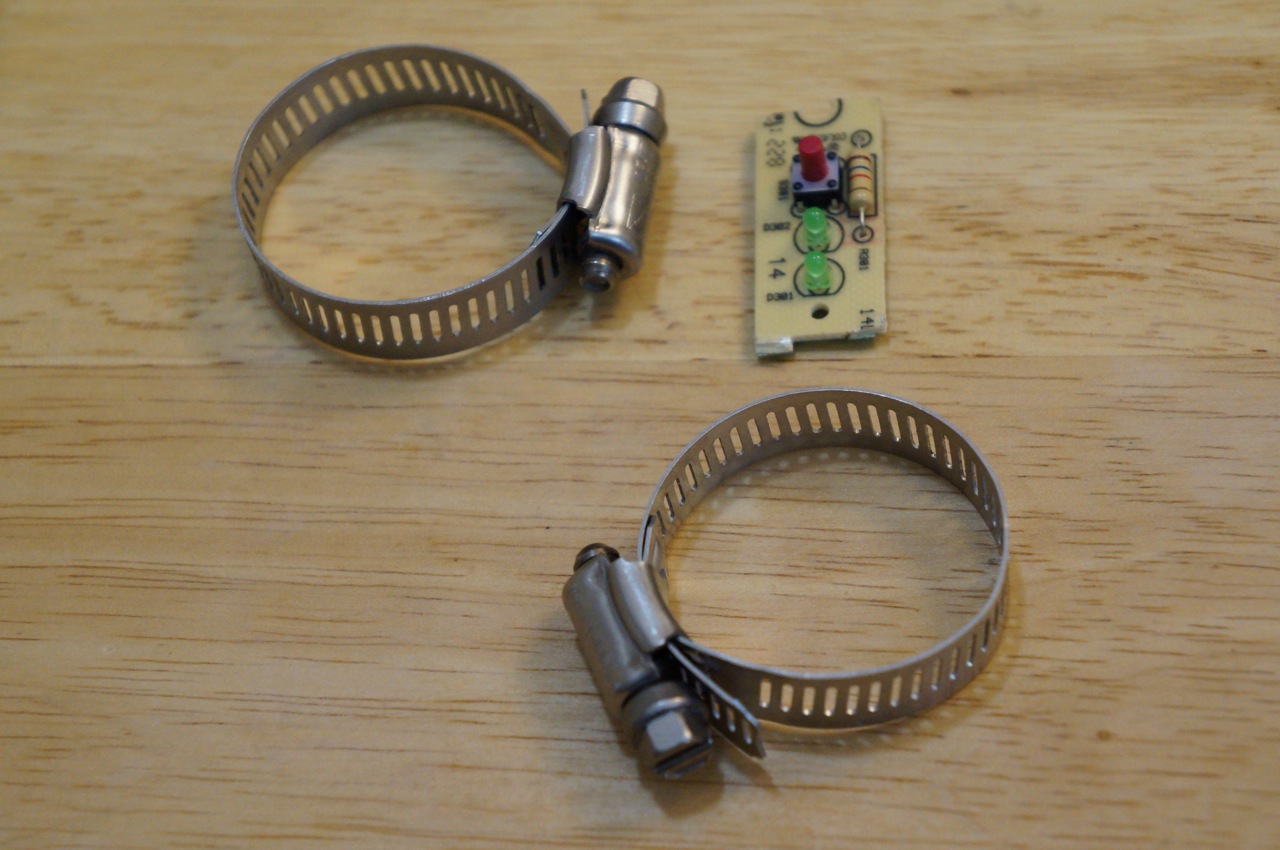
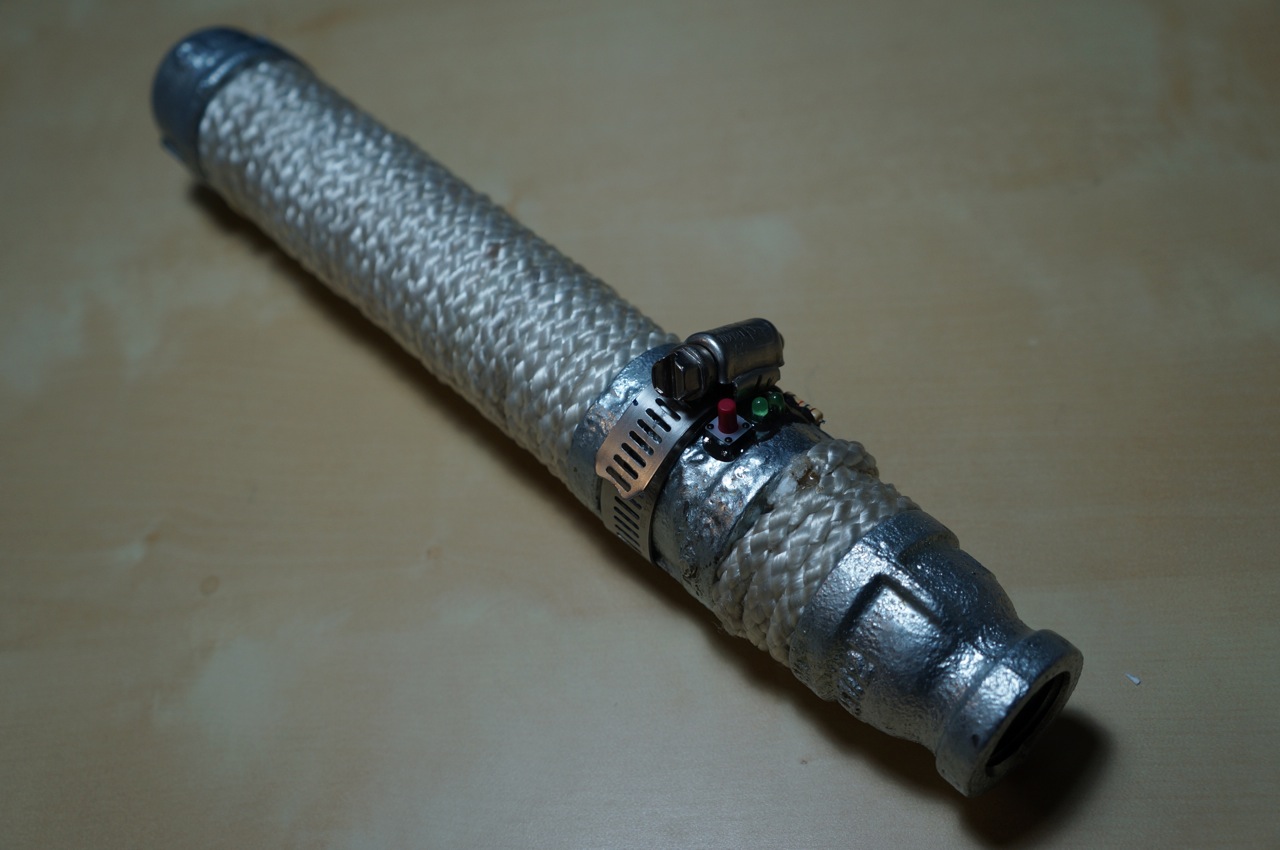
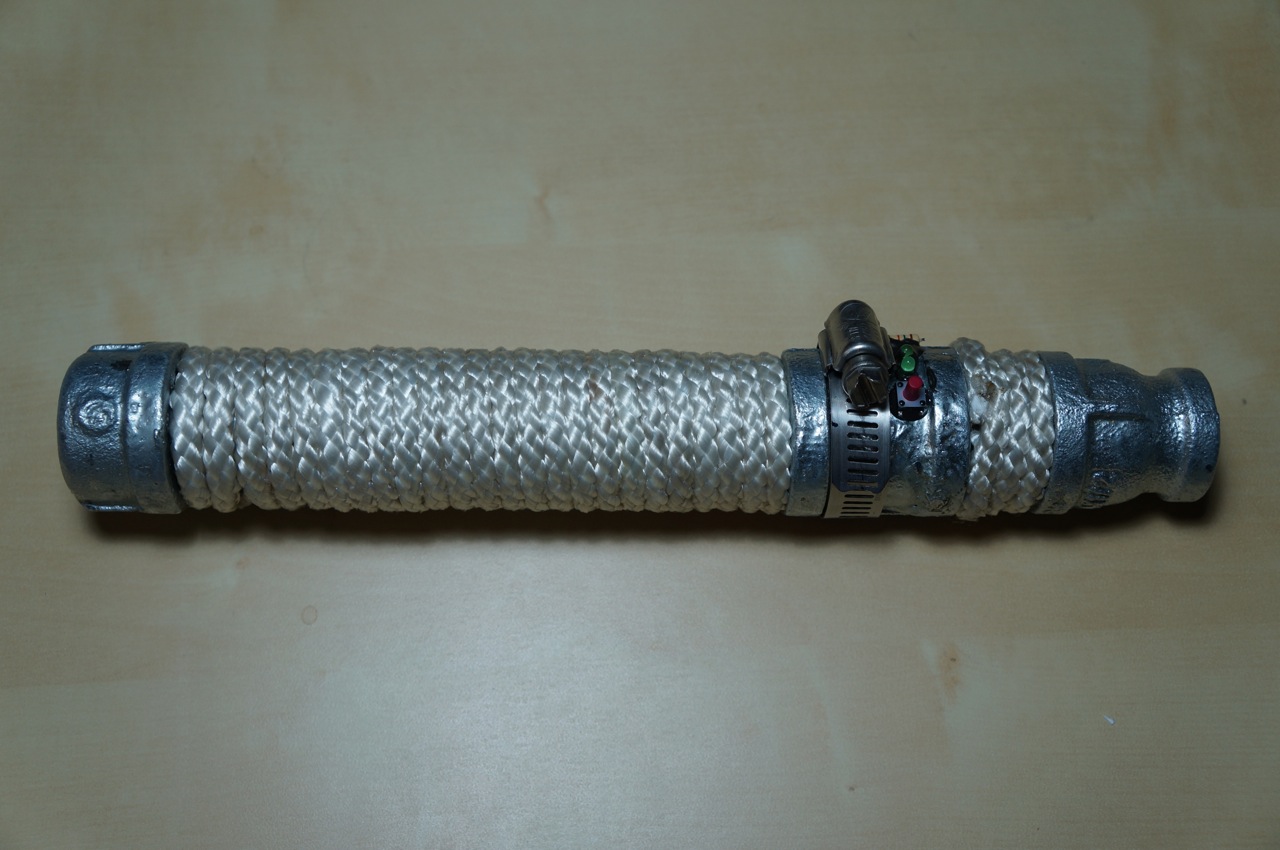
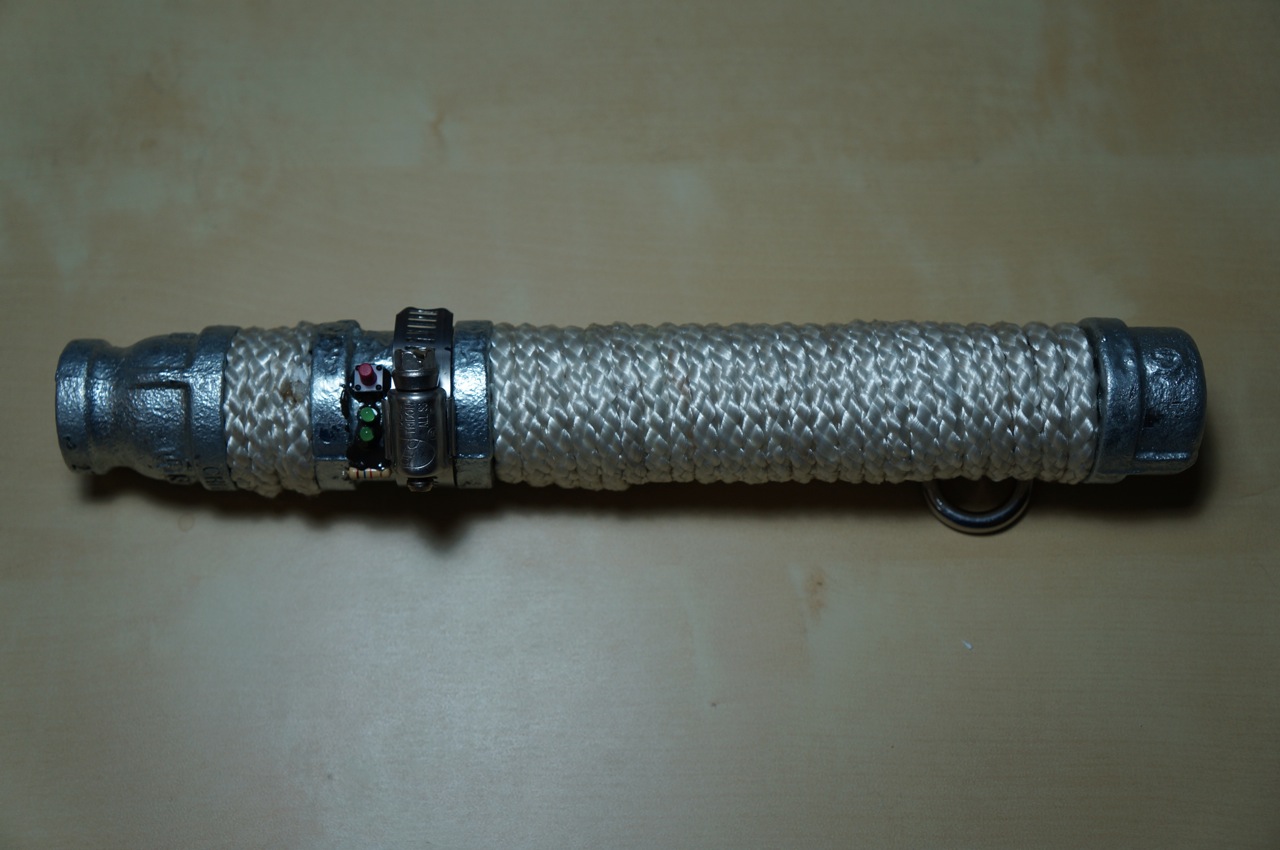
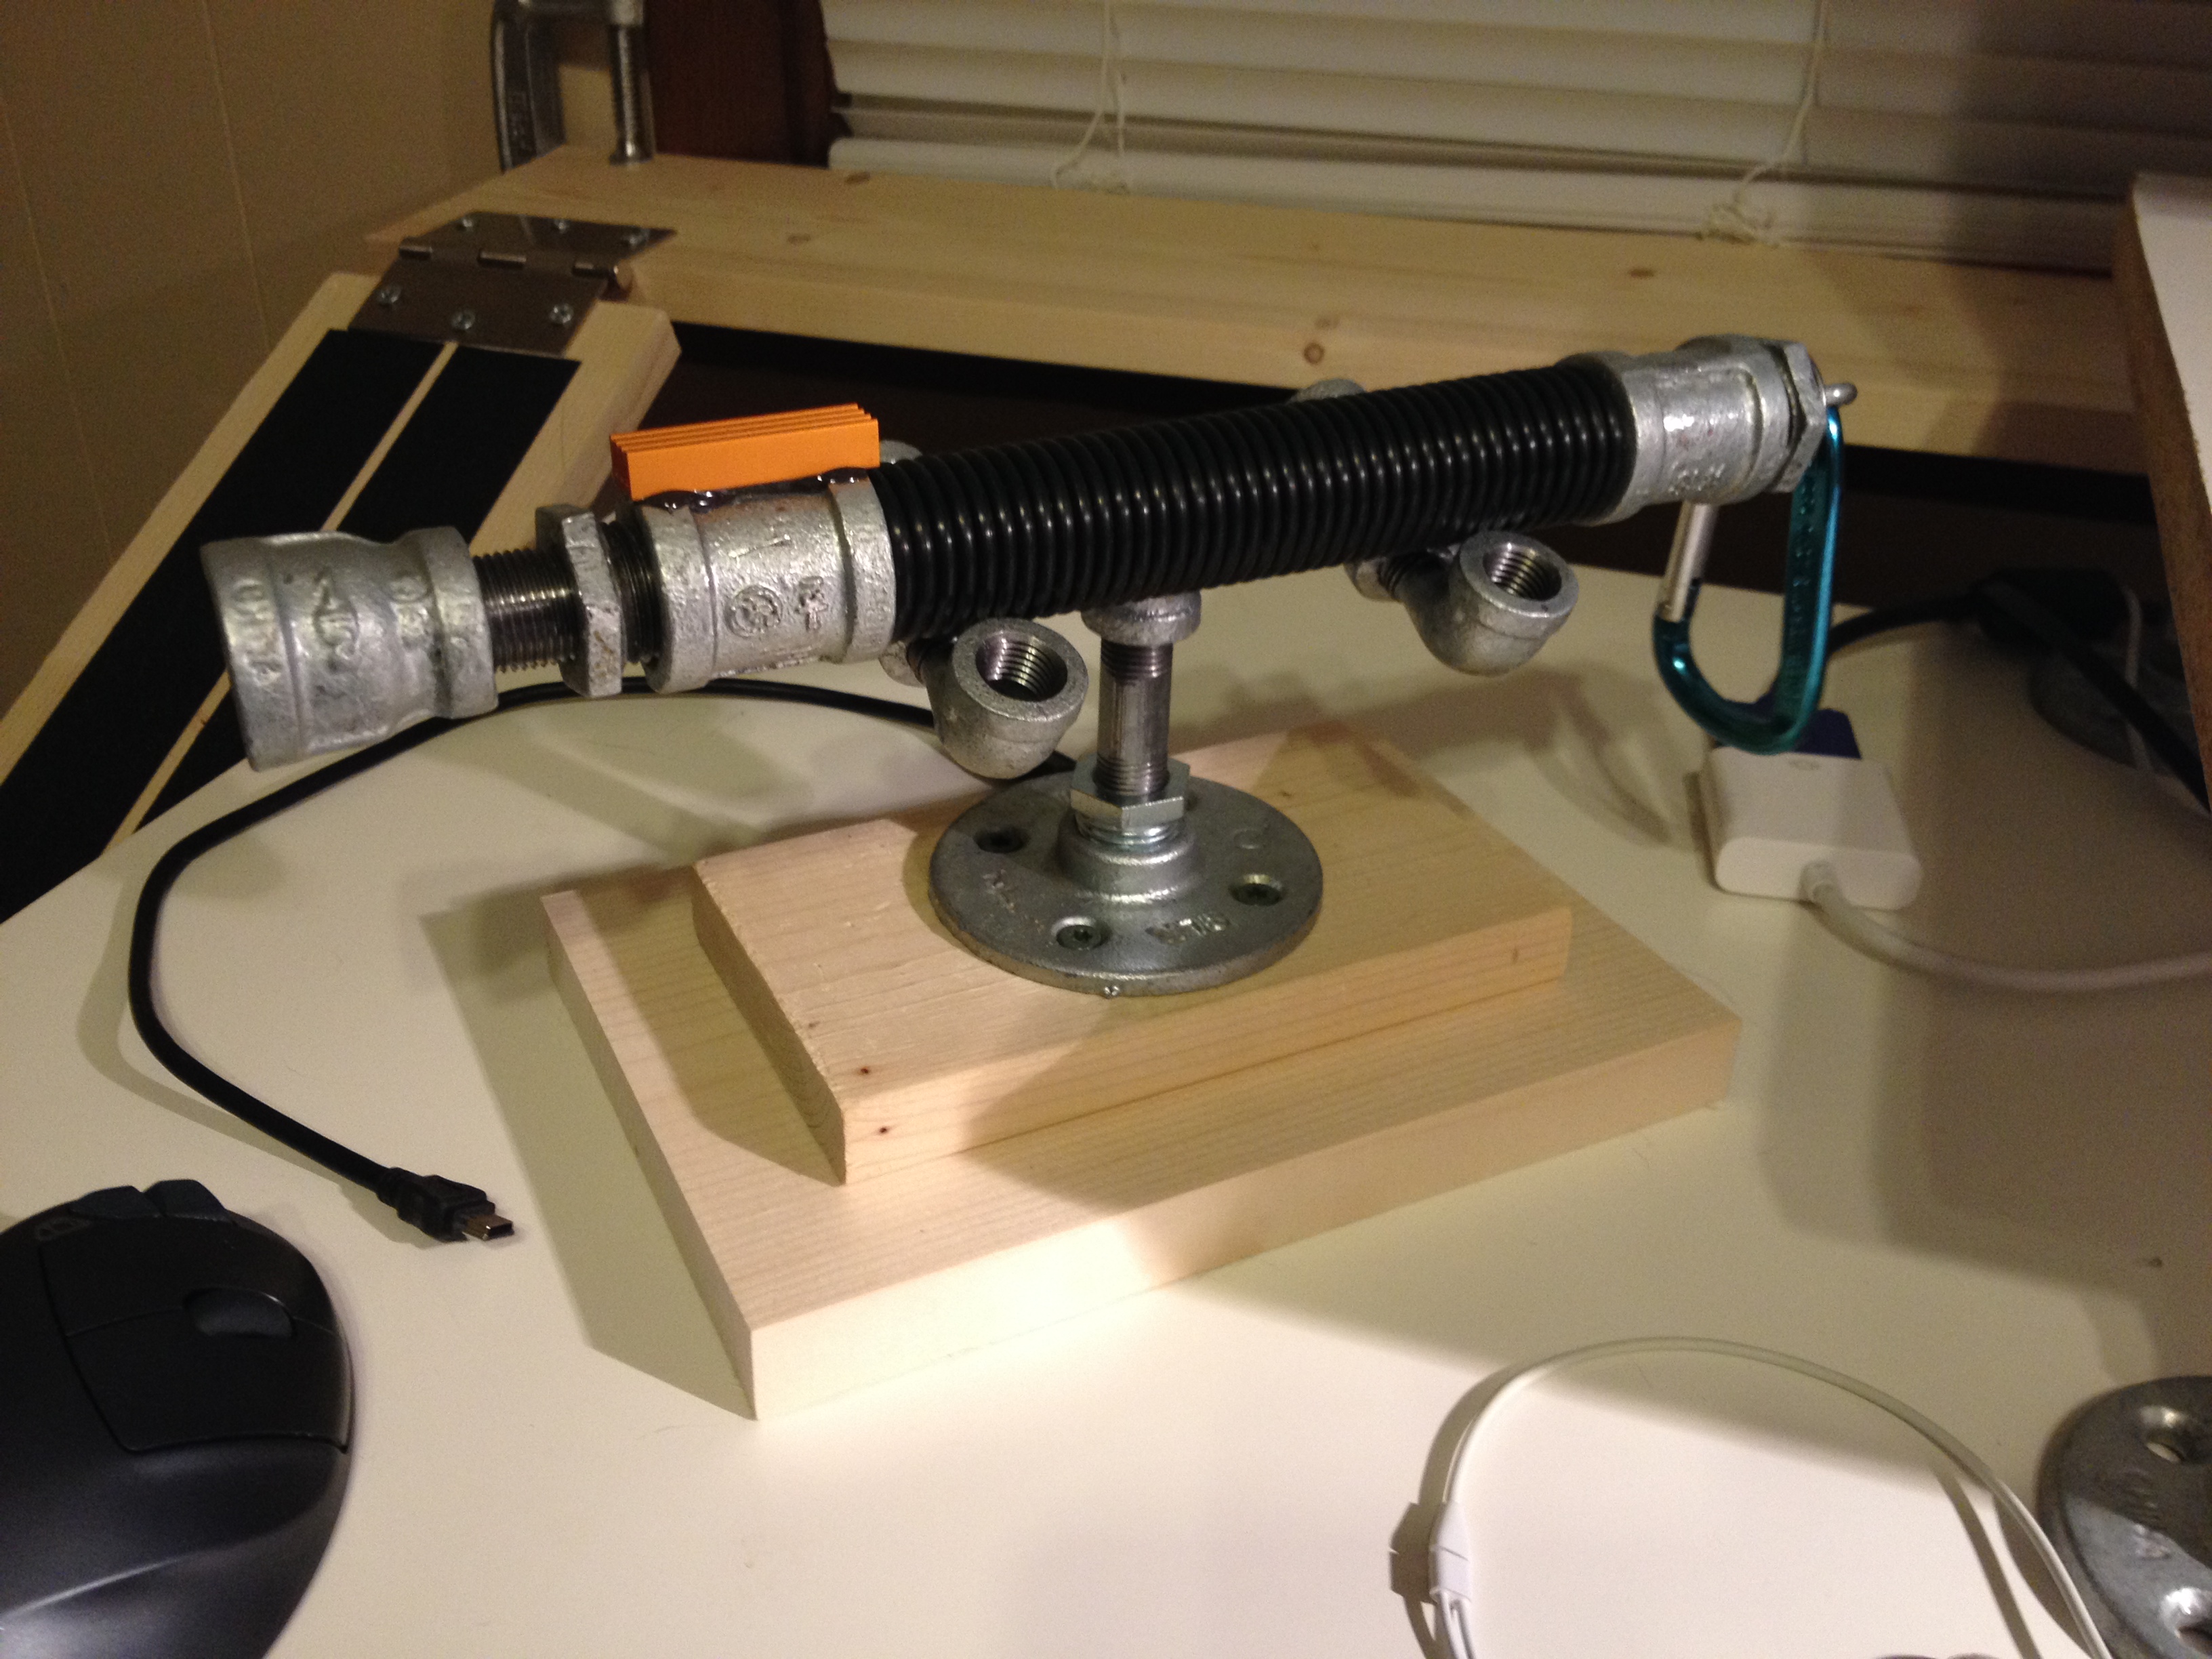
Since Ryan would likely bang his lightsaber when sparring, I wanted to make it as practical as possible while giving it a technological appearance. First, I tried attaching a circuit board from an average doorbell button with two hose clamps.
While I thought this fit the rugged look that Ryan might like for his lightsaber, I thought that it would be more practical to use only one hose clamp and affix the doorbell components with JB Weld after removing them from the circuit board.
I liked this configuration best. The hose clamp protects the switch, lights (non-functional), and resistor.
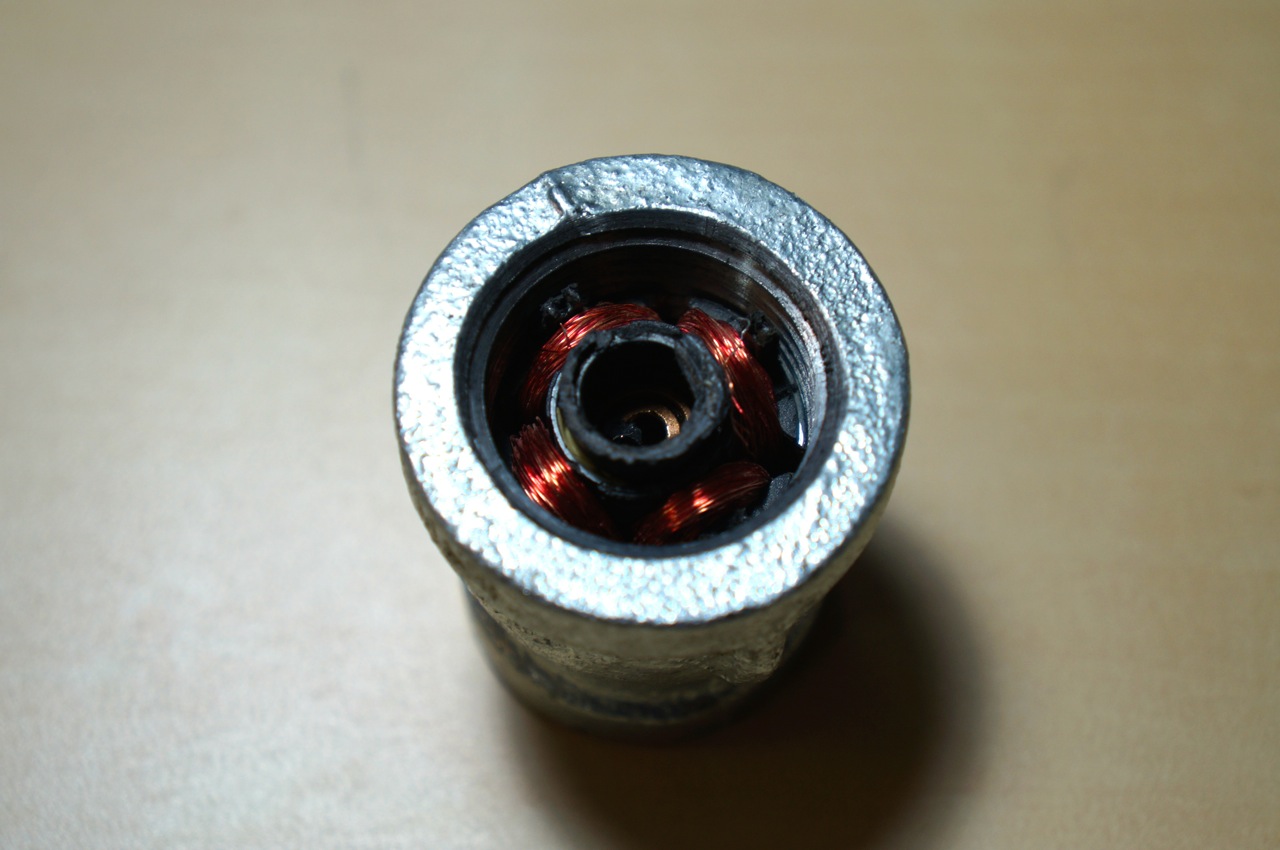
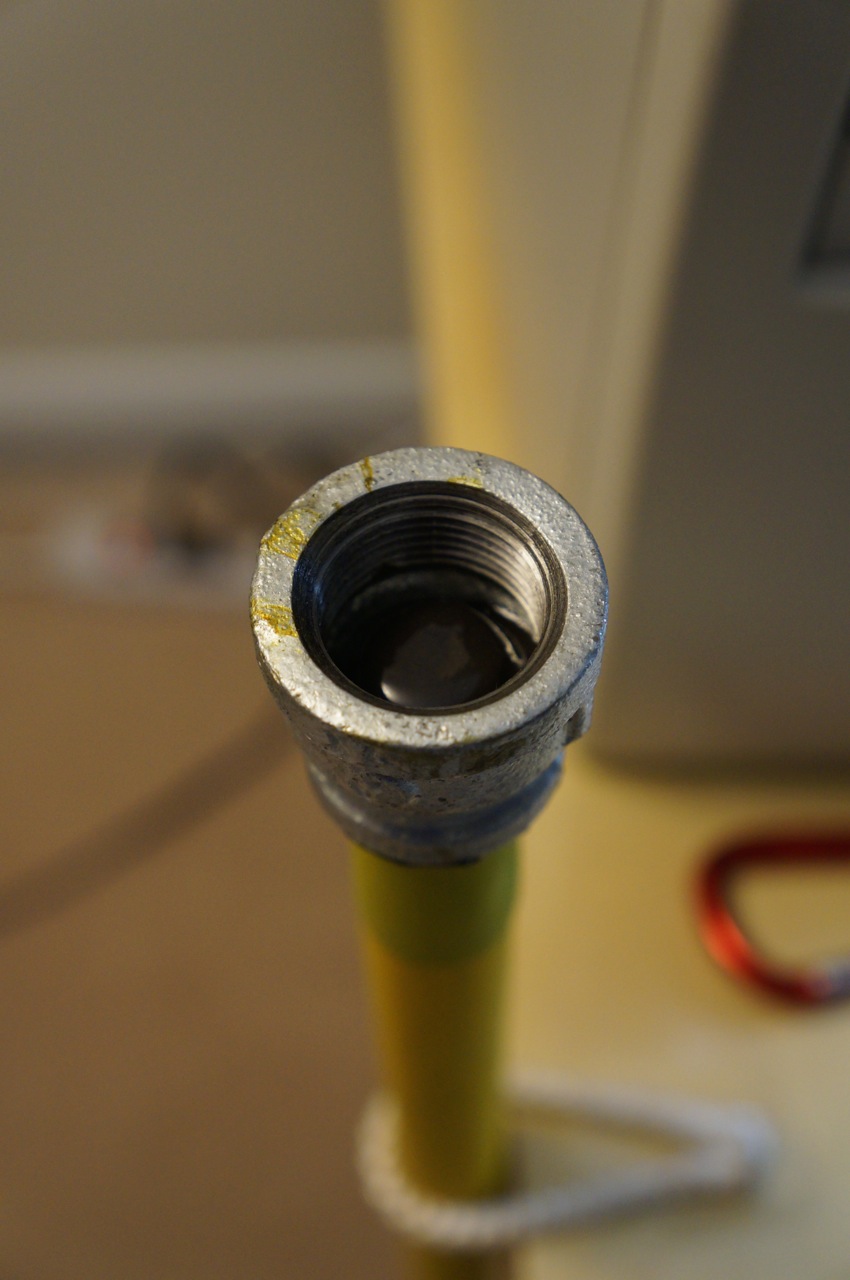
Next, I wanted the display emitter on the deactivated lightsaber (3/4″ to 1/2″ coupling) to look “realistic,” so I pulled the electromagnet from an 80″ computer fan, crushed it with my channelocks, and inserted it into the 3/4″ end of the 3/4″ to 1/2″ coupling. Repurposing the electromagnet draws on a visual/physical rhetoric of technology in the same way that movie props and set design use this for world building, extrapolating, and establishing plausibility.
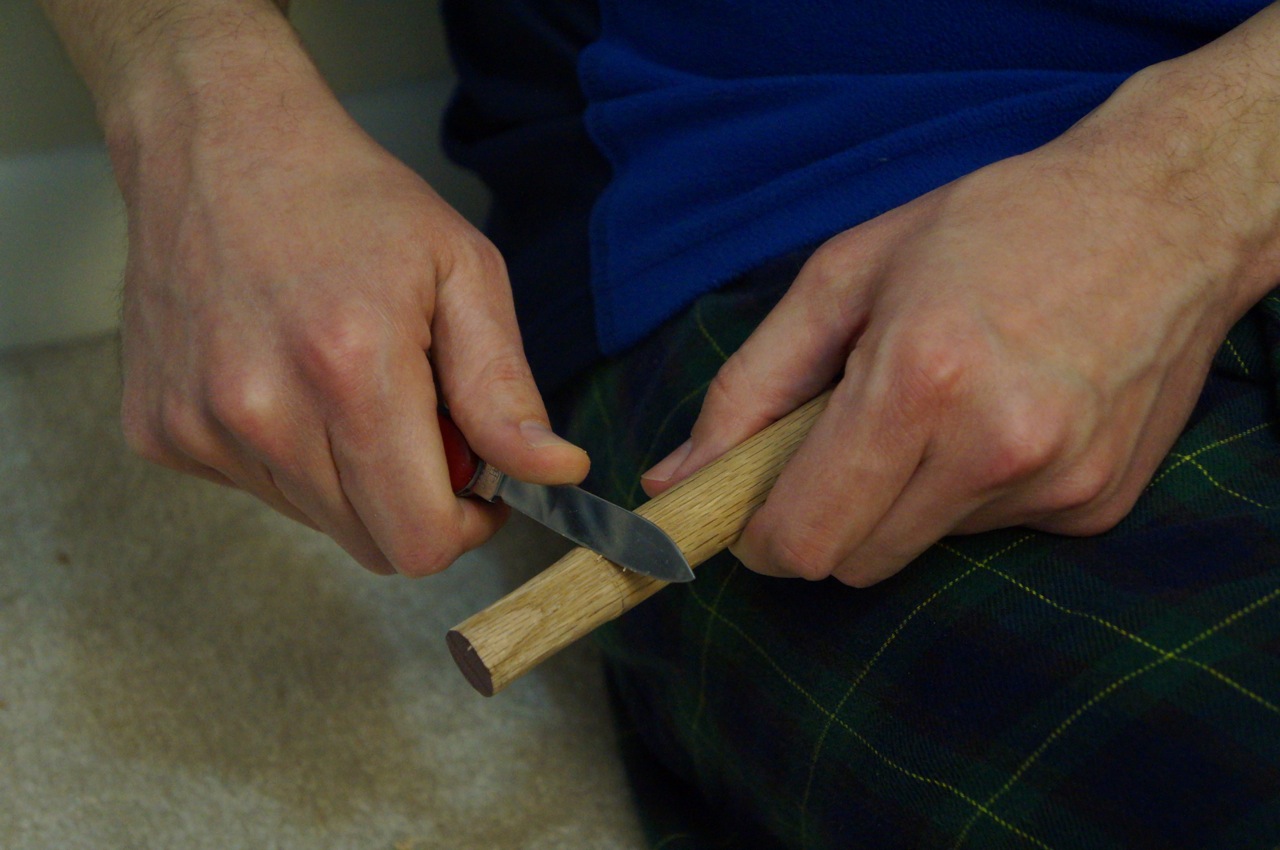
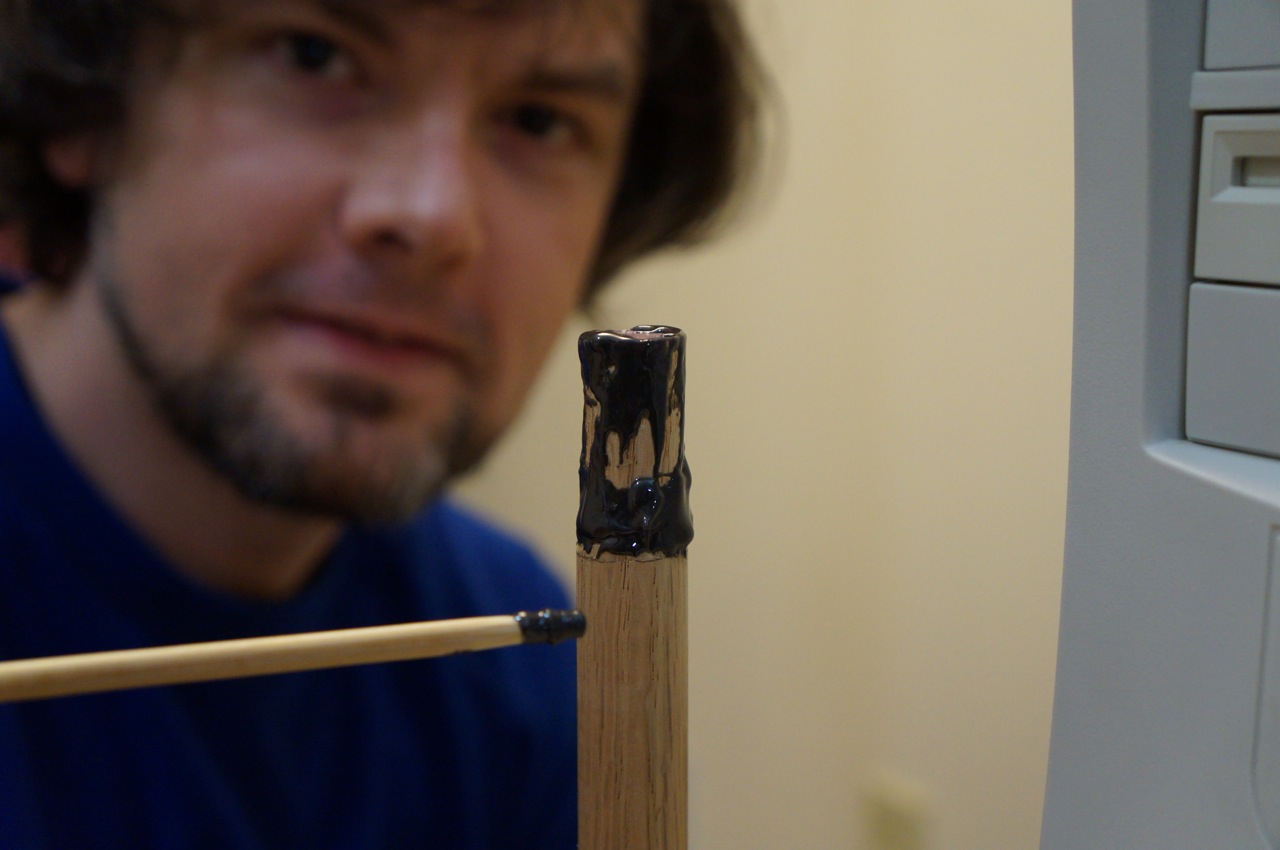
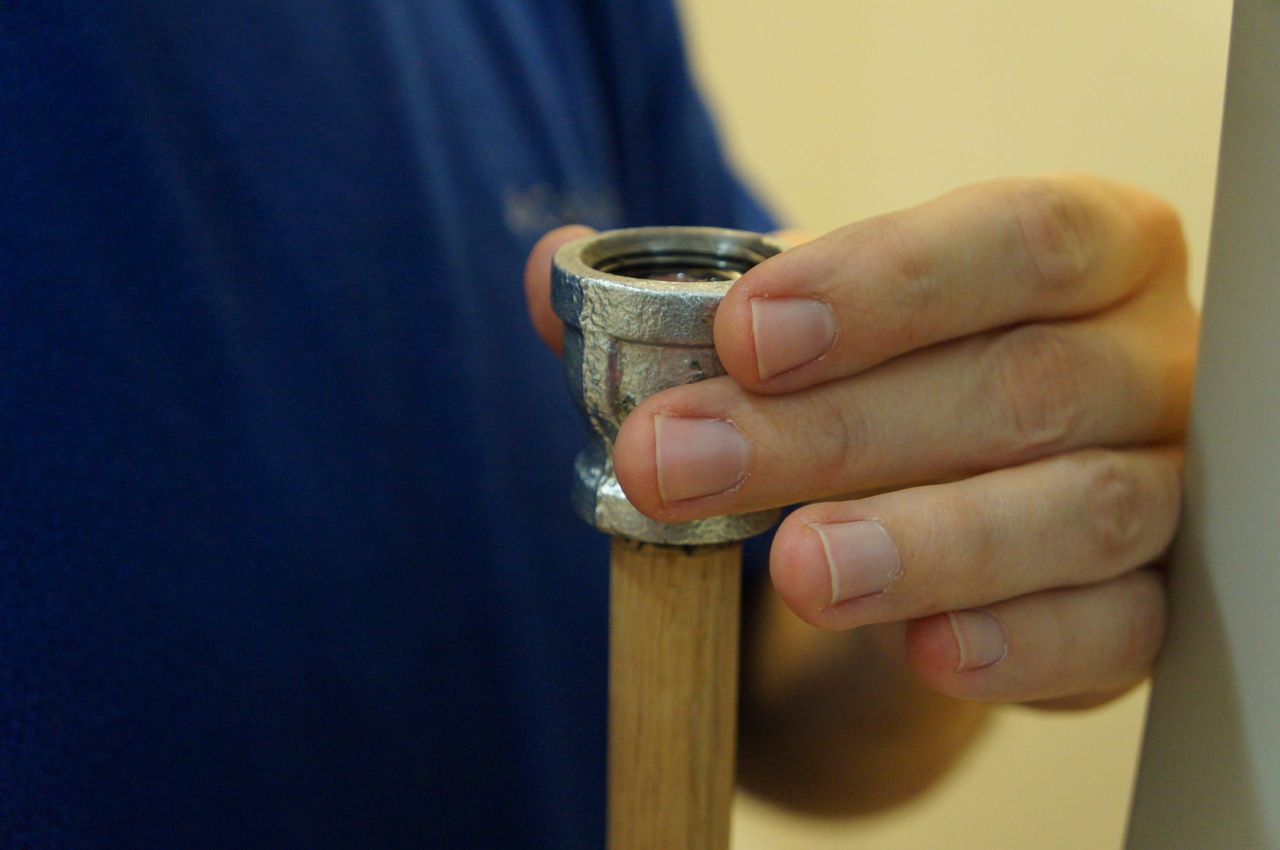
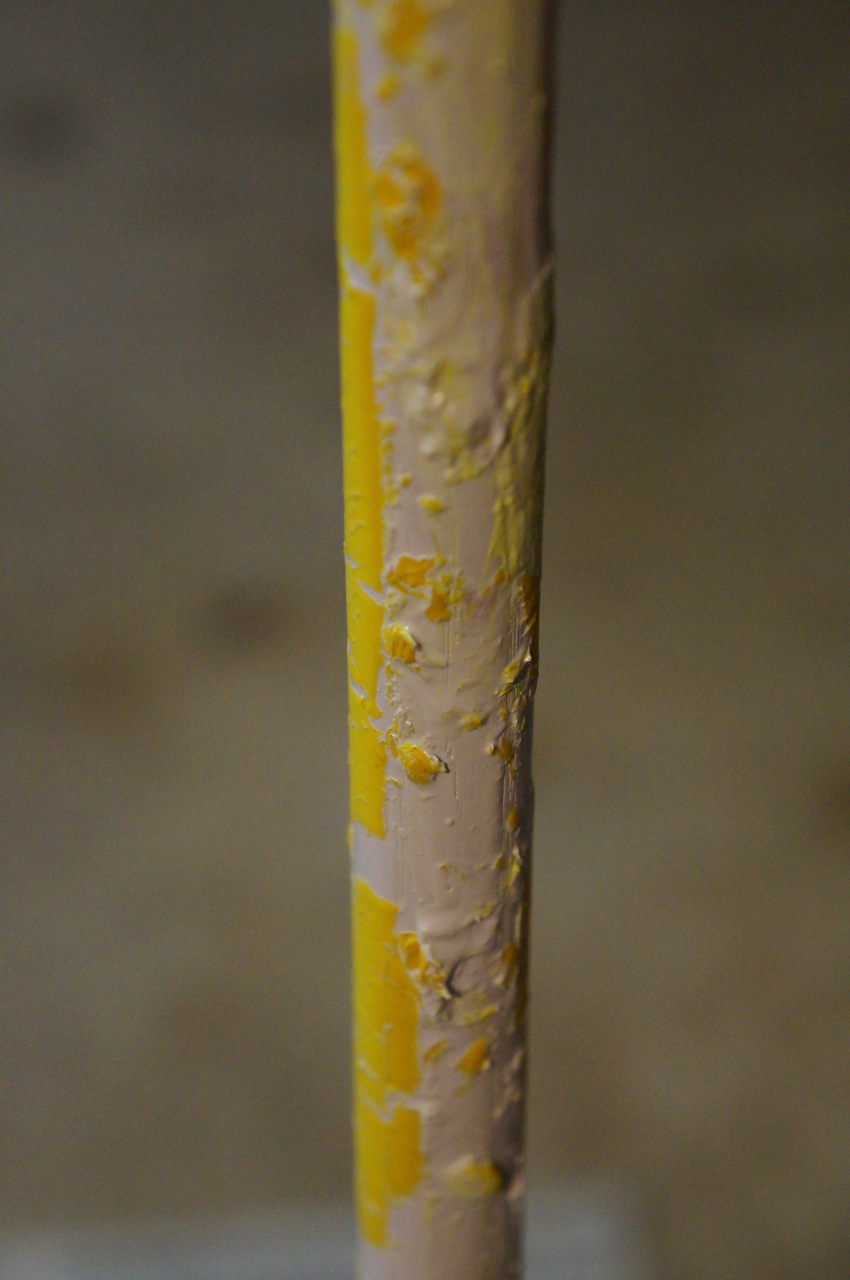
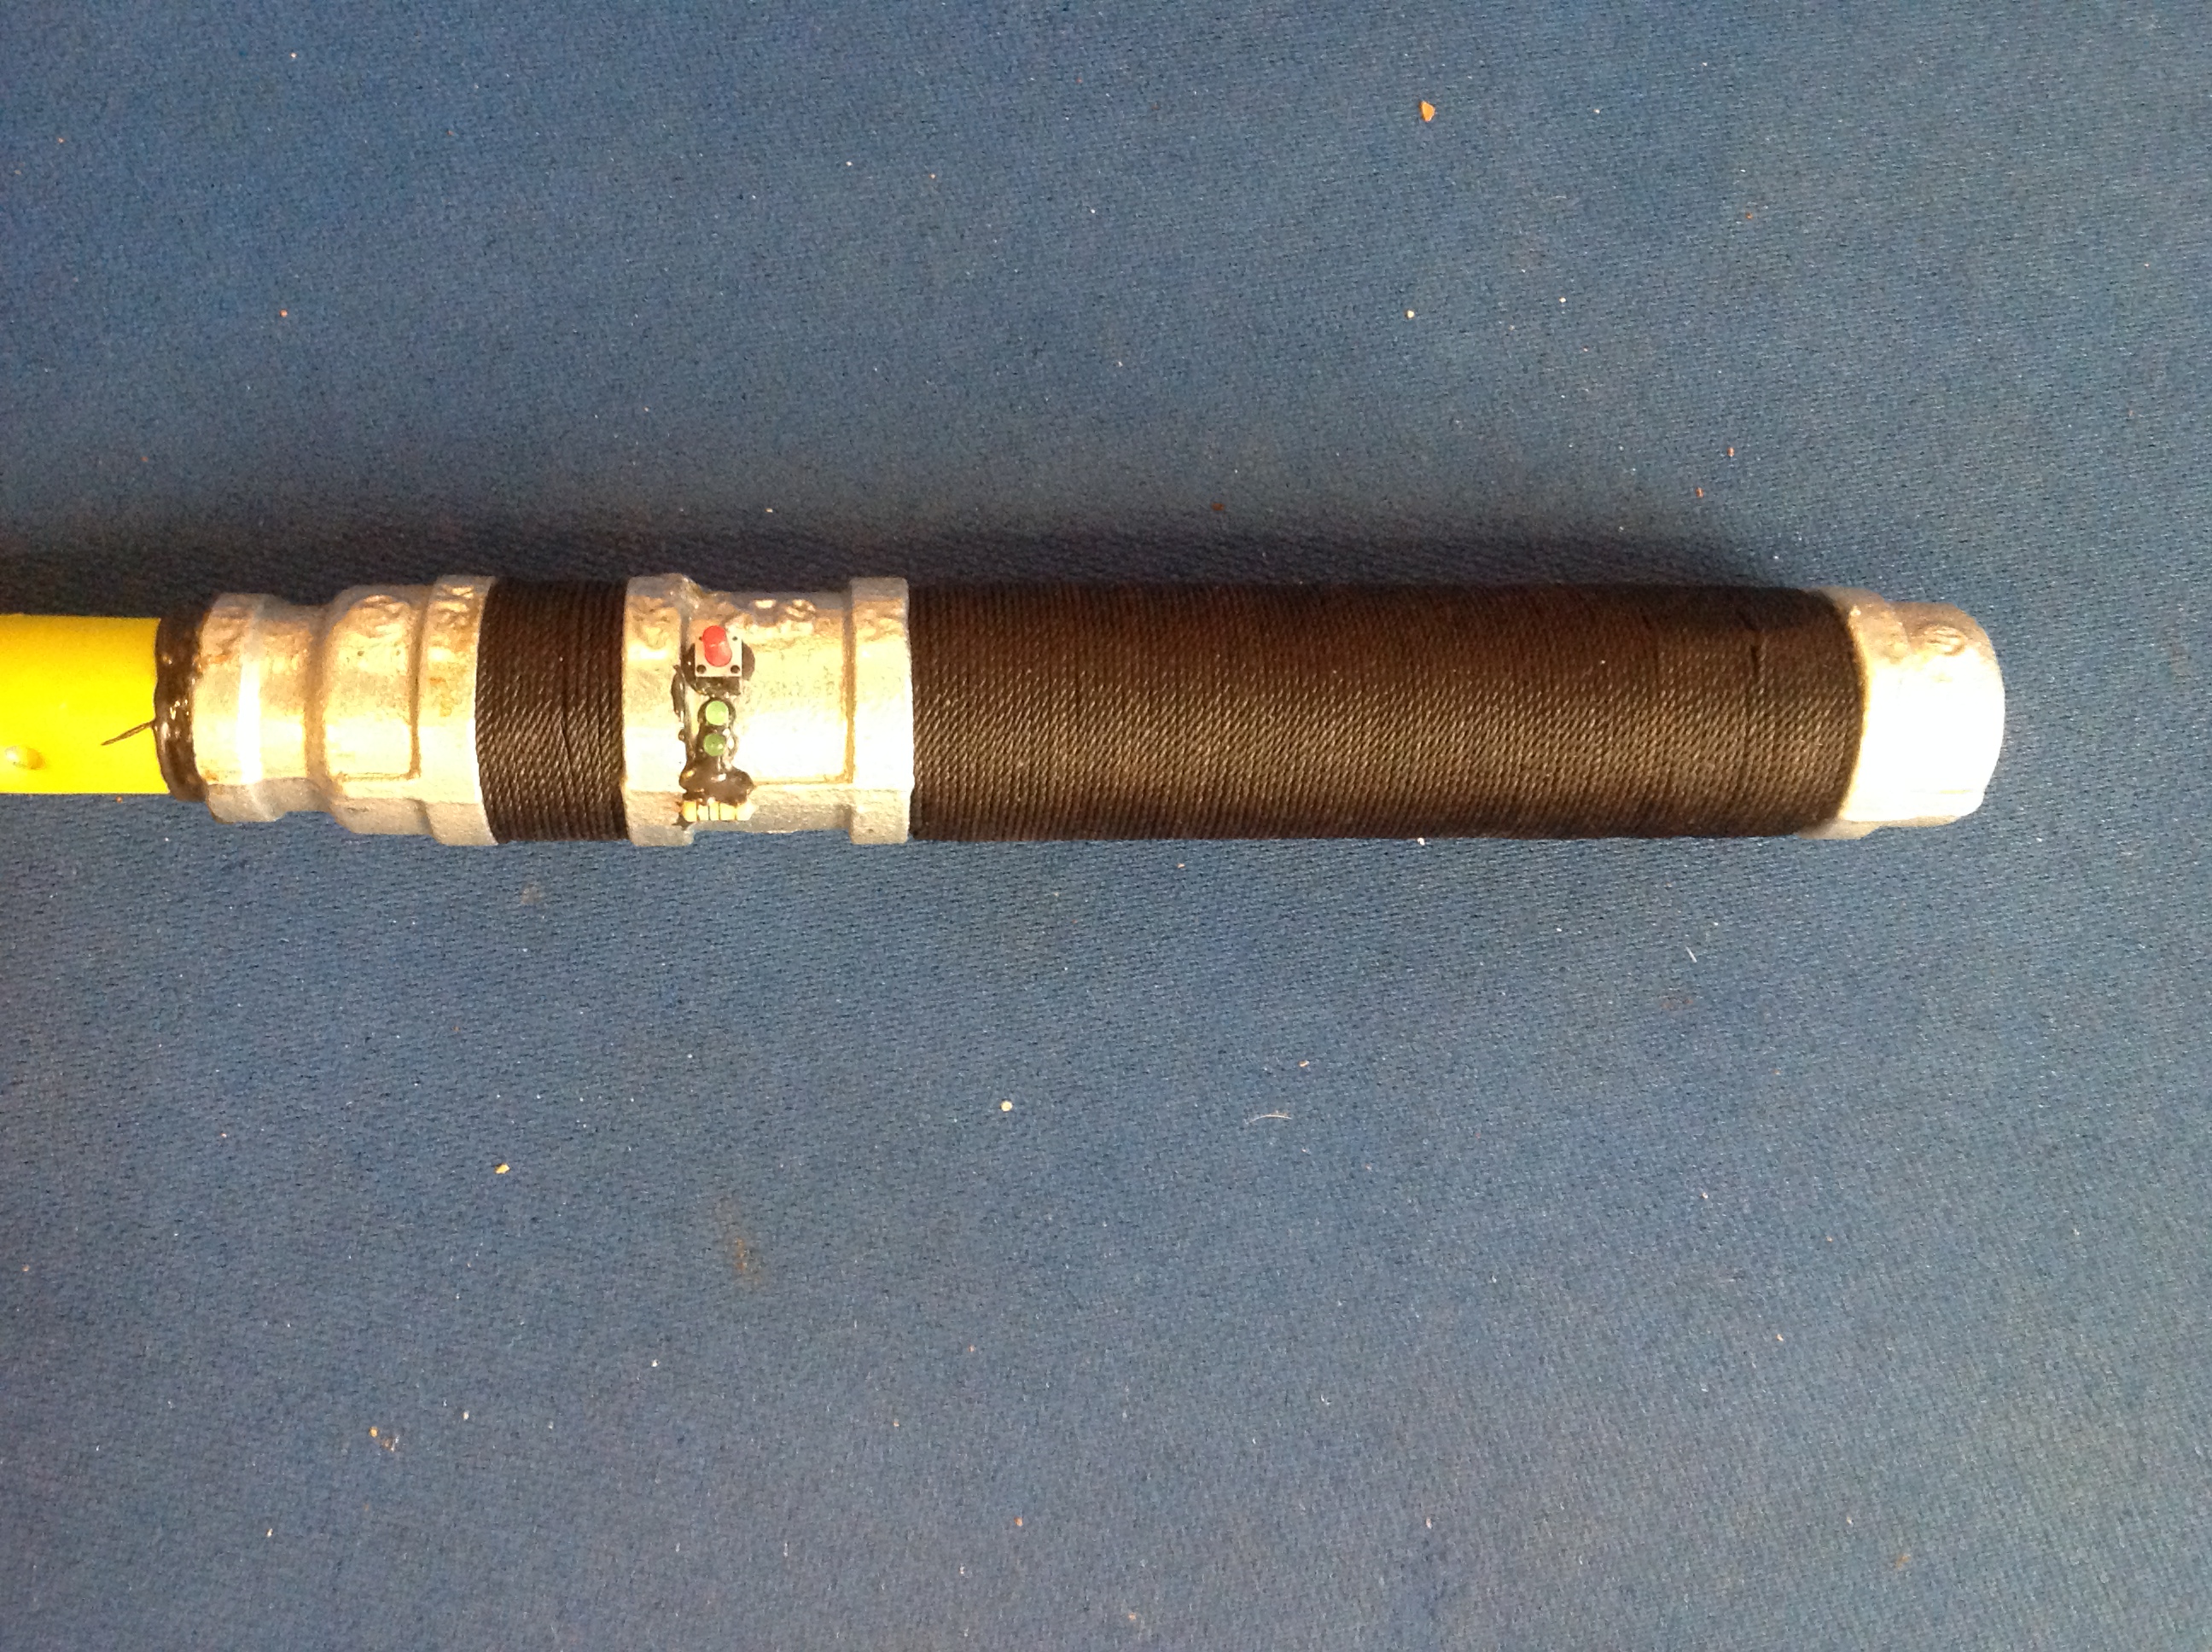
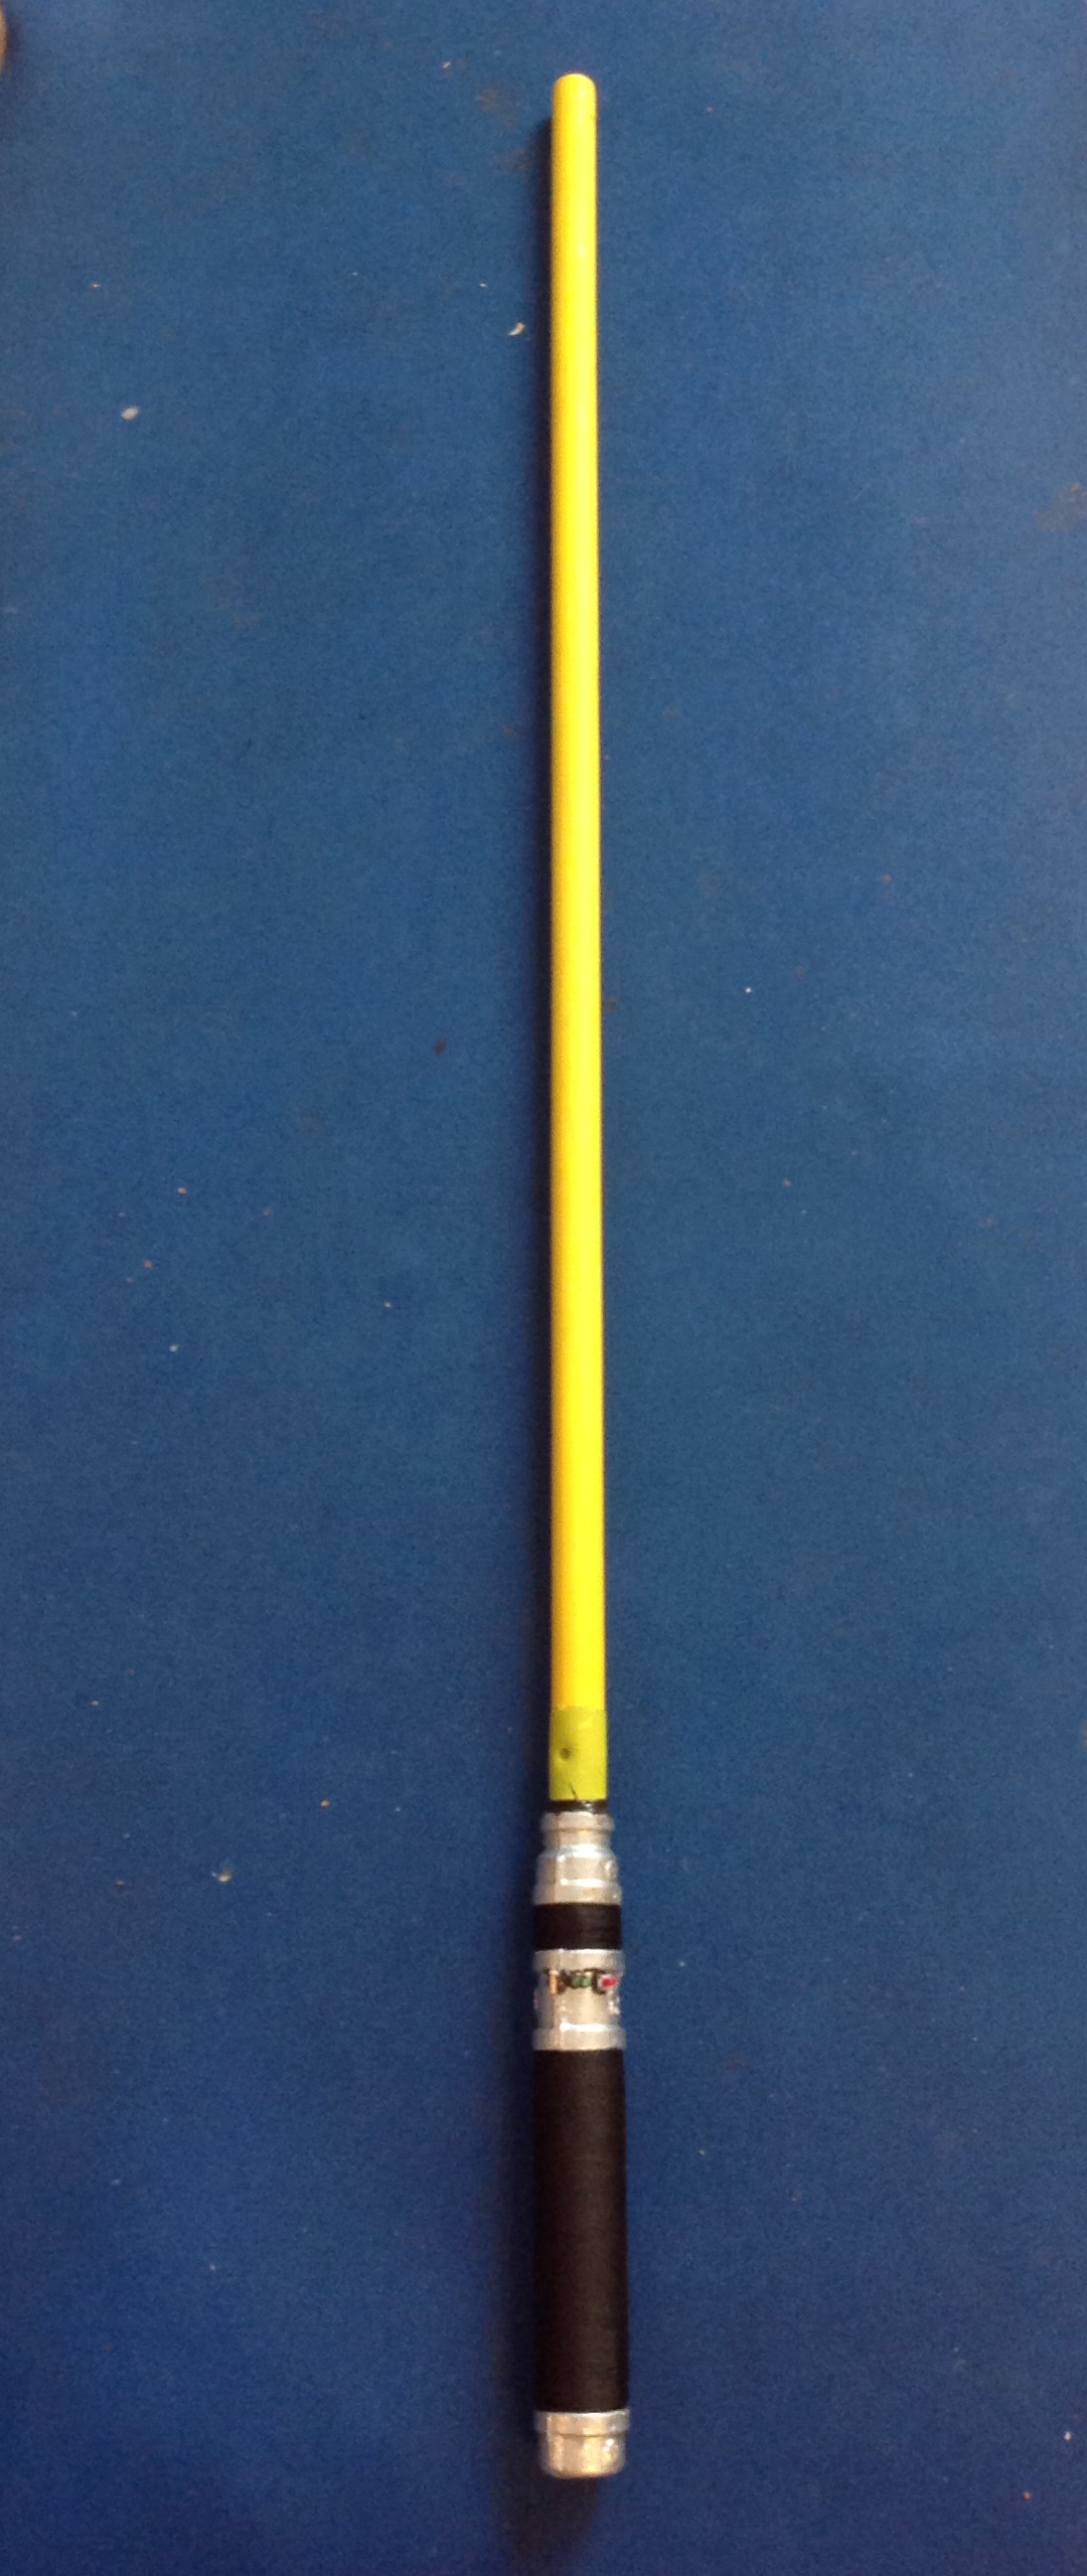
The next phase of the lightsaber build involved the other sparring emitter. I needed to rigidly attach a wooden blade to the second 3/4″ to 1/2″ coupling in the 1/2″ end of the coupling and paint it to match the yellow blade color that Ryan sought (signifying the Consular Jedi).
I began by taking an oak dowel rod and whittling one end enough to screw it into the 1/2″ end of the 3/4″ to 1/2″ coupling.
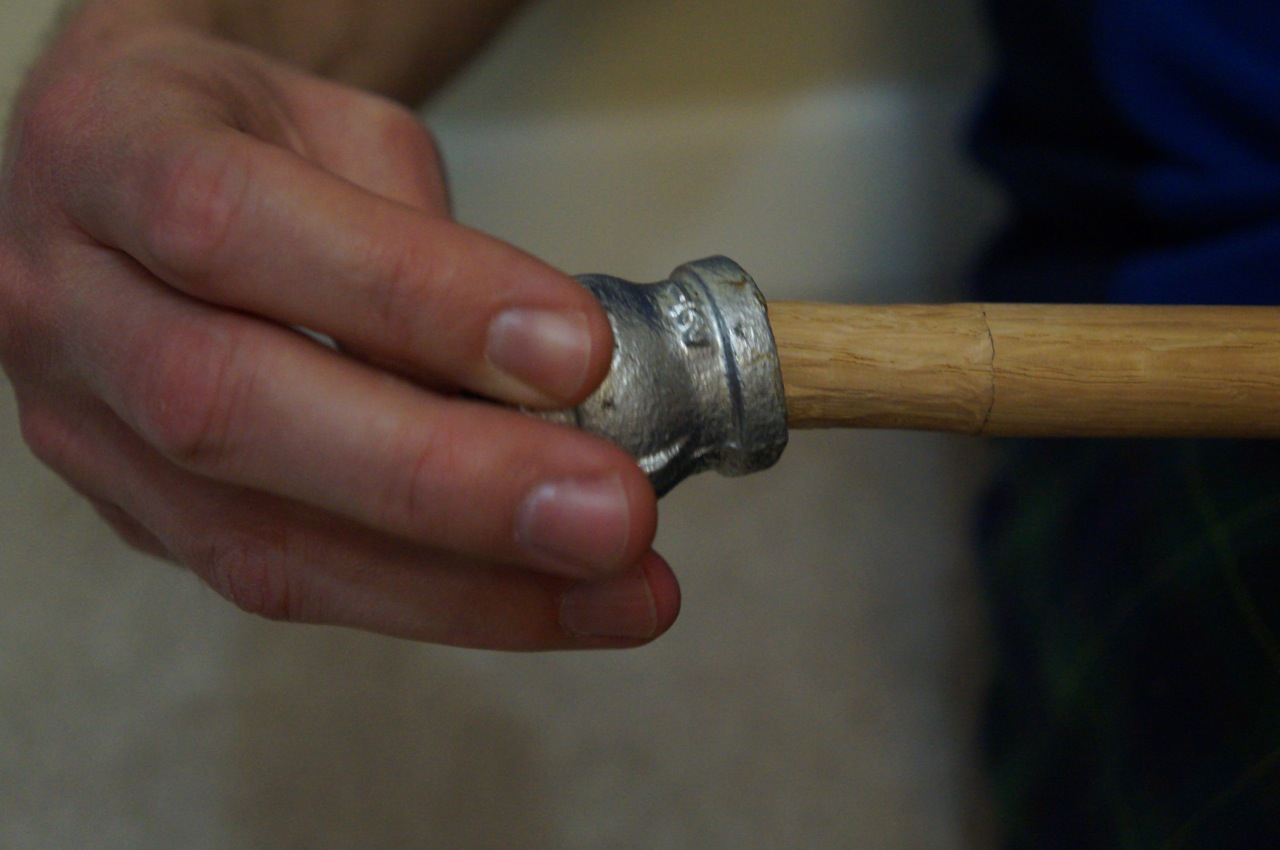
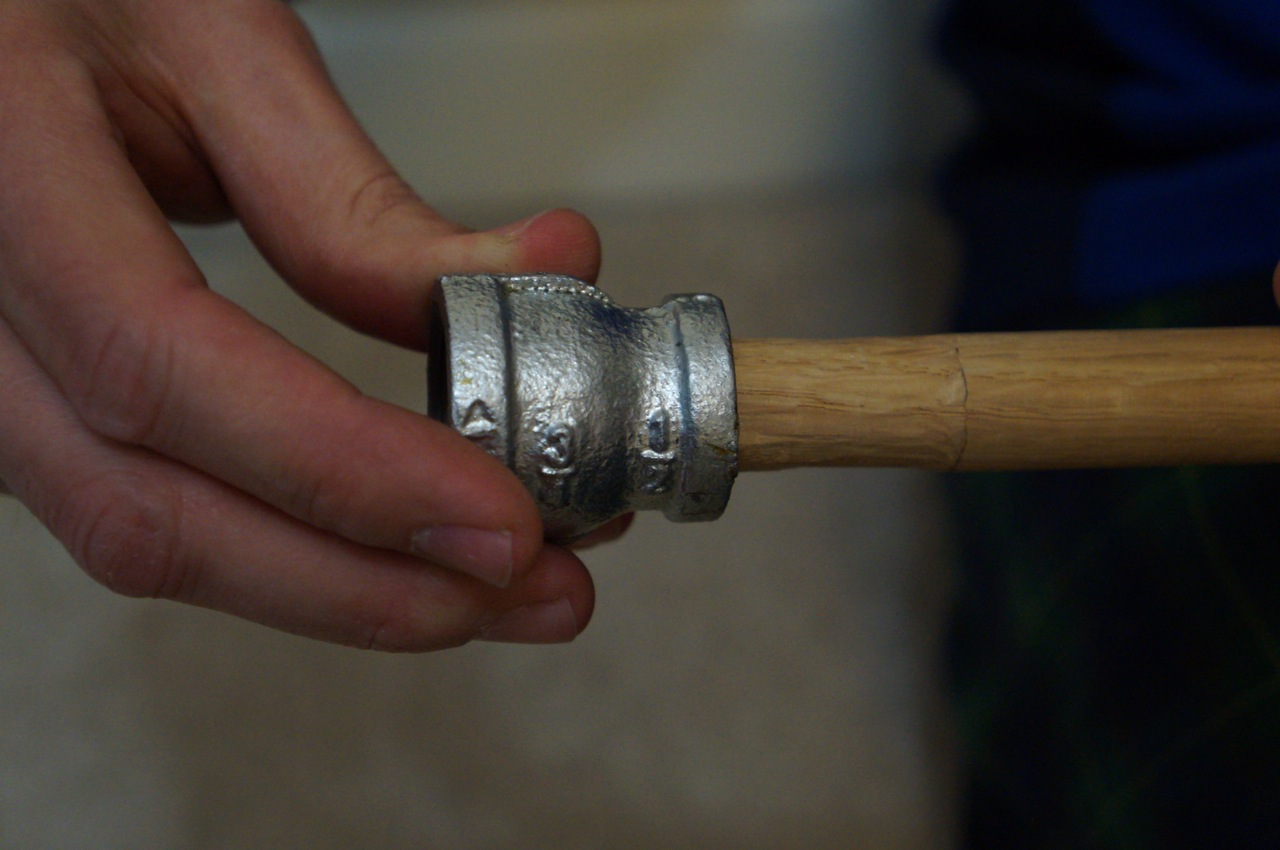
Then, I used JB Weld to permanently connect the coupling to the dowel rod.
I had to make sure that I did not put too much JB Weld on the tip closest to the 3/4″ pipe thread, which screw into the “close” end of the lightsaber when the blade needs to be drawn.
I made sure that it was centered and straight.
Finally, I painted the dowel rod above the coupling with a primer and then with the florescent yellow.
Unfortunately, I misread the spray paint cans and ended up with a mess when the florescent yellow would not stick to the dried primer (I mistakenly picked up white primer + paint instead of simply primer).
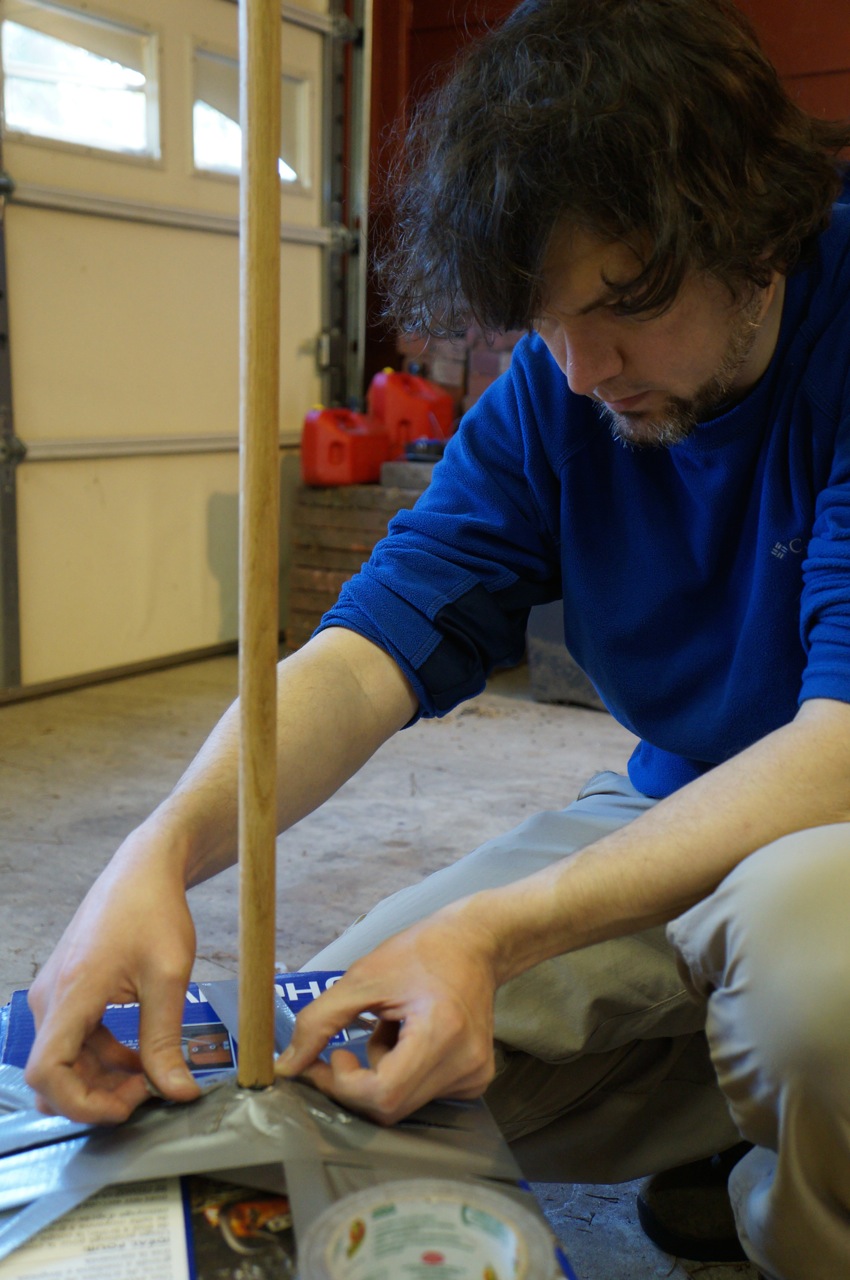
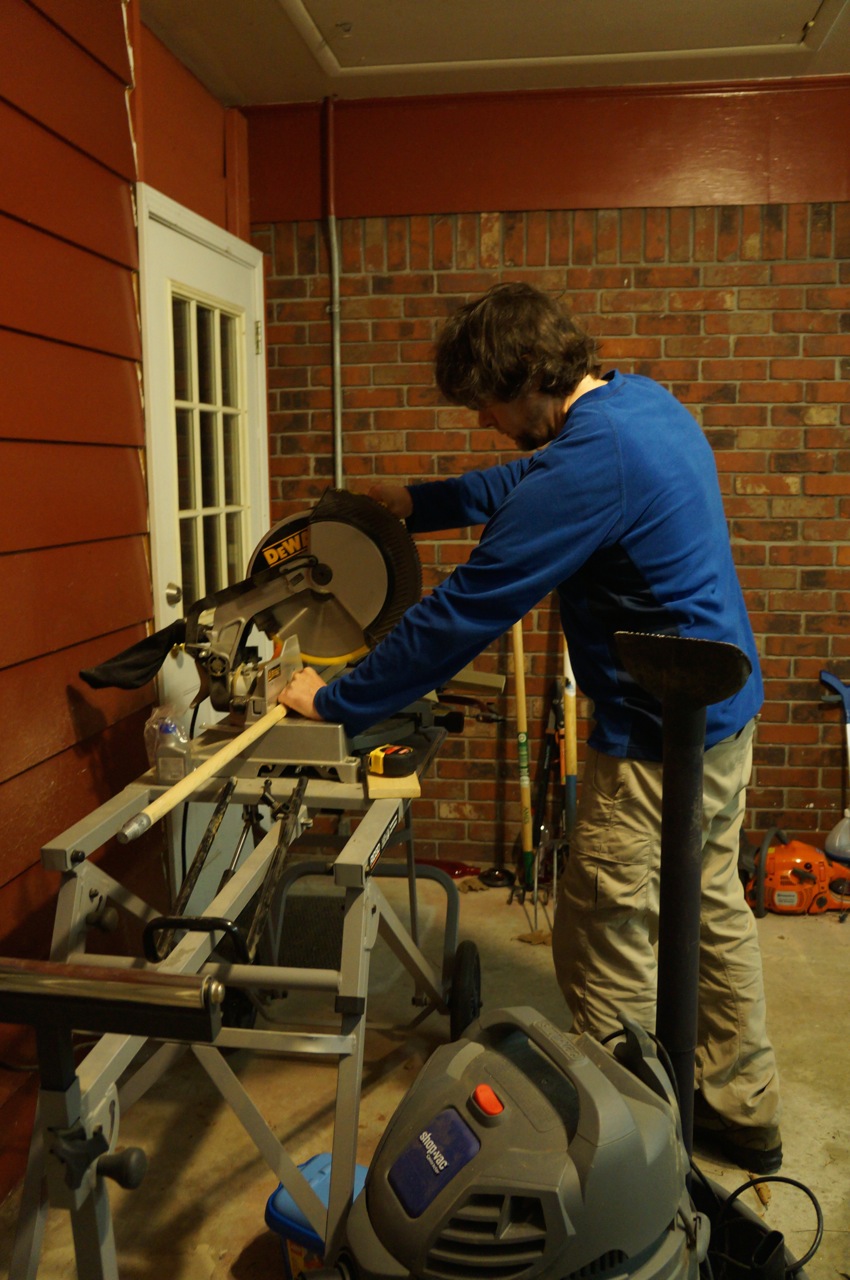
Luckily, I had a paint brush handle in the garage that was long enough to serve the same purpose even if it might be made out of pine instead of oak.
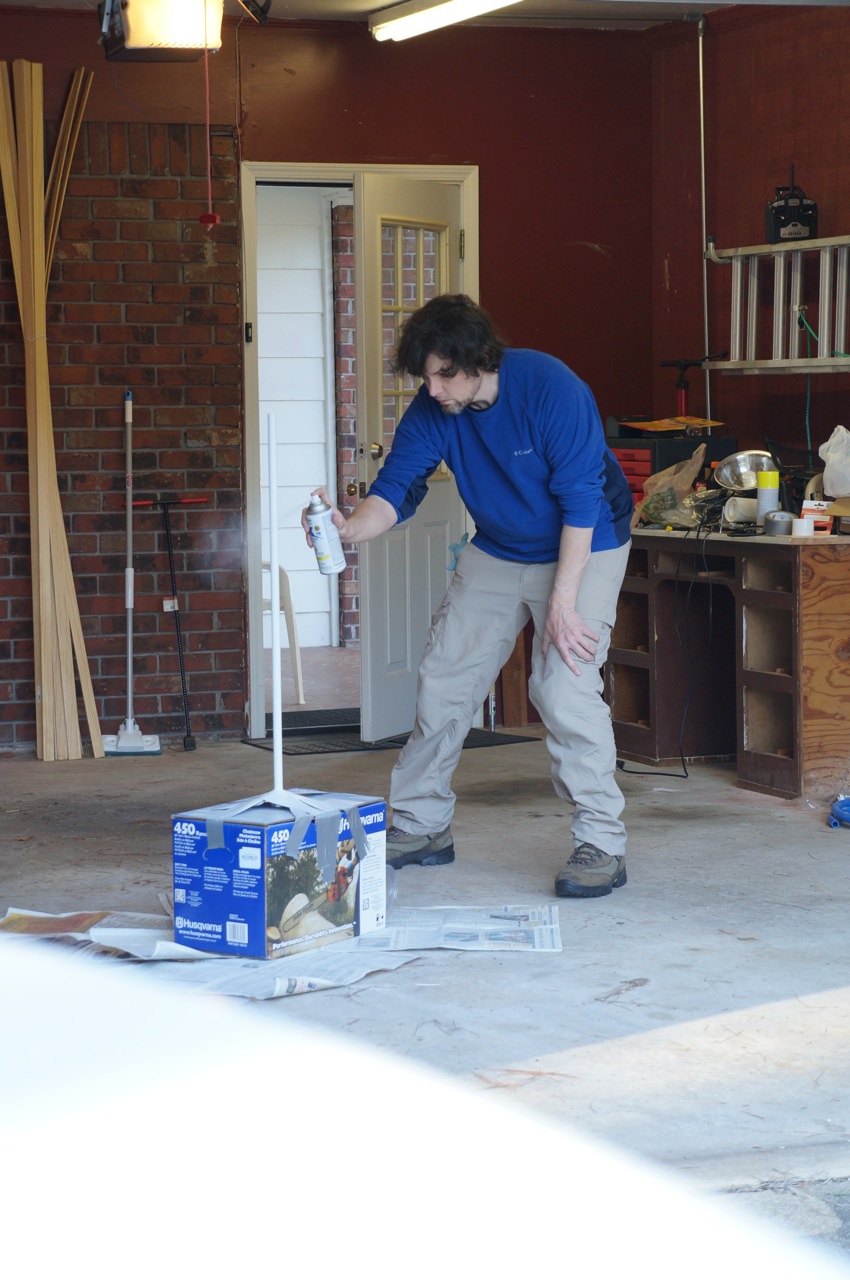
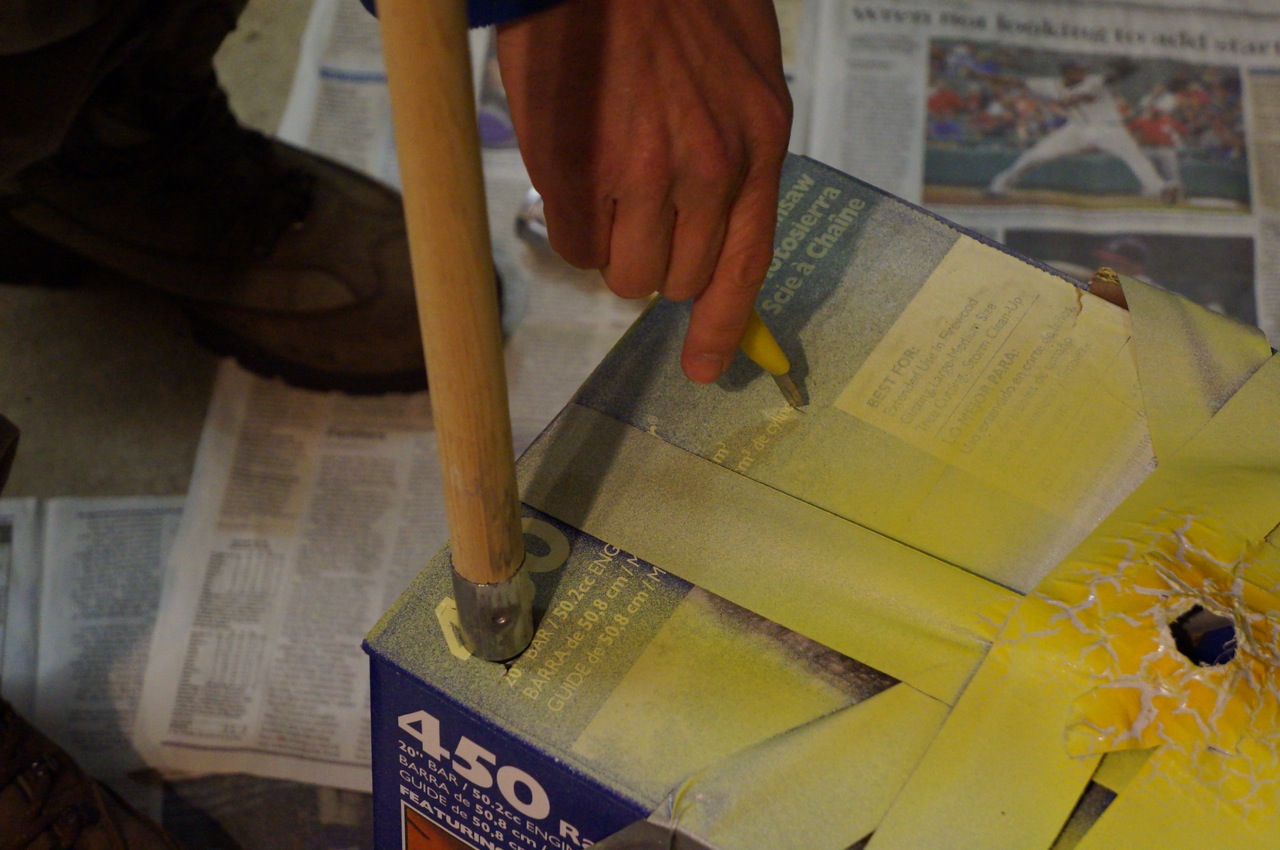
I cut the paint brush handle down to 36″.
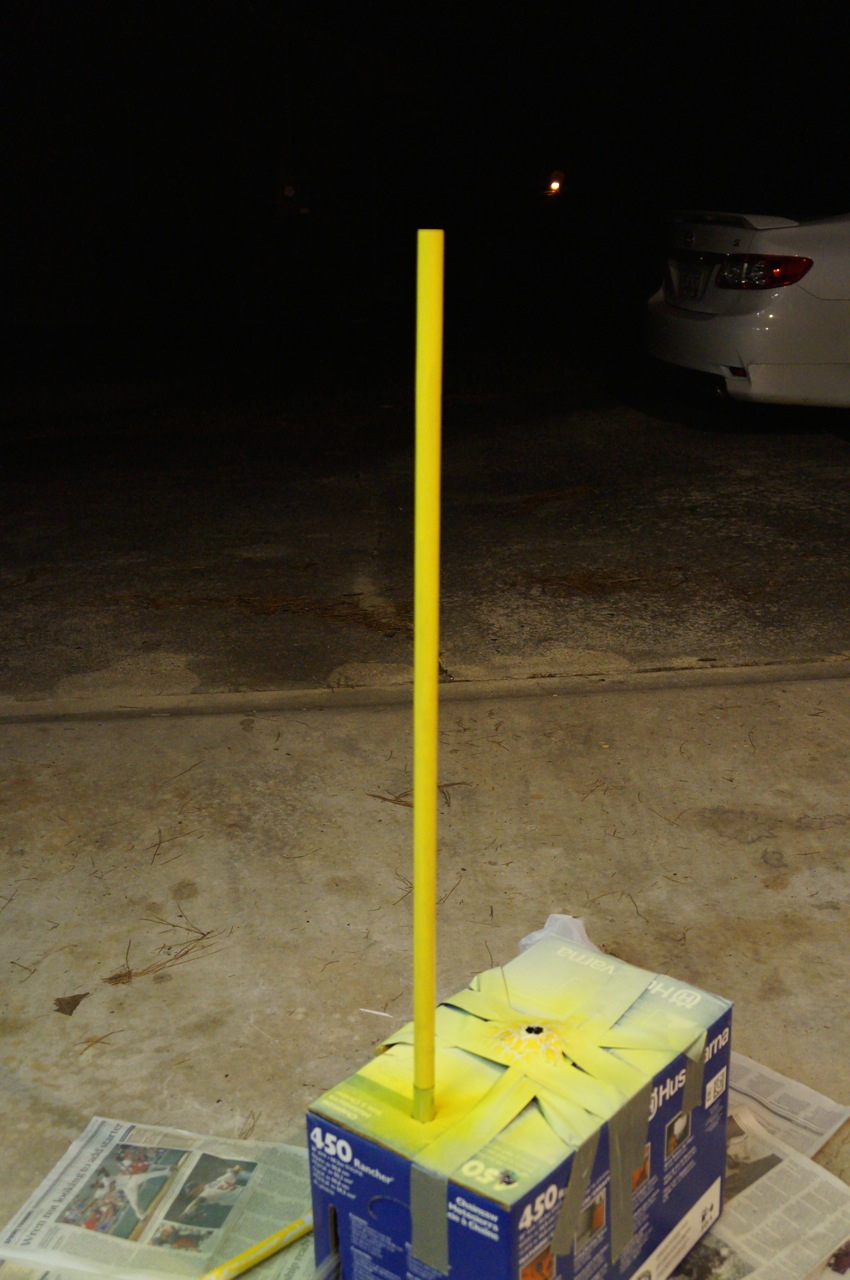
Set it up for painting with the remaining florescent yellow paint.
Many coats later, it was a bright yellow befitting a Consular Jedi!
After the paint dried, I screwed the metal end of the brush into another 3/4″ to 1/2″ coupling and bonded the blade to the coupling with JB Weld.
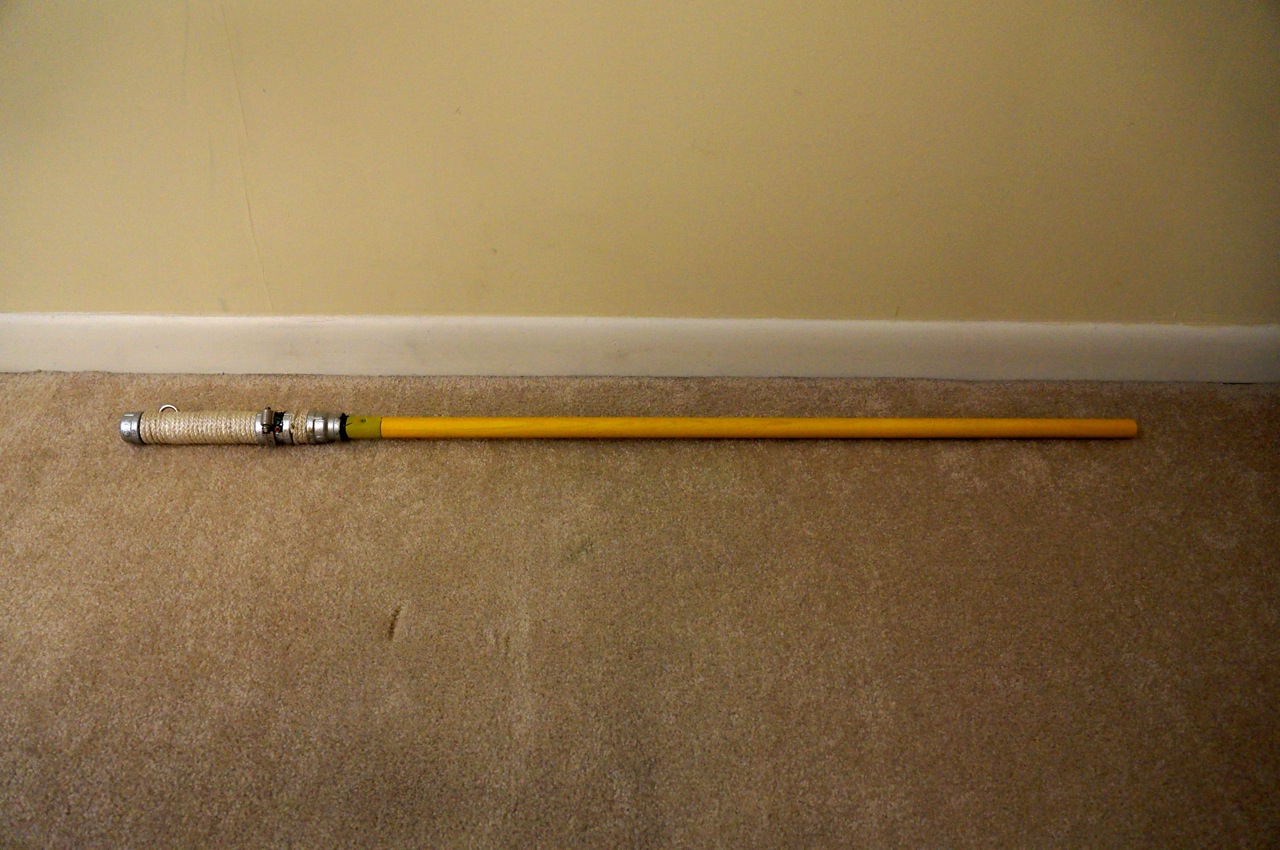
After everything had dried, I mated the blade with the lightsaber handle.
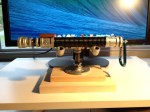
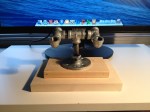
I was happy with the outcome of the lightsaber in deactivated mode, too.
I gave the lightsaber to Ryan as a birthday present. I included this explanatory diagram that explains how the saber is more than simply parts (e.g., the rope is from the same bundle that Ryan and I used when we cut trees down in my yard last year).
Since I build this lightsaber, Ryan removed the nylon rope grip and improved it with three layers of bank line or tarred twine. The result is quite impressive aesthetically and practically!
Photo courtesy of Ryan Cox.
Photo courtesy of Ryan Cox.
I will post future posts on the lightsabers that I have built for myself and examples of our sparring (when we have the time for Ryan to teach me some things).
UPDATE: Readers asked me to post photos of my other lightsabers–one inspired by Luke Skywalker’s lightsaber in Return of the Jedi and Darth Maul’s double-bladed lightsaber from The Phantom Menace. When I built these sabers for myself, I didn’t take as many photos of the process as in the lightsaber above for Ryan, but these photos should illustrate the basics of how to build similar DIY lightsabers.
Luke Skywalker ROTJ Lightsaber and Stand
This was the first version of Luke’s lightsaber. I am working from memory as I do not have the lightsaber in front of me to give the exact specifications. I believe that working from the left to the right: 3/4″ to 1/2″ reducer, 1/2″ threaded pipe 1″ long, 1/2″ to 3/4″ bushing, 3/4″ coupler, 3/4″ pipe 7″ long, 3/4″ coupler, 3/4″ to 1/2″ bushing, flat washer with eye bolt affixed (epoxied into bushing). The orange lightsaber control attached to the first coupler is from a computer motherboard heatsink (sawed in half with a hacksaw) and epoxied to the coupler. The wrap is nylon rope.
In the next iteration, I replaced the nylon rope wrap with rubber o-rings that I ordered online (pack or 40 or 50). To install the o-rings, remove the last coupler on the right and roll down the o-rings one-by-one.
To display Luke’s lightsaber, I used smaller pipes attached to a wood base (two different sizes of lumber screwed together through the metal base connected to the pipes).
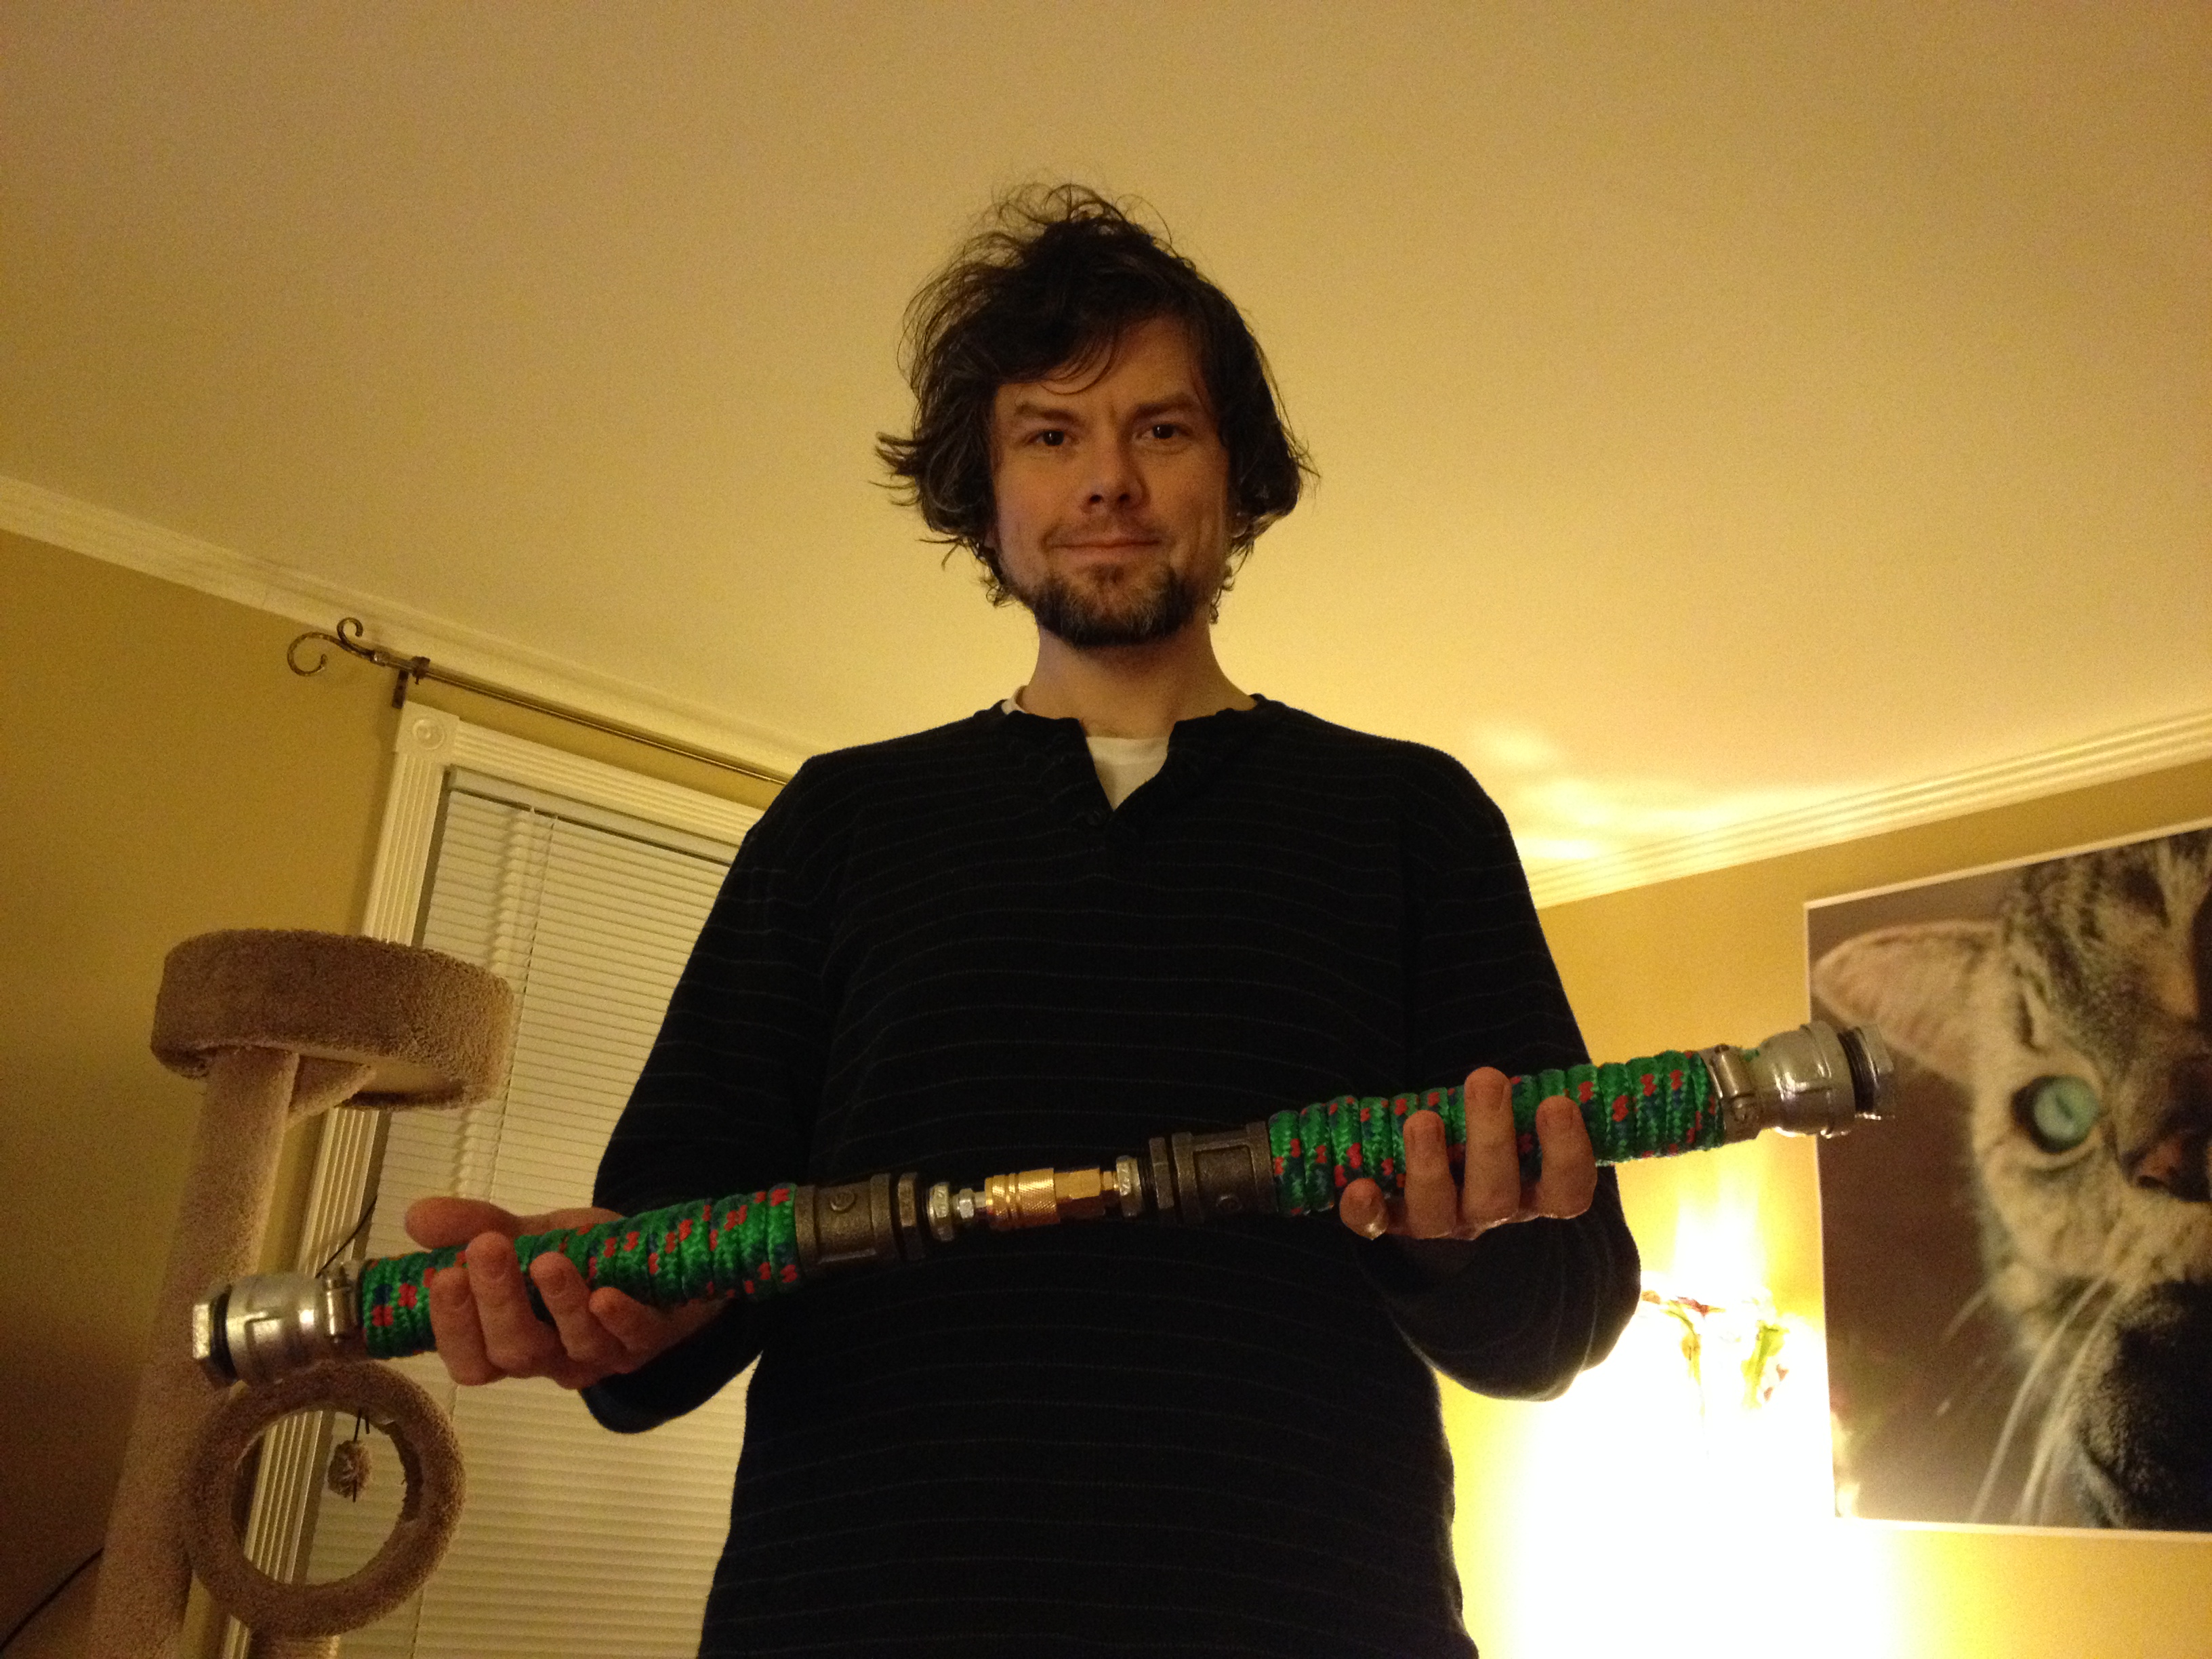
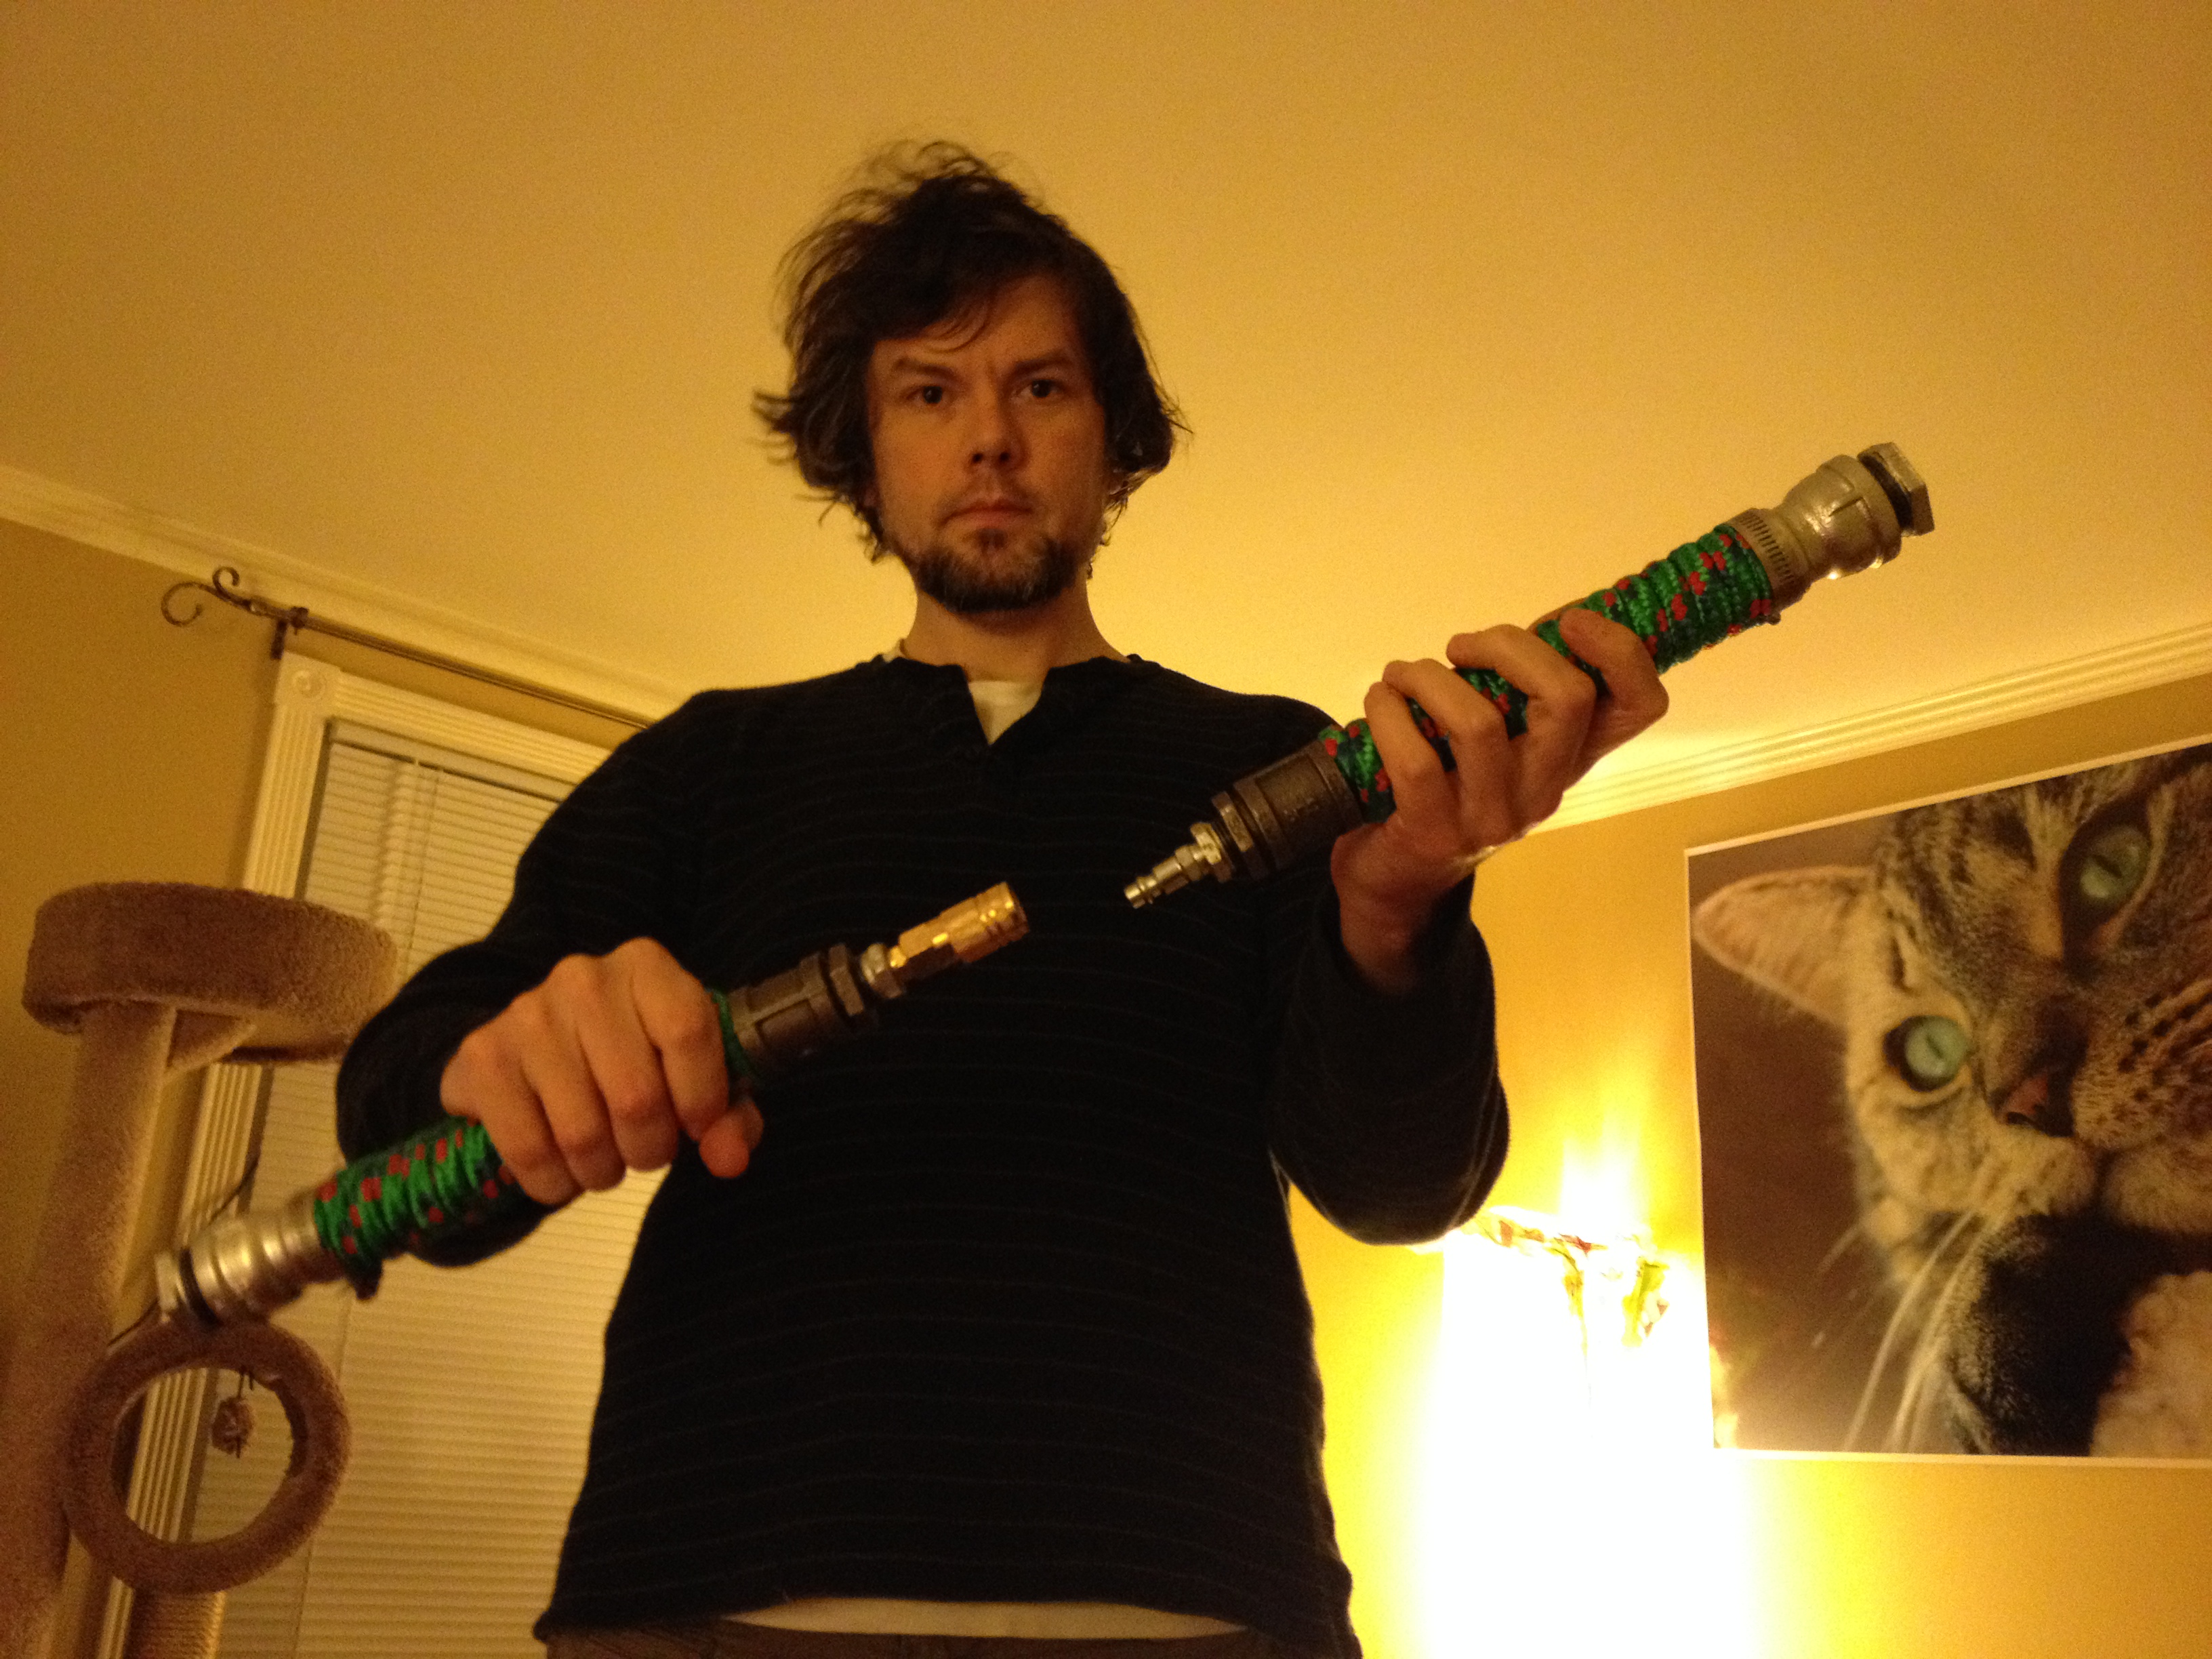
Darth Maul’s Double-Bladed Lightsaber
I built this Darth Maul inspired lightsaber as a way to figure out an easy way of having a two bladed saber that can split into two separate lightsabers. My solution was to use quick disconnect air hose fittings.
In order to make this work with the larger pipes used for Darth Maul’s lightsaber, which appears heftier in Episode I, I had to use two bushings to reduce down to the smaller size of the air hose fittings.
Here is the double-bladed lightsaber connected.
Here is the double-bladed lightsaber disconnected into two separate sabers. I didn’t build blade attachments for this saber, so I couldn’t test how much pressure/stress could be applied to the quick disconnect coupler that holds everything together. I suspect that this kind of assembly can only be used for show rather than demonstration of saber techniques (as I had constructed the two sabers above). With further modification, I believe that someone could sheath the quick disconnect coupler with metal so that the saber appears more solid from end-to-end instead of having this smaller, weak point in the middle as this demonstration saber appears.
I hope these extra photos and explanation help. Good luck with your builds, and please share any photos that you post online of your sabers in the comments below!
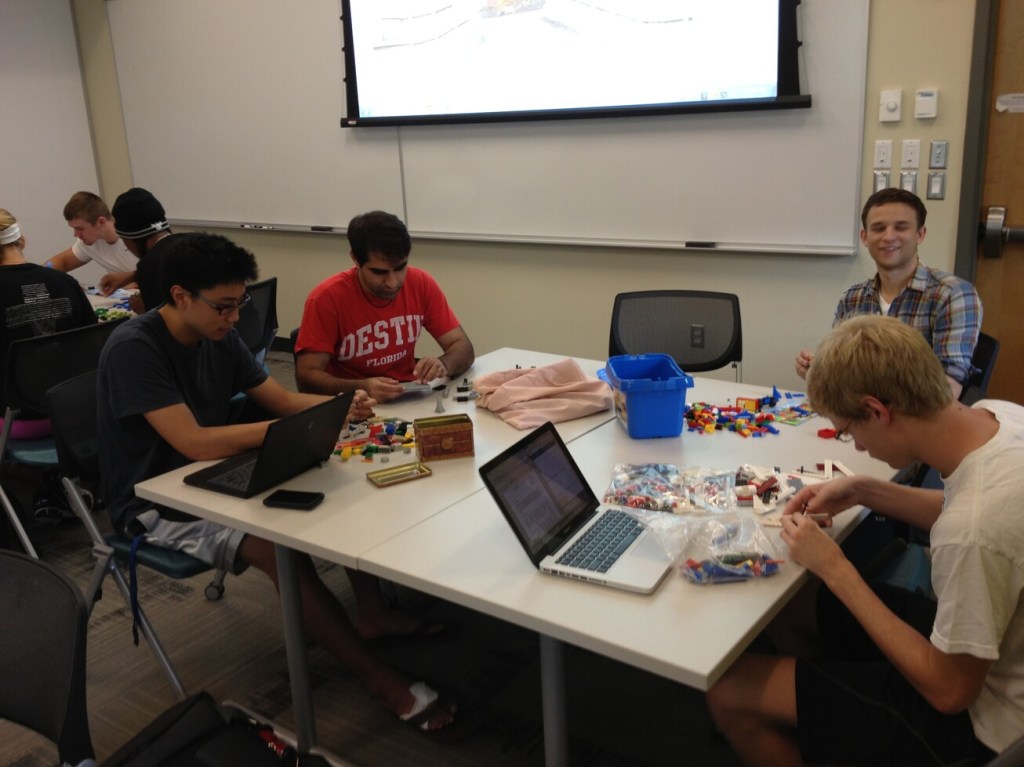
My LMC3403, Technical Communication students are well into their second unit project on reader-centered and process-driven fundamentals. In a fun assignment, I wanted the students to try out many different types of technical communication deliverables for different readers/audiences. Also, I wanted them to think differently about nonverbal communication with the heavy emphasis on haptics, physicality, and making.
In this project, their primary task is to build a set of instructions for a Lego model of their own design.
Their Lego model should represent something about their studies, their professional field, or their entrepreneurial spirit.
Their project began with the creation of a proposal memo that laid out their entire project: designing instructions, testing instructions, reporting on tests in a memo, revising instructions, and reflecting on the project in a memo.
Throughout the process, they have to be mindful of different audiences (executives, managers, and customers).
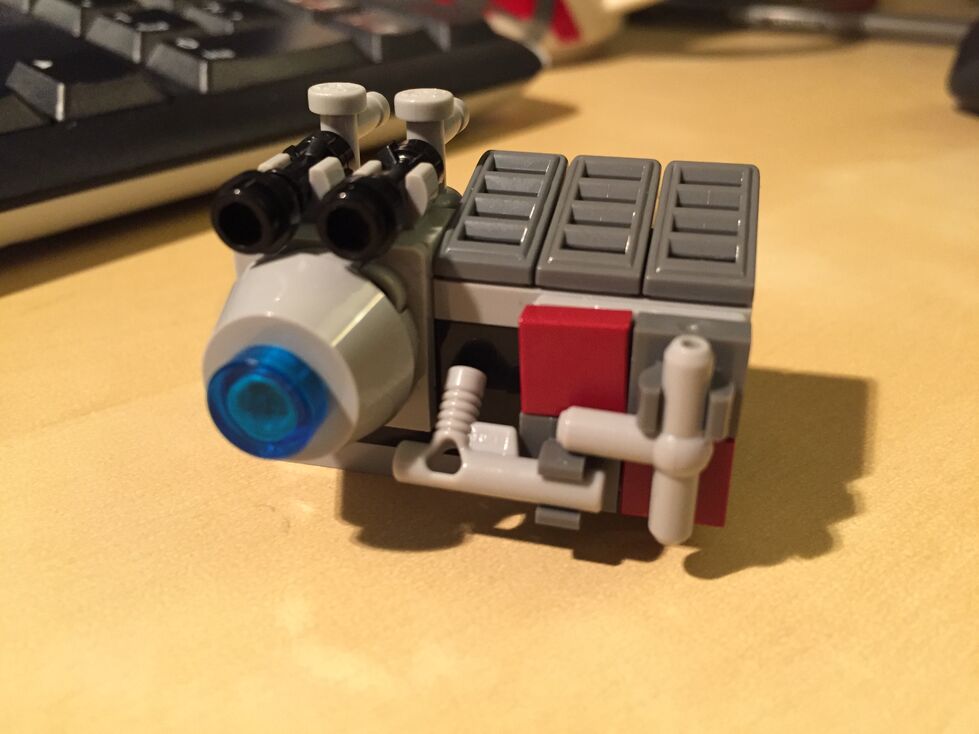
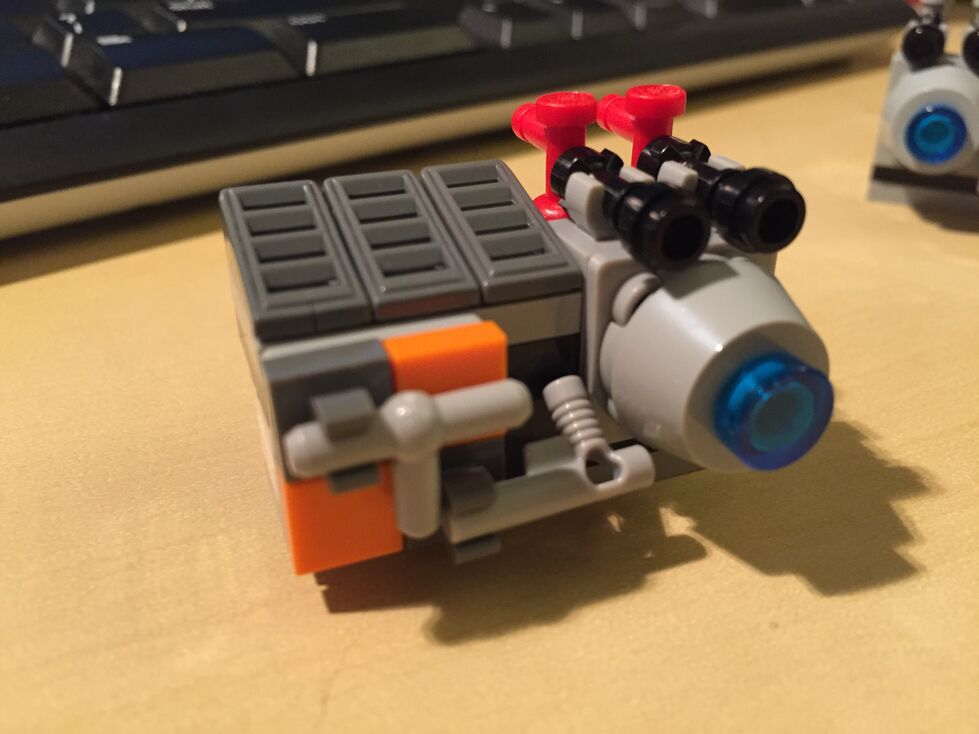
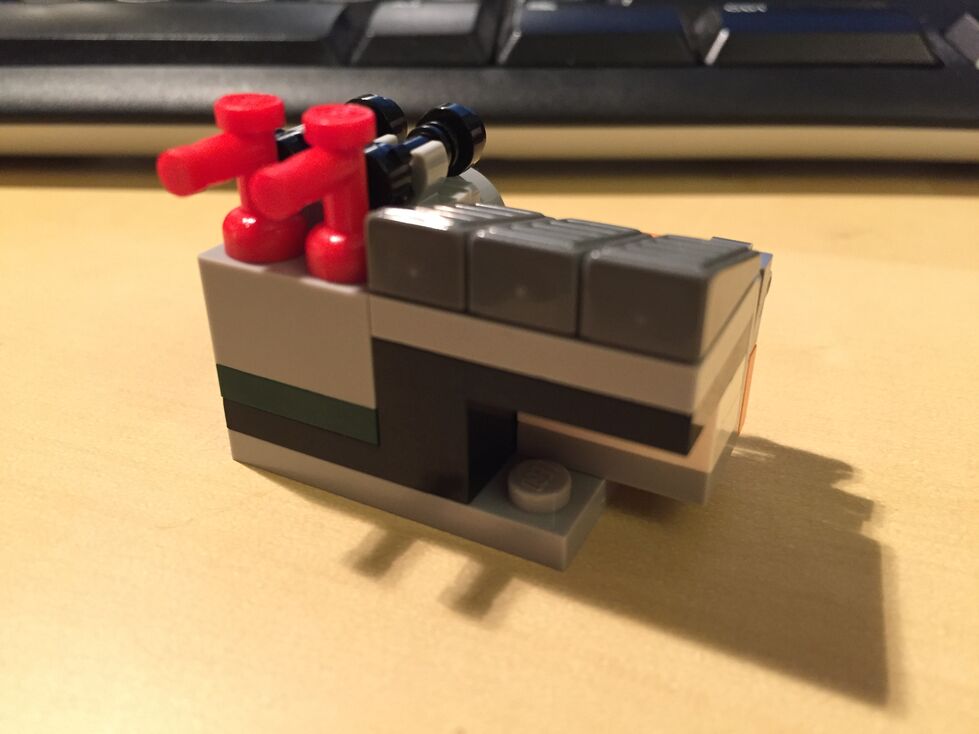
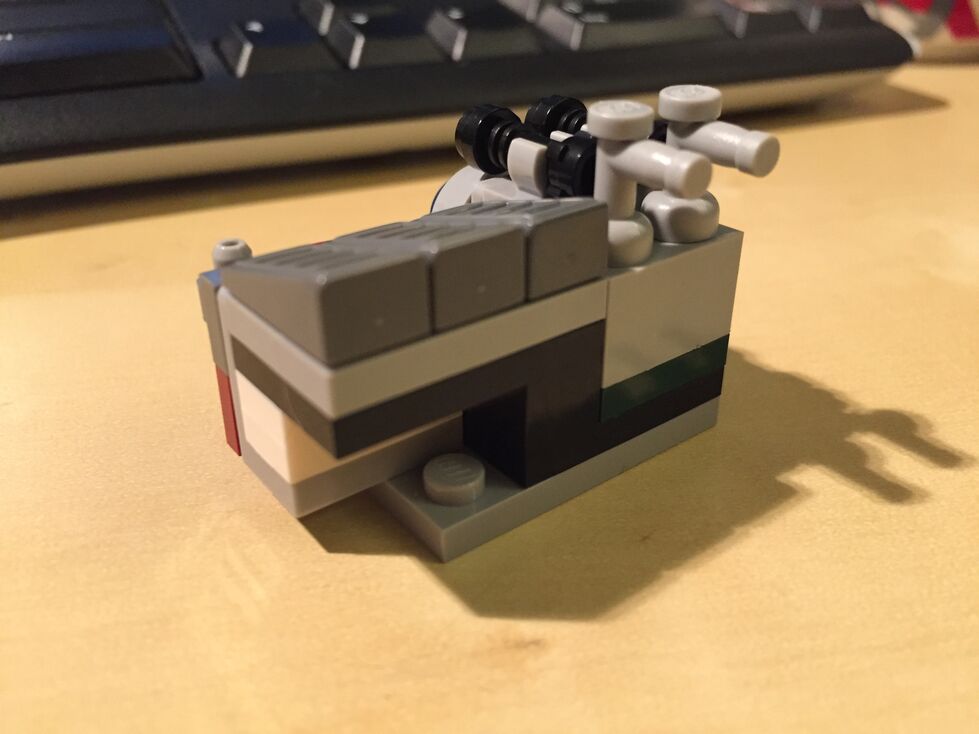
In these photos, the students are busy at work creating the first version of their Lego models.
I was happy to overhear someone say, “It’s nice to actually do something fun in a class for once!”