I’ll be speaking on a discussion panel about Artificial Intelligence, Generative AI, and College Writing at Borough of Manhattan Community College, CUNY (BMCC), Fiterman Hall 1304 on Wednesday, April 2 from 2-4 PM. If you’re free, it would be great if you could join us for what I think will be a lively in-person conversation. Details are below and the event flyer is posted above and below.
The Spring 2025 Robert Lapides Faculty Forum
Wednesday April 2 Fiterman Hall 1304 (245 Greenwich St.) 2-4 pm
A Step Toward the Unified Macro-Mind or a Cybernetic Lawnmower in the Groves of Academia? : Generated Text and the Future of College Writing
Recently, Large Language Models and generated texts have sent shockwaves through the academic community. Do they represent the initial glimmerings on a new horizon of transhuman creativity or are they, in Noam Chomsky’s phrase, merely “glorified autofill,” a “high-tech plagiarism” based on a self-cannibalizing database? Where old-fashioned plagiarism now seems like a relatively simple matter of ethics and originality, Artificial Intelligence and the looming specter of the Literary Chatbot bring a whole host of more tangled issues of Perception, Knowledge, Autonomy, and Class Warfare into the classroom.
Many believe the neural net models of cognition don’t begin to pierce the mystery of the mind—Roger Penrose and others remain unconvinced that human thinking can be reduced meat-puppet computation, while John Searle’s Chinese Room parable undermines the idea that mere symbol-juggling can ever result in emergent consciousness. Still, techno-optimists believe we are at the precipice of an age of cyborg enhancements in which human potential will be radically expanded and the primate mind will be uploaded into Cloud-dwelling immortality.
We will be discussing these issues and many others in an open symposium with CUNY professors Jason Ellis, Carlos Hernandez, Lisa Sarti, and Shane Snipes. We encourage our colleagues to come to voice their concerns and hopes on this increasingly crucial and urgent matter.
The event is named in memory of Robert Lapides, a past English department professor at BMCC. Reading his obituary, you get the sense that he did good work that saved voices from the past from erasure, and created space for voices in the present to carry the work forward.
“Robert Lapides, professor emeritus in the English Department, husband of Professor Diane Dowling, died on January 1, 2021. At BMCC for over 40 years, Professor Lapides will be remembered for his passion, his life-long fight for social, economic, and racial justice, and his commitment to building communities where differences can be expressed. Never afraid to speak up or ask questions, he was genuinely interested in his students and colleagues. His intense curiosity about people, places, politics, history, literature, psychology, religion–about what it means to be human–informed all his efforts. He encouraged his students to embrace their humanity, including the parts of themselves they felt they needed to hide, building their courage to write honestly. His legacy can be found in his influence on the many students and colleagues he worked with, the online communities he created, in his faculty magazine Hudson River, and for editing Lodz Ghetto, collected writings left behind by Jews confined to the Lodz Ghetto in WWII. Until the end, he was working on his book about the creative development of Charles Dickens, which will be published posthumously” (from Ellen Moody’s Under the Sign of Sylvia blog, 25 Mar. 2021).
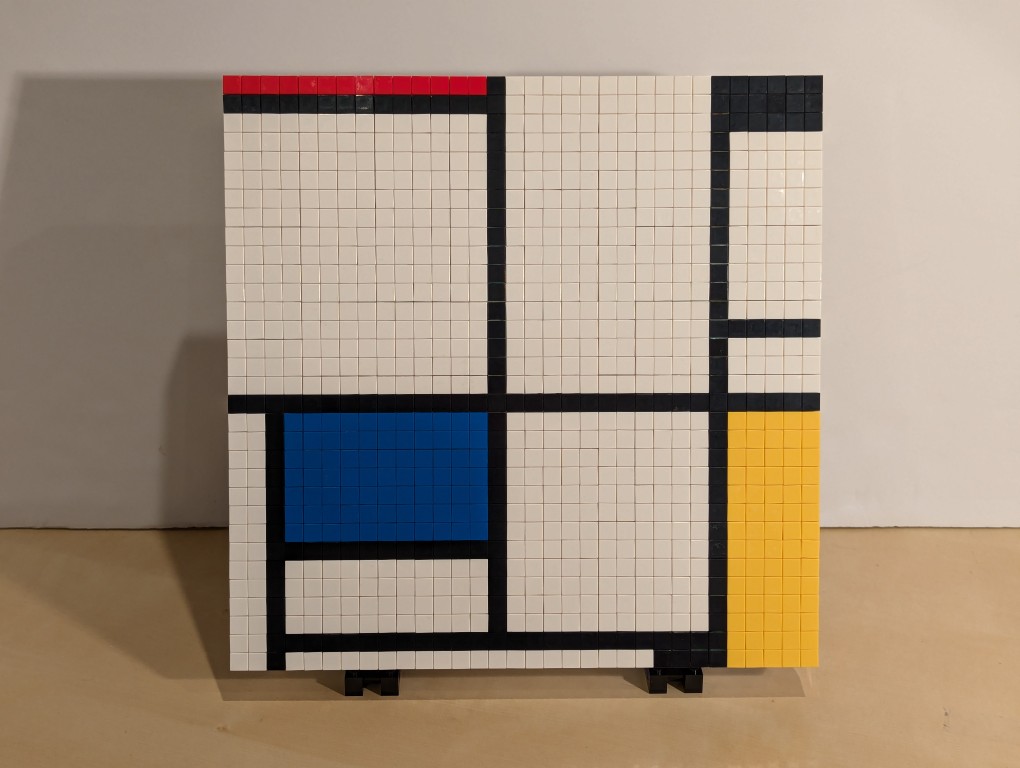
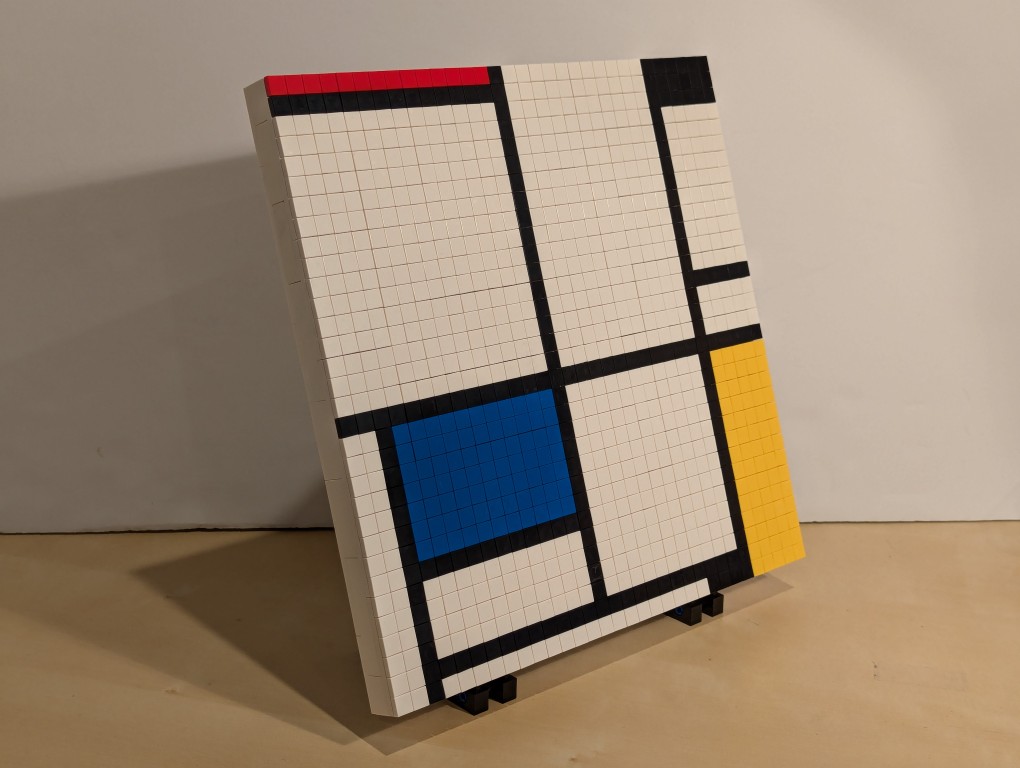
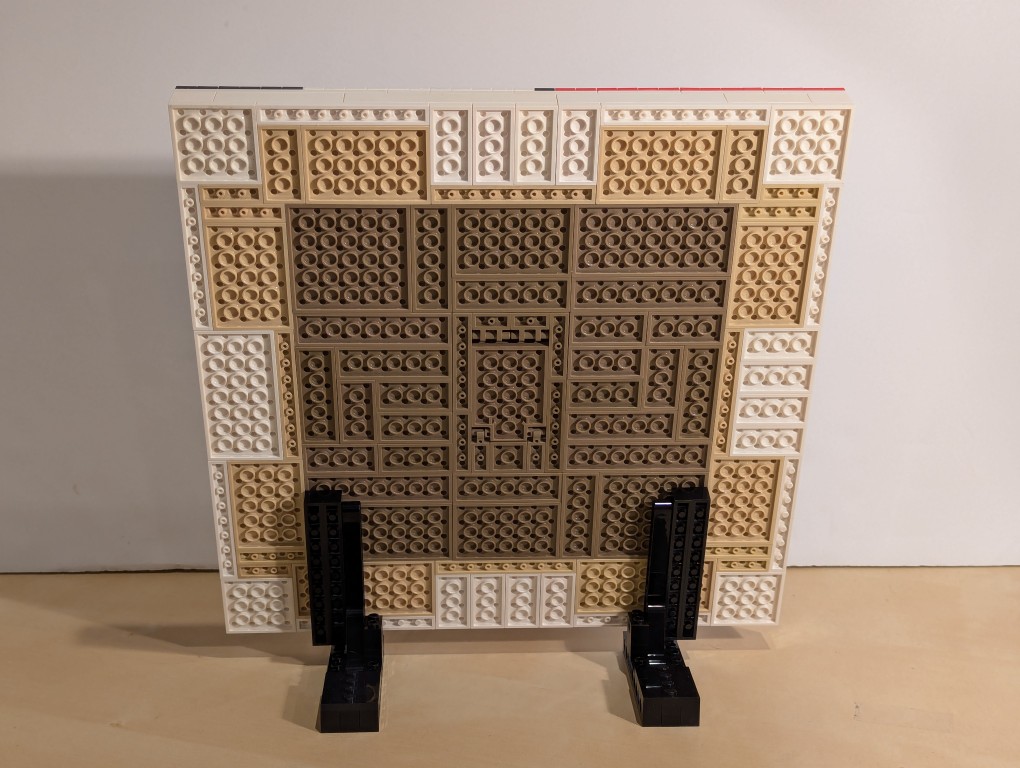
I have appreciated Piet Mondrian’s neoplasticism artwork for many years. As I wrote about here, I was glad to see his work shown in Lt. Cmd. Data’s quarters on Star Trek: The Next Generation. Then, after seeing some of his works in person at the Museum of Modern Art in Manhattan, I hatched a plan to copy his the painting from Data’s quarters–Mondrian’s Tableau I (1921) on display at the Kunstmuseum Den Haag–using a different medium: LEGO.
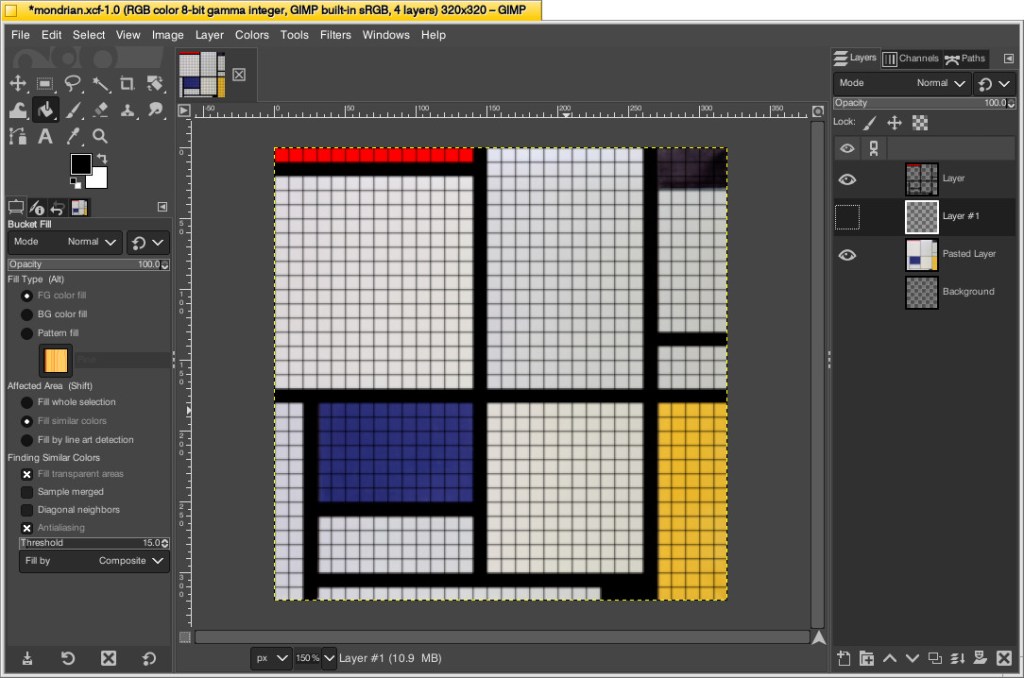
Planning with GIMP
Before creating a planning image using GIMP, I had to decide what size I wanted (and could afford) my build to be. I had already decided to use LEGO 1×1 flat tiles as the “painting medium.” Using LEGO’s Pick-a-Brick service online, these bricks cost $0.05 each in a variety of colors. If I went with a 32×32 stud “canvas,” that would give a surface area of 1,024 studs and therefore a need of 1,024 flat tiles to cover all of those studs. This would cost $51.20 for enough tiles to cover a 32×32 surface. Other options that I considered was enlarging each dimension by 1.5 to 48×48 for 2,304 studs and a cost of $115.20 for enough tiles or enlarging by 2 to 64×64 for 4,096 studs and a cost of $204.80 for enough tiles. Even using bricks that I already owned to create the canvas and stand, it was hard to spend more than the $51.20 for enough tiles to cover a 32×32 canvas and essentially fill the volume of your hands cupped together.
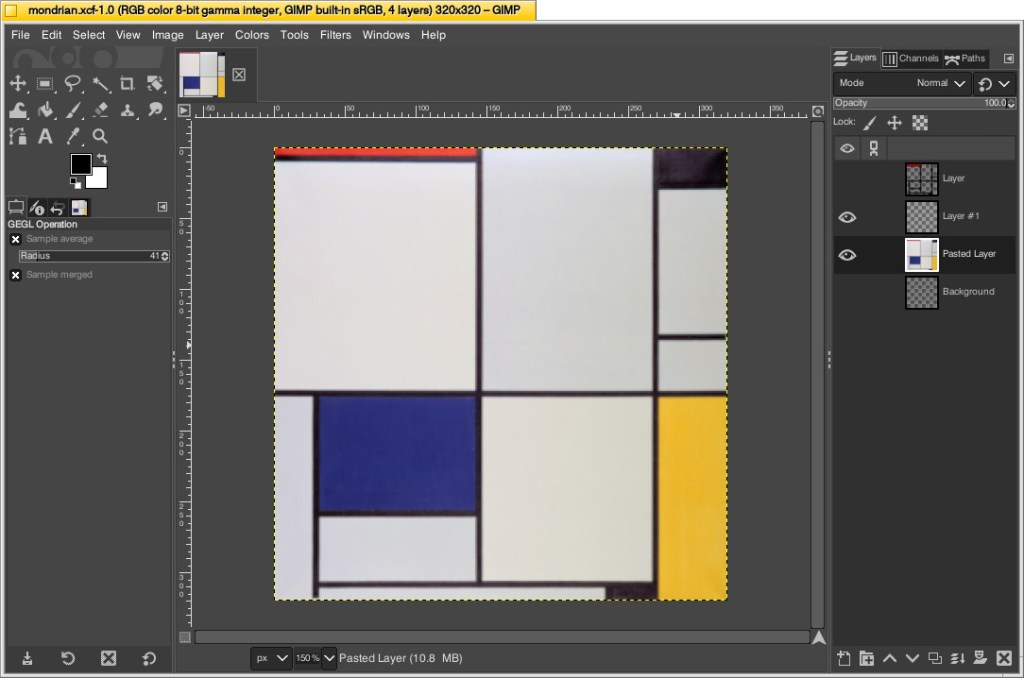
With that decision made, I could begin working in GIMP. First, I opened an image of Mondrian’s Tableau I (1921). The original is painted on a 103cm x 100cm canvas. Since I am creating a perfect square, I needed to square this image and resize it to match my calculations. To do this, I simply selected Image > Scale Image > unlinked the horizontal and vertical resolution > entered 320 for X and Y > clicked Scale. This made the image a perfect square with a resolution of 320 by 320.
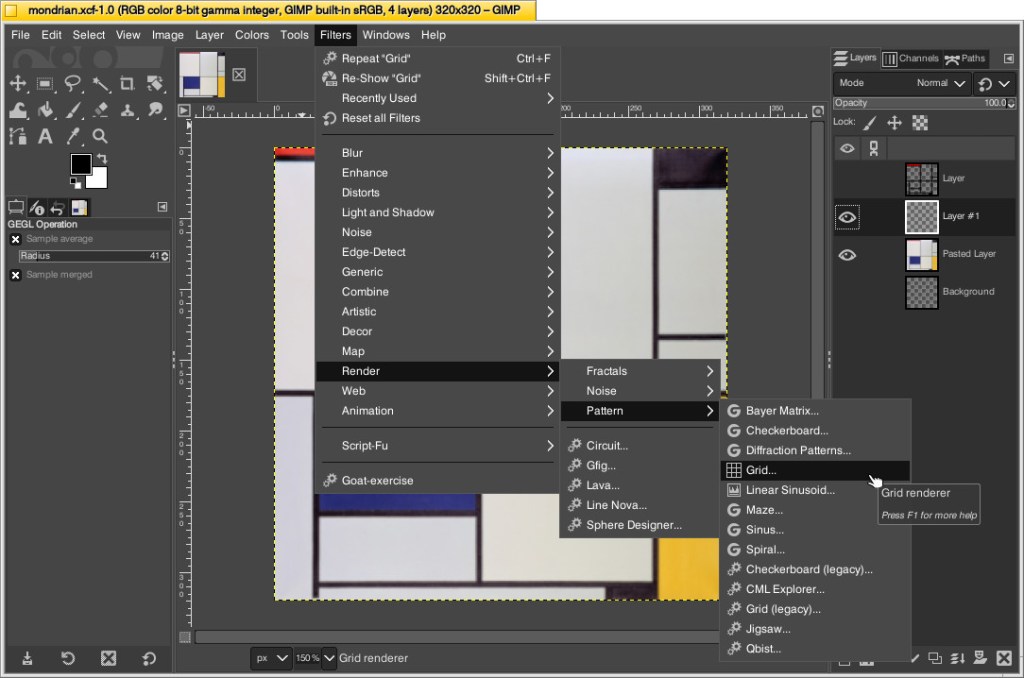
Next, I needed to make the image look more LEGO-like to calculate how many flat tiles I would need of each color. To do this, I added a new layer over the original image and then clicked Filters > Render > Pattern > Grid.
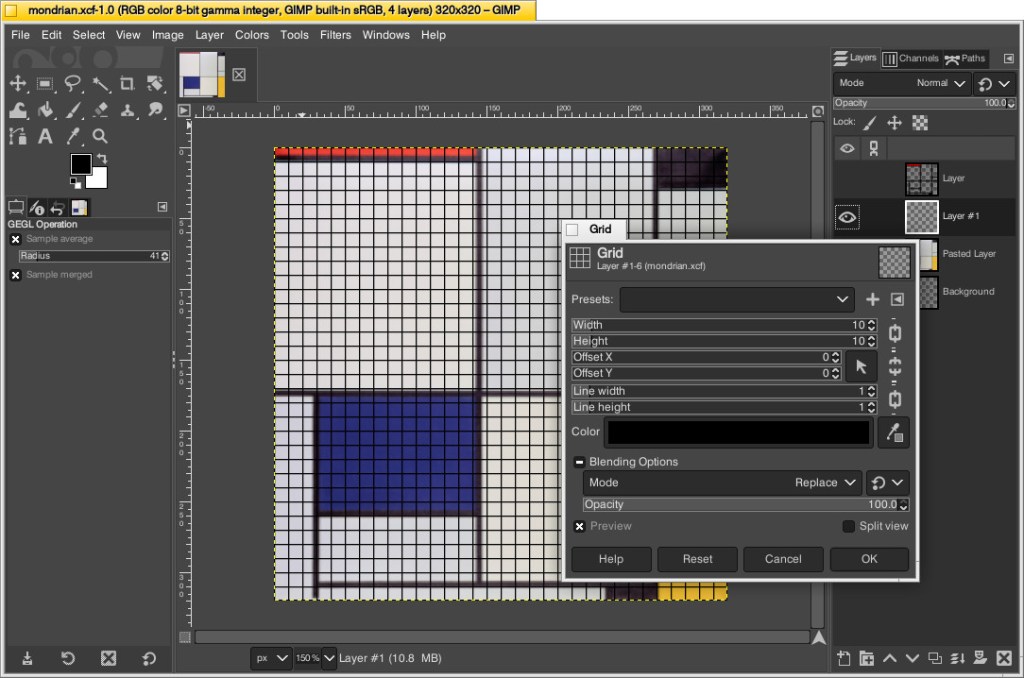
On the Grid pop-up window, I changed the Width and Height to 10–meaning that there would be a grid line every 10 pixels on the X and Y axes. Since I had already scaled the image to 320 pixels on each side, this grid would perfectly approximate the 32 x 32 grid of my LEGO canvas. Also, I set the line width and height to 1 pixel each so that it wouldn’t be too large and obscure the next step. After clicking OK, the grid appears over the image.
While remaining on the layer with the grid, I selected the paint bucket tool, selected the color of the target areas–black, blue, red, and yellow–in turn, and filled the appropriate squares to match the original painting underneath. I did this to make sure I was making the tile count as accurate as possible. If I hadn’t done this, the black lines would be less noticeable and what I might count as a colored square versus a black line might become confused. At a LEGO resolution of 32×32 studs, it was impossible for me to make it as accurate as the original, so this technique helped me approximate the original with a high degree of accuracy.
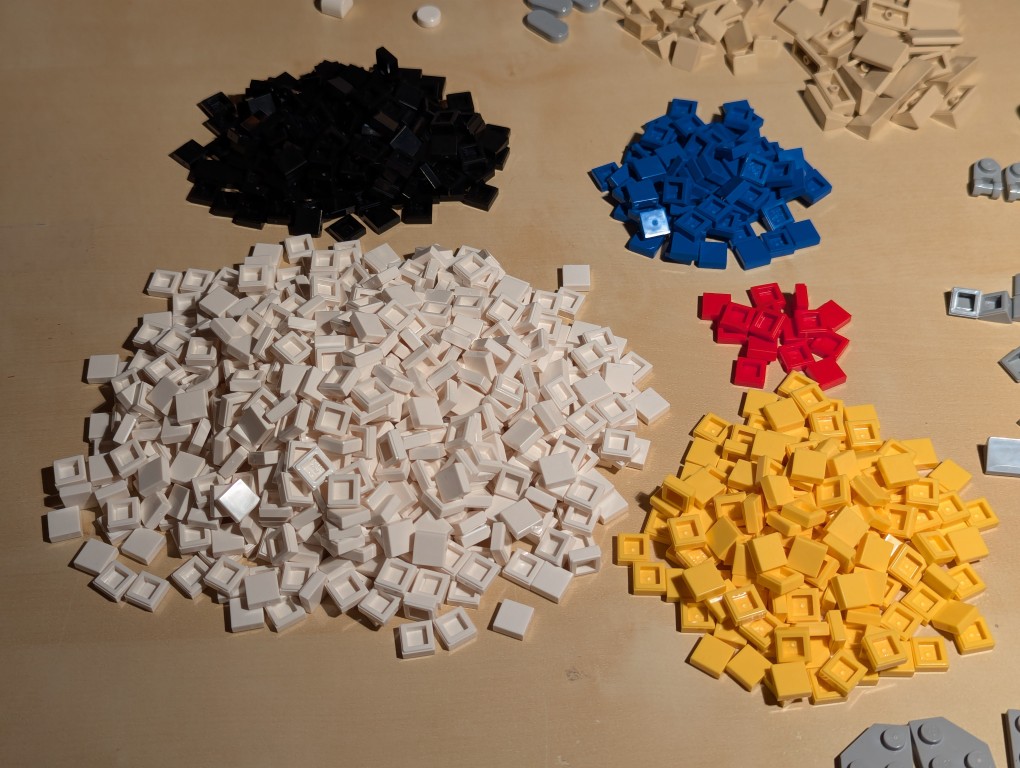
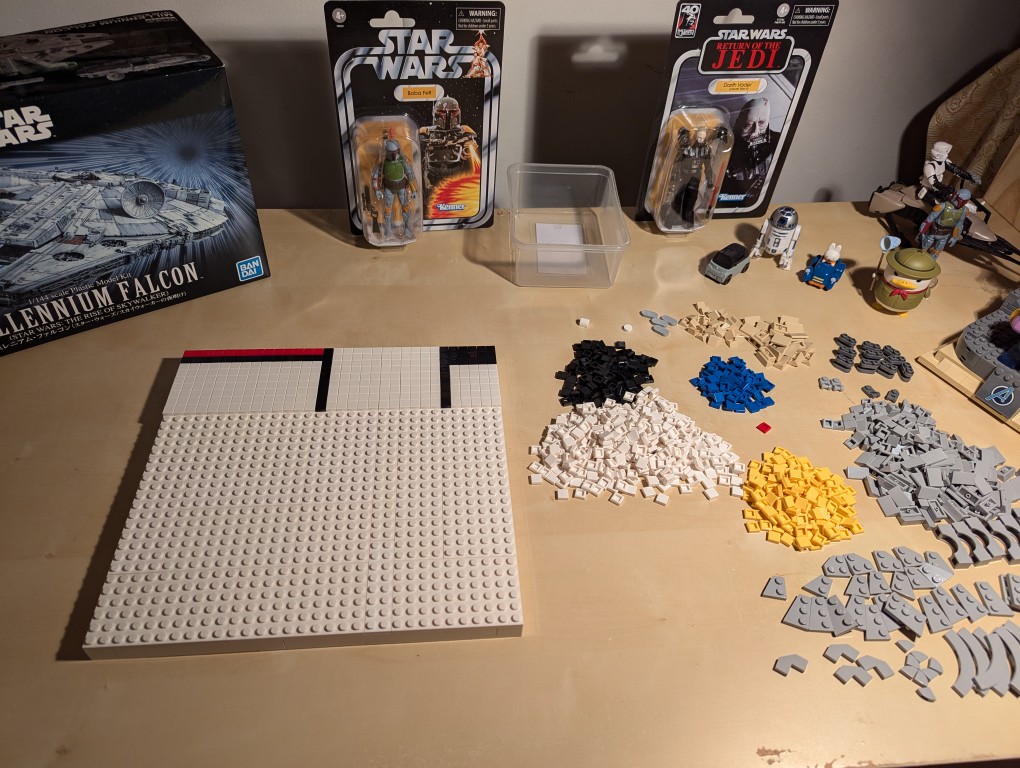
Then, I counted the squares of each color to make my LEGO order: 686 white, 177 black, 77 blue, 70 yellow, and 14 red. I ordered a extra flat tiles of each color in case my counting was incorrect.
Building the Canvas
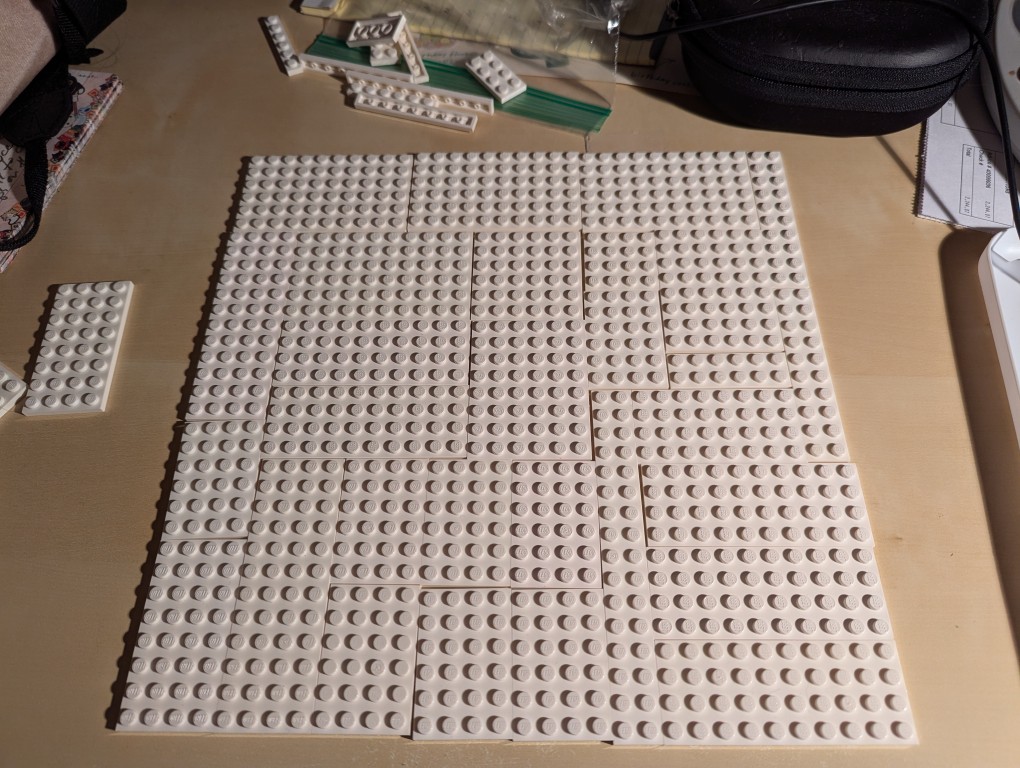
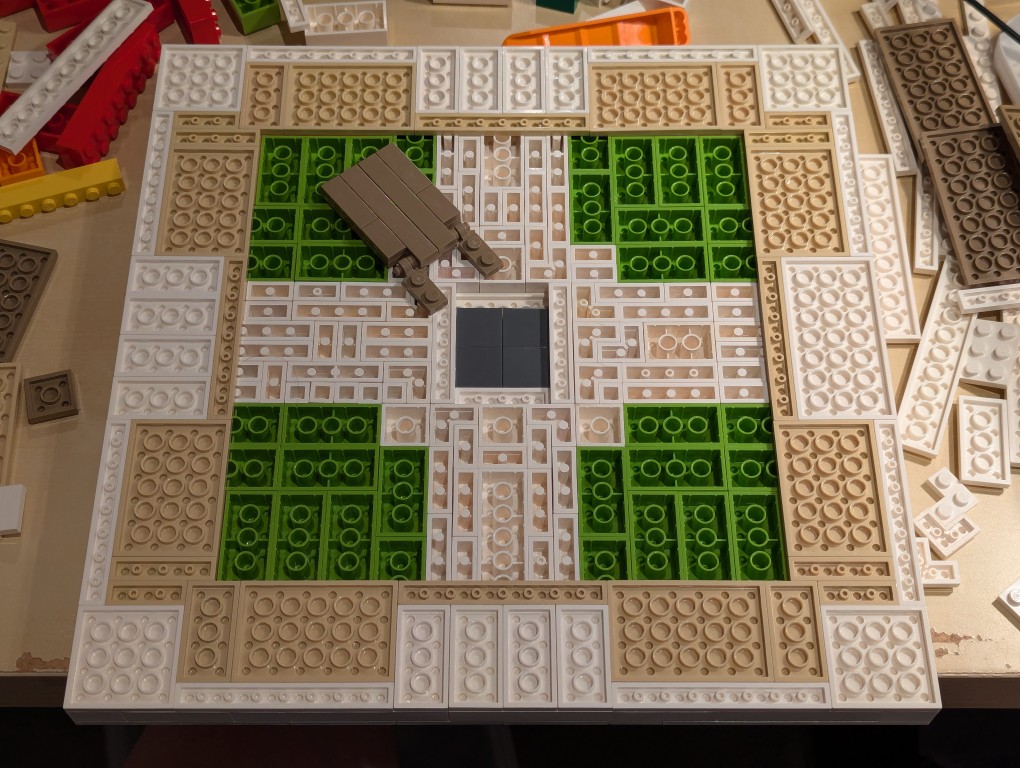
I wanted to build a substantial canvas for the Mondrian instead of using a 32×32 base plate. Also, I wanted to build with as many white bricks and plates as I could to reduce how much I had stored in plastic bins under my desk.
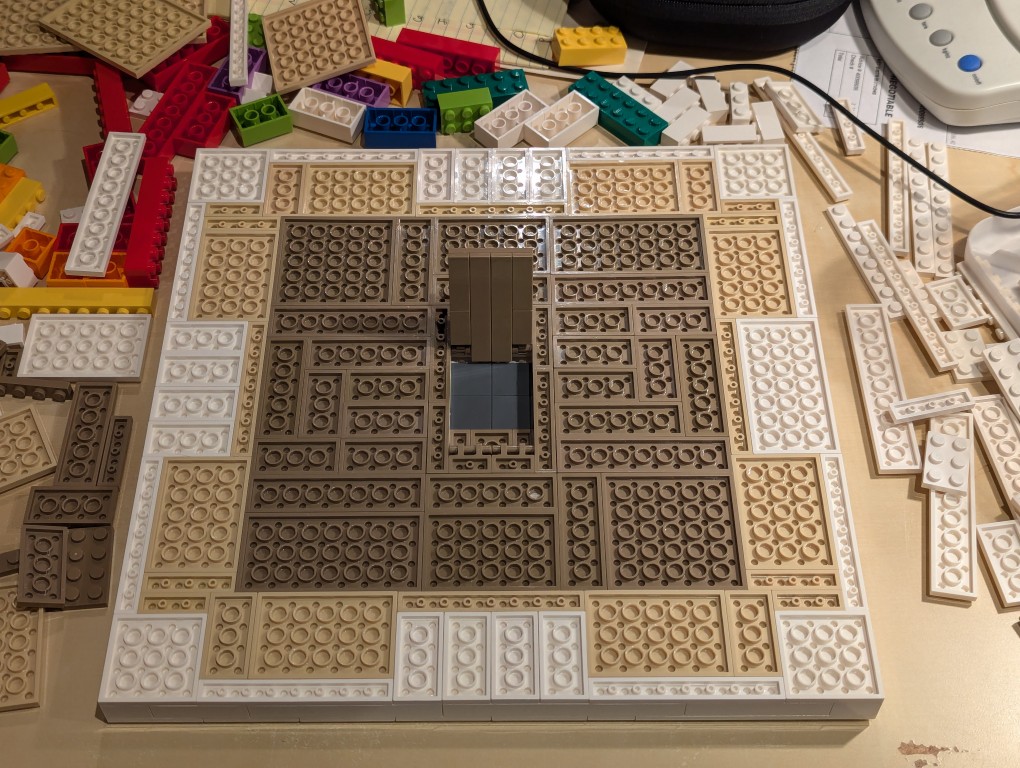
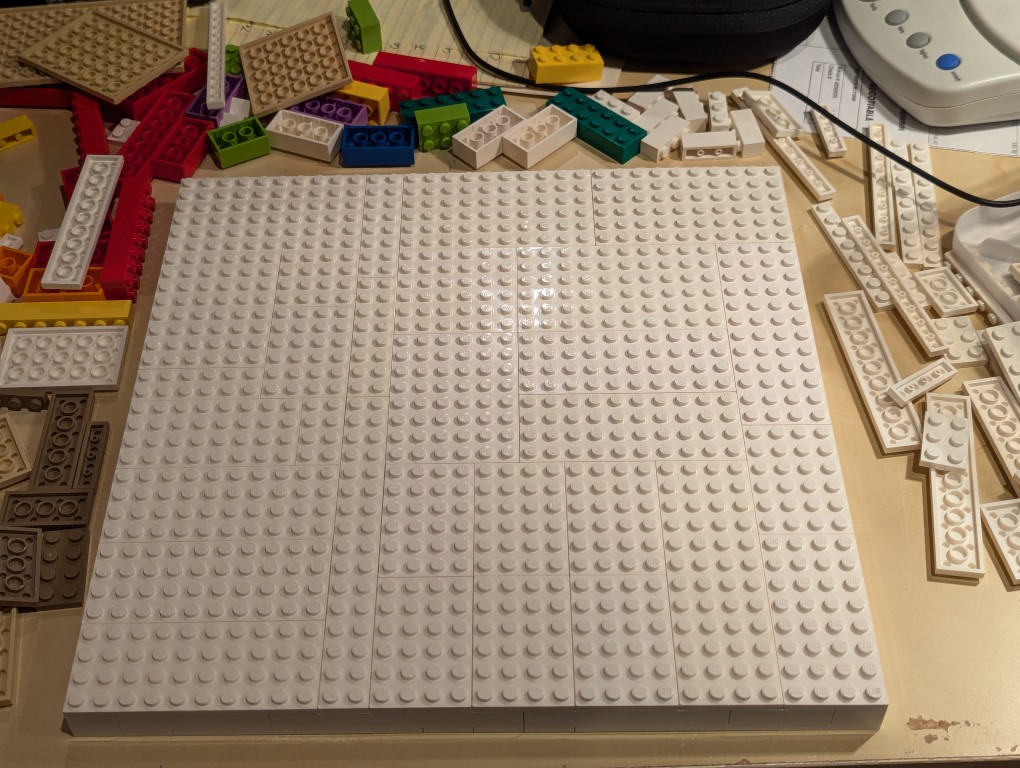
To begin, I laid out a 32×32 grid of plates. I didn’t have a large number of similar types of white plates, so I had to try different configurations before settling on one. If I had to do over again, I would have tried configuring it for more staggered stepping instead of long break lines as I did.
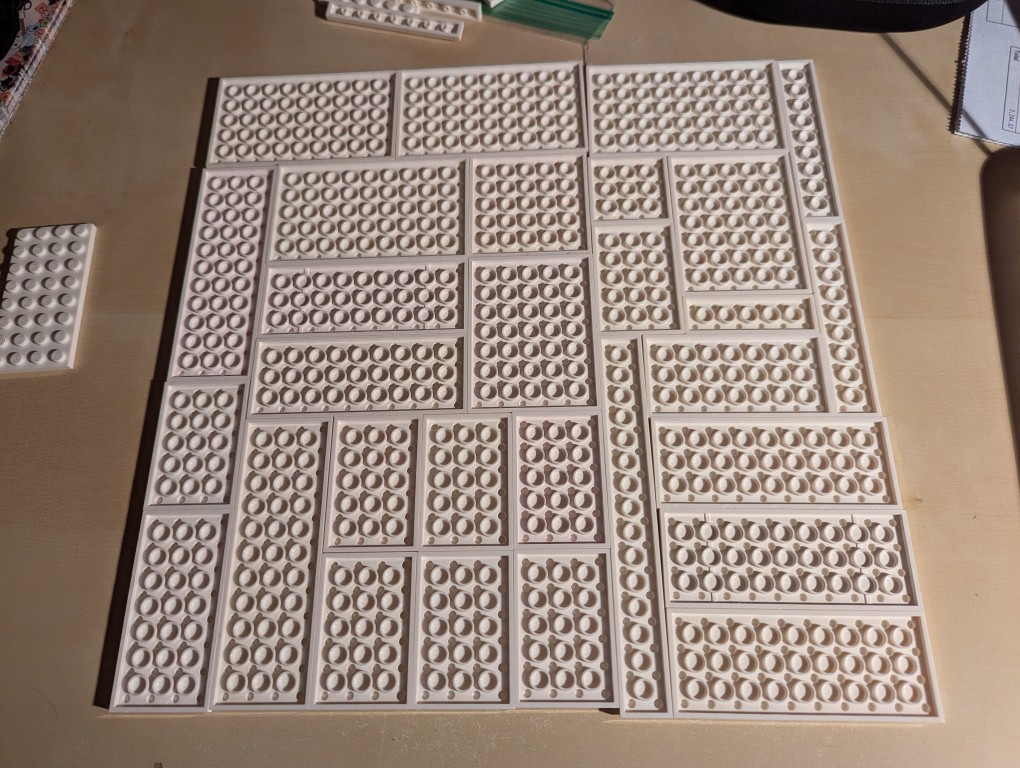
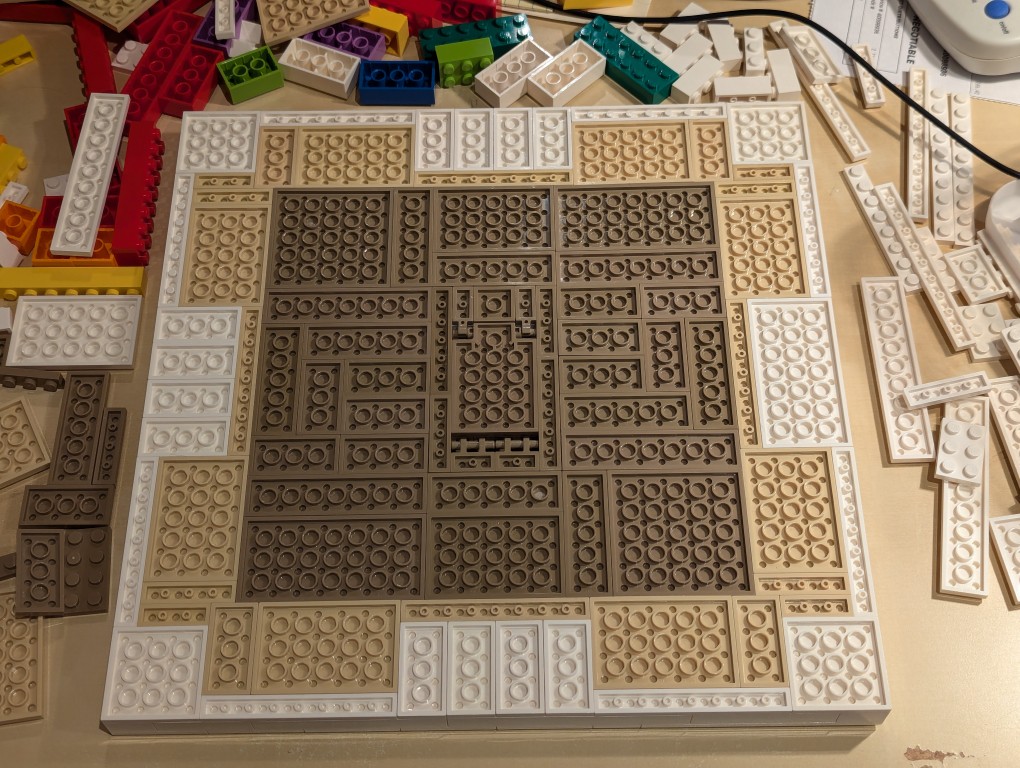
I flipped over the plates to begin building the support frame for the canvas using bricks.
I wanted the canvas to appear stretched, so I continued the color white from the canvas’ plates to the border.
Knowing these other colors would be hidden, I used filler bricks in a mirrored pattern (I would know what it was like underneath even though no one else would).
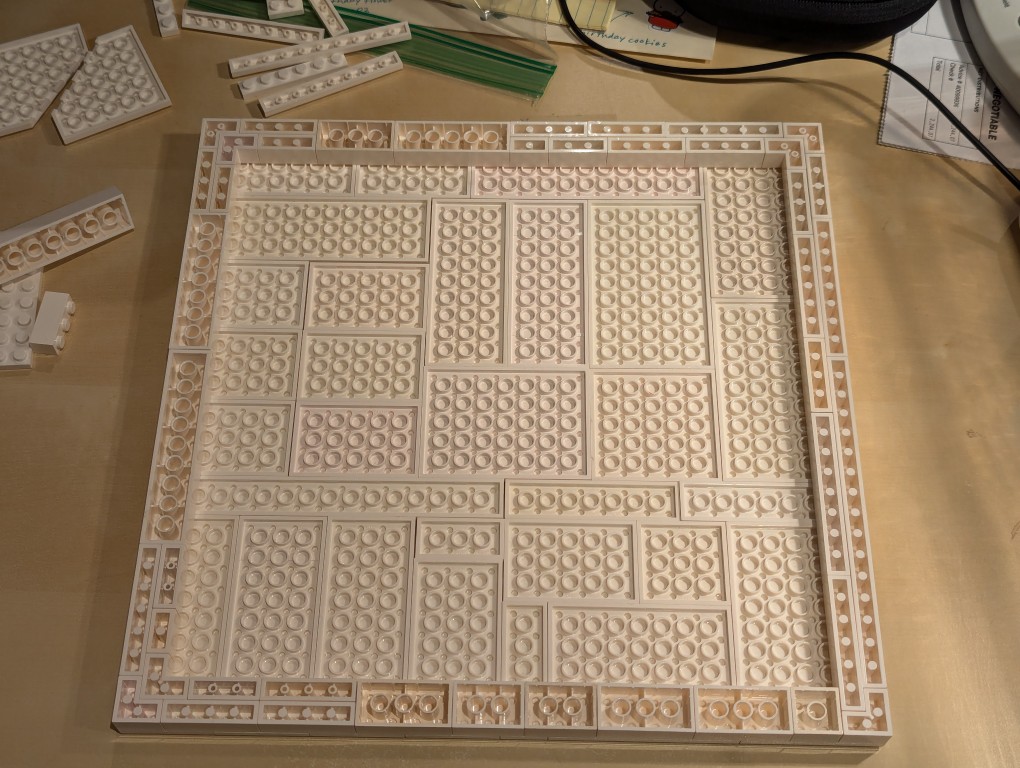
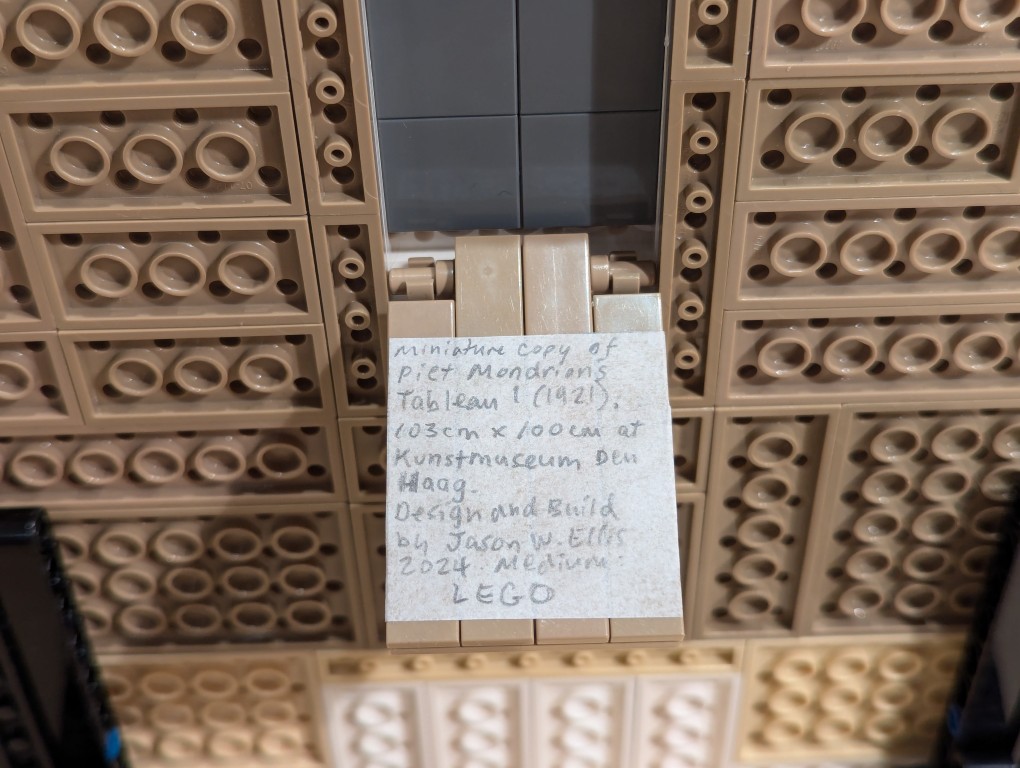
After beginning to cover the filler bricks with white plates (stretched canvas) and sand plates (wood frame), I thought that it would be cool to build a hidden compartment to hold a written statement about the artwork. So, I pulled out some central bricks, filled the center with inverted 2×2 flat tiles.
I constructed a compartment door on hinges in the middle of the back of the canvas and filled the rest of the space with dark sand plates (paper backing protecting the canvas).
Here is the hidden compartment door open.
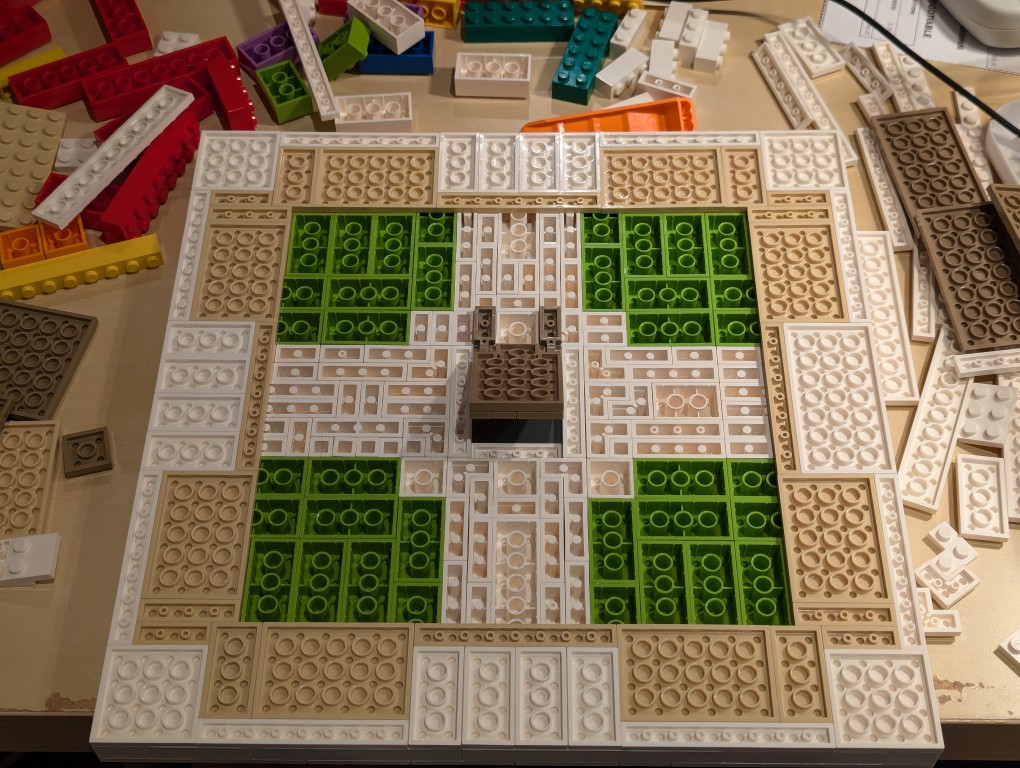
Flipped back over, the canvas is primed and ready for the “paint.”
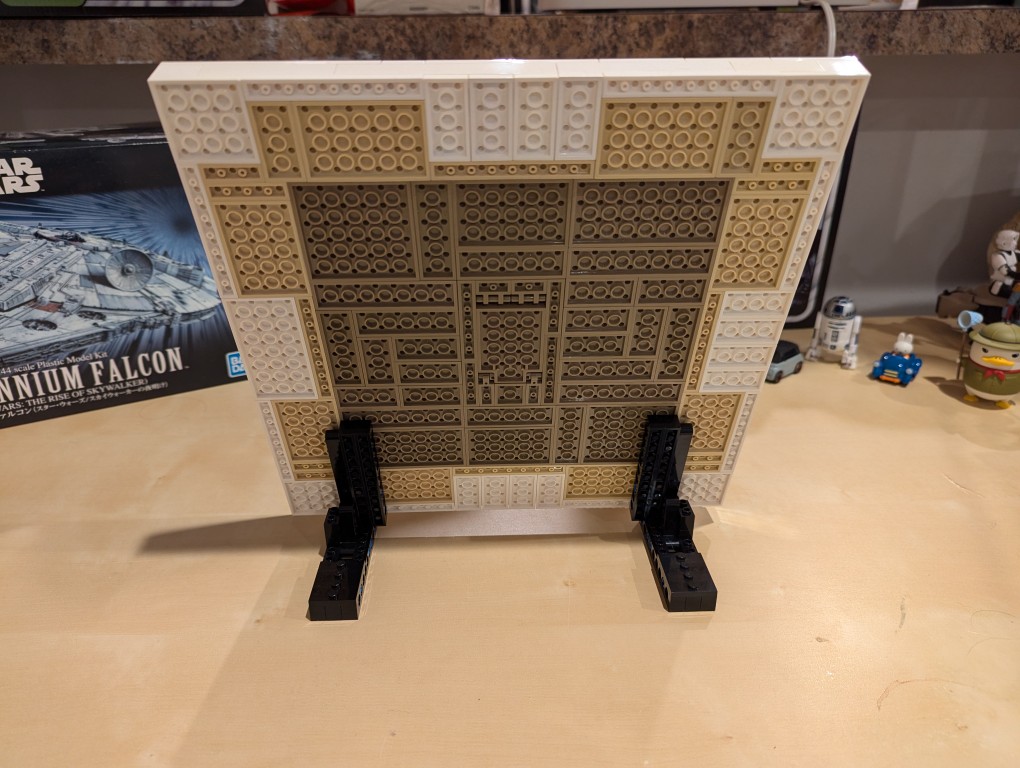
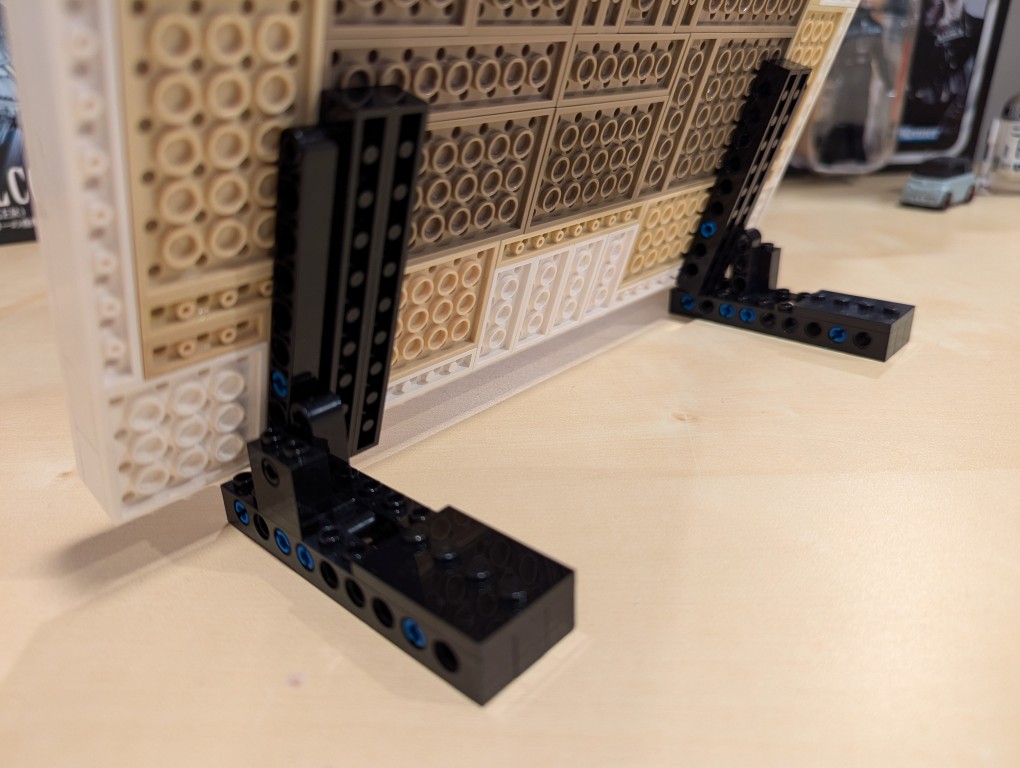
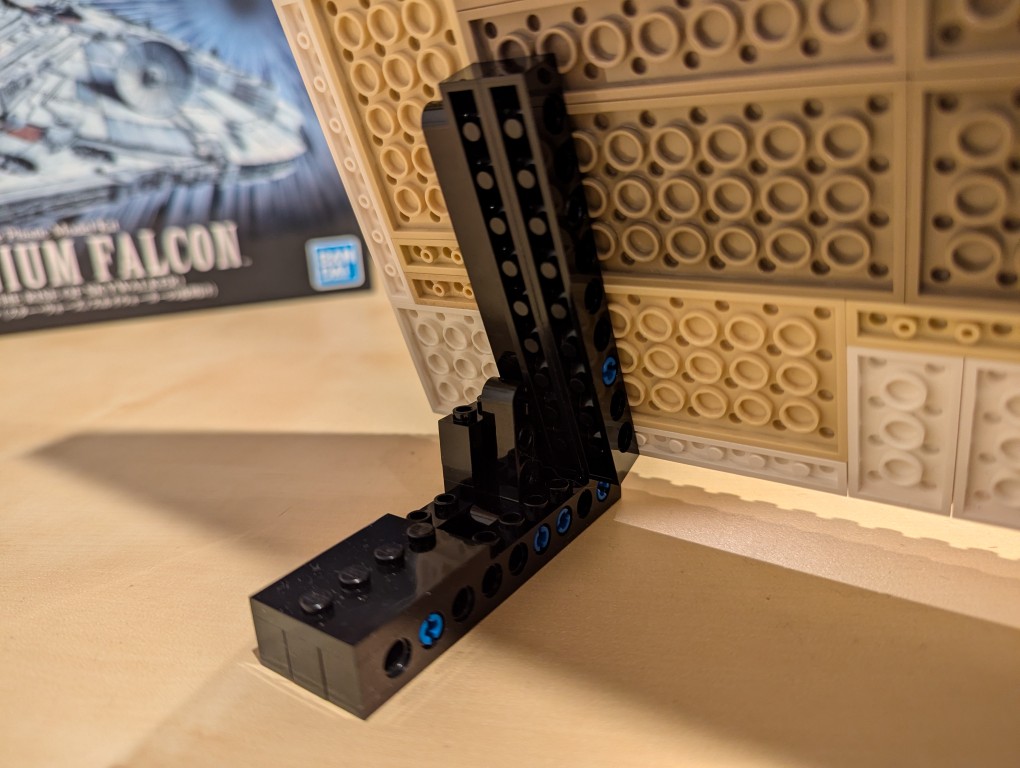
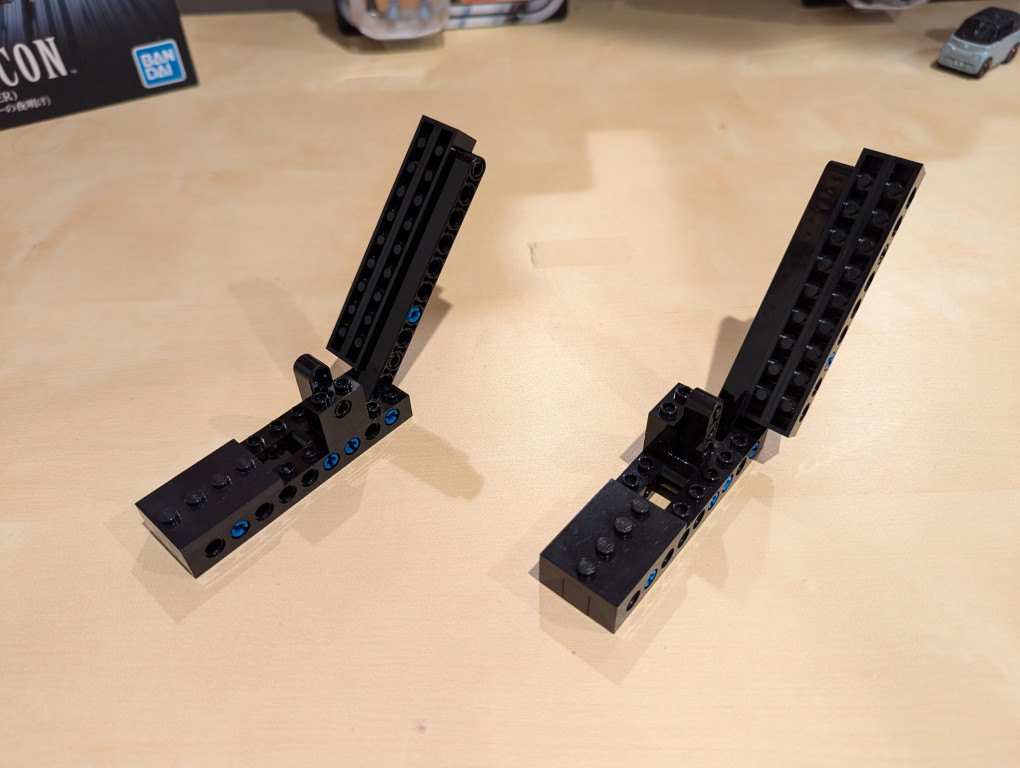
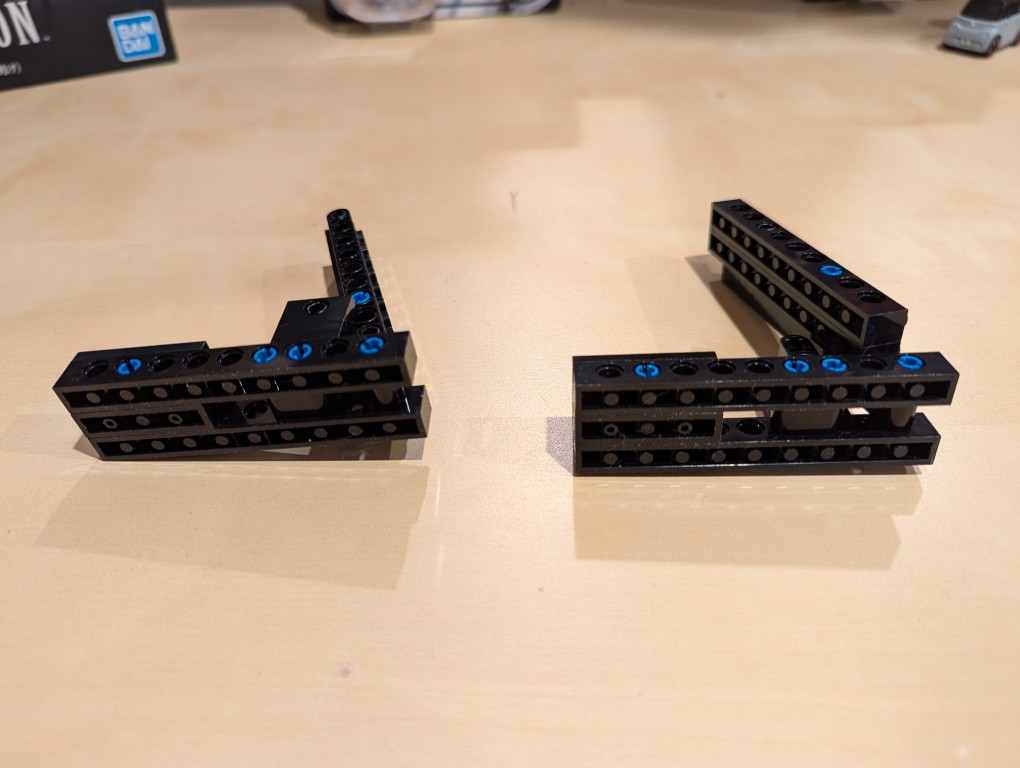
Constructing Display Stands for the Canvas
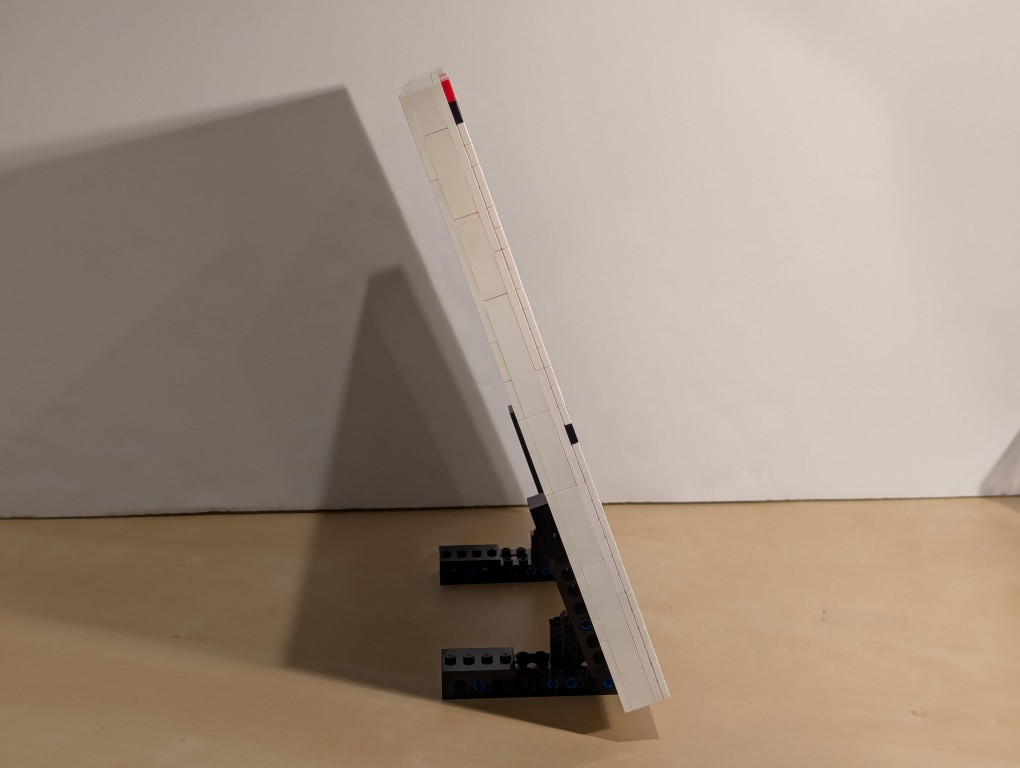
I used LEGO Technic bricks to build two stands for the canvas so that it was held at a stable angle.
It’s about 70 degrees from horizontal.
I beefed up the friction connection between the stands and the canvas by using two 1×10 Technic bricks that attach to the canvas.
From the blue color, you can see that I used a number of 3 brick width pins.
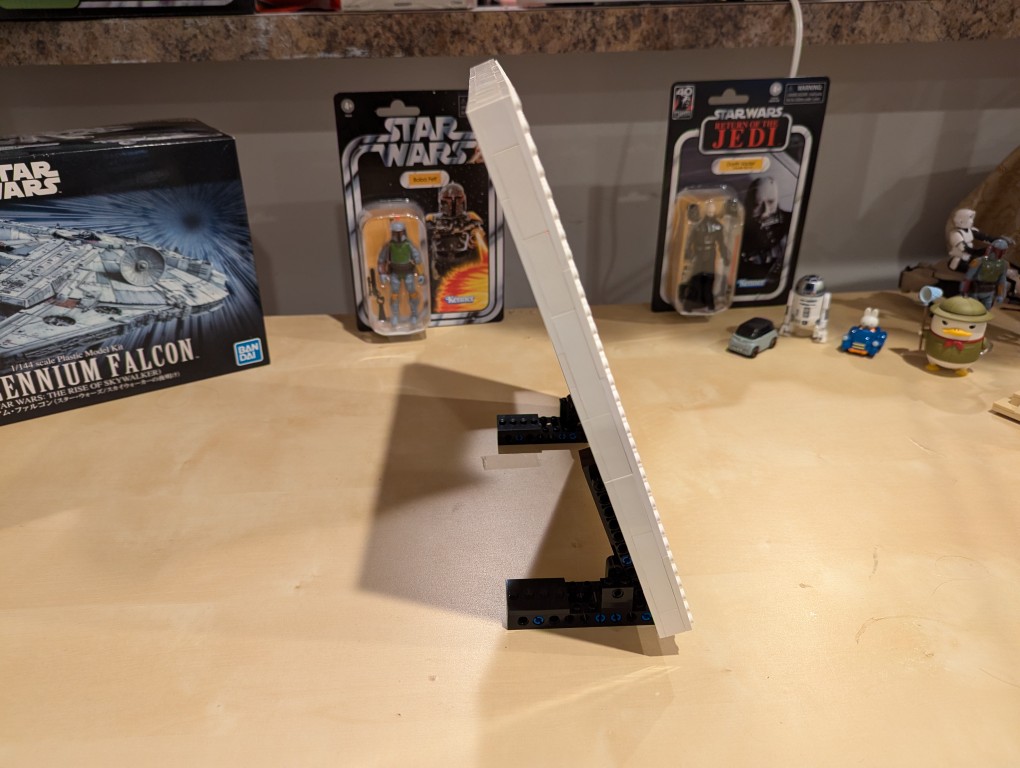
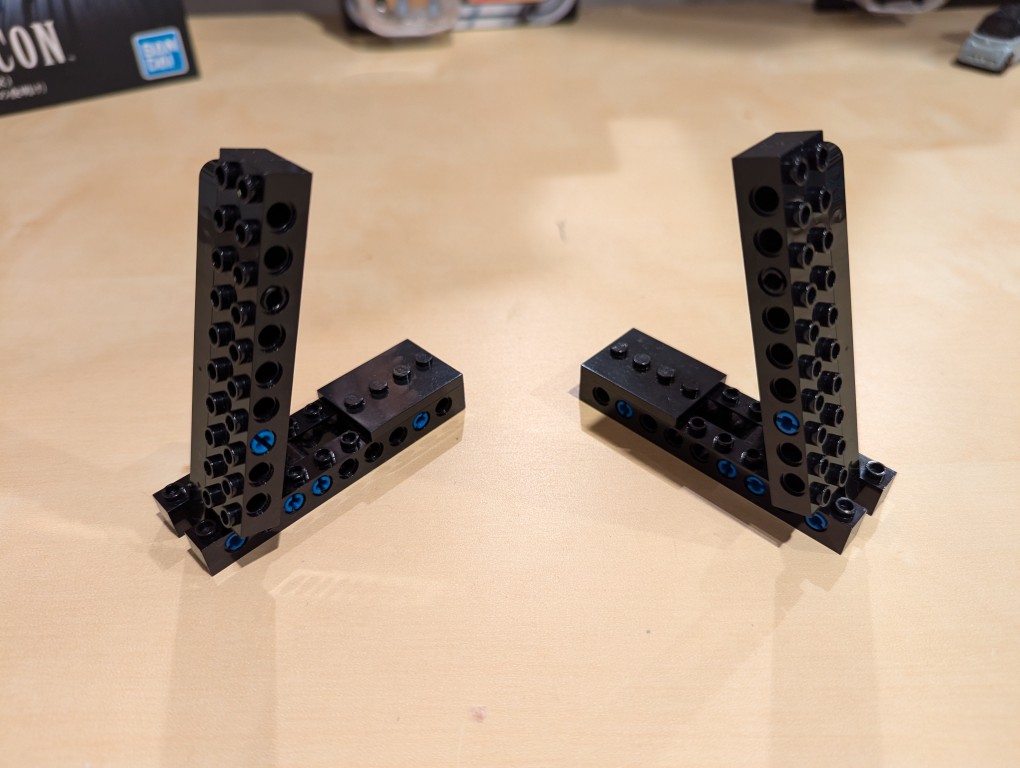
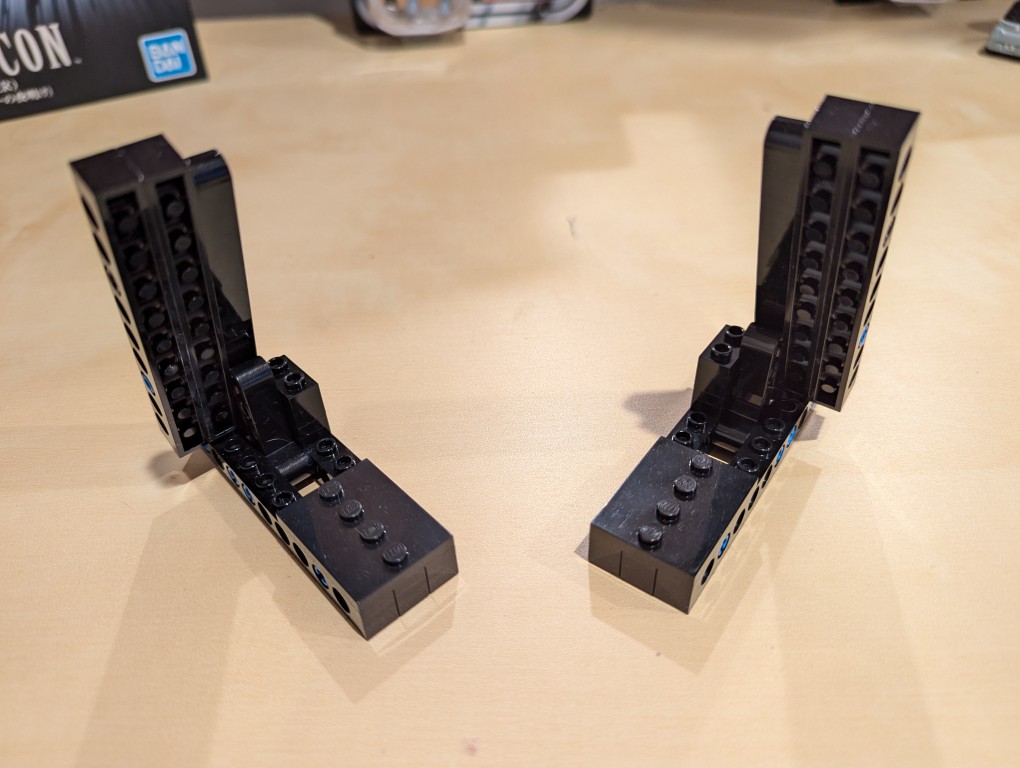
These photos show the stands in more detail detached from the canvas.
Note that the angle is achieved by having the long arm simply rest against a smaller L-shaped Technic support arm. Gravity holds things in place.
I added extra Technic bricks to the stand’s bottom support legs for extra strength.
Assembling Mondrian’s Tableau I (1921)
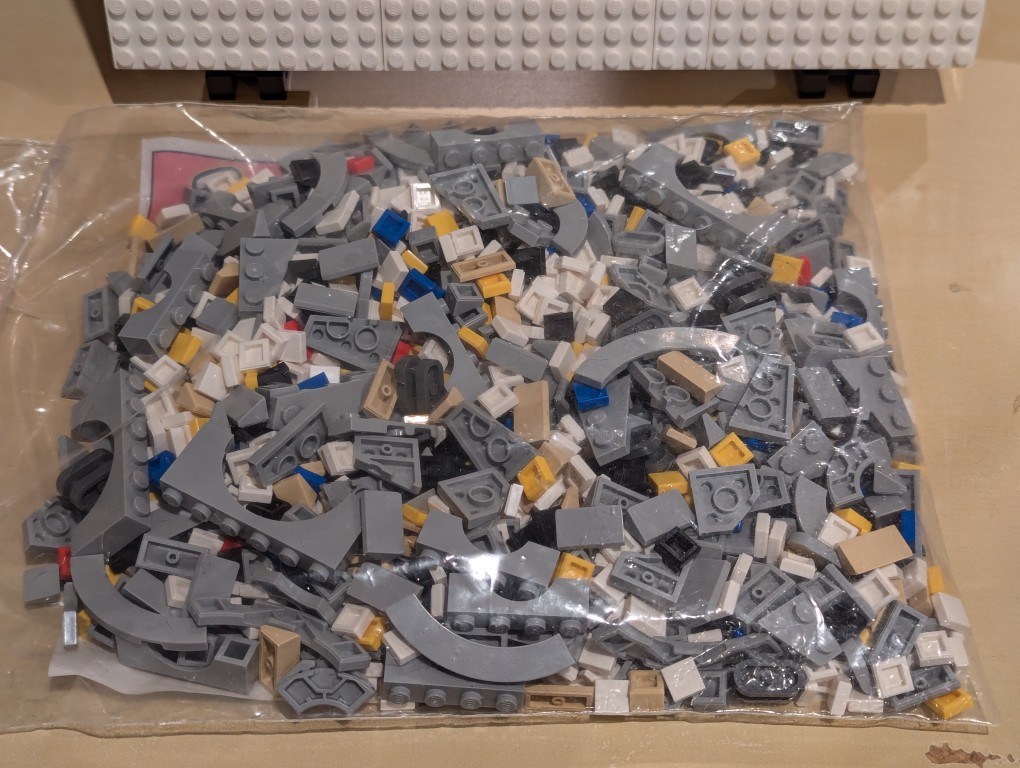
After placing my LEGO Pick-a-Brick order for the “painting” 1×1 flat tiles, it took about a week-and-a-half to arrive.
I ordered bricks for a custom Millennium Falcon that I am currently also working on, so I needed to sort everything out.
Here I am sorting the LEGO bricks.
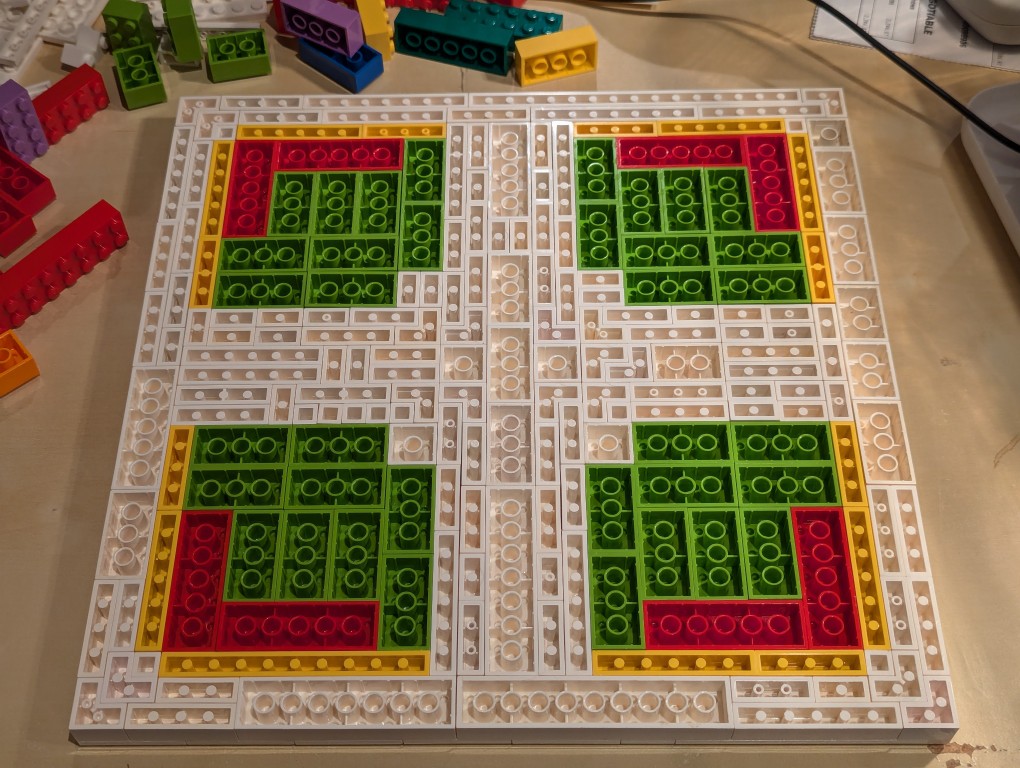
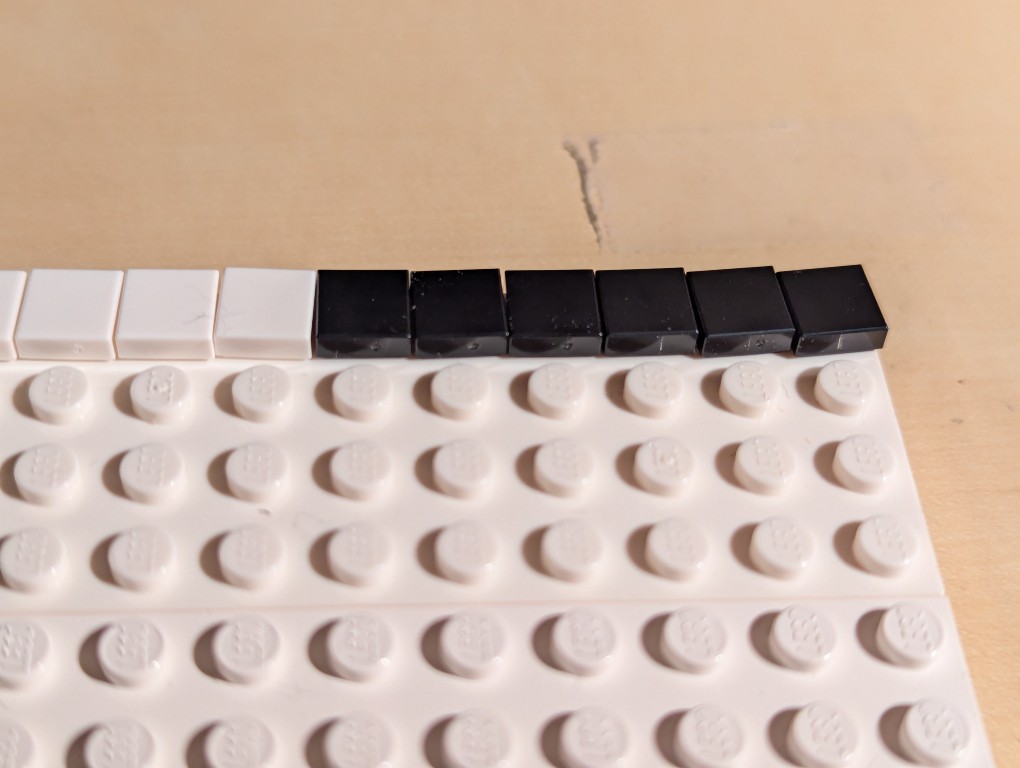
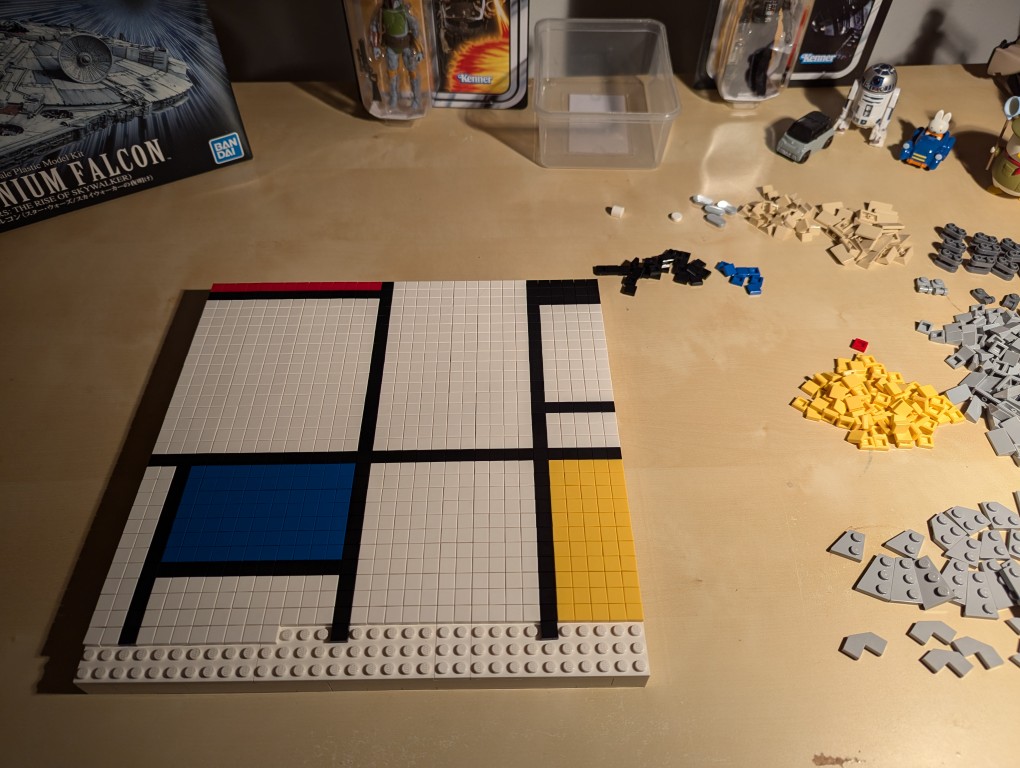
With the bricks sorted, I began to paint my recreation of Mondrian’s Tableau I (1921).
I began at the top horizontal line and created one line at a time–kind of like a CRT drawing a line of pixels across the screen one-at-a-time.
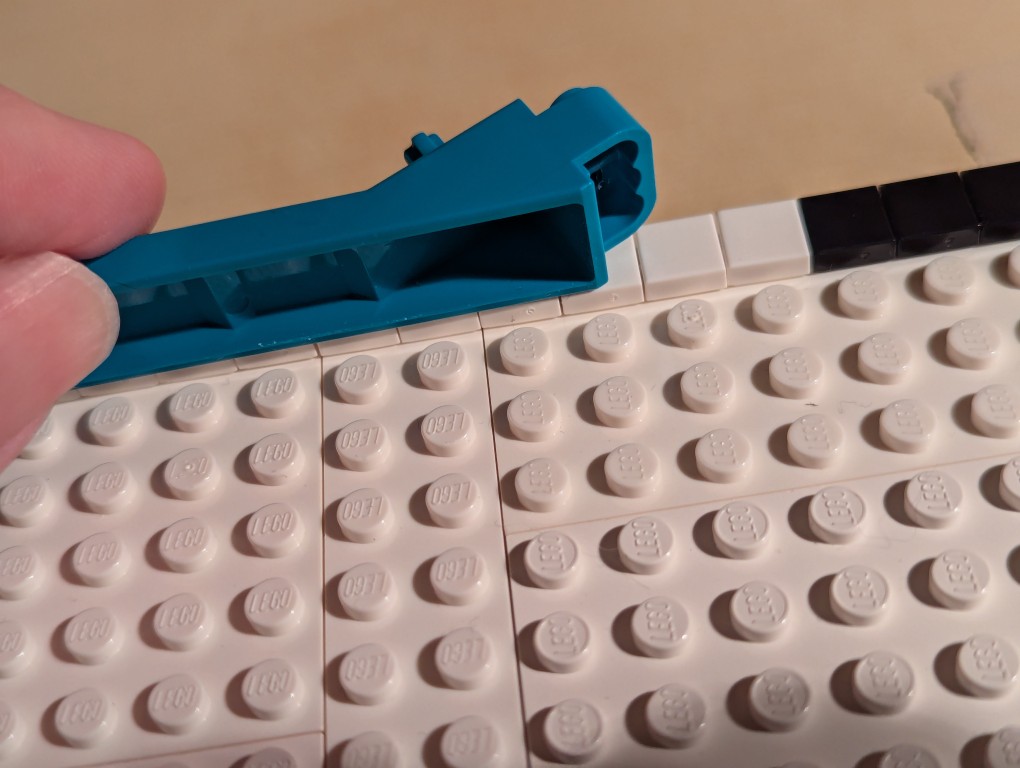
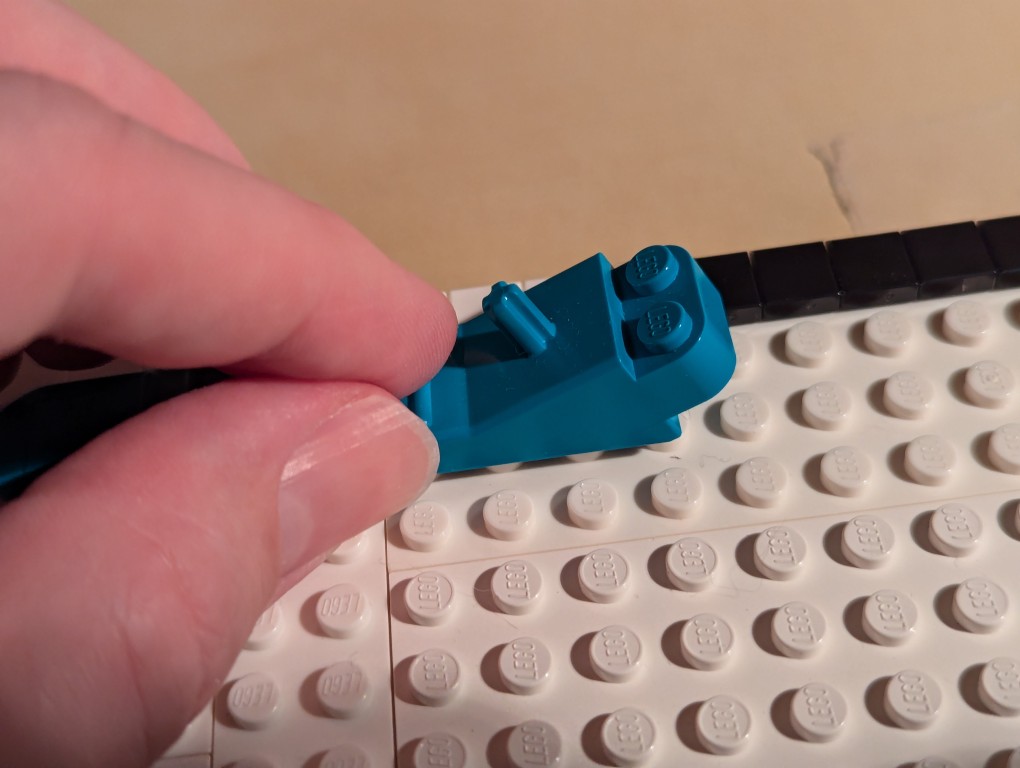
The problem with LEGO flat tiles is that they are difficult to align just by placing them on a stud.
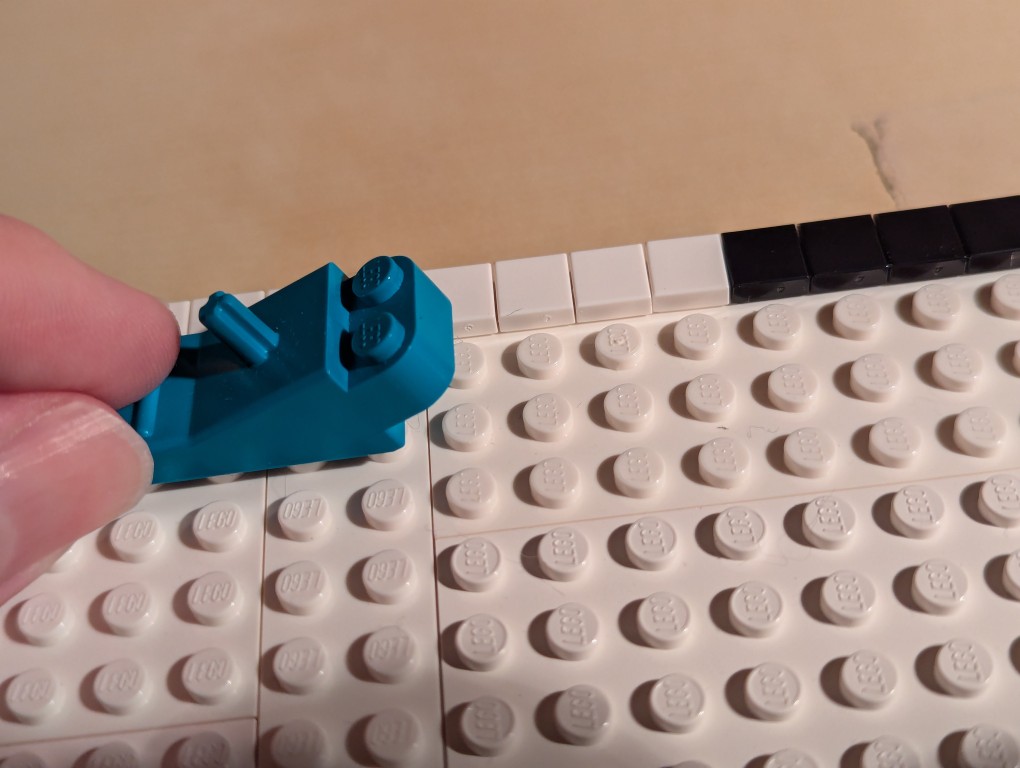
To align each line of flat tiles, you can take a brick separator, place it edge-wise along the flat tiles, and pull it back-and-forth lightly–hard enough to press against the flat tiles’ edges but not so hard as to keep it from moving above the adjacent studs as in the picture above.
As you can see, the flat tiles are now aligned better. I did this trick for each line of flat tiles as I worked down the canvas.
Nearing the end of the build, I discovered that I didn’t have enough flat tiles in white and black. I recounted and recalculated. My count was correct, but LEGO short changed me about 70 elements from my order and gave me 70 extra yellow tile that I didn’t order. I called their customer service the next day and asked that they correct the order. I received the missing parts after another week-and-a-half. I continued “painting.”
After several weeks, I had completed my copy of Mondrian’s Tableau I (1921) using LEGO!
The side view reveals hints of the “paint” of the lines of 1×1 flat tiles.
The back of the canvas mounted on the display stands has its hidden compartment in the back center of the canvas.
For the hidden artist statement, I cut out a 4×4 square and wrote in pencil, “Miniature copy of Piet Mondrian’s Tableau I (1921), 103cm x 100cm at Kunstmueum Den Haag. Design and Build by Jason W. Ellis 2024. Medium: LEGO.” I pasted it on the flat tiles inside the lid of the hidden compartment.
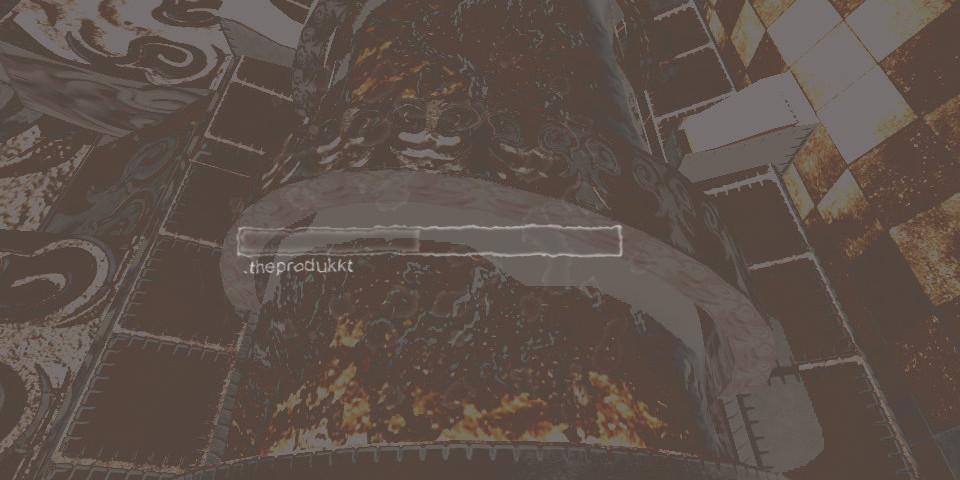
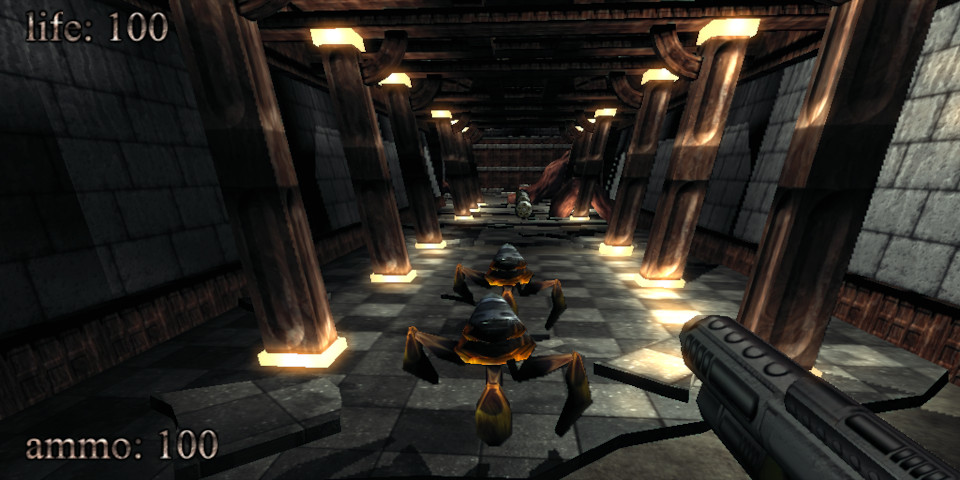
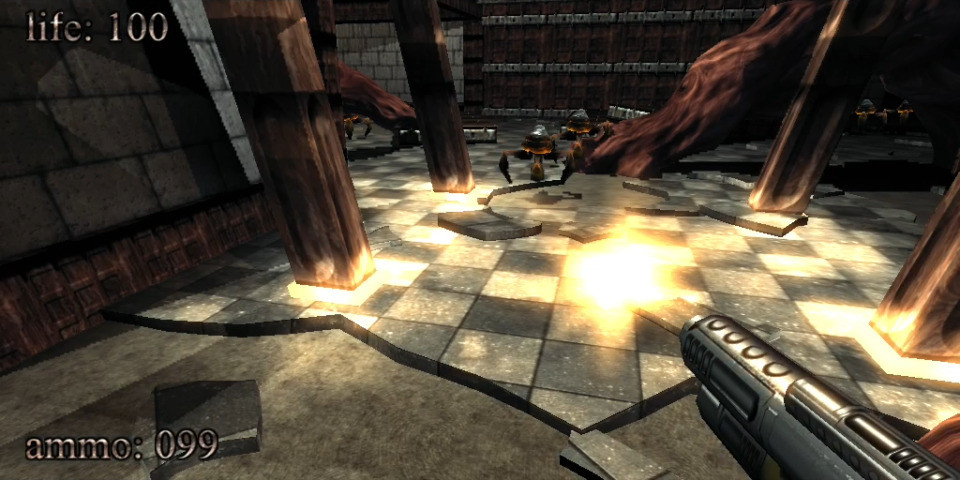
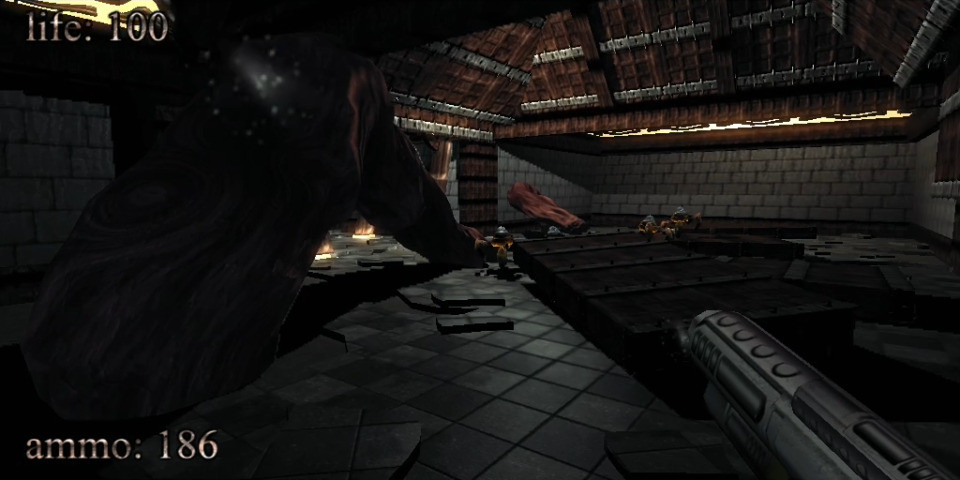
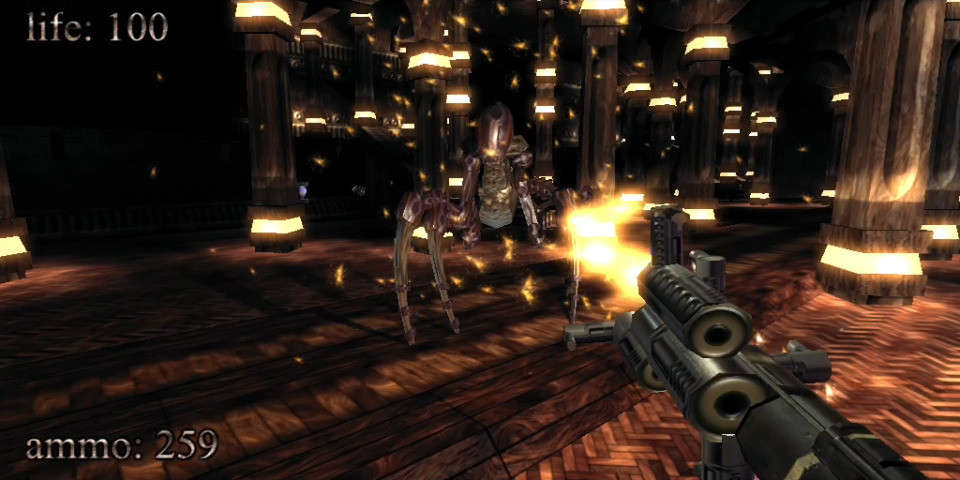
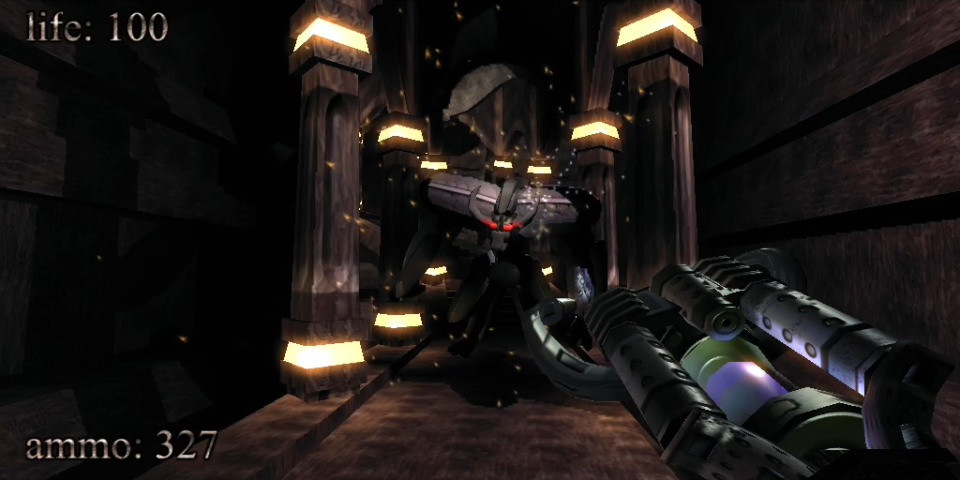
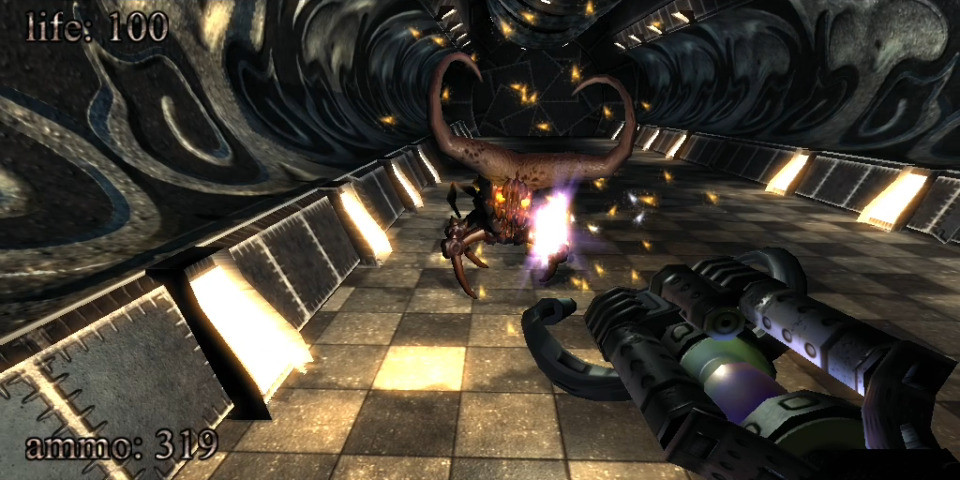
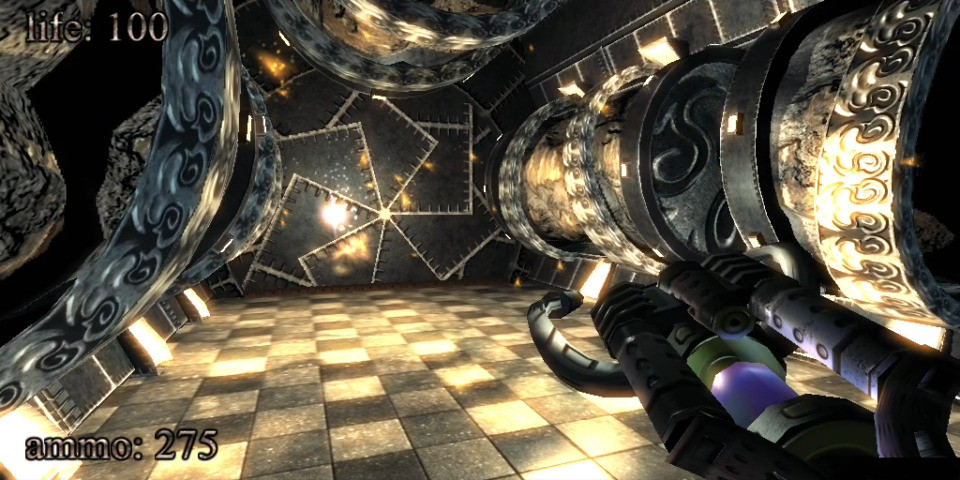
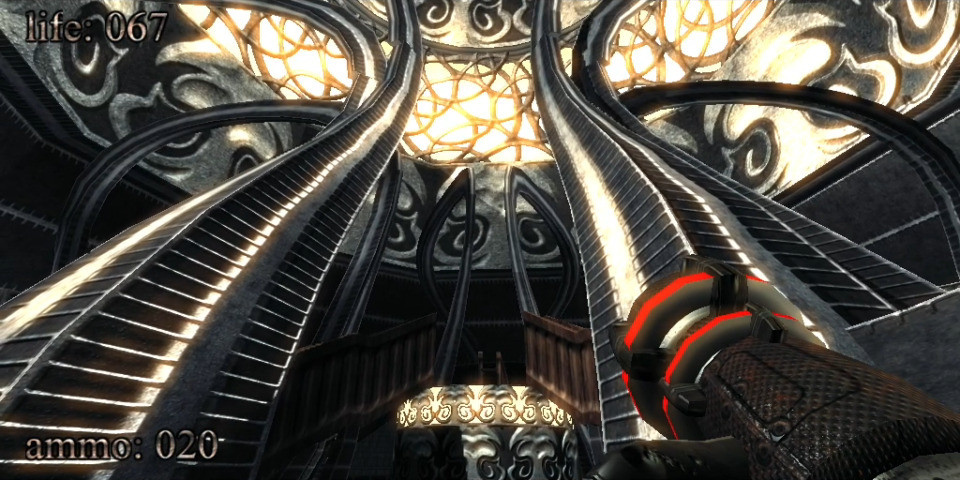
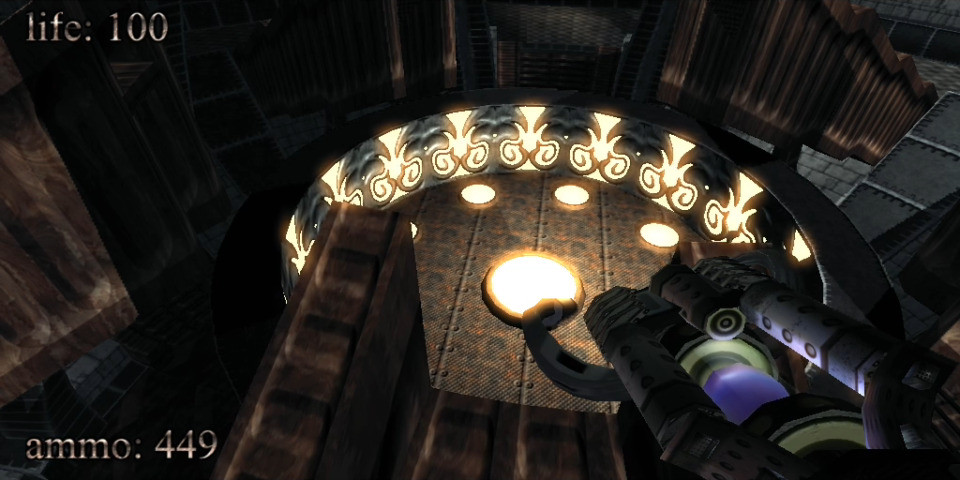
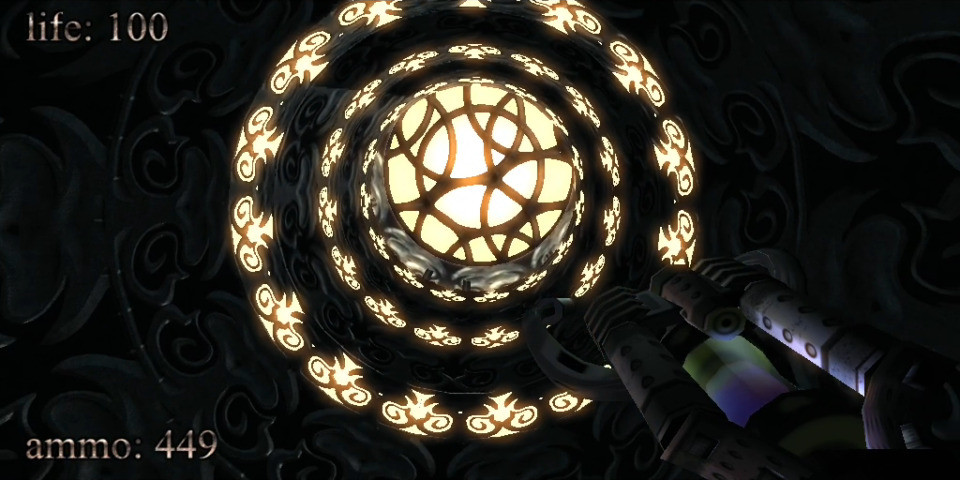
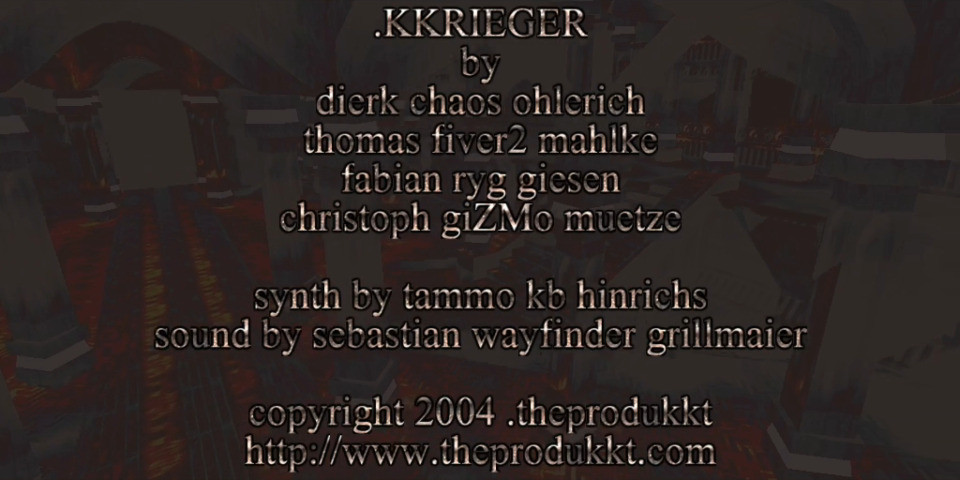
In 2004, .theprodukkt, a project aiming to use “generative computer graphics” and “procedural content creation,” developed a demoscene-inspired first person shooter (FPS) called .kkrieger that features a complex 3D environment with lighting and shadow effects, a variety of enemies, a selection of weapons, an atmospheric soundtrack, and engaging sound effects. Incredibly, .kkrieger is an astonishingly small 96K! The game uses a clever procedural approach to recreate its main elements at runtime instead of storing those assets in an appropriate file format that would balloon the game’s installation.
To put .kkrieger’s tiny file size in perspective, consider that Wolfenstein 3D (1992) is 1.3MB installed, Doom (1993) is 4.6MB, Quake (1996) is about 700MB (including its audio CD soundtrack), Unreal Tournament (1999) is about 780MB, Halo: Combat Evolved (2001) is about 700MB, and Half-Life 2 (2004) is about 6GB. Put another way, many of the in-game screenshots that I made and attached to this post in JPEG format are about the same size or larger than the entire kkrieger game!
To accomplish this feat, .theprodukkt designed the game to run on high-end PC hardware of that era on Microsoft Windows with DirectX 9.0b:
.kkrieger requires a relatively high-end machine to run properly. To be
precise:

- A 1.5GHz Pentium3/Athlon or faster.
- 512MB of RAM (or more)
- A Geforce4Ti (or higher) or ATI Radeon8500 (or higher) graphics card
  supporting pixel shaders 1.3, preferably with 128MB or more of VRAM.
- Some kind of sound hardware
- DirectX 9.0b
In the readme.txt included with the game’s executable, .theprodukkt explains the technical details for .kkrieger:
  In general, if you have any technical questions concerning .kkrieger, either refer to our web site or contact us via email. However past experience shows that there are some rumours and misunderstandings about our work that are very hard to correct, so we'll state the truth here, in written form, for all the world to see :)

- We do .not. have some kind of magical data compression machine that is able to squeeze hundreds of megabytes of mesh/texture and sound data into 96k. We merely store the individual steps employed by the artists to produce their textures and meshes, in a very compact way. This allows us to get .much. higher data density than is achievable with normal data compression techniques, at some expense in artistic freedom and loading times.
- .kkrieger is not written in 100% assembler/machine language. Not even nearly. Like the vast majority of game projects being developed today, .kkrieger was mostly written in C++, with some tiny bits of assembler where it is actually advantageous (notably, there are a lot of MMX optimisations in the texture generator).
- A kilobyte is, historically, defined to be 1024 (2^10) bytes, not 1000. Thus .kkrieger is a game in 96k even though it's actually 98304 bytes.
- The concept of the texture/mesh generators was developed by fiver2. We do .not. want to claim that the techniques we used to develop .kkrieger are new inventions. It´s rather a  selection of useful operations and their parameters to optimise the results.
For this post, I ran .kkrieger on my Ryzen 7 5800X system (NVIDIA RTX 3090 Founder’s Edition, 128GB DDR4 RAM) with 32-bit Wine 8.0-repack-4 for Debian with it set to run in an emulated 1024×768 desktop (to avoid it resetting my display settings and make it easier to capture game play using OBS Studio. It ran smoothly without any glitches. However, it did freeze once during a sequence of running it multiple times. After closing Wine, it successfully ran on the next try. You can download a copy from the link in the first paragraph that leads to a cached copy of the official website in the Internet Archive’s Wayback Machine.
I made this image of an anthropomorphic cat hacker with Stable Diffusion while thinking about the illicit computer hardware in Vernor Vinge’s “True Names” (1981) and award-winning .kkrieger first person shooter that occupies only 96K disk space and procedurally creates its textures, music, and sound effects at runtime–simply put a phenomenal bit of programming. I got wine setup to run .kkrieger on my computer, so I’m thinking a post about it is in the works.
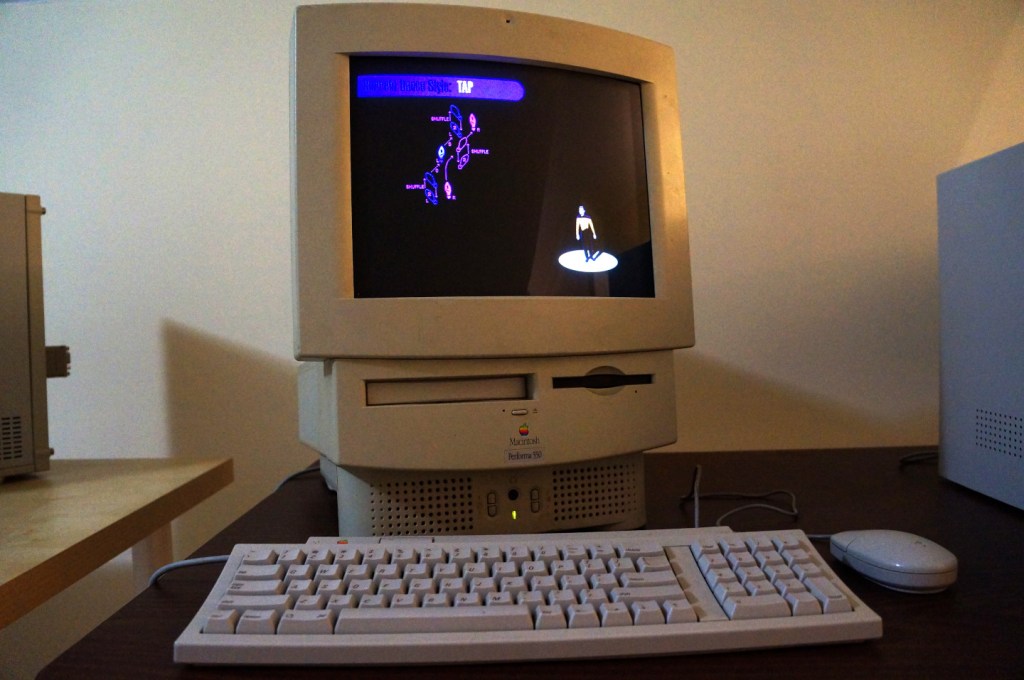
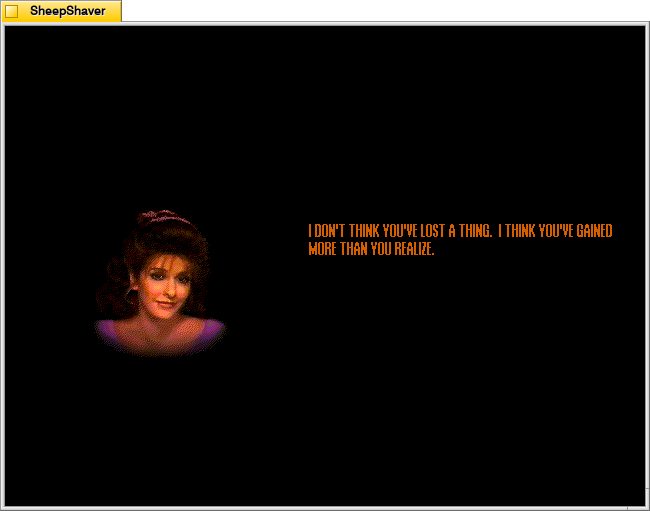
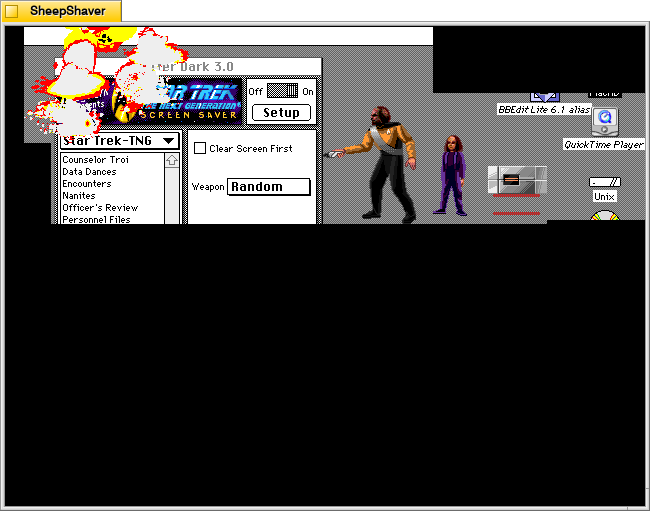
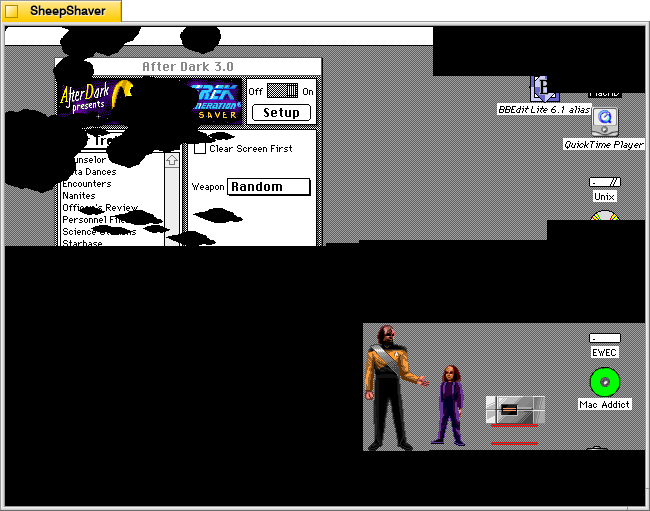
Berkeley System’s After Dark – Star Trek: The Next Generation is one of my favorite pieces of software. It consumes electricity and CPU cycles to create audio and visual experiences that are ostensibly meant to prevent CRT screen burn-in. Put another way, it’s a program meant to solve a bygone era’s technological problem while providing passersby a little bit of entertainment. Above, it is running on the Apple Macintosh Performa 550 that I donated to Georgia Tech and is now housed in the RetroTech Lab at the Georgia Institute of Technology (center-right on landing page). Data’s dancing is protecting the Performa’s built-in 14″ Sony Trinitron monitor. Below are screenshots of the screensaver in action.
Integrated into the After Dark screensaver system, it has 13 modules: Counselor Troi, Data Dances, Encounters, Nanites, Officer’s Review, Personnel Files, Science Stations, Starbase, Starfleet Messages, Tachyon Particle Field, The Borg, Warp Effect, and Worf’s Weapons.
Counselor Troi
Counselor Troi appears and gives advice and affirmations.
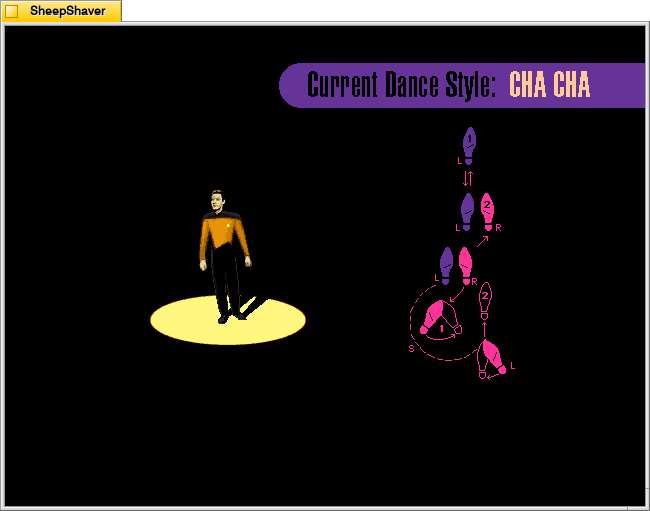
Data Dances
Data appears in the spotlight while the step pattern for different dance styles, such as tap or cha cha, appear to the side. Appropriate music plays and Data dances the steps.
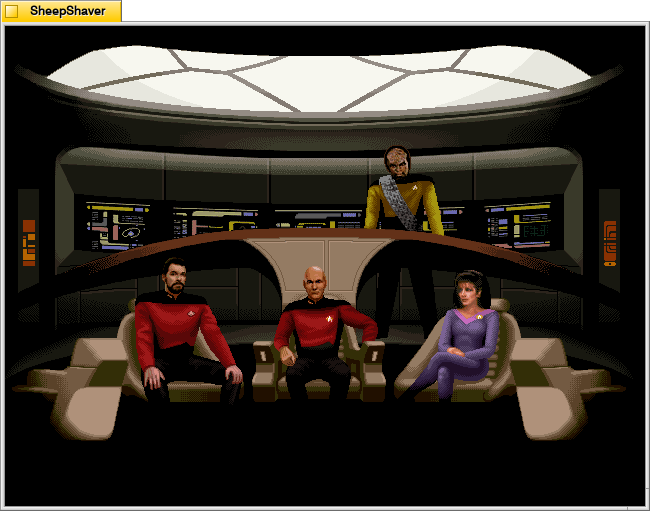
Encounters
Encounters switches between views of the Enterprise crew on the bridge and what they see on the main viewscreen.
Nanites
Nanites, an intelligent nanotechnology, devour the screen and self-replicate.
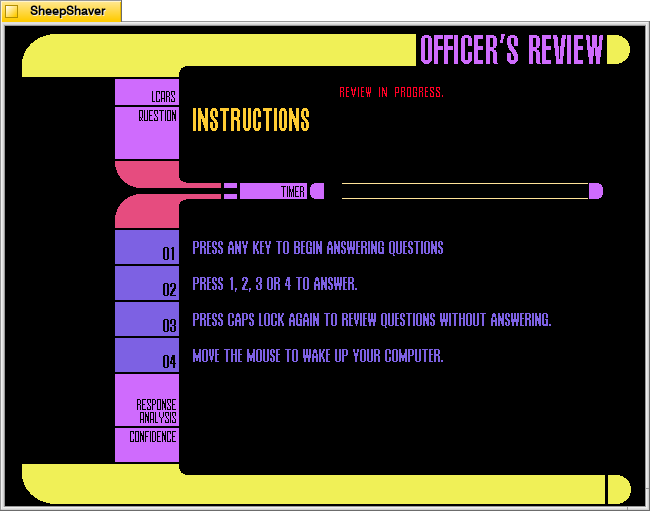
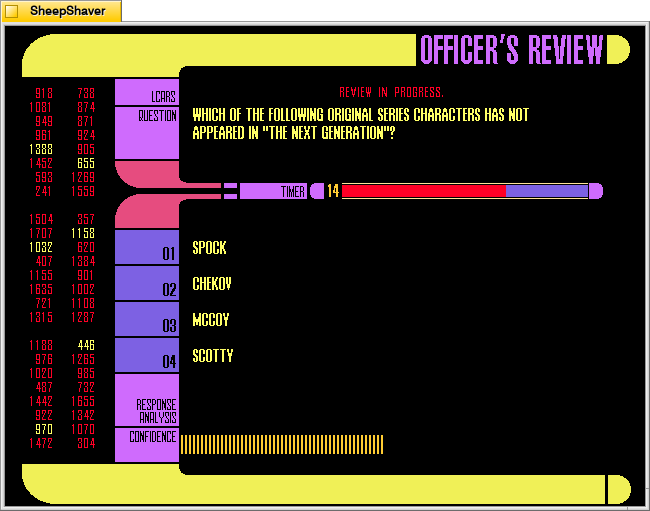
Officer’s Review
Officer’s Review is a timed Star Trek TNG quiz that uses keyboard inputs that don’t deactivate the screensaver (as mouse movements would).
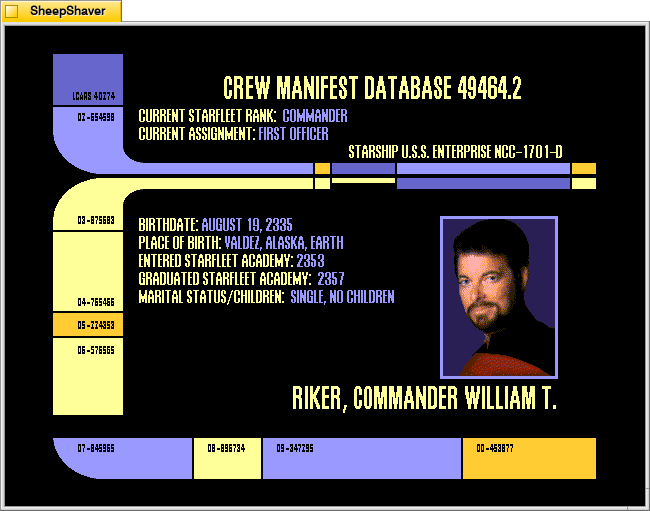
Personnel Files
Personnel Files rotates through information screens of different characters on the show.
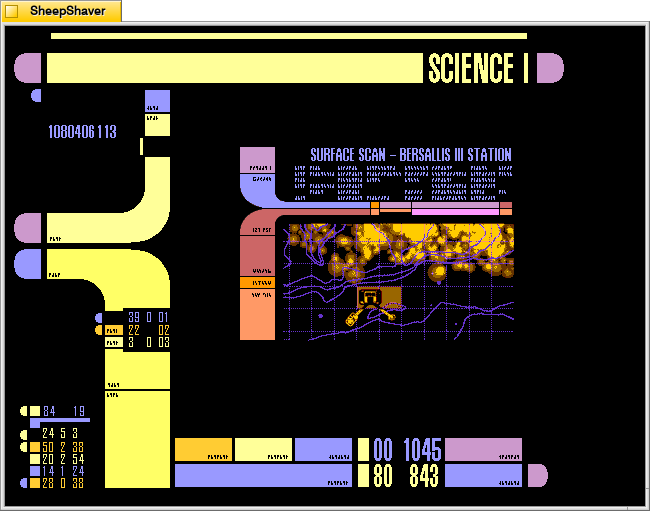
Science Stations
Science Stations displays changing information panels that update and change just like the LCARS science station panels on the bridge.
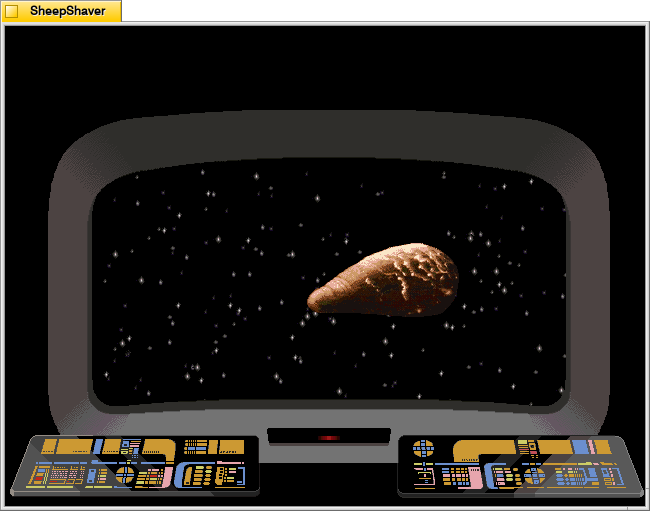
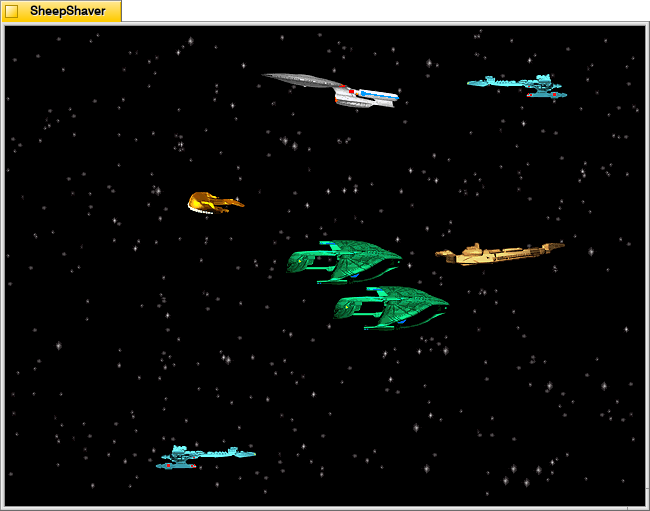
Starbase
Starbase shows different ships flying through space with an occasional starbase coming into view.
Starfleet Messages
Starfleet Messages show different informational and warning messages that appear in different places on the screen.
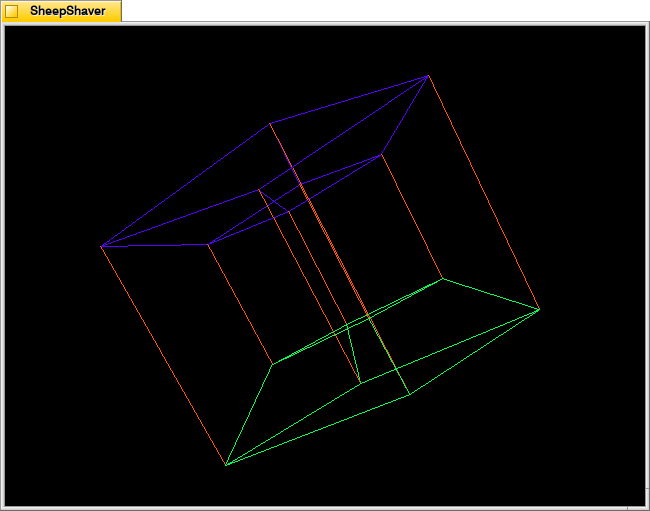
Tachyon Particle Field
The Tachyon Particle Field looks like a four-dimensional tesseract interacting with three-dimensional space.
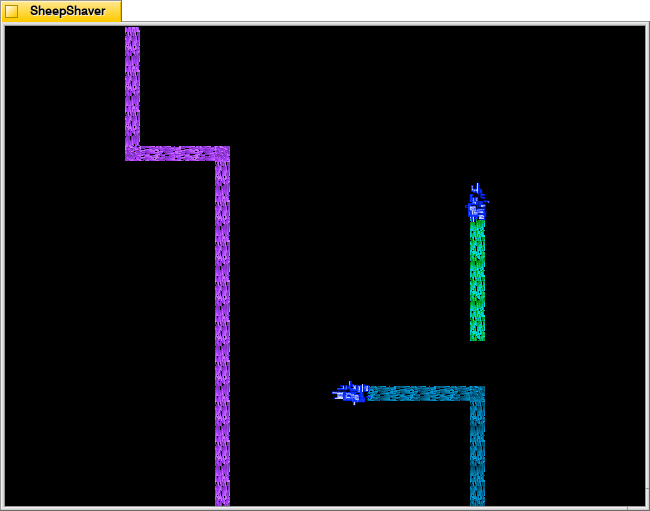
The Borg
The Borg materialize in different places on the screen to assimilate it using their technology.
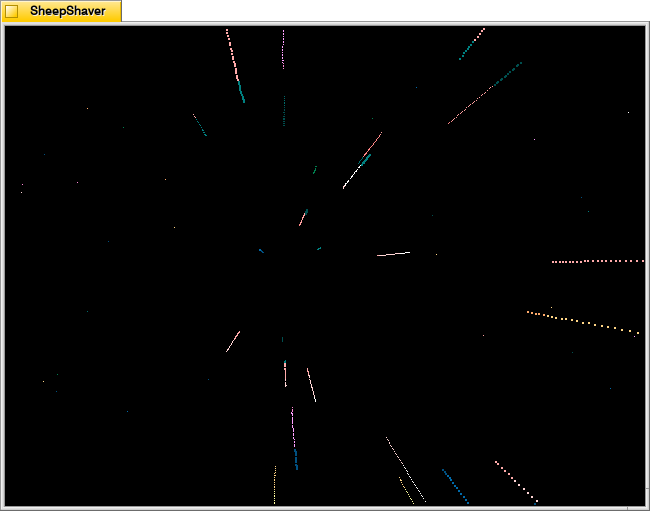
Warp Effect
Warp Effect shows the passage of stars while traveling at warp speed.
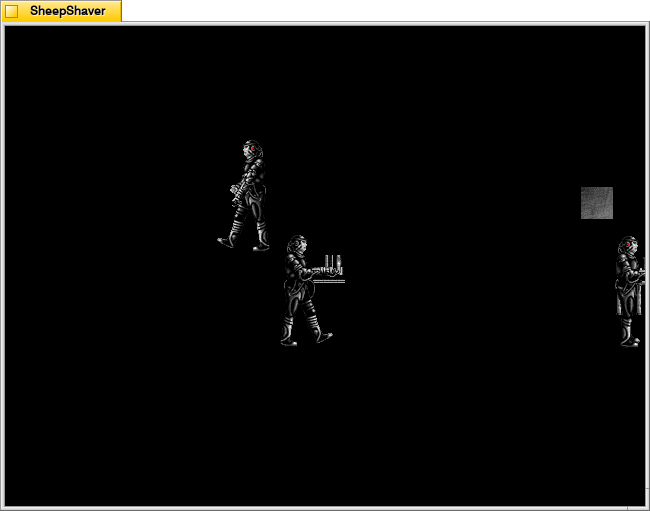
Worf’s Weapons
Finally, Worf’s Weapons feature Worf’s son Alexander handing his father different weapons, such as a phaser or bat’leth, to destroy the screen with. Where Worf walks, the underlying screen is revealed. Where he damages the screen, it turns black.