Wendy Hagenmaier, Jason W. Ellis, and Jody Thompson next to Apple Performa 550 and iMac.
Yesterday, I had the pleasure of making the first donation of three computers to the Georgia Tech Library Archives, which is launching its own Retrocomputing Lab for scholars and students to use. The Georgia Tech Library Archives is already well-known for its significant Georgia Tech Science Fiction Collection and other holdings.
I met with Department Head Jody Lloyd Thompson and Digital Collections Archivist Wendy Hagenmaier to setup the three computers and talk about each machine’s provenance and current operation. We set the computers up on the right side as you enter the Georgia Tech Library Archives. This is a temporary location as the Archives makes plans for their use in Archives for the time being and possibly more in the future as part of the on-going Georgia Tech Library renovation project.
Apple Performa 550 and iMac.
From my personal collection–which I am having to cull before moving to Brooklyn for my new job at City Tech, I donated three computers: an Apple Performa 550 (1994), Apple iMac (1999), and Dell Dimension 4100 (2001). Before donating the computers, I refurbished each to be in as factory-fresh condition as possible.
For the Peforma 550, I installed a PDS ethernet NIC and replaced the SCSI hard drive with one that was less noisy than its original one. Then, I installed Mac OS 7.6.1 and some software including the AfterDark Star Trek: The Next Generation screensaver and ClarisWorks, and utilities for working with files and disk images.
For the slot-loading, DV iMac, I replaced the motherboard battery and performed a fresh install of Mac OS 9.2.1. The optical drive suffers from a weak ejection mechanism. I made sure that the bottom plastic bezel fit properly, but reseated it had no effect on improving the drive’s ability to eject discs correctly. I warned the librarians about this, and recommended buying an external, Firewire optical drive and using the paperclip ejection method in the meantime.
Dell Dimension 4100.
For the Dell Dimension 4100, I installed a 3Com NIC donated by Mark Warbington. I installed Windows 98 Second Edition and painstakingly installed the drivers for the components in the Dell (this was a laborious process, because despite having the Service Tag number, some recommended drivers did not work on all of the components).
I provided two sets of speakers–one for the Performa 550 (it’s internal speakers had stopped working about a year ago) and one for the Dell Dimension 4100. In the event of future hardware problems, I gave them spare AGP video cards, optical drives, a 3.5″ floppy disk drive.
Also, I gave them some spare motherboards, controller cards, and hard drives that might be useful for displays in the Library.
The Georgia Tech Library Archives have big plans for making digital archival work and learning an integral component of what they do. If you have functional and working computer hardware or software, you should consider donating it to the Georgia Tech Library Archives, or if you have technical skills for working on older hardware and software, you can donate your expertise and time, too. Contact Jody and Wendy by email or phone here: Georgia Tech Library Archives contact information here.
Oct. 21, 2023 Update: Video link removed as it no longer exists.
This is the twelfth post in a series that I call, “Recovered Writing.” I am going through my personal archive of undergraduate and graduate school writing, recovering those essays I consider interesting but that I am unlikely to revise for traditional publication, and posting those essays as-is on my blog in the hope of engaging others with these ideas that played a formative role in my development as a scholar and teacher. Because this and the other essays in the Recovered Writing series are posted as-is and edited only for web-readability, I hope that readers will accept them for what they are–undergraduate and graduate school essays conveying varying degrees of argumentation, rigor, idea development, and research. Furthermore, I dislike the idea of these essays languishing in a digital tomb, so I offer them here to excite your curiosity and encourage your conversation.
In the next few Recovered Writing posts, I will present my major assignments from Professor Kenneth J. Knoespel’s LCC 3314 Technologies of Representation class at Georgia Tech. LCC 3314 is taught in many different ways by the faculty of the Georgia Tech’s School of Literature, Media, and Communication, but I consider myself fortunate to have experienced Professor Knoespel’s approach to the course during the last phase of my undergraduate tenure. The ideas that we discussed in his class continue to inform my professional and personal thinking. Also, I found Professor Knoespel a great ally, who helped me along my path to graduation with side projects and independent studies.
This is another example of a WOVEN multimodal essay assignment. In it, I used WVE/written, visual, electronic modes to discuss a specific technology. These essays (focused on past, present, and future technologies) gave me a chance to use technology to explore the meaning behind and impact of technologies. The next essay will focus on a future technology of my own design.
In this essay assignment, we were tasked with exploring an example of a present technology. I chose to write about Apple’s Airport Express, which my roommate Perry Merier had recently purchased. At the time, the idea of an extremely small computing/routing/audio device was new and innovative. Also, it was incredibly useful.
Jason W. Ellis
Professor Kenneth J. Knoespel
LCC3314 – Technologies of Representation
October 28, 2004
Artifact of the Present – Apple Airport Express
Apple Airport Express (Image from Apple Computer)
The Artifact
The Apple Airport Express is a multifunction wireless Internet router (i.e., base station) that first hit shelves in June 2004. It can serve as a wireless Internet base station, extend the range of an existing wireless network, receive streaming music and transfer that to a home stereo, and share a USB printer on a wireless network. It can do all of these things and yet its small rectangular shape can be inscribed in the circumference of an audio CD.
Description
The Airport Express is only 3.7 inches tall, 2.95 inches wide, and 1.12 inches deep. It is about the size of a Powerbook G4’s power brick (AC to DC converter). If you do not need the included power cord extender, then the Airport Express is completely self-contained. Unlike most other wireless routers, the Airport Express has its power converter built-in. The electronics that allow it to juggle all of its functions lie within the glossy white plastic housing.
On the back edge of the Airport Express there is a fold-out AC power connector. The power prongs fold back into the unit so that it is easily carried in a bag without snagging on anything. The bottom edge has three connectors. The first is the ethernet RJ-45 connector. This can be connected to a DSL or cable modem so that the Airport Express can wirelessly transmit Internet access to computers with wireless capabilities that are within range. Next is the USB connector. This can be hooked to a USB printer so that the printer can be shared with anyone on the wireless network. The last connector is an audio mini-jack that supports both digital and optical audio output. This can be connected to a home stereo so that music can be streamed from a computer running iTunes to the Airport Express. In the event of a lockup, there is a small reset button on the bottom of the device. The front edge of the device has an LED. This LED lights up as amber or green. The color of the LED and its state (i.e., on, off, blinking) can indicate different things about the status of the Airport Express.
Airport Express Connectors (left) and Airport Express Plugged-In (right) (Images from Apple Computer)
The components inside the Airport Express are tightly packed. A good deal of engineering had to go into making function follow form in this artifact. Home wireless routers are usually two or three times the size of the Airport Express and they have an external power brick (that may be the same size as the Airport Express). This device has to contain a power converter, wireless networking components, wired networking components, network routing components, USB printing components, and audio components. Some of these parts are combined on a single piece of silicon to save space on the circuit board.
Airport Express split in half. Note the circuit boards on the left and power converter on the right. (Image from ipodding.com)
Social Significance
Apple Computer introduced its Airport technology in July 1999. The choice to use the name “Airport” was a deliberate one. It is easy to remember and it evokes certain images of what the technology is able to do. The bits of data seem to fly through the air on invisible radio waves. Airport technology is the place where these bits take off and land–from the base station to the computer and vice versa. Speed, travel, and mobility are some of the images that Apple intended the Airport Extreme to conjure for potential buyers.
The Airport Express uses the two most widely adopted wireless networking standards: 802.11b and 802.11g. A working group within the Institute of Electrical and Electronics Engineers (IEEE) established those standards. The IEEE 802 standards committee develops the standards for local area networks as well as for metropolitan area networks. Work group 11 focuses on wireless networking standards. Publicly available standards such as these are part of the success of computer and networking hardware. Standards allow for components manufactured by different companies to be interoperable. Because the Airport Express uses several open standards it will work along side other wireless hardware and it will work with Macs as well as PCs.
The Federal Communications Commission (FCC) and the National Telecommunications and Information Administration (NTIA) regulate the radio frequency spectrum. The NTIA is part of the Executive Branch of the US Government that “manages the Federal government’s use of the spectrum” while the FCC is an “independent agency” that “regulates the private use of the spectrum” (NTIA). The 802.11b and 802.11g wireless networking standards are approved by the FCC to use the 2.4GHz radio band for transmitting and receiving bits of data carried on radio waves.
The US Radio Spectrum Frequency Allocations. The red ellipse approximately marks where in the spectrum 802.11b and 802.11g operate. (Image from NTIA)
Each person with a computer with wireless capability, a copy of iTunes, a stereo, and an Airport Express is in effect a one-person radio station. Music can be streamed from the computer to the Airport Express which passes it along to the home stereo via an audio cable. Digital music is now freed from the computer and transferred back to the home stereo. This capability points to one of the Airport Express’ weaknesses. Music streaming from a computer can only be played on one Airport Express at a time. There is no technology barrier keeping more than one Airport Express from receiving the streaming music so there is some reason that Apple restricted this capability on the Airport Express. If this were enabled customers would buy more than one Airport Express so that they could stream music to multiple rooms.
The music travels wirelessly to the Airport Express and then to the stereo via wires. (Image from Apple Computer)
The Airport Express’ limitations might be due to pressure from the music industry. Apple gives the music playing software, iTunes, away for free. It can play CDs, MP3s, and it can access Apple’s Online Music store. This software can copy (i.e., rip) CDs that may or may not be owned by the iTunes user. Additionally, iTunes will play legitimate MP3s as well as those that are obtained in violation of current copyright law. The Recording Industry Association of America (RIAA) and some music recording artists find this unacceptable. Apple has tried to work on the side of the consumer, but they have to appease the music industry as well. To do this Apple has integrated special encryption in music downloaded from the Apple Online Music Store so that only the authorized buyer can play those MP3s. Additionally, iTunes establishes a secure connection to the Airport Express by encrypting the music stream with Advanced Encryption Standard (AES) encryption, which is in turn protected by RSA encryption. This prevents others from recording an iTunes music stream.
Encryption is also employed to protect the wireless users on the Airport Extreme’s network. Part of this protection comes from encrypting the wireless network traffic and the other part comes from the built-in firewall. The older encryption is called Wired Equivalent Privacy (WEP) and the newer security is called Wi-Fi Protected Access (WPA). WPA was built to supercede WEP. The built-in firewall uses network address translation (NAT) to create a network that uses private IP addresses instead of public (and thus directly connected to the Internet) IP addresses. NAT exchanges data between the public world and the private network. Generally, only the NAT server can directly connect to the computer on its private network and not a computer in the outside world.
Security and privacy is a growing concern for people in a more wired world. Identify theft is becoming a boon for some (e.g., the thieves, private investigators, lawyers, politicians) and a bust for others (i.e., the person whose identity is stolen). One way that a person’s private identifying information is stolen is by an individual “sniffing” a wireless network’s data traffic for that precious information. New industries and groups have grown out of this problem of identity theft. Wireless devices like the Airport Express need to have protections built-in so that a user’s private information will be better protected.
The physical construction of the Airport Express involves electrical engineering, computer engineering, and industrial design. Electrical engineering and computer engineering overlap in a project such as this. Custom chips have to be designed and built that handle data traffic, digital-analog conversion of sound, configuration software, controlling of a radio transmitter/receiver, and print control software. Simplicity and elegance of design are demanded in order to fit such a feature rich artifact into a very small package. Apple has a history of taking an artifact that is assumed to look or work in a particular way and transforming its appearance into something new and fresh (e.g., the original Macintosh, iMac, and iPod). Airport Express works similarly to any other wireless router, but it pushes the elements of design (both as a physical artifact and with the internal circuits and chips) so that it is identified by the user as something more than its function.
Sleek and new shapes also reinforce the perception of speed. Airplanes are fast and this artifact is the Airport (sending and receiving these fast airplanes of data) Express (quick, fast, simple). Computer technology has been a long progression of speed. How fast does this computer perform the tasks that I will be using it for? Can it play Doom 3? The same is true for networking technologies. Wired networking is hands down the fastest networking technology so wireless has to compete with wires in speed, but it can distinguish itself by its convenience.
(Photo by John M. Dibbs.)
These new designs effect a change in the way people think about their computer technology. Soft colors, translucent plastics, curves and gentle transitions give technology a friendlier “face.” It isn’t imposing and the technology can now fit into a color scheme in your home. Computer technology shifts from utility to lifestyle. Apple brings together these networks of technology, government oversight, music industry muscle, and industrial design principles so as to provide customers with the technology desired but in a package that makes it less technical and more like a streamlined appliance.
Mavericks installed on CustoMac. NB: MBPr on desk and PowerMacintosh 8500/120 on right.
Last summer, I wrote about my experiences installing Mac OS X 10.8 Mountain Lion on my Asus P8Z77-V and Intel i7-2700K PC here. What I neglected to say at the time was that an alarming number of creeping instabilities led me to ultimately abandon running Mountain Lion on my PC and return to Windows 7.
I later learned that some of these instabilities were likely linked to a bad PSU and video card–both of which were replaced by the manufacturers under warranty (awesome kudos to Antec and EVGA). With the new PSU and video card, my PC returned to 100% stability under Windows 7. This made me wonder if I could try rolling out a Mavericks installation on my PC.
Also, I wanted to use Mac OS X’s superior file content search technology and other third-party textual analysis tools in my research. I have a MacBook Pro 15″ retina (MBPr), but it lacks the hard drive capacity for my accumulated research files. The comfort that I feel in the MacOS environment and the need for lots of fast storage led me to turn my attention back to turning my PC into a CustoMac (aka “hackintosh”).
This time, I wanted to streamline and simply my setup as much as possible and incorporate components that should work out of the box (OOB). Toward this end, I reduced my hardware configuration from this:
ASUS P8Z77-V LGA 1155 Z77 ATX Intel Motherboard (disabled on-board Intel HD 3000 video and Asus Wi-Fi Go! add-on card)
evga 01G-P3-1561-KR GeForce GTX 560 Ti 1024MB GDDR5 PCIe 2.0 x16 Video Card (removed to simply setup and save power–who has time for gaming?)
Antec High Current Gamer 750W Gamer Power Supply HCG-750
Corsair Vengeance C70 Gaming Mid Tower Case Military Green
Cooler Master Hyper 212 Plus Universal CPU Cooler
Samsung 22X DVD±RW Burner with Dual Layer Support – OEM
Intel 128 GB SATA SSD
Three Western Digital HDDs for file storage and work space.
IoGear GBU521 and TP-Link TL-WDN4800 from Microcenter.
Also, I added two new components that were recommended from the TonyMacx86 Forums:
TP-Link 450Mbpx Wireless N Dual Band PCI Express Adapter (TL-WDN4800). It works in Mavericks OOB.
IoGear Bluetooth 4.0 USB Micro Adapter (GBU521). It works in Mavericks OOB.
ASUS’s Wi-Fi Go! card works great in Windows 7, but it caused problems with my Mavericks installation.
As noted above, I physically removed my 560 Ti video card, because I wanted to simply my setup for installation purposes. Also, I removed the ASUS Wi-Fi Go! add-on card, because despite disabling it in BIOS, the Mavericks installer seemed to hang on a wi-fi device while attempting to set its locale (a setting that determines what radio settings to use based on the country that you happen to be in). After I removed the Wi-Fi Go! card, I had a nearly flawless Mavericks installation process (NB: removing the Wi-Fi Go! card required removing the motherboard, turning it over, removing a screw holding in the Wi-Fi Go! card, turning the motherboard over, and unplugging the Wi-Fi Go! card).
These are the steps that I used to install Mavericks on my PC:
Following installation of Mavericks, boot from your USB drive, select your new Mavericks installation drive, arrive at the desktop, and run Multibeast.
Select these settings in Multibeast:
Quick Start > DSDT Free (I left all pre-selected options as-is. Below are additional selections that I made.)
Drivers > Audio > Realtek > Without DSDT > ALC892
Drivers > Disk > 3rd Party SATA
Drivers > Graphics > Intel Graphics Patch for Mixed Configurations
Drivers > Misc > Fake SMC
Drivers > Misc > Fake SMC Plugins
Drivers > Misc > Fake SMC HWMonitor App
Drivers > Misc > NullCPUPowerManagement (I don’t want my machine to go to sleep)
In order to arrive at the above instructions, I read a lot of first hand experiences and third party suggestions on TonyMac’s forums. I owe a tremendous debt of gratitude to the amazing community of CustoMac builders who take the time to share their thoughts and lessons and equally so to the tool-builders who create amazing software including UniBeast, Multibeast, and Chameleon Wizard!
I would suggest that you remember that there is not always one path to a successful build. I distilled a lot of posts into my successful build. Your experience with similar hardware might take a different path. Reading others experiences and trying their suggestions experimentally can lead to your own successful discoveries. Thus, I took the time to try out different configurations of hardware until settling on the stripped down approach with on-board video and OOB networking gear. I tried several different installations: a failed Mavericks installation with kernel panics (Wi-Fi Go! card installed and wrong Multibeast configuration), a successful Mountain Lion installation (barebones and correct Multibeast configuration), and a successful Mavericks installation (detailed above).
Obviously, MacOS X can run on a wide range of PC hardware given the correct drivers, configuration information, etc. Apple could do great things if only Tim Cook and others would think differently and move beyond the tightly integrated hardware-software experience. Apple’s engineers could do great things with building better operating systems that adapt to a person’s hardware. Given the chance, they could challenge Microsoft and Google with a new MacOS X that is insanely great for everyone–not just those who can afford to buy new hardware.
Now, back to using some of the tools that I use in my research on a computing platform that I enjoy:
16 GB Transcend Flash Drive from NOVA in Taipei, Taiwan
My friend sent me a link to a video by someone who turned an older Core2Duo-based Dell Optiplex into a Hackintosh. The video convinced me to do something that I had been meaning to do for a long time but had never got around to actually doing: removing Windows 7 on my ASUS P8Z77-V/Intel i7-based PC that I built late last year and installing Mac OS X 10.8.
A Hackintosh, or what some folks call a CustoMac, is a standard PC that runs one of the Intel-based version of Mac OS (this includes 10.4 Tiger, 10.5 Leopard, 10.6 Snow Leopard, 10.7 Lion, and 10.8 Mountain Lion).
Prior to this project, I had purchased Mountain Lion from the MacApp Store for my old MacBook 5,1 (Aluminum Unibody, Late-2008). When my parents gifted me a rMPB, it already had Mountain Lion installed. This gave me the needed components that I needed to setup my flash drive to install Mac OS on my PC: a Mac and a purchased copy of Mountain Lion.
According to the definitive source for creating CustoMacs, TonyMacx86, my hardware isn’t ideally suited for a pain-free installation (If you are beginning from scratch, you should check out TonyMacx86’s excellent buyer’s guide here). Nevertheless, I worked my way through six re-installations before discovering the combination of settings that yielded a reliable and stable Mountain Lion installation.
evga 01G-P3-1561-KR GeForce GTX 560 Ti 1024MB GDDR5 PCIe 2.0 x16 Video Card
Antec High Current Gamer 750W Gamer Power Supply HCG-750
Corsair Vengeance C70 Gaming Mid Tower Case Military Green
Cooler Master Hyper 212 Plus Universal CPU Cooler
Samsung 22X DVD±RW Burner with Dual Layer Support – OEM
Intel 128 GB SATA SSD
Western Digital Caviar Green WD10EARX 1TB IntelliPower 64MB Cache SATA 6.0Gb/s 3.5″ Internal Hard Drive – Bare Drive
These are the steps that led to my successful Mountain Lion installation:
Follow TonyMacx86’s UniBeast (the software that prepares your installation media) and Mountain Lion installation guide here. I have modified the instructions below to reflect what I did after creating my bootable flash drive containing the Mountain Lion installer and a folder that I made containing MultiBeast (the software that configures your Mountain Lion installation for your computer’s hardware). (Depending on your needs, you might need other software, including MaciASL, which can create a DSDT file–another kind of configuration file for MultiBeast that gives Mac OS the information that it needs to run well on your hardware. You will need to configure it with sources from PJALM’s DSDT Patch Repositories. Ultimately, I decided to proceed with a DSDT-free installation.)
Turn on the PC with the flash drive inserted on one of the front mounted USB 3.0 slots.
Press F8 to select bootup device and select the flash drive.
Chimera, the bootloader software, provides you with an option to select the flash drive’s Mac OS installation to boot. If you press the down arrow key on the keyboard, you will be presented with other options including help. If you begin typing, you can enter commands to assist with booting the installer.
On the Chimera boot selection screen, type “PCIRootUID=0”. Press Enter. This ensures that the installer’s Mac OS installation will display video correctly. Without this option, the screen goes dark after the Apple logo over gray screen.
From the Mac OS installer menu bar, select Utilities > Disk Utility > Format your boot drive for Mac OS Extended, Journaled. Close the Disk Utility window to return to the installer. Proceed with installation. Reboot when completed.
Press F8. Select the flash drive. At the Chimera screen, select your internal hard drive’s new Mac OS Mountain Lion installation, type in “PCIRootUID=0”, and press Enter.
Mountain Lion will boot from your hard drive and begin the setup procedure (choosing location, creating your Admin account, etc.).
If you have already downloaded MultiBeast and placed it in a new folder on your flash drive, open your flash drive from the Desktop, navigate to MultiBeast, and launch it.
Proceed to the selection screen and check these things:
Drivers & Bootloaders > Drivers > System > Patched AppleIntelCPUPowerManagement > OS X 10.8.x
Complete installation and close MultiBeast.
Navigate to Applications > Utilities > Disk Utility. Select your hard drive and click Repair Permissions. When completed, close Disk Utility, eject your flash drive and remove from the USB port, and reboot.
When back at the Desktop, go to System Preferences > Energy Saver > Disable Computer Sleep by sliding the widget to the far right.
Plug your computer into your router with an ethernet cable if you have not already done so. You can easily get online with the wired connection.
Your installation is complete!
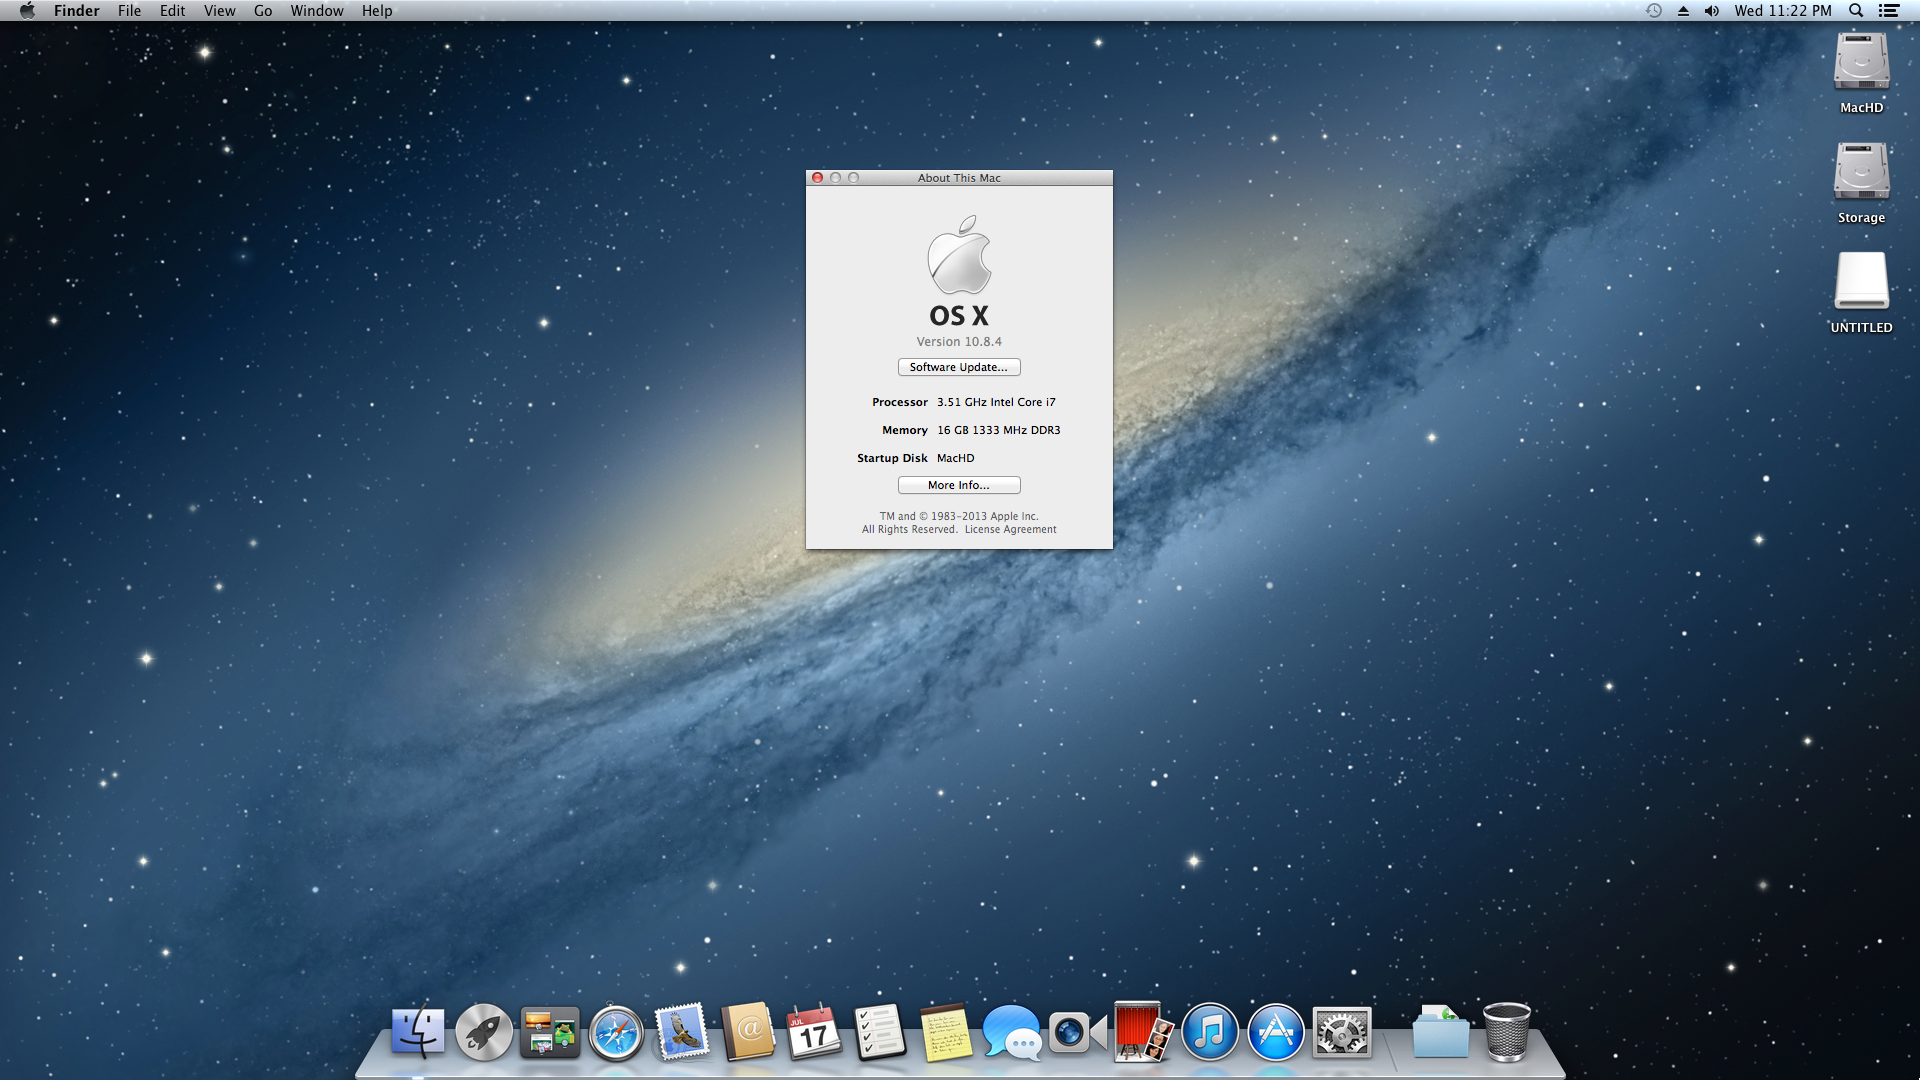
Mac OS X 10.8.4 desktop showing CPU and memory. Everything is running a-okay!
I chose to go this route, because I could not get Mac OS to boot with the DSDTs that I created with MaciASL (using the configuration for the P8Z77-V motherboard and graphics source per PJALM’s instructions). My problems could have been related to the DSDT or due to incompatibilities between its settings and my P8Z77-V’s BIOS ROM version (I was unable to use the motherboard’s BIOS Flashback feature to successfully load one of these hacked BIOS ROMs on this site). Apparently, if you can get the DSDT to install correctly and have the hacked BIOS, you will be able to enjoy power management settings and control. Since I have my computer only on when I am using it, I do not have any problem with this lack of functionality. Since installation, my Hackintosh has been running great. It is snappy, video and sound work great, network connectivity is fine, and Doom 3 plays fantastically at 1080p!
After the installation, I discovered one tremendous problem: FileVault cannot be activated for your boot drive. Apparently, this is due to FileVault needing a real Mac’s EFI environment (or the error message that it generates indicates that it has to do with its inability to re-partition the bootdrive–likely due to the Chimera bootloader). As far as I can tell from reading posts on the TonyMacx86 forums, there is no way around this problem. One option would be to save your files in a TrueCrypt container or fully encrypted drive that is separate from your bootdrive. Another way is to use TrueCrypt full disk encryption as detailed on this helpful blog post from Frugal Computing (FC also has some great articles about building Hackintoshes).
Others in the TonyMacx86 forums have had varying levels of success with the Asus P8Z77-V and Mountain Lion, so I do not want to dissuade you from attempting to get more functionality on your installation. The above is simply a report of what worked for me. It might work for you, and it might give you a beginning for your own Hackintosh project.
Yesterday was the one year anniversary of Steve Jobs’ death. I wrote about it last year when I was still in Kent, Ohio–right after my Dad called me to tell me the sad news.
Yesterday, I reflected on missing out on meeting and talking with Jobs–something that Scott Kurtz captured brilliantly on PvP. Growing up, I wanted to meet him–the natural element, the force of nature, the man who led his company to create “insanely great” things that enabled people to be creative in the digital age. However, I didn’t want to meet him in passing. I wanted to make or do insanely great things myself–things worthy of his admiration and interest. I suppose I’m still working on those insanely great things, and I unfortunately missed my window of opportunity to accomplish those things while Jobs was still with us. Nevertheless, his inspiration lives on and it drives me.
Yesterday, Apple debuted a fitting tribute video to Steve Jobs’ legacy–Apple’s inheritance. To borrow Michael Stipe’s words out of context, it was “a right pretty song.” I snapped the pictures at the top and bottom of the post from that video. I decided to keep the frame of Mac OS X, because it just seemed right.
Yesterday, I thought about something Jobs says in the video. He says, “It’s in Apple’s DNA that technology alone is not enough. It’s technology married with liberal arts, married with the humanities that yields us the result that makes our heart sing.” This was from Jobs’ surprise appearance to introduce the iPad 2 on March 2, 2011.
Today, the obvious need for the humanities to be infused in our technologies is lost, I believe, on many people–particularly other technology innovators and so-called “education innovators,” who fight for STEM to the exclusion of all other ares of study. It extends also to education debates taking place right now in the United States. At the recent presidential debates, there was mention made of the need for STEM (science, technology, engineering, and mathematics) education, but there was no mention of the humanities. How can we produce top rate engineers without instilling them with the ability to communicate effectively, the ability to think critically, the ability to argue rhetorically, the ability to think ethically, the ability to recognize and appreciate human difference, and the ability to situate themselves and their work within historical, cultural, and social networks? STEM is obviously one half of the solution, but the humanities and all that we have to offer are the other half of creating a total solution. If we choose to ignore the interconnection and interdependence of STEM and the humanities, we will not create an “insanely great” future. Instead, we will destroy the legacy of insanely great innovators, leaders, and teachers who worked so hard to give us a present time that could lead to a brilliant future.
Tomorrow, we will reflect on the choices that we make today. We have to seize this opportunity to work collaboratively and integratively towards that future. If we ignore this opportunity today, tomorrow we will regret our choice: “Yesterday, all my troubles seemed so far away/Now it looks as though they’re here to stay/Oh, I believe in yesterday” (John Lennon and Paul McCartney).
Steve Jobs looks toward the sky next to Apple’s flagship store in New York City.