Tag: How To

  • How to Modify 3/8″ Threaded Bolt-On Caster Wheels to Fit Unthreaded 7/16″ Mount Points on Home Hospital Bed

    home hospital bed with messy sheets

    If you have a home hospital bed that needs to be relocated easily but can’t find unthreaded caster wheels, this guide might be helpful to you.

    The problem that I recently encountered was a very heavy home hospital bed that needed to be moved around easily without being dragged around on a new floor. The particular bed that I was dealing with was manufactured by Thill, Inc in the USA. It is at least 30 years old and exceedingly heavy.

    thill manufacturer label on steel frame of bed

    It sits on four feet capped with glued-in plastic inserts with 7/16″ holes. Judging by late model home hospital beds, there are caster wheels that lock into these holes. Unfortunately, I couldn’t source four of them within the tight time frame that I was needing to make this bed mobile.

    ruler showing mount point is 7/16"

    I knew that I could get threaded bolt-on casters with non-marking rubber wheels from Rural King in Waycross, Georgia. However, those caster wheels’ bolts were 3/8″ threaded. I needed a way to make those bolts larger and secure on the bed. I thought of how to build a sleeve that would increase the bolt’s diameter but not be easily compressed with use. I had just finished drinking a canned Starbucks Espresso when I imagined how I could use its aluminum can to build a sleeve.

    unopened starbucks espresso and cream drink

    My plan was to cut some of these aluminum cans into sheets that I could wrap around the 3/8″ bolt to increase its size to 7/16″ when it was pushed into the mount point on each foot of the bed. Any aluminum can would work, but I had a the Starbucks cans on-hand, so that’s what I used.

    drawing of sheet of aluminum being wrapped around caster mounting bolt

    Using a razor, I cut the top and bottom of each can off. Then, I carefully cut down the height of the can to create a sheet of aluminum. Then, I used tin snips to cut the sheets of the needed length and width to match the bolts on the caster wheels.

    cut up aluminum cans with tin snips and ruler on 12" board

    This is approximately what each sheet looked like, but I used ones with cleaner edges for the final assembly.

    sheet of aluminum can

    I tightly rolled the aluminum sheet around the bolt. Holding it in place with my fingers, I pushed the bolt into the mounting point. If it slid in too easily, I used a longer sheet of aluminum to bulk it up before trying again. The goal was to install the caster wheel securely so that it wouldn’t wobble or fall out if the bed were lifted off the floor.

    rolled sheet of aluminum

    Once the four caster wheels were installed, the bed could be easily wheeled around on the floor with minimal effort–far easier than trying to lift or drag its heavy mass!

    caster wheel installed on hospital bed
  • How I Shot the LEGO Pride Flag Photo

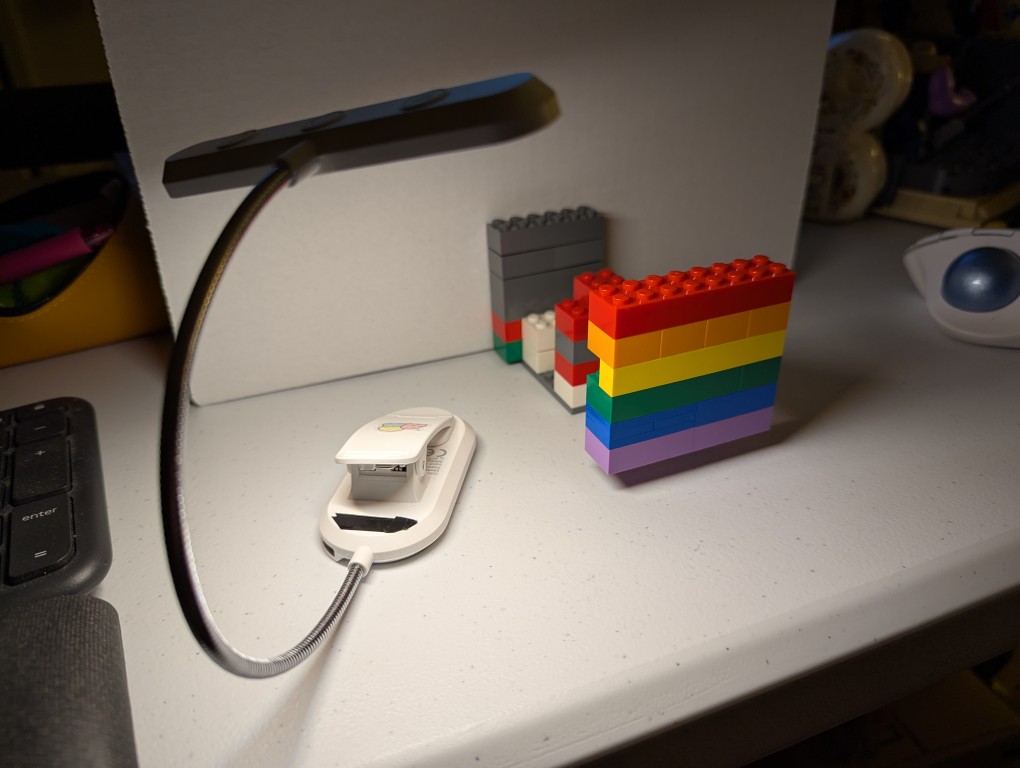
    lego bricks resembling the pride flag are connected to a mix of other hidden lego bricks in front of a white cardboard box and illuminated by a book reading light

    On Monday, I posted happy wishes for Pride Month with a photo that I made of a LEGO Pride Flag.

    To create the photo, I first dug through my boxes of LEGO to find 8 stud wide bricks that matched as close as possible to the Rainbow Flag’s approximation of ROYGBIV: red, orange, yellow, green, blue, and purple.

    My first shots had the flag resting on the table some distance in front of a white cardboard box, which served as a neutral background. For lighting, I held a USB rechargable book reading light belonging to Y just above my smartphone to avoid casting a shadow from the camera.

    I didn’t like how these turned out, because the flag was kind of boring just sitting there. So, I thought about levitating it like in Monday’s post.

    To levitate the flag, I built a counter-weighted assembling of 6-stud wide bricks with an armature that connected behind the yellow bricks in the Pride Flag. I built this armature one brick higher than the flat to give it the illusion of floating in midair.

  • How I Guide Stable Diffusion with ControlNet and Composite Images

    GIMP showing a multi-layer image of Lynn Conway on the right and her co-authored textbook Introduction to VLSI Systems on the left.

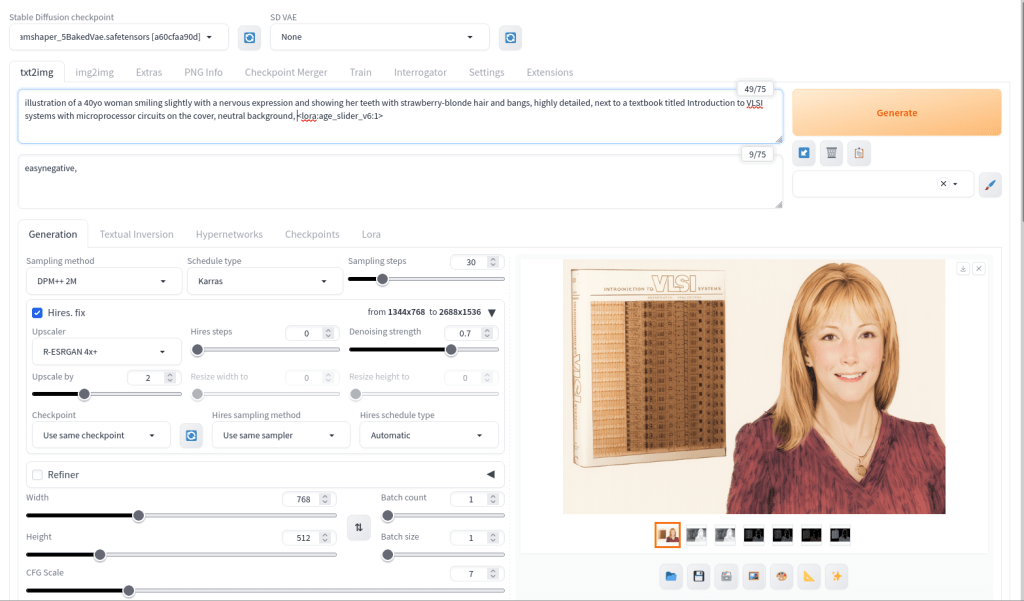
    For the illustration of Lynn Conway and her co-authored textbook Introduction to VLSI Systems at the top of yesterday’s post, I used a locally hosted installation of Automatic1111’s stable-diffusion-webui, the finetuned model Dreamshaper 5, which is based on StabilityAI’s Stable Diffusion 1.5 general model, and the ControlNet extension for A1111.

    Stable Diffusion is an image generating AI model that can be utilized with different software. I used Automatic1111’s stable-diffusion-webui to instruct and configure the model to create images. In its most basic operation, I type into the positive prompt box what I want to see in the output image, I type into the negative prompt box what I don’t want to see in the output image, and click “Generate.” Based on the prompts and default parameters, I will see an image output on the right that may or may not align with what I had in mind.

    Automatic1111's stable-diffusion-webui image generating area

    For the positive prompt, I wrote:

    illustration of a 40yo woman smiling slightly with a nervous expression and showing her teeth with strawberry-blonde hair and bangs, highly detailed, next to a textbook titled introduction to VLSI systems with microprocessor circuits on the cover, neutral background, <lora:age_slider_v6:1>

    I began by focusing on the type of image (an illustration), then describing its subject (woman), other details (the textbook), and the background (neutral). The last part in angle brackets is a LoRA or low rank adaptation. It further tweaks the model that I’m using, which in this case is Dreamshaper 5. This particular LoRA is an age slider, which works by inputting a number that corresponds with the physical appearance of the subject. A “1” presents about middle age. A higher number is older and a lower/negative number is younger.

    Automatic1111's stable-diffusion-webui ControlNet extension area

    ControlNet, which employs different models focused on depth, shape, body poses, etc. to shape the output image’s composition, is an extension to Automatic1111’s stable-diffusion-webui that helps guide the generative AI model to produce an output image more closely aligned with what the user had in mind.

    For the Lynn Conway illustration, I used three different ControlNet units: depth (detecting what is closer and what is further away in an image), canny (one kind of edge detection for fine details), and lineart (another kind of edge detection for broader strokes). Giving each of these different levels of importance (control weight) and telling stable-diffusion-webui when to begin using a ControlNet (starting control step) and when to stop using a ControlNet (ending control step) during each image creation changes how the final image will look.

    Typically, each ControlNet unit uses an image as input for its guidance on the generative AI model. I used the GNU Image Manipulation Program (GIMP) to create a composite image with a photo of Lynn Conway on the right and a photo of her co-authored textbook on the left (see the screenshot at the top of this post). Thankfully, Charles Rogers added his photo of Conway to Wikipedia under a CC BY-SA 2.5 license, which gives others the right to remix the photo with credit to the original author, which I’ve done. Because the photo of Conway cropped her right arm, I rebuilt it using the clone tool in GIMP.

    I input the image that I made into the three ControlNets and through trial-and-error with each unit’s settings, A1111’s stable-diffusion-webui output an image that I was happy with and used on the post yesterday. I used a similar workflow to create the Jef Raskin illustration for this post, too.