This semester, I am using course release time to focus on a research project that I am tentatively titling, “The Language of Computers in Science Fiction, 1975-1995.” Most of my readings come from SF magazines, but I’m finding some material in anthologies, too. More to follow…stay tuned.
Recently, I decided to rebuild LEGO set 76038 Attack on Avengers Tower from the Avengers 2: Age of Ultra line. The trouble was that the elements for the set were strewn throughout my boxes of bricks and sorted drawers. I used some of the bricks in an Iron Man Hall of Armor MOC, which had to be disassembled for this project. A 511 piece set like this might normally take me a couple of hours to complete. As I had to sort and find the bricks while looking at the downloaded PDF instructions on my computer screen, it took the better part of a day to complete the impressive playset. Then, I started thinking about how to make this good set even better. One aspect that bothered me about it is how short it is. While I understand that LEGO considers cost, playability, and profitability in designing their sets, I thought that Avengers Tower should stand above the Manhattan skyline, which according to the logic of minifigure playsets would put this two or three levels higher. I decided to add two floors, because where the bottom floor extends to–following the slope established in the original set–is about as far out as the edge of platform at the top of the tower. To my mind, this seemed to work out well for a taller and proportionate LEGO Avengers Tower.
LEGO 76038 Attack on Avengers Tower Unmodified
Barring the additional minifigures (and four Iron Legion instead of the stock two), the photo above is of the unmodified LEGO 76038 Attack on Avengers Tower. On the lower level, it has the Iron Legion docking area and medical bay. The middle level has the Iron Legion repair bay/Ultron’s first embodiment and the diagnostic bay with scanner for studying Loki’s scepter. The top level features the platform, entertaining space, and computer station. The tower’s pinnacle is a drone deployment system.
I like the design work that went into the overall design of LEGO 76038. The angular front of the tower and the curve flowing down the side from the platform is spot-on with the design from the film. Of course, LEGO’s designers embellished the design for playability, but the thought that went into what elements should be included such as the Iron Legion bays and the scepter scanner reveal how dedicated their designers are to creating a model that balances play with realism.
Planning Additional Levels
To begin my modification to Avengers Tower, I had to plan out how to extend the slope of the front part of the tower. Following the slope provided in the original model, I saw that the next level–if it were the same height as the previous level–would need to extend two studs past the previous level. This allowed me to plan how much area in studs I would have to work with for the new first or bottom most level, and the new second level. The rear part of each level–with curved, translucent windows would remain the same for the new fourth and fifth levels. The new first level features an interactive Arc Reactor and Computer Server Room. The new second level features Tony Stark’s workshop and the Iron Man Hall of Armor.
Arc Reactor
I started building my addition to Avengers Tower on the bottom most, or new first level. Thinking back to the first Avengers film, I wanted the tower to have its own Arc Reactor. The first challenge was to think about what that would look like as it is only seen in the film as a 3D schematic on Pepper Potts’ computer monitor, and the second challenge was to integrate some interactivity into this part of the model. While the Arc Reactor doesn’t spin (just the plasma within its torus moves within its magnetic confinement rings), I thought a geared spinning mechanism might be fun to engineer. Due to the placement of the window, I added a series of three gears to move the work where it was needed to spin the reactor. A small knob on the right side of the tower is used to spin the reactor. I added gauges, pipes, valves, and supports to frame the Arc Reactor within its space.
Computer Server Room
Opposite the Arc Reactor on the first level is the computer server room. I built the 19″ computer racks four bricks high, but I might make these higher later. I staggered their placement to imply depth to the space. In the back corner, Ant-Man is hiding out to see what Stark might be up to.
Tony’s Workshop
I focused the new second level on Iron Man. In the front, sloped space, I created Tony Stark’s workshop. It has a desk with computer, parts, coffee mug. Next to the desk is a set of drawers with tools, and on top are two containers and Stark’s Mark V or Suitcase Armor from 76007 Iron Man: Malibu Mansion Attack. In the foreground, Tony Stark has a wrench, and a set of Iron Man armor is on the rotating work platform. Below are some false starts that I made while trying out different designs for this space, including a movable robot arm, which looked very nice but overcrowded the small area available.
Hall of Armor
On the rear side of the second level is Tony Stark’s Iron Man Hall of Armor. I was able to fit six different Iron Man armors in this tight space by building two tiers for the armor–one lower and in the foreground, and one higher and in the background.
New Avengers Tower Assembled!
After completing the new first and second levels, I connected them to the bottom of the original Avengers Tower model. This took some time and massaging to get full clutch without accidentally breaking the model. I’m happy with the new, taller version of Avengers Tower. I wonder what role, if any, it might play in the upcoming Avengers 4 film.
When I built my desktop PC last year, I opted for a low-end video card, because my graphics requirements were modest and it helped keep the cost of computer parts down. Since then, I’ve wanted to experience a better visual experience on my computer in games and graphics simulations, meaning more detail and effects, and higher frame rates at 1080p resolution.
Unfortunately, video card prices were outrageously inflated due to high demand from Etherium and other easy-entry cryptocurrency miners. With the welcome crash of electricity-wasting cryptocurrency markets and the anticipated announcement of a new generation of video cards from nVidia, the prices of video cards began to return to lower prices, which prompted me to begin looking for an upgrade.
Considering that I have a 400-watt EVGA PSU and my monitor is 1080p, I focused on nVidia’s GeForce GTX 1060, because despite its Pascal architecture’s very modest power requirements (recommended 400 watt PSU and 6-pin PCIe auxiliary power), it pushes very high-quality graphics at 1080p resolution. While the 3GB model was less expensive than the 6GB model, I chose the latter, because it has more CUDA cores (1280 vs. 1152), more texture mapping units/TMU (80 vs. 72), and more streaming multiprocessors/SM (10 vs. 9). These enhancements coupled with twice as much GDDR5 video ram justified its slightly higher price for better performance and hopefully greater use lifespan. I went with EVGA’s single fan version of the 1060, because I have had good experiences with their products and I appreciate their streamlined, unostentatious, and quiet design on this video card.
After purchasing the GeForce GTX 1060 6GB video card for $280 from Microcenter and installing it in my PC, I stress tested it and ran benchmarks to verify that everything was okay after the upgrade. As you can see above, it scored a 3D Graphics Mark of 10684, which is more than twice as high as the 3,954 scored by my old Radeon RX 550 4GB video card.
In the Final Fantasy XiV Heavensward benchmark, the GTX 1060 GB scored an 11,797 at 1080p, while the RX 550 4GB scored only 4,416 at the same resolution.
In the Docking Bay 94 Unreal Engine 4 simulation, I get well over 40 fps with the settings maxed out at 1080p. Read about how the simulation was made and find download links on 80 level.
And, I get to fly the Millennium Falcon in EA’s Star Wars: Battlefront 2 video game. While the game’s graphics are amazing, I was reticent to purchase it after its launch debacle with in-game purchases and loot crates. Thankfully, EA backtracked on those things after the gaming and Star Wars fan communities collectively denounced these greedy and unethical practices.
Finally, EVGA’s current video game promotion includes a free copy of Destiny 2 with the purchase of a GTX 1060 or higher video card. After redeeming my copy, I’ve played a little of it, and I like it. I’m a big fan of the original Halo by Bungie, and this game reminds me of that game without the story relying on a single archtype hero, such as Master Chief. In Destiny 2, you can create your own character based on class (Titan, Hunter, or Warlock), species, sex, and appearance. For my first experience in the game, I created a Hunter. The GTX 1060 6GB video card makes this game run smooth and look beautiful at 1080p.
Overall, I’m very glad that I made this upgrade to my PC. If you’re considering an upgrade now rather than waiting for nVidia’s recently announced RTX line of video cards, I strongly recommend the GTX 1060 6GB as a lower cost, high performance video card.
Neuromancer for Commodore 64/128. Item in City Tech’s Retrocomputing Archive.
Recently, I posted about the new OpenLab site that I launched for “Retrocomputing at City Tech.” On the site, I included a photographic inventory of the computing hardware and peripherals that I have on-hand in my office in Namm 520. Now, I’ve added to the site with a second page that inventories a majority of the software that is in the vintage computing archive. The software archive includes games (like Neuromancer pictured above, Star Wars X-Wing and TIE Fighter, and Star Trek 25th Anniversary), productivity software (such as Microsoft Office 2004), encyclopedias (Comptons, Groliers, and Microsoft Encarta), and operating systems (Windows 95, Macintosh System 7.5, Mac OS X 10.0-10.3 and 10.5). Follow the link above to see all of the software on its original media followed by textual descriptions.
I’ve wanted an IBM ThinkPad since I first saw my boss’ at Netlink in the fall of 1998. But, while I’ve been invested in PCs over the years tangentially, I reserved Macs as my primary desktop or laptop computing platform, which combined with the premium price on IBM and then Lenovo ThinkPads kept me in the Apple premium category. Put another way, I could afford one but not both.
Apple, as I’ve confided with friends, is diverging from my computing interests and needs. While design has been an important part of Apple’s DNA since the Apple II (arguably even earlier if we consider Woz’s design aesthetics for the Apple I motherboard layout), its increasing emphasis on fashion and accessorization and seeming less technological investment and innovation in its desktop and laptop computers have soured my allegiance to the company and its computers.
So, I thought about how to try out a different kind of PC laptop–one that I had wanted but could not afford when it was originally released–and make an investment in extending the life of what some folks might consider an obsolete or recyclable computer.
Within this framework, I wanted a laptop to take the place of the MacBook Pro that I had sold on eBay awhile back while the resell value was still high before rumored price reductions as product refreshes roll in. It needed to be relatively lightweight and have a small footprint. Also, it needed to have good battery life. And of course, it needed to run the software that I use on my home-built desktop PC.
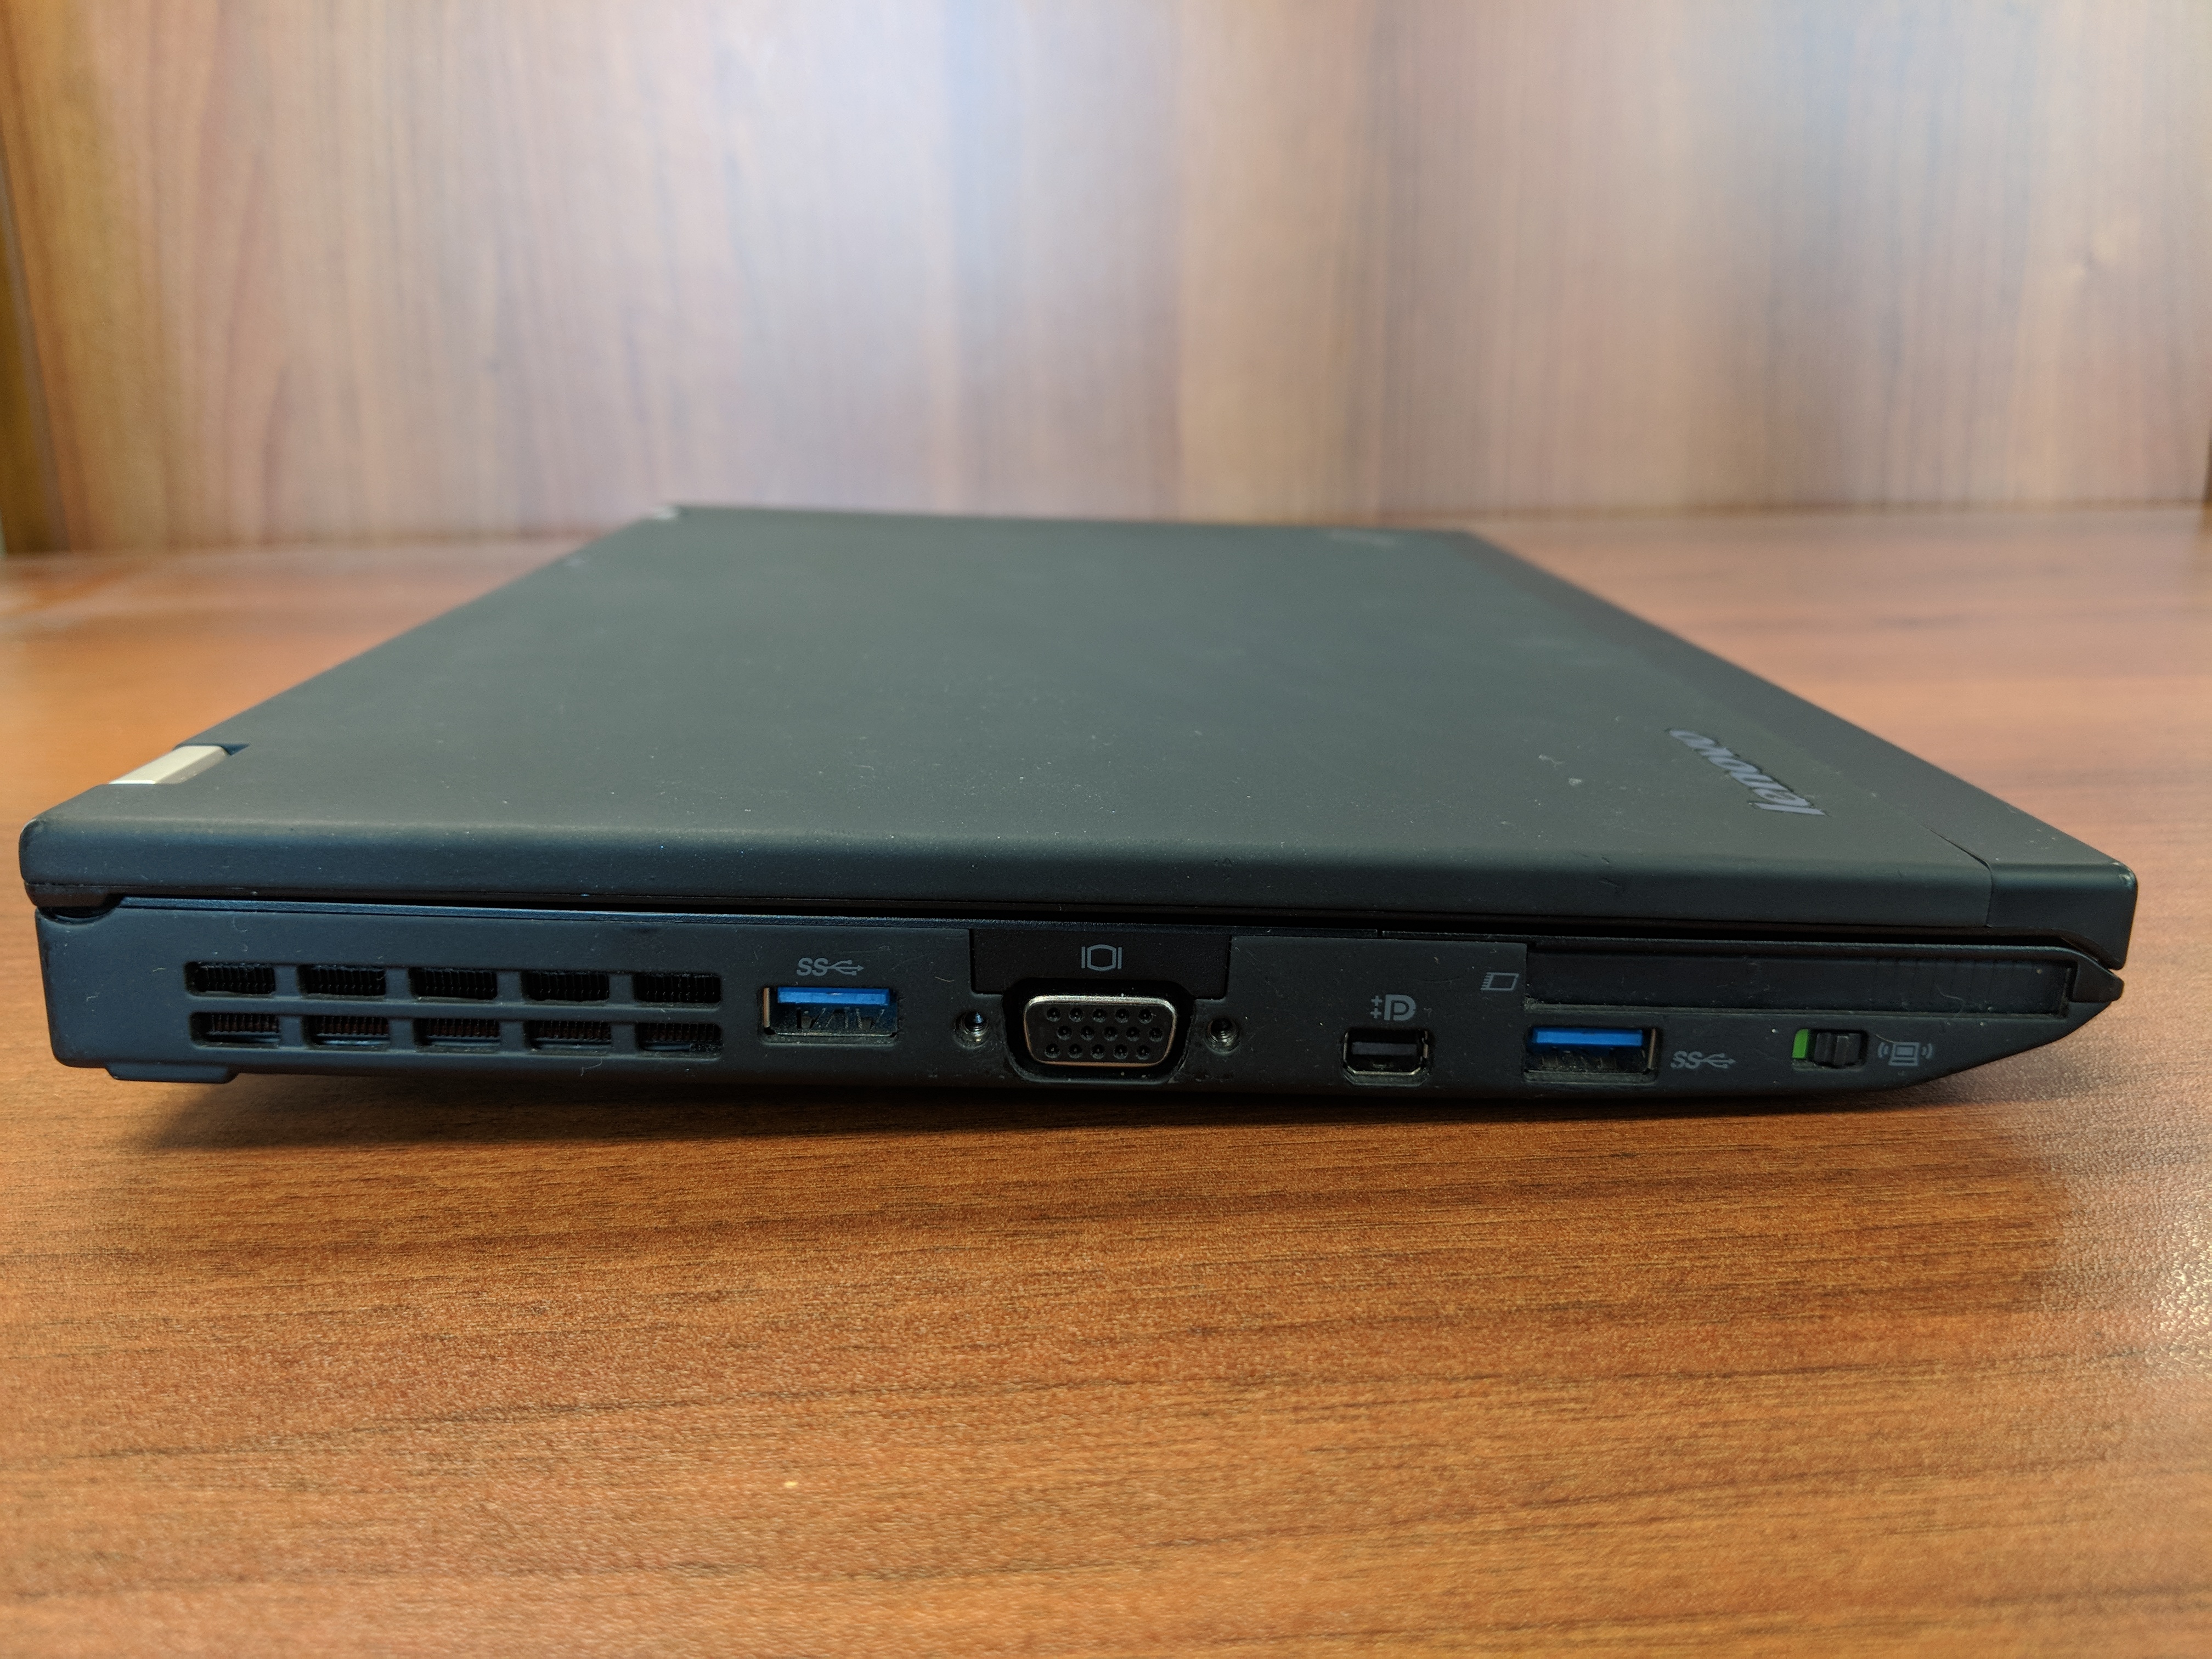
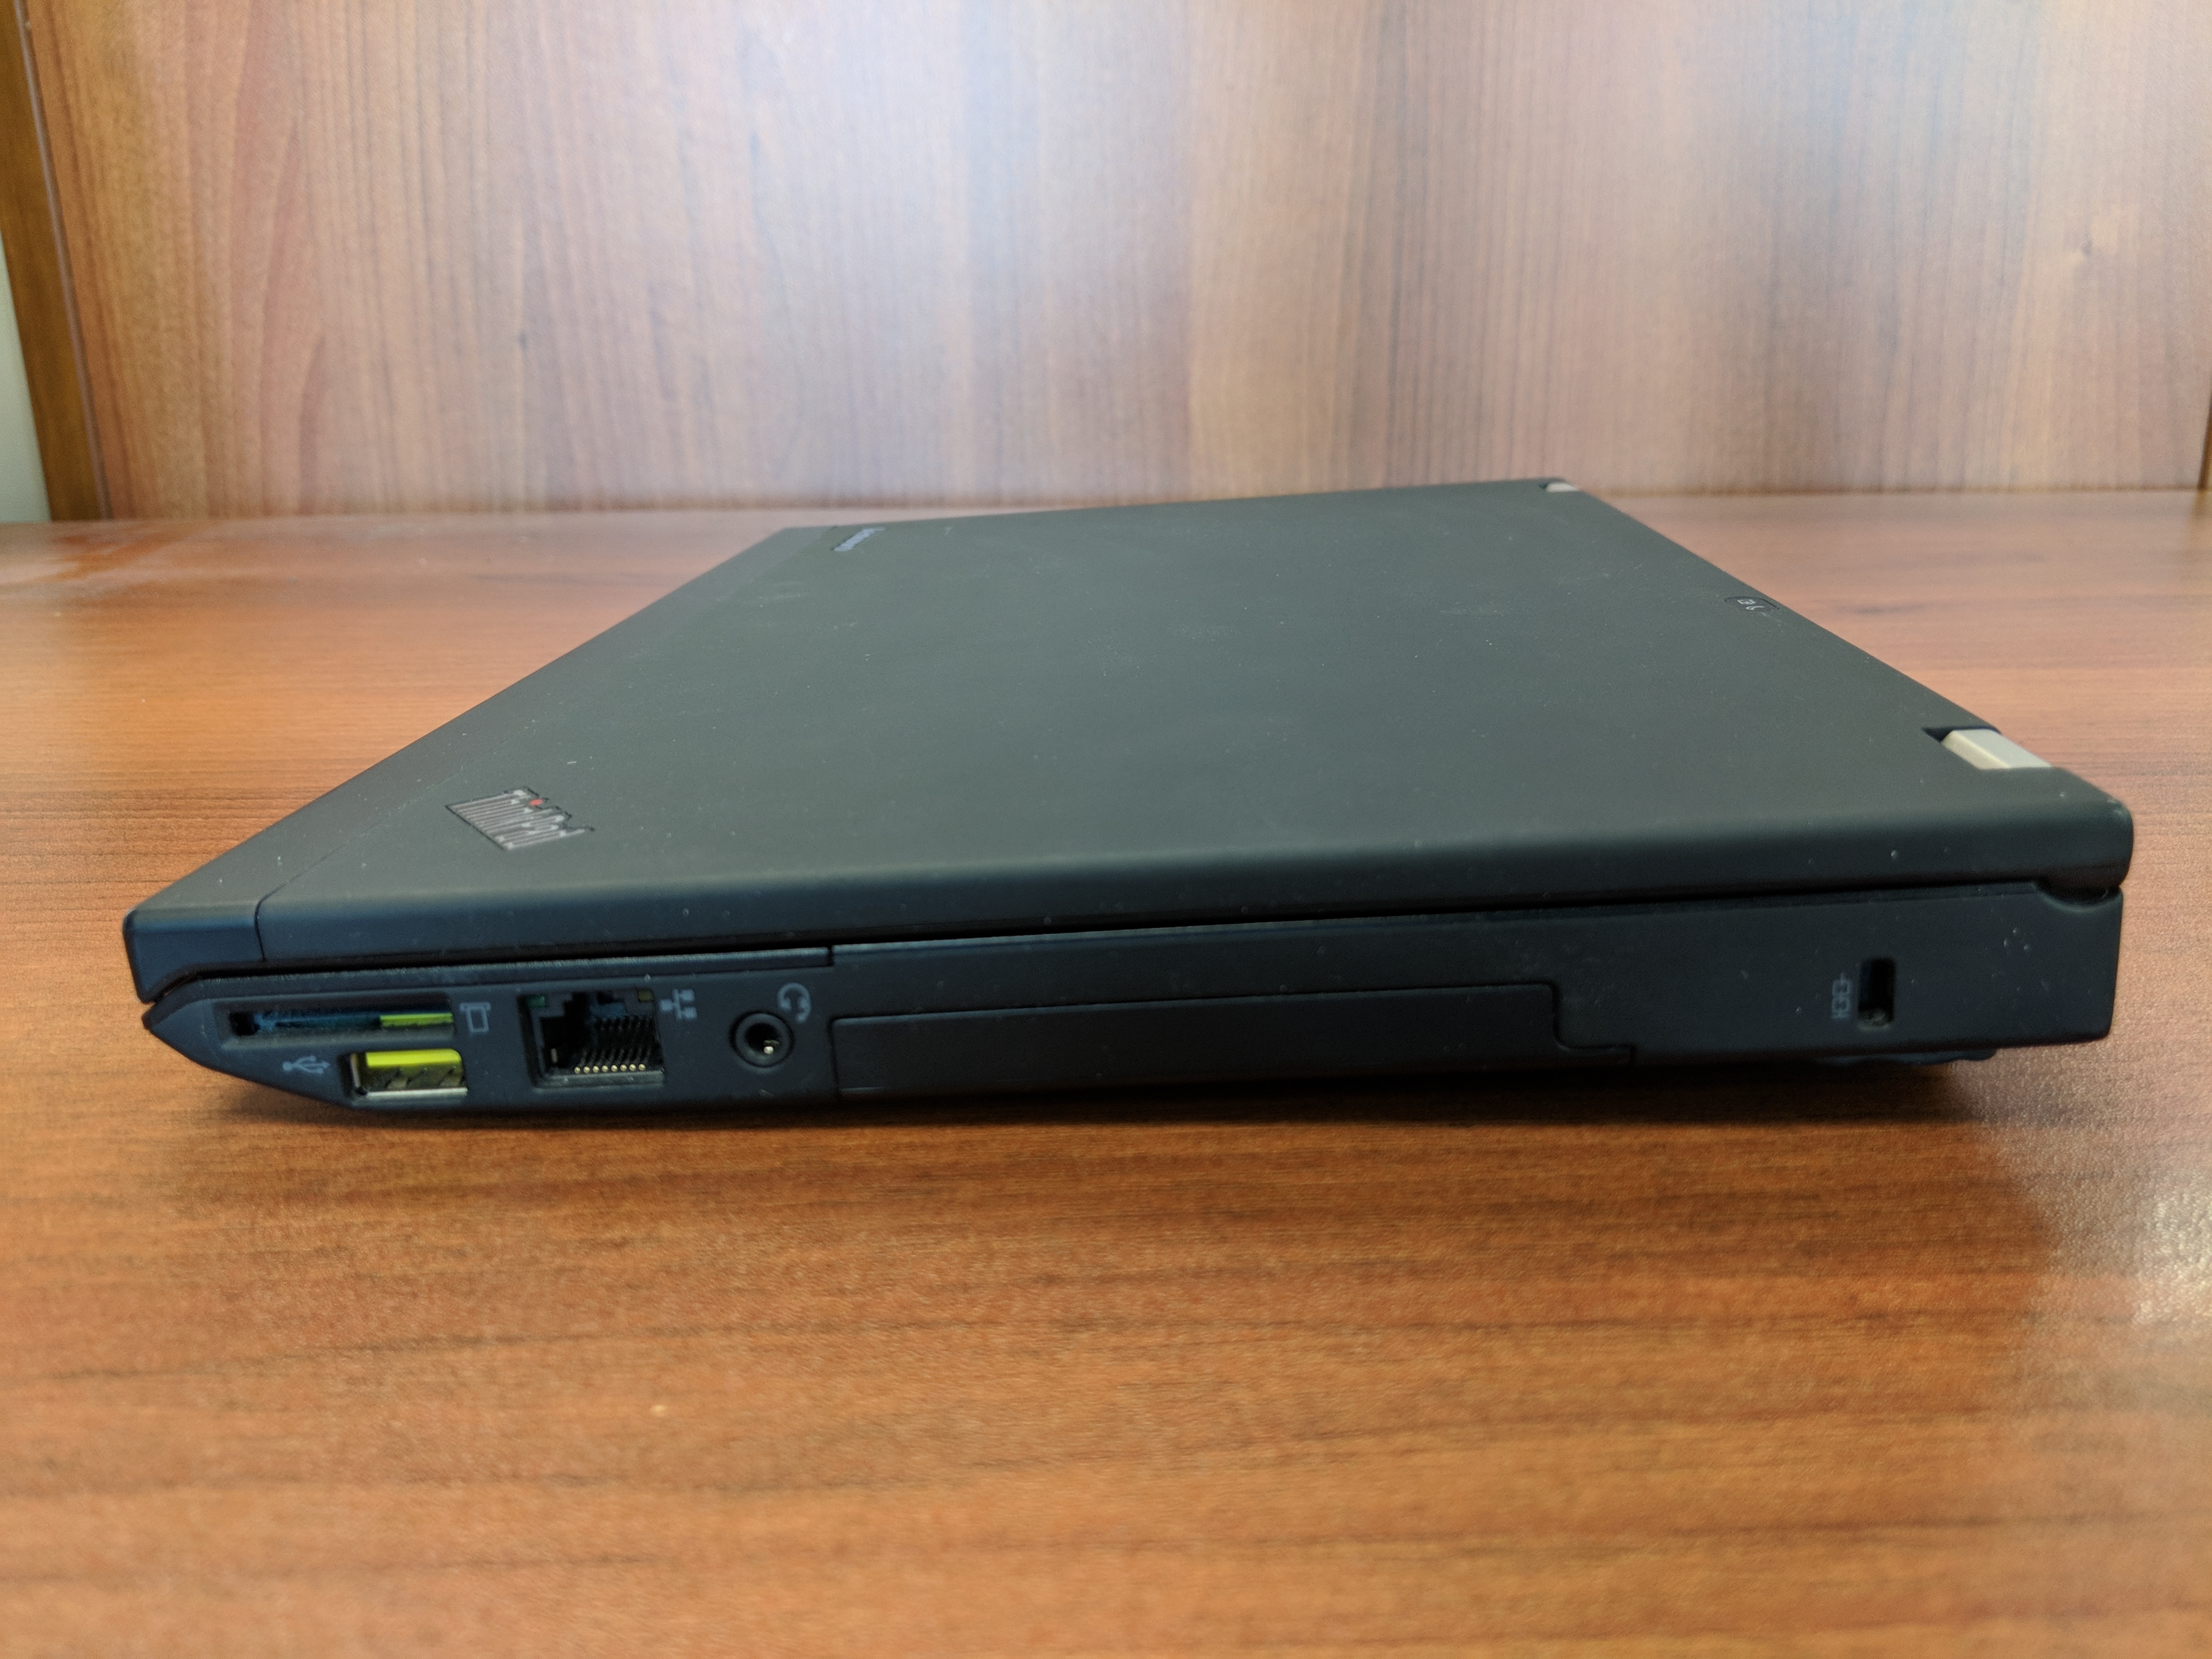
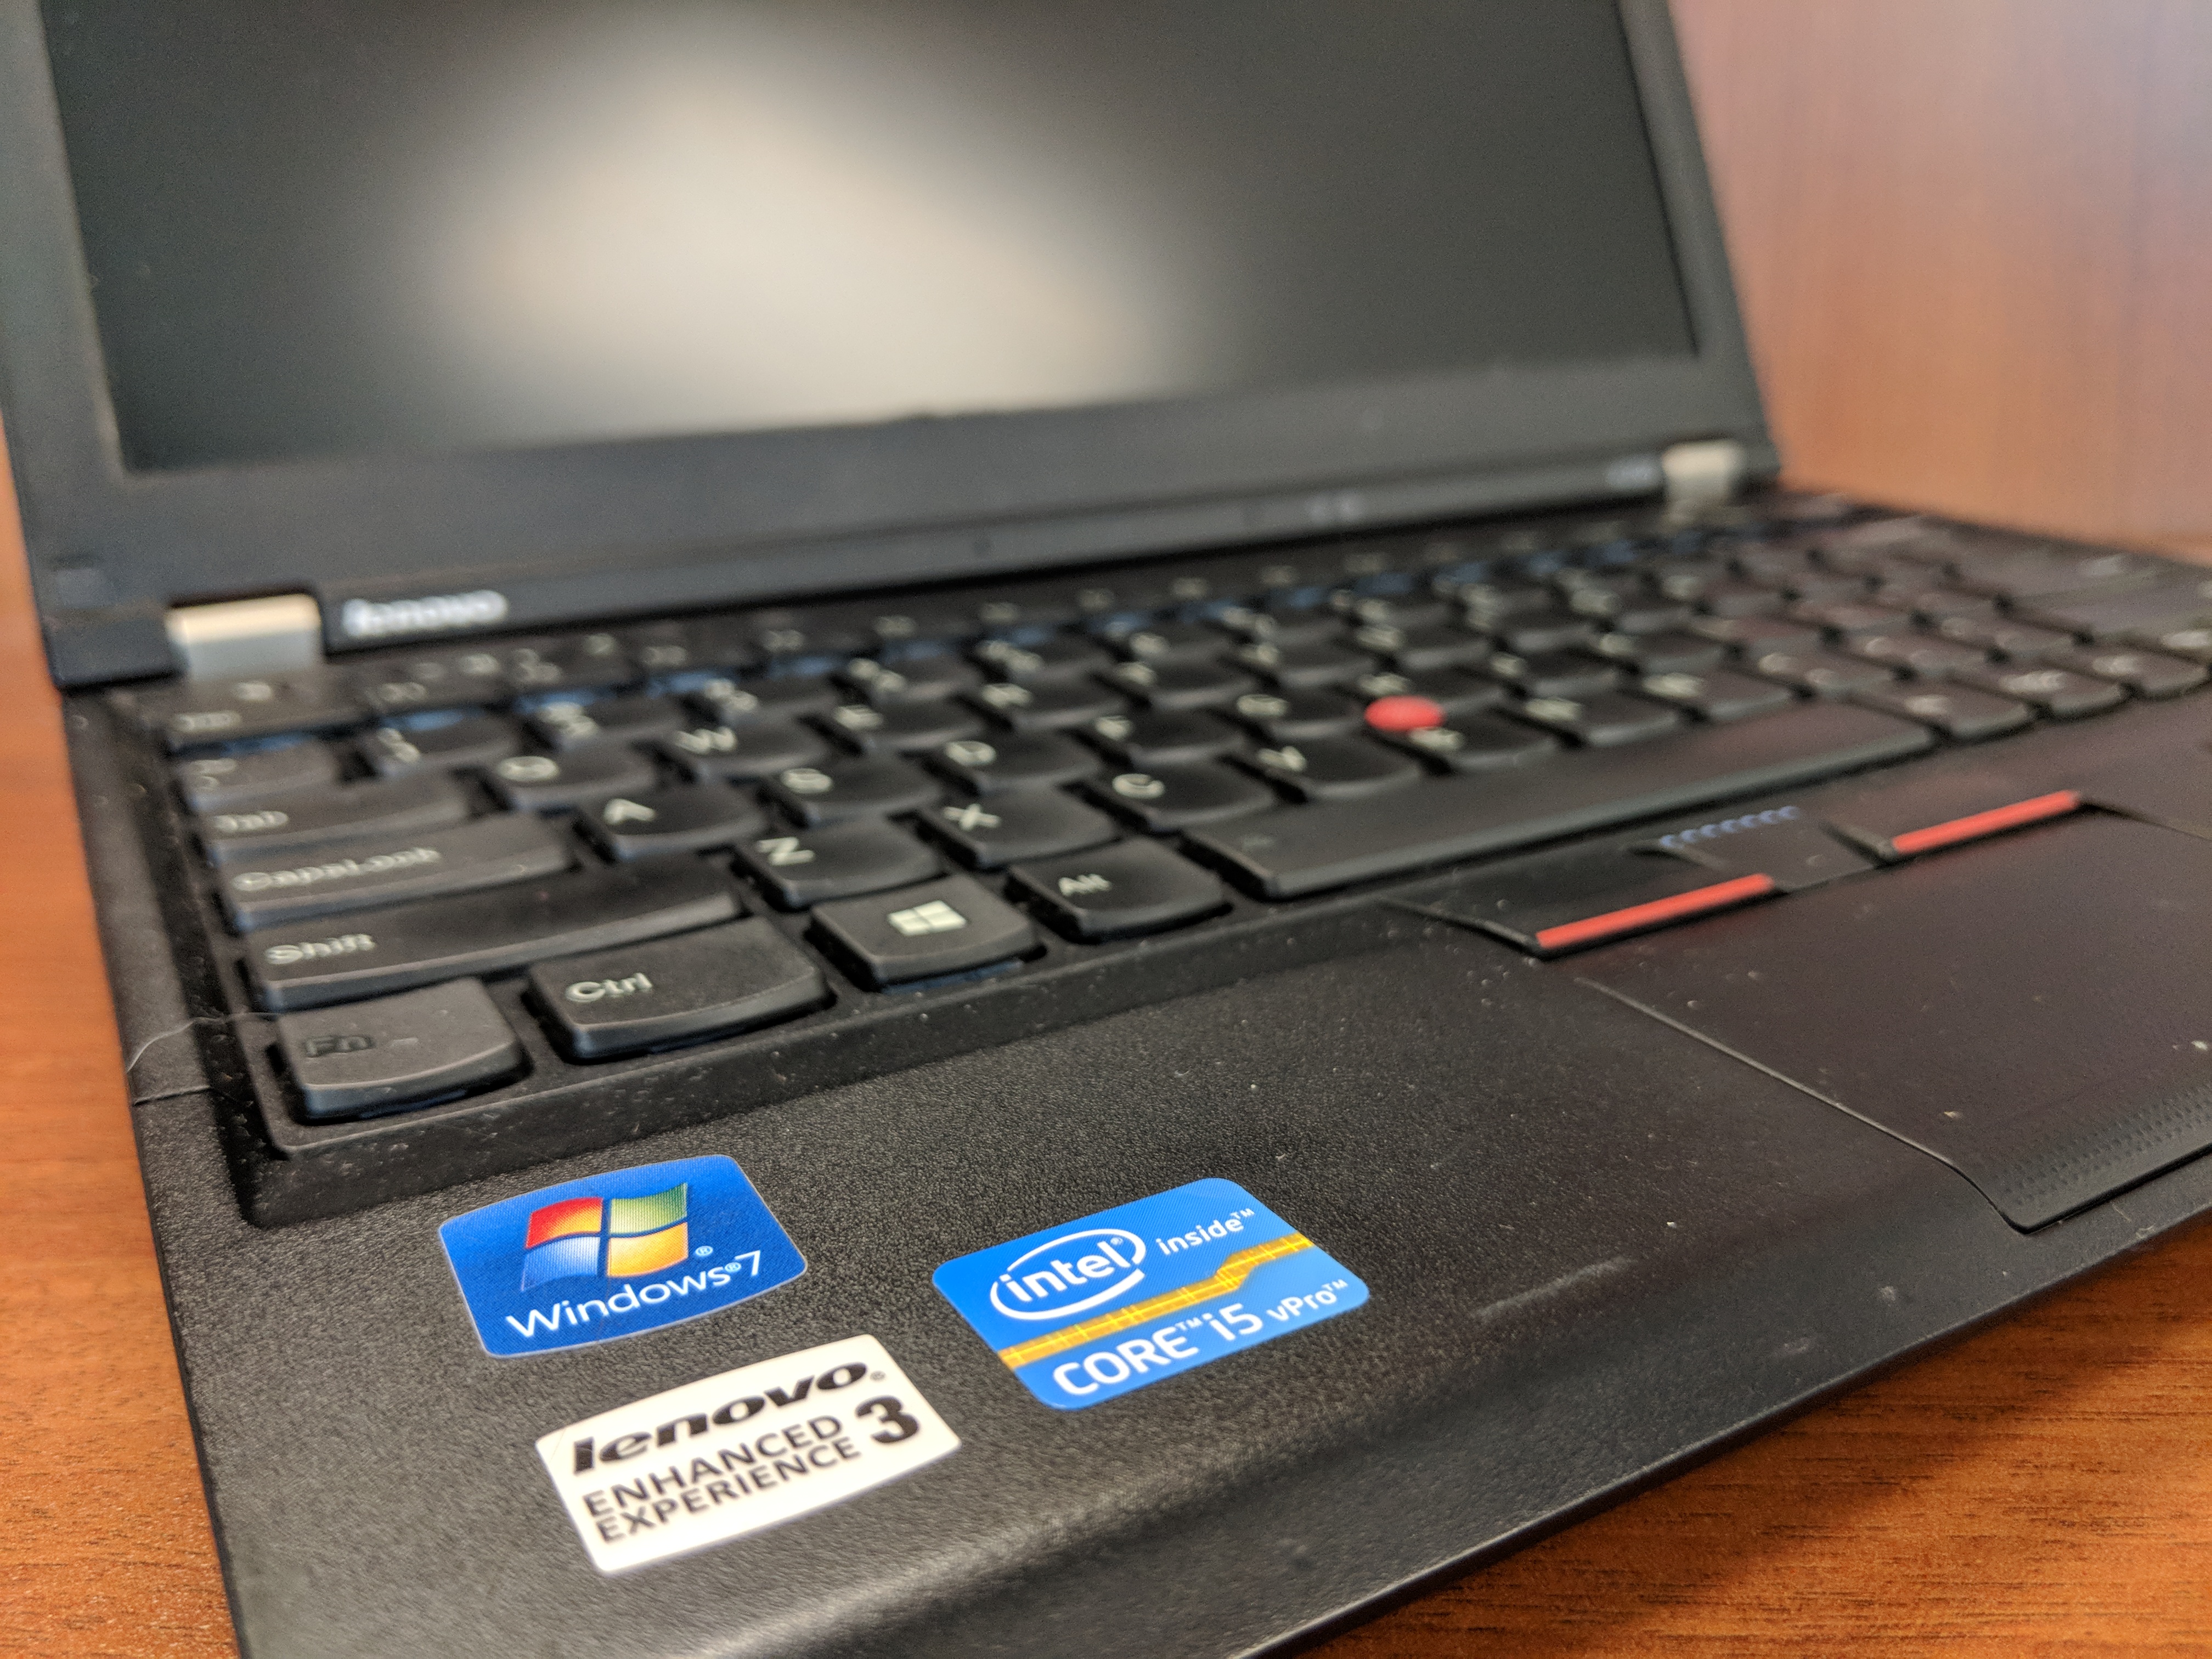
Eventually, I decided to purchase a very well taken care of Lenovo ThinkPad X230 on eBay. Originally released in 2012 for a lot more than what I paid for it, this ThinkPad model features an Intel Core i5 3320M Ivy Bridge CPU running at 2.6GHz with 2 cores and supporting 4 threads. It has 8GB DDR3 RAM and a 180 GB SSD. In addition to built-in WiFi, it has an ethernet port, 3 USB 3.0 connectors, an SD Card reader, VGA and Display port connectors, and a removable battery.
From a user interface perspective, it has a chiclet keyboard which responds well to typing quickly. Its touchpad leaves a little to be desired in terms of responding to some gestures like scrolling, but its red pointing nub and paddle-style mouse buttons at the top of the touchpad are exquisite. It includes some feature buttons like a speaker mute button next to volume keys above the function key row, and on the left side there is a radio on/off switch for the WiFi and Bluetooth.
Initially, I tried out the ThinkPad X230 with Ubuntu, and everything seemed to work out of the box (though, I added TLP for advanced power management). However, I switched back to Windows 10 Professional with a full nuke-and-pave installation, because I have some software that is far easier to run natively in Windows instead of through Wine or virtualization in Linux.
In Windows 10 Professional, the ThinkPad X230 meets all of my productivity needs. I use LibreOffice for most things, but I also rely on Google Docs in Chrome for some tasks (like inventorying the City Tech Science Fiction Collection). The WiFi works well even at City Tech, which has one of the most cantankerous wireless networks I’ve encountered. At home, I use it on my lap to browse while watching TV.
The X230 is snappy and quick despite its age. Of course, the SSD and ample RAM support increased input/output for the older CPU. Chrome, LibreOffice, and Windows Explorer respond without hesitation. It easily plays downloaded Solo: A Star Wars Story 1080p trailers in VLC, too.
With the included 6 cell 45N1022 battery, it runs for several hours (this is a used battery, so its capacity might be lower than one that is brand new). I purchased a 9 cell 45N1175 battery, which I’m testing out now. With the 6 cell battery, it is just shy of 3 pounds, and with the 9 cell battery is a little over 3 pounds. I’m hoping that between the two of them that I can get plenty of work done on the go without being tethered to a power outlet.
Future tests include running World of Warcraft and watching full length movies. The display’s viewing angles could be better, but I’m willing to accept them as they are as I can adjust the brightness and display gamma easily using keyboard shortcuts and the Intel Display Adapter software to minimize its poorer display quality as compared to the latest HiDPI displays available now.
I’m tickled to use the Lenovo ThinkPad X230 as my main laptop. Now, I can say that I’m a proud ThinkPad owner instead of a zealous Apple user.
At the bottom of this post, I’ve included more photos of the X230.
If you’re considering a new computer, I would, based on this and my other vintage computing experiences, suggest that you consider trading up for a used or refurbished machine. Getting a used computer keeps that computer out of a landfill or being destroyed for its rare metals, and it might be an opportunity to try out a computer that you might have missed on its first time around.