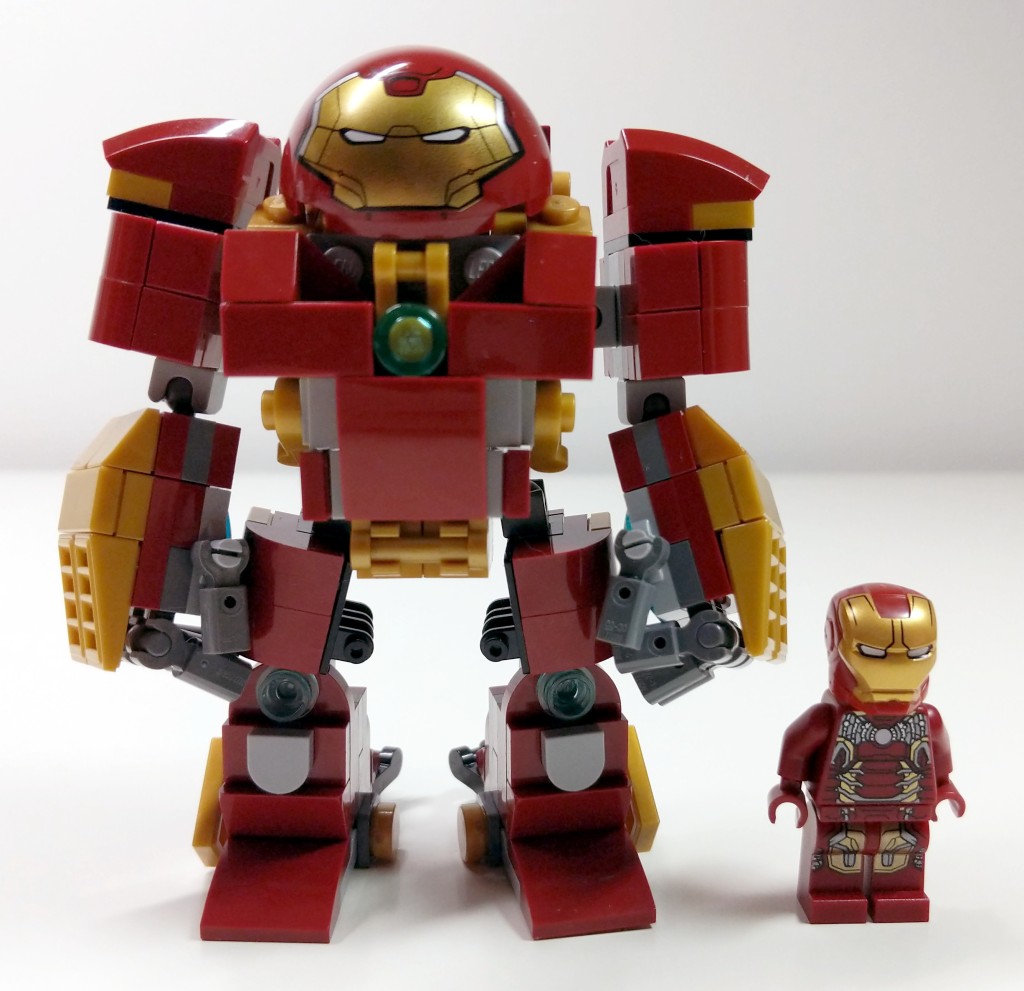
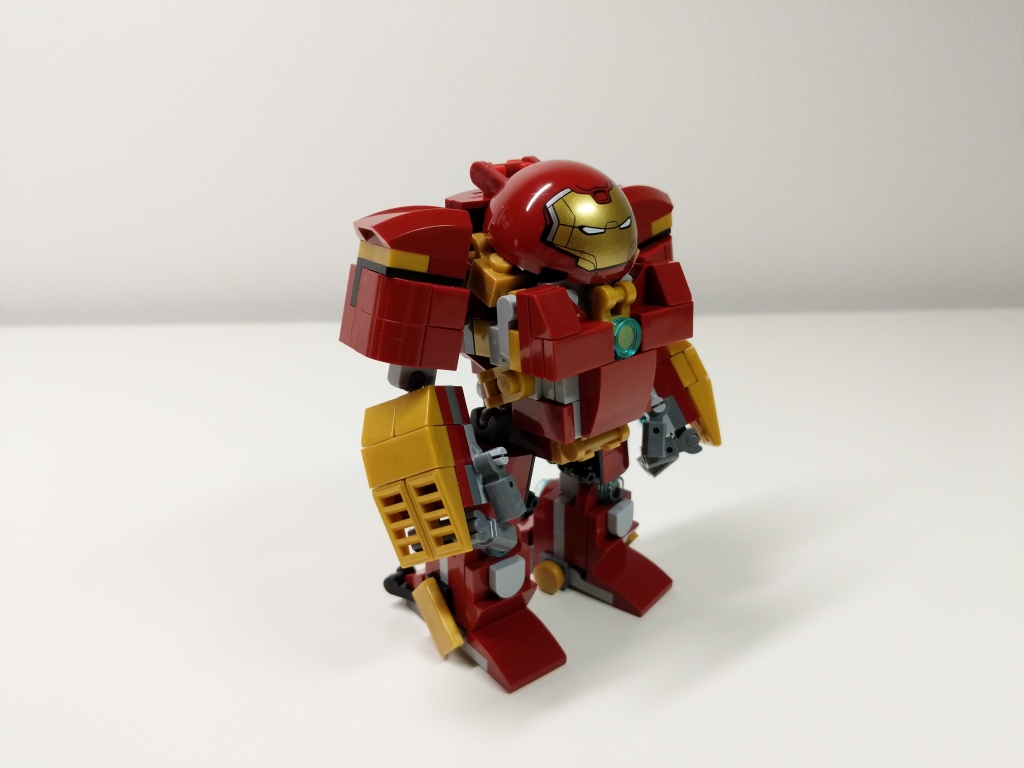
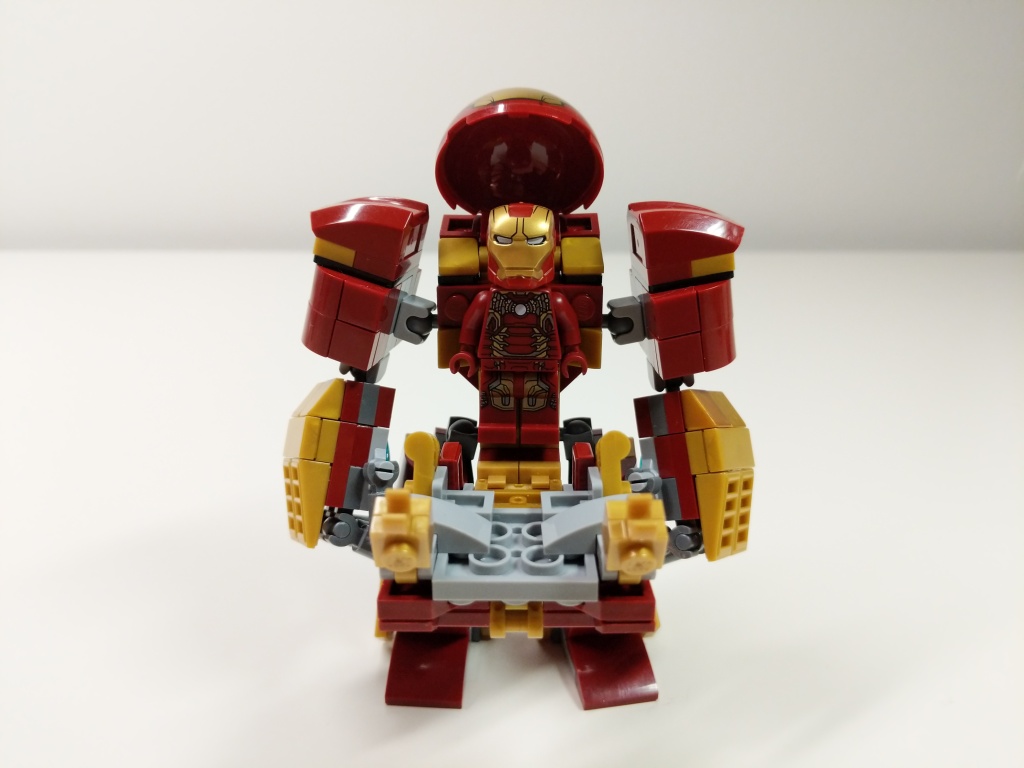
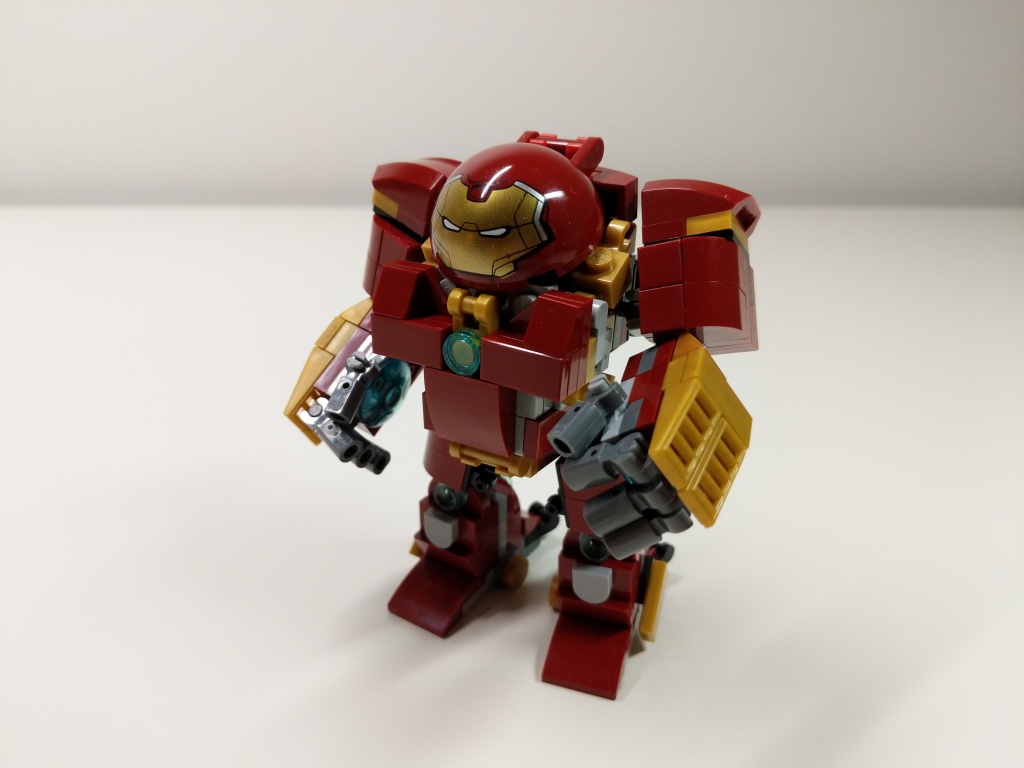
My Iron Man Hulkbuster Mark 44 Armor MOC with Iron Man Mark 43 Armor Minifigure.
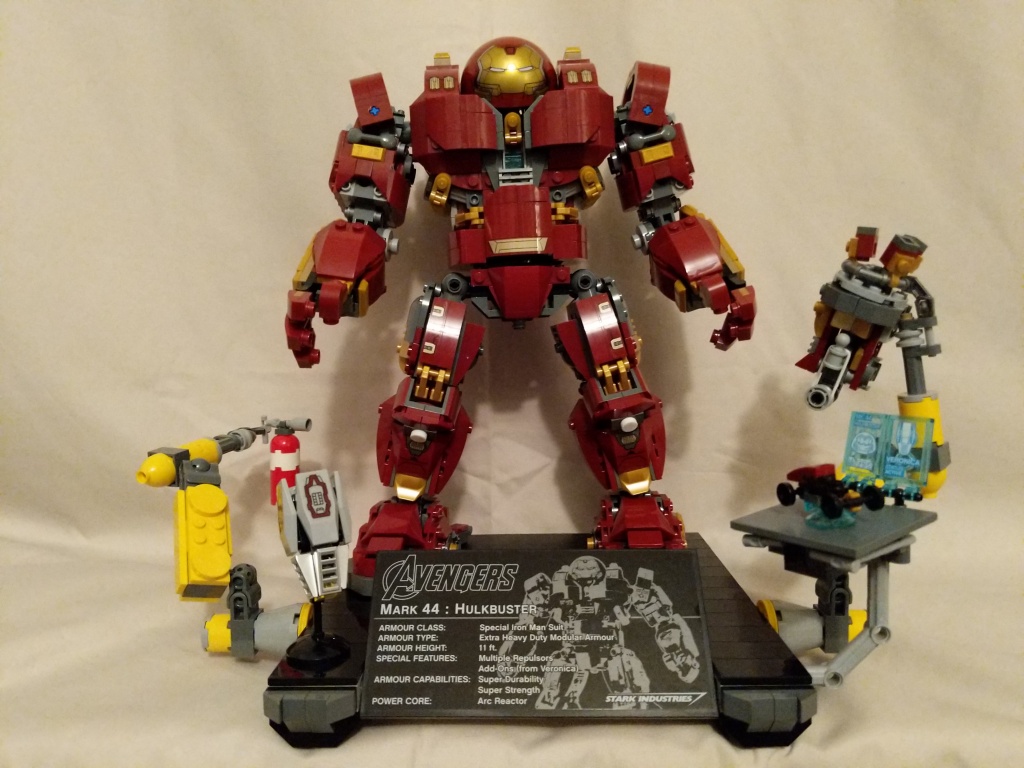
Continuing my recent post of past LEGO MOCs (my own creation), I wanted to share this minifig scale Hulkbuster armor for Iron Man that I built during the summer of 2019 as something more playable and scaled properly than 76105 The Hulkbuster: Ultron Edition pictured below.
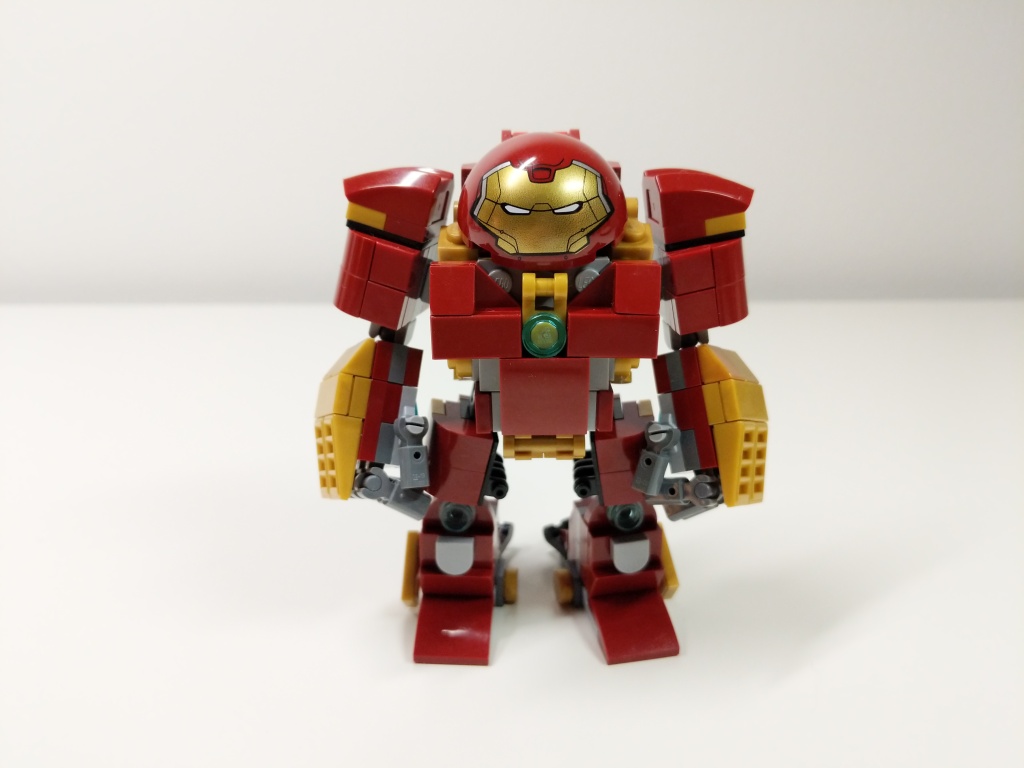
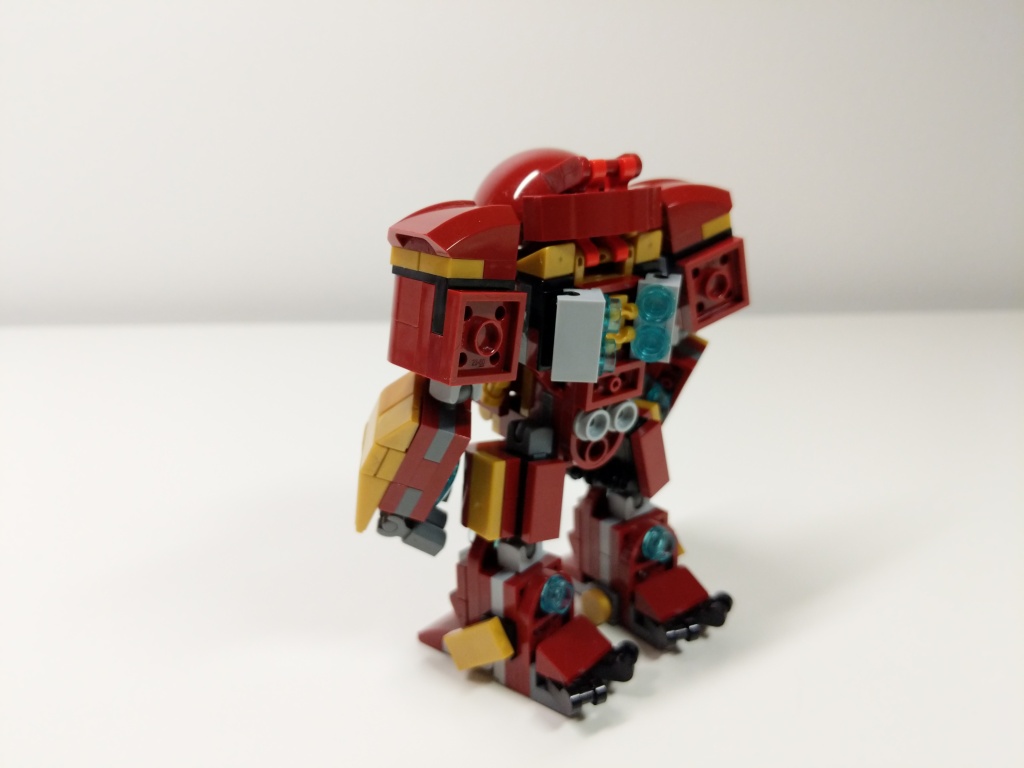
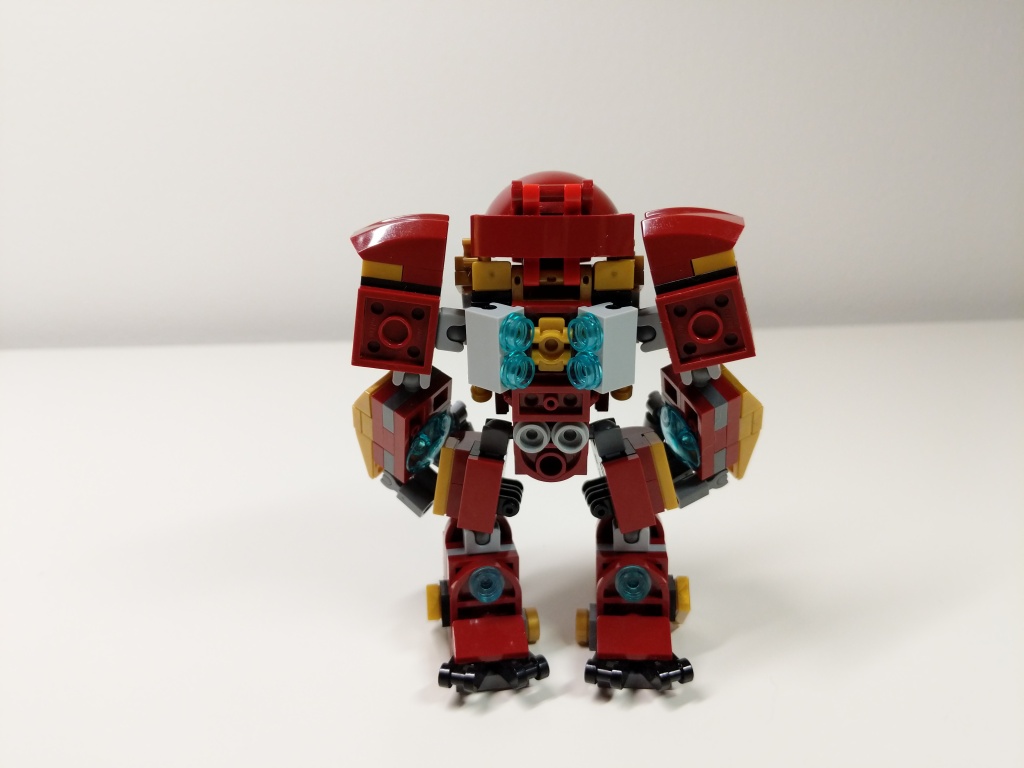
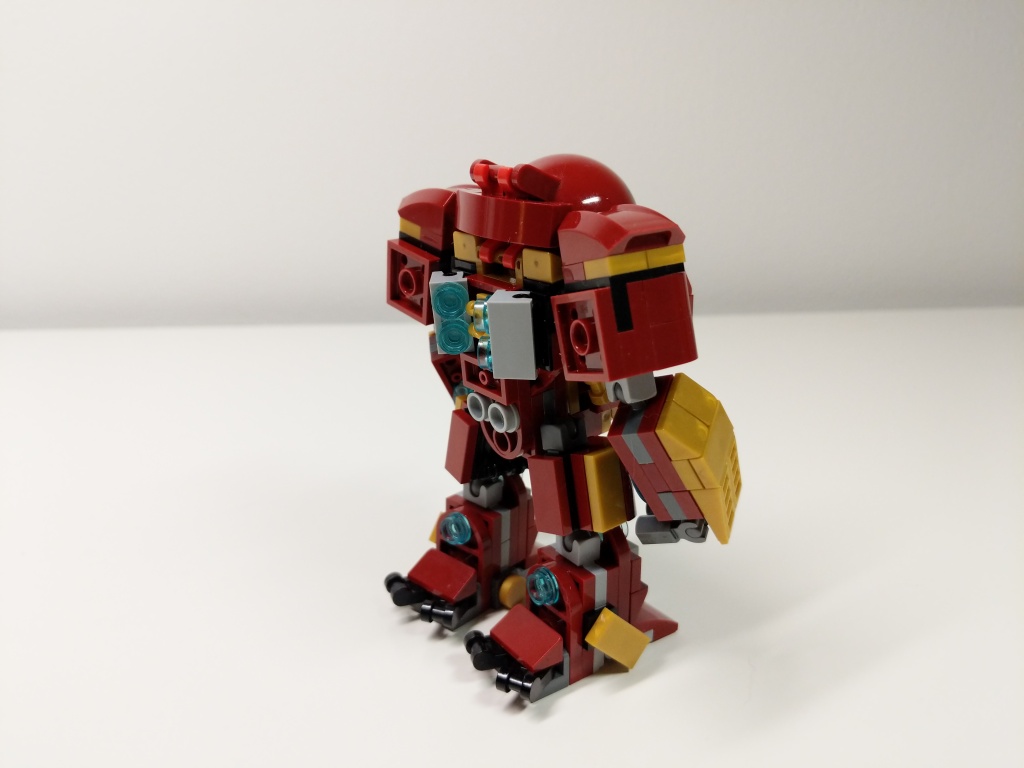
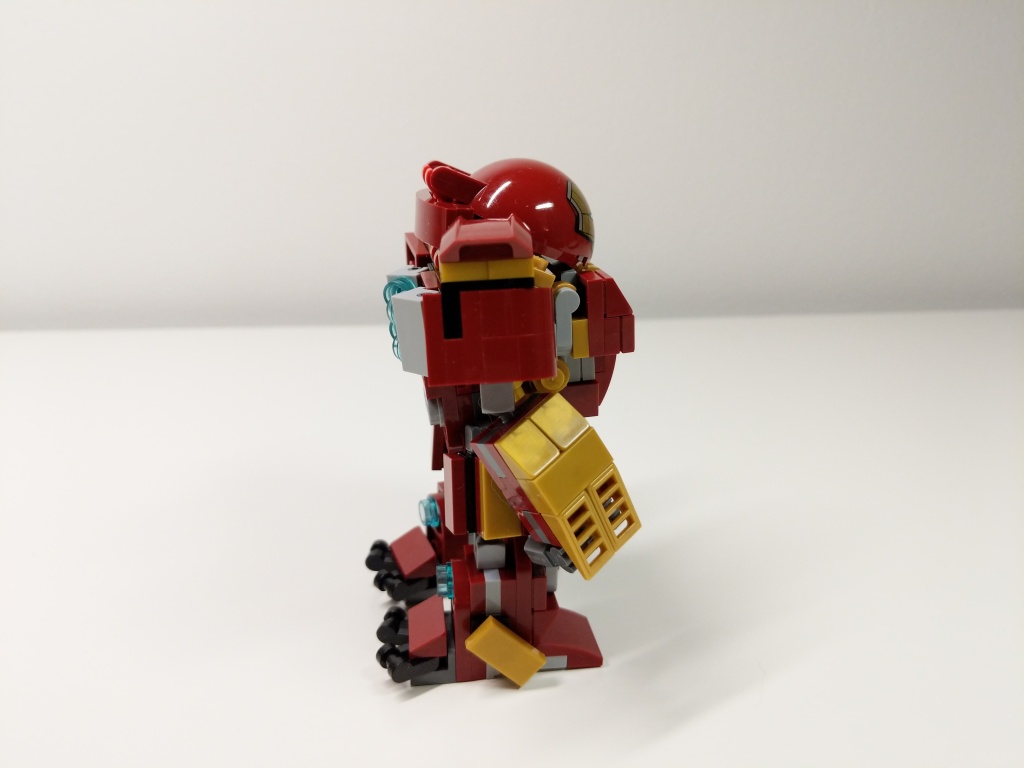
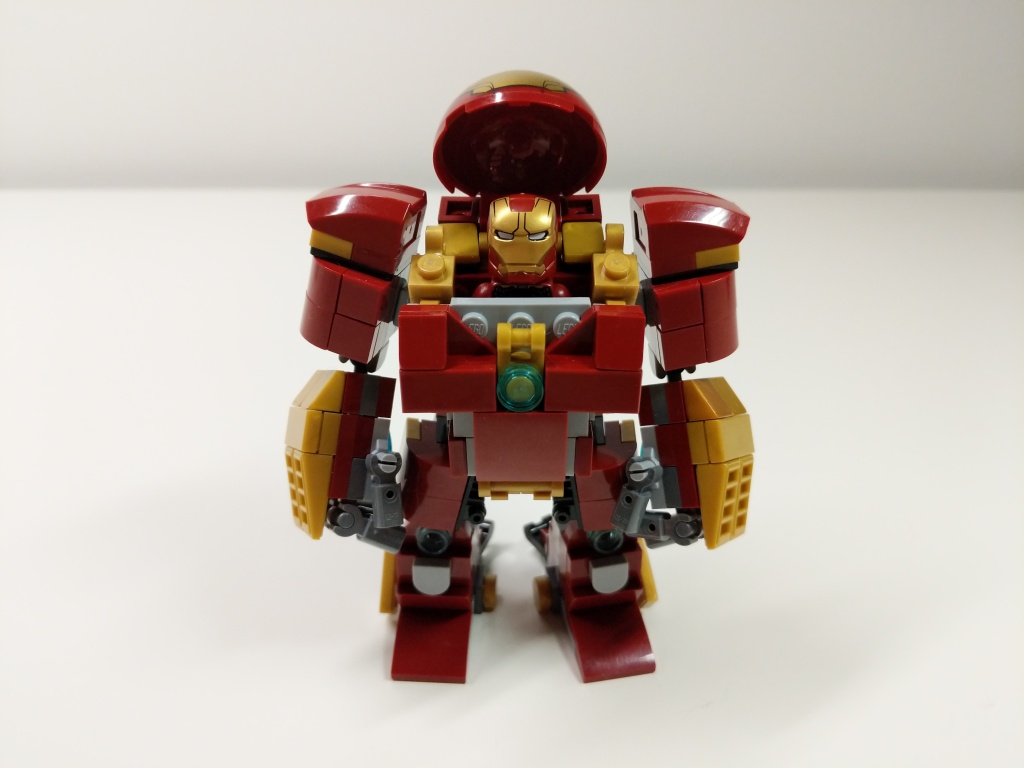
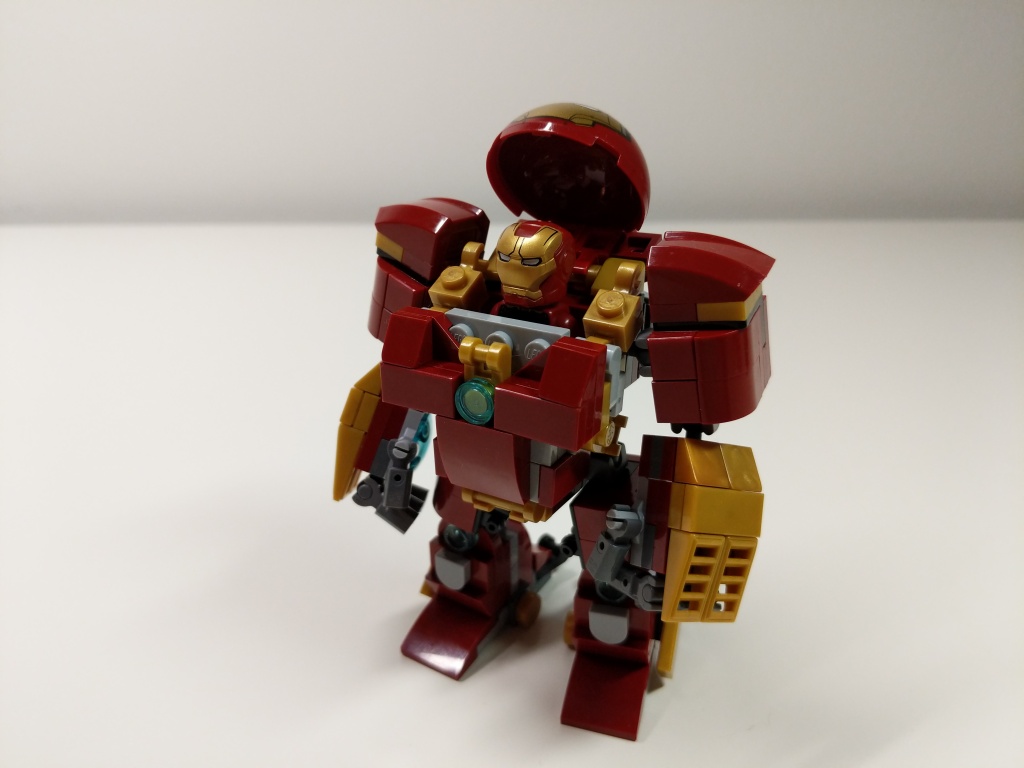
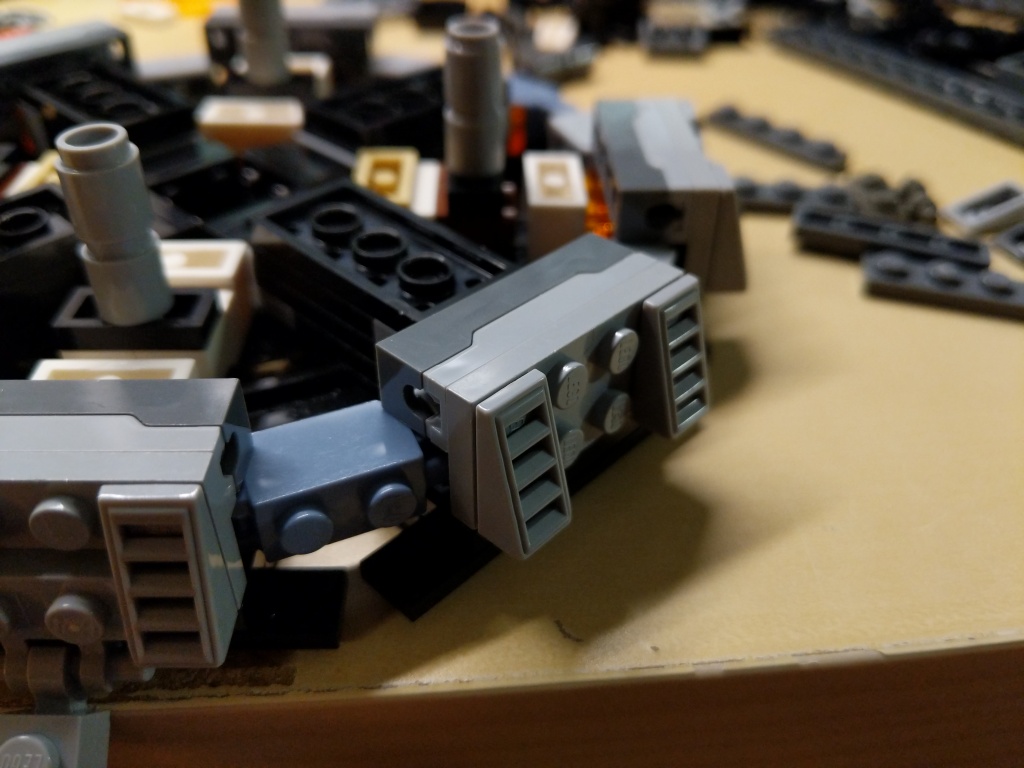
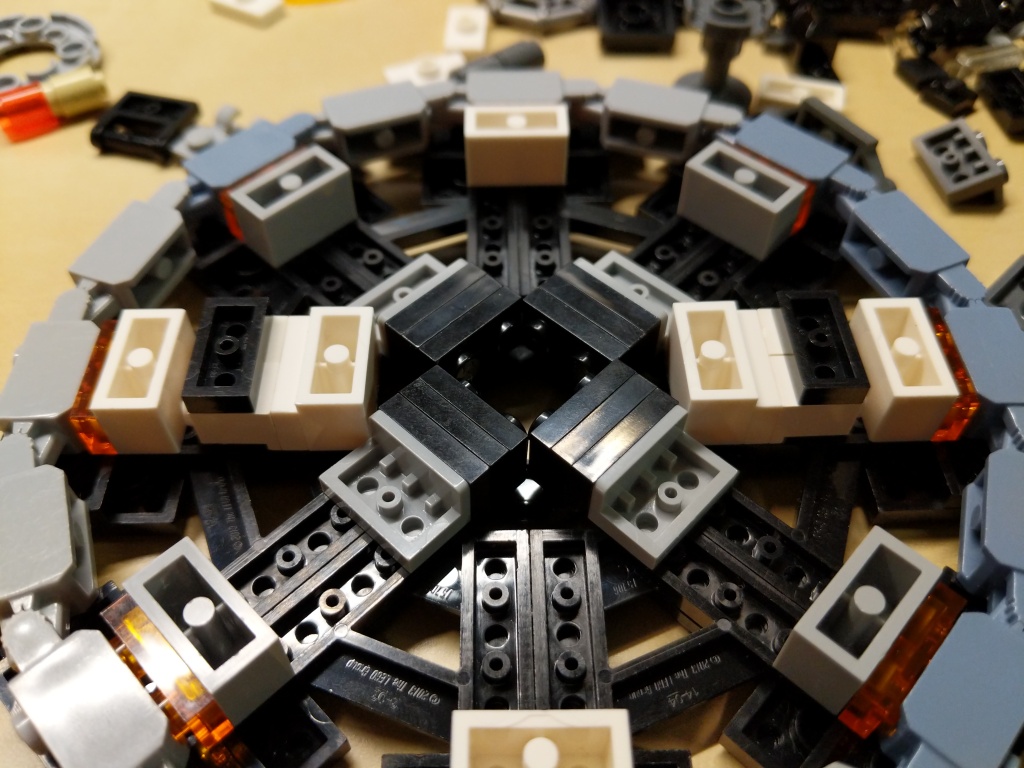
Iron Man’s Mark 44 Hulkbuster Armor is meant to put him on par with The Hulk in terms of strength and size. Considering the minifigure at the heart of the 76105 set, it is gargantuan in comparison to The Hulk. Therefore, I set a goal to build Hulkbuster armor that matched the mini-figure scale as closely as possible, encapsulate an Iron Man minifigure, and have more points of articulation than the smaller Hulkbuster armor in 76031 The Hulk Buster Smash (having a swivel waist like the 76105 Hulkbuster in this small size was beyond my skill).
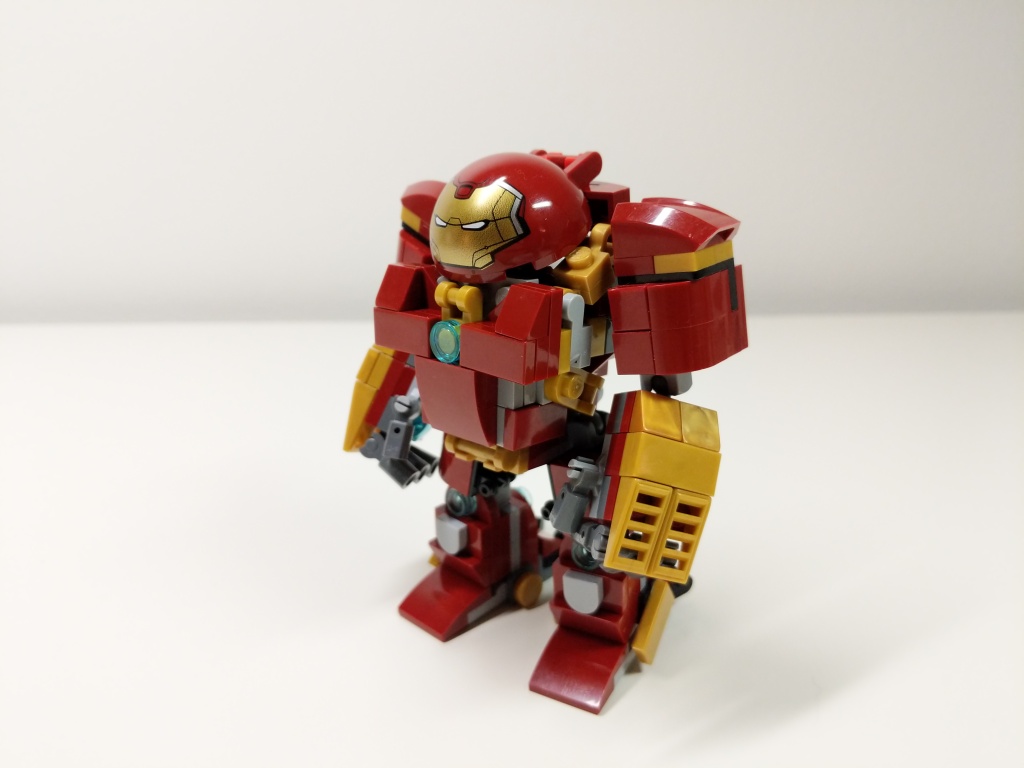
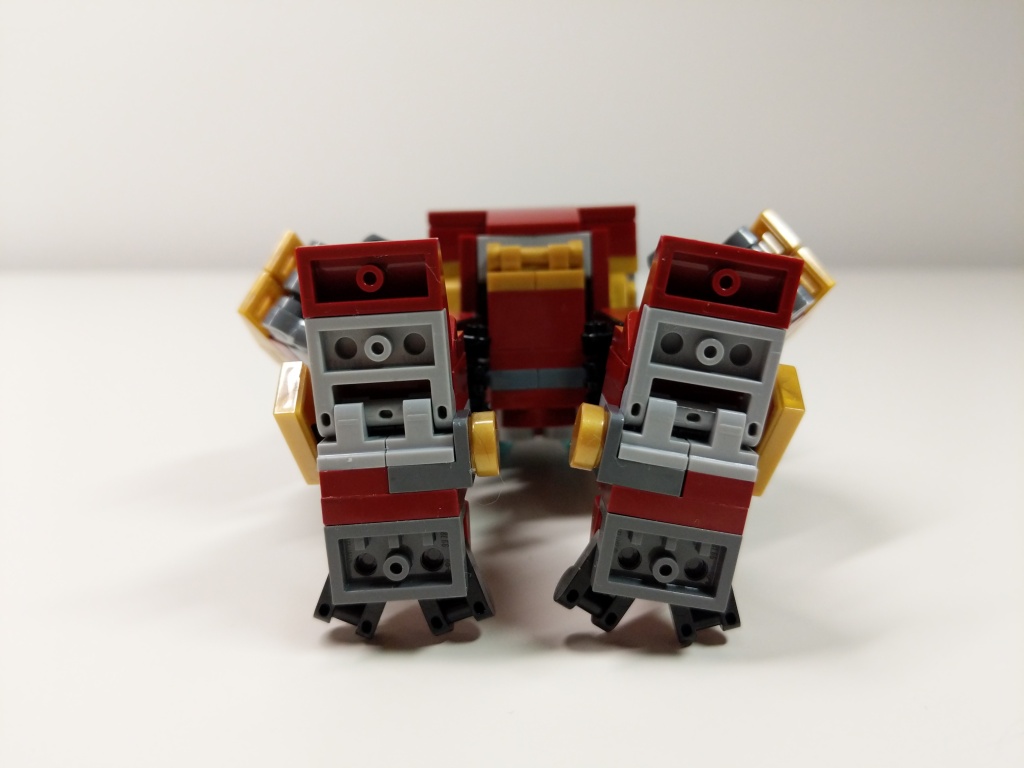
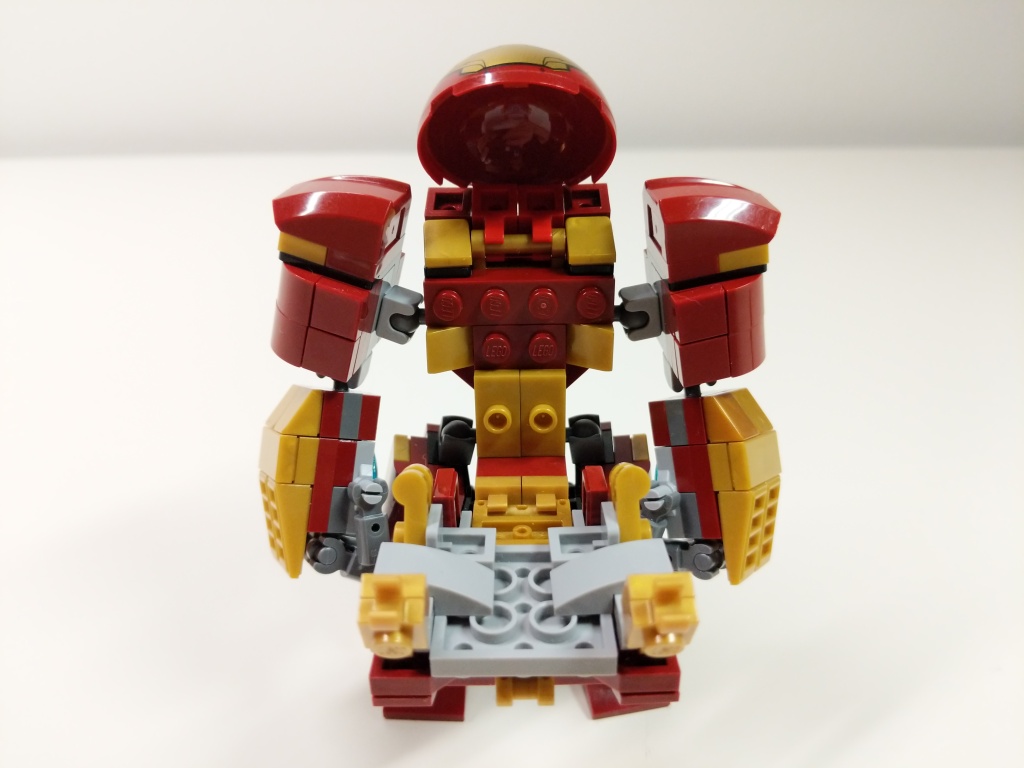
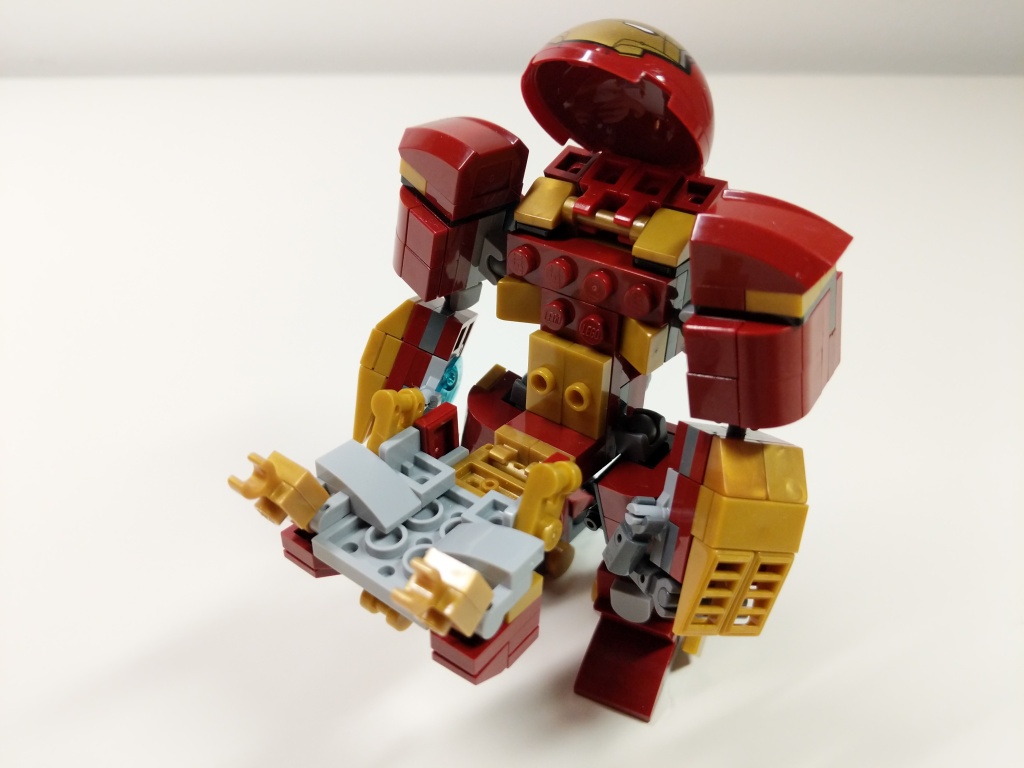
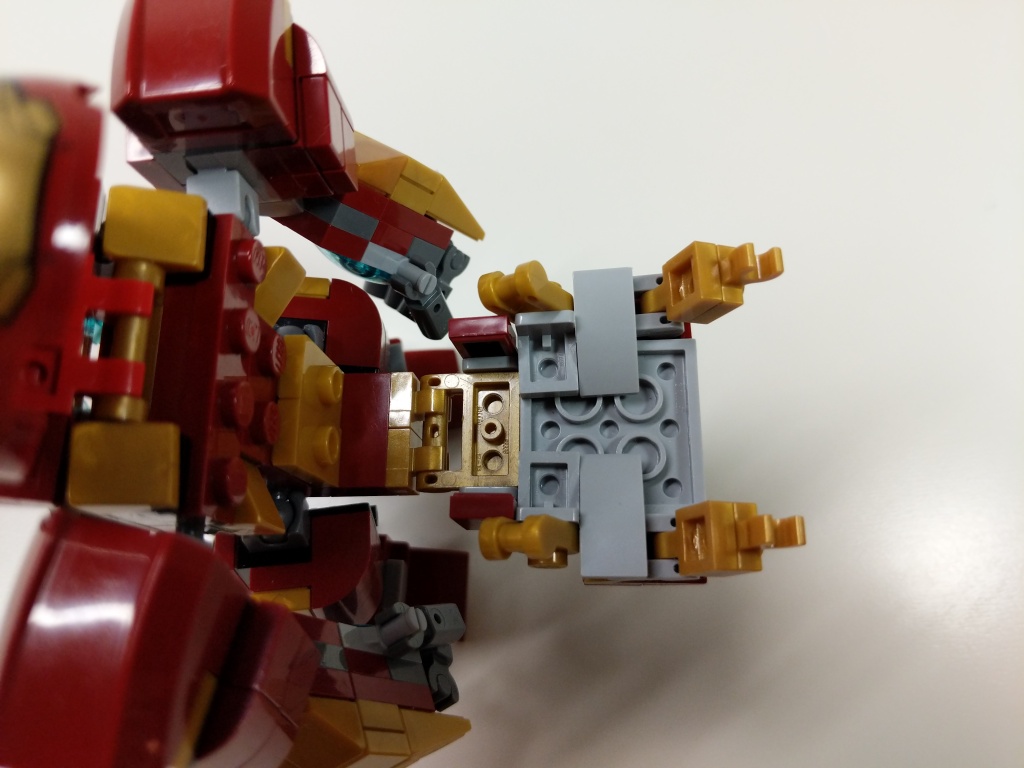
Igor in 76125 Iron Man Hall of Armor inspired the basic layout of Hulkbuster using the ball-joint connectors. The 5-stud wide chest piece with an arc reactor in the center and wrap-around elements is my favorite part of the build. Rotated views with a focus on key details are included below.
Given more specialized elements–especially in dark red and metallic gold–I think that I can continue to refine this model to pack as much detail as possible within its small size in comparison to its larger brethren.
I’ve been a big fan of the Marvel Cinematic Universe (MCU) since Robert Downey, Jr. donned the armor in Iron Man (2008). Following the thread of the story through 22 films that concluded with Iron Man’s ultimate sacrifice in Avengers: Endgame (2019) was staggering.
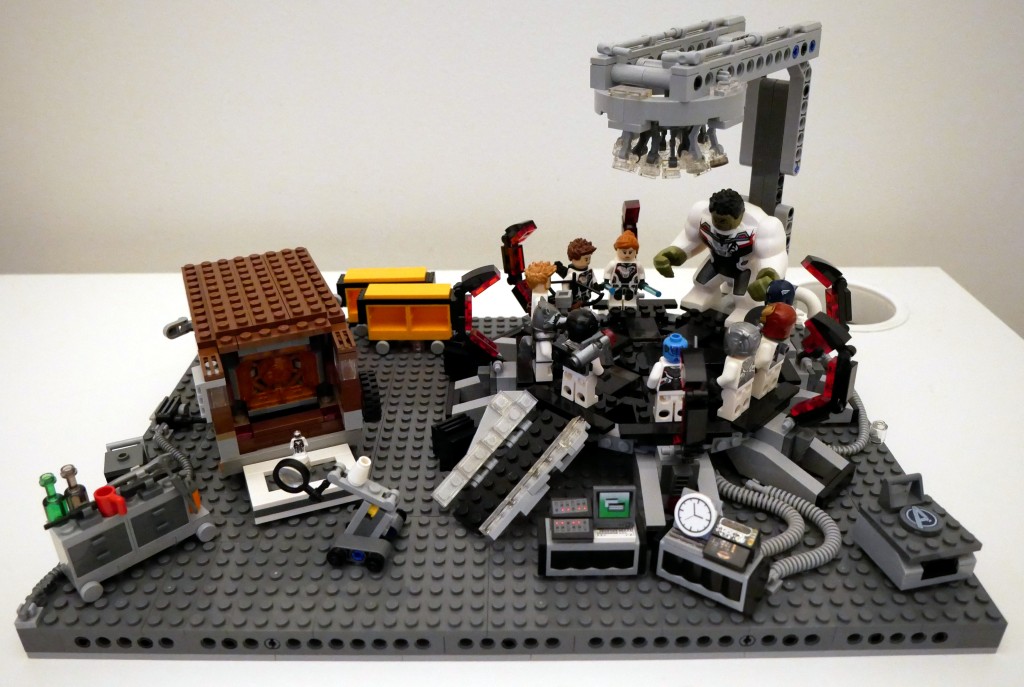
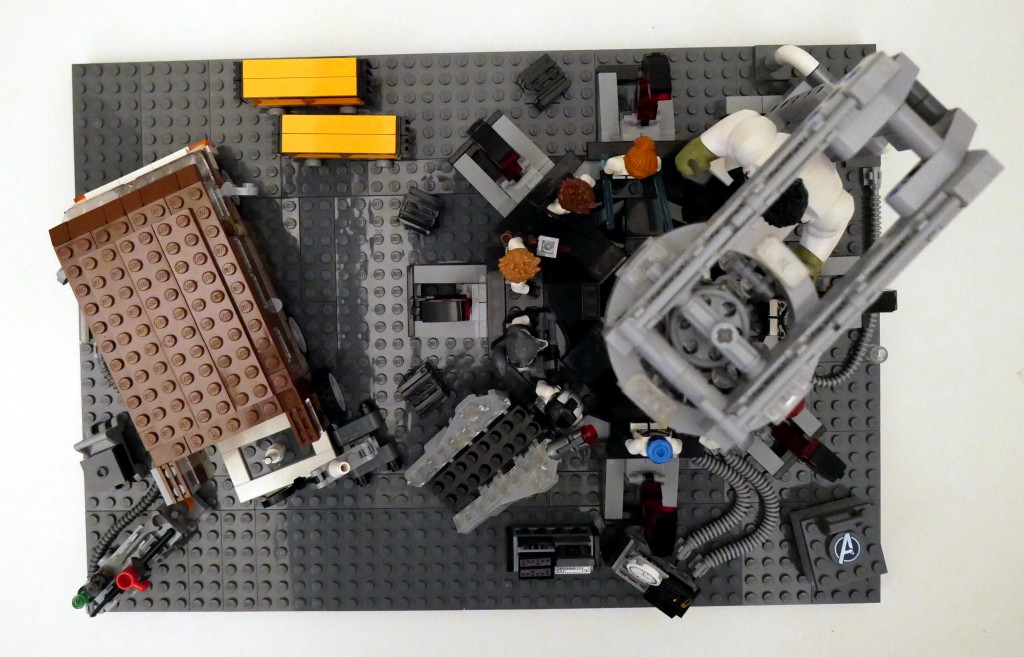
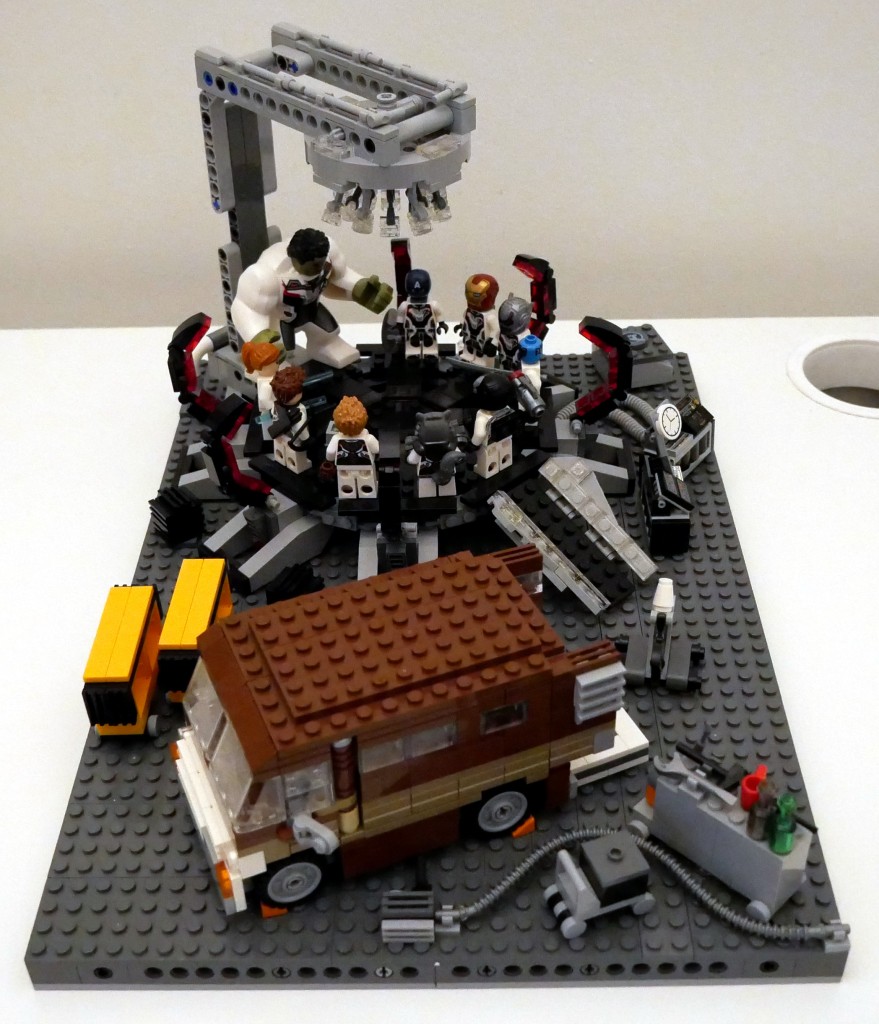
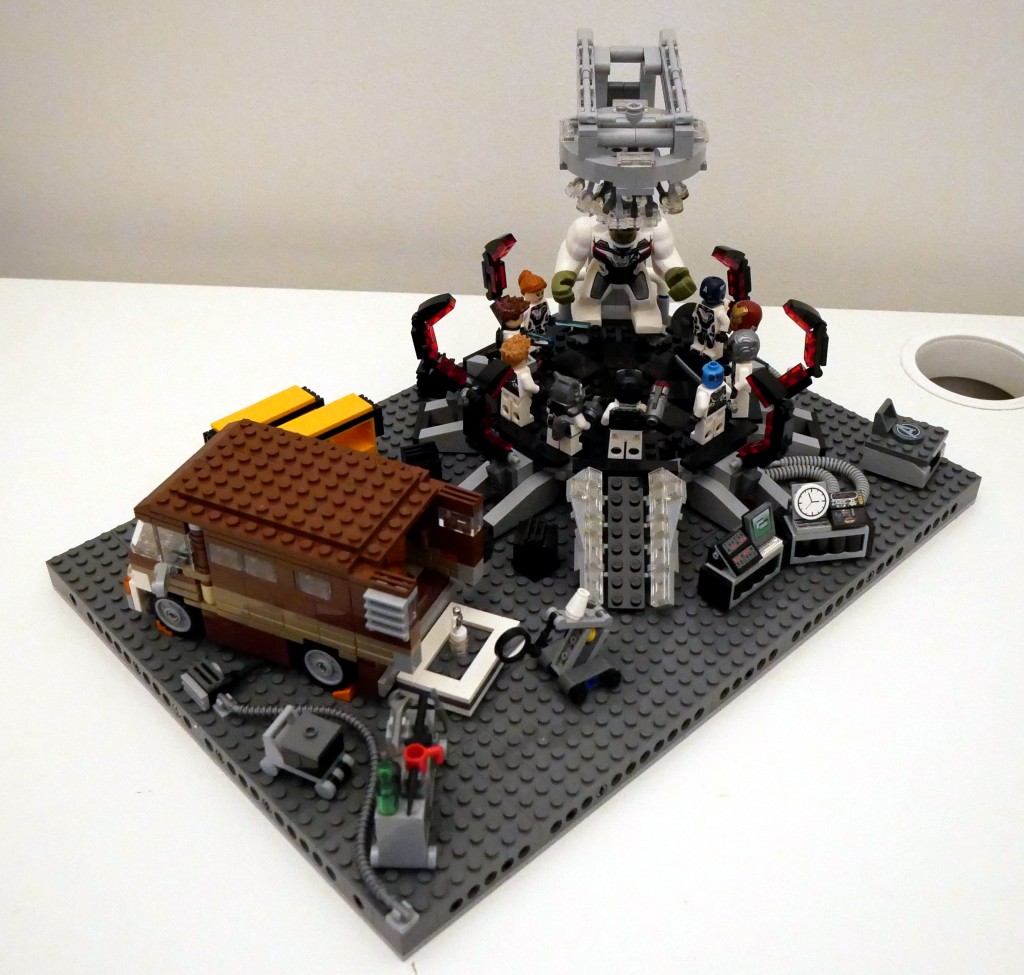
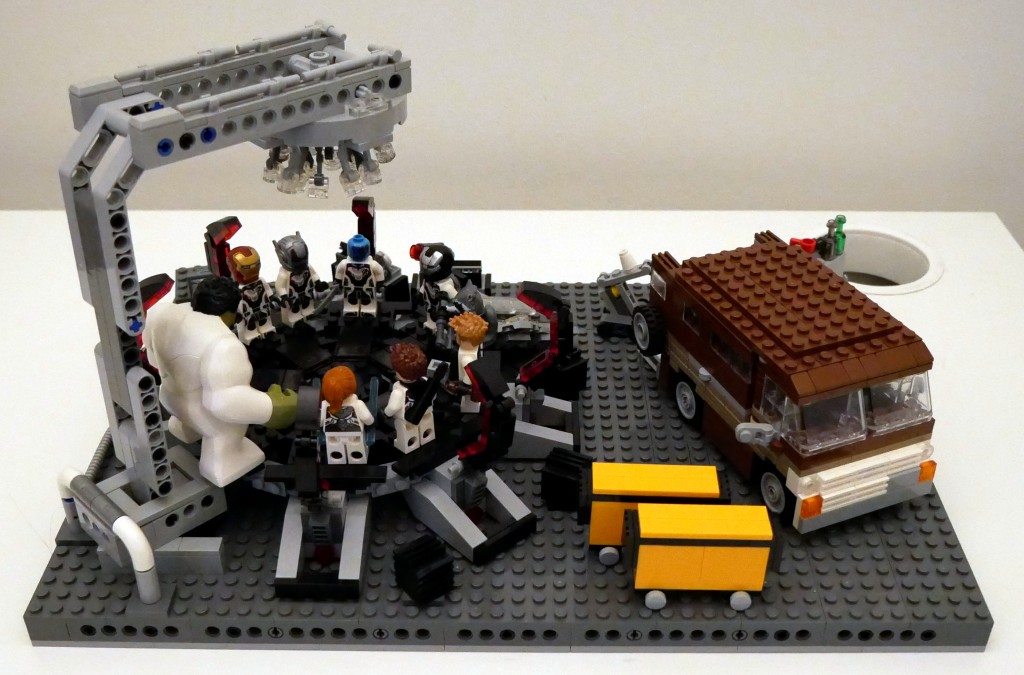
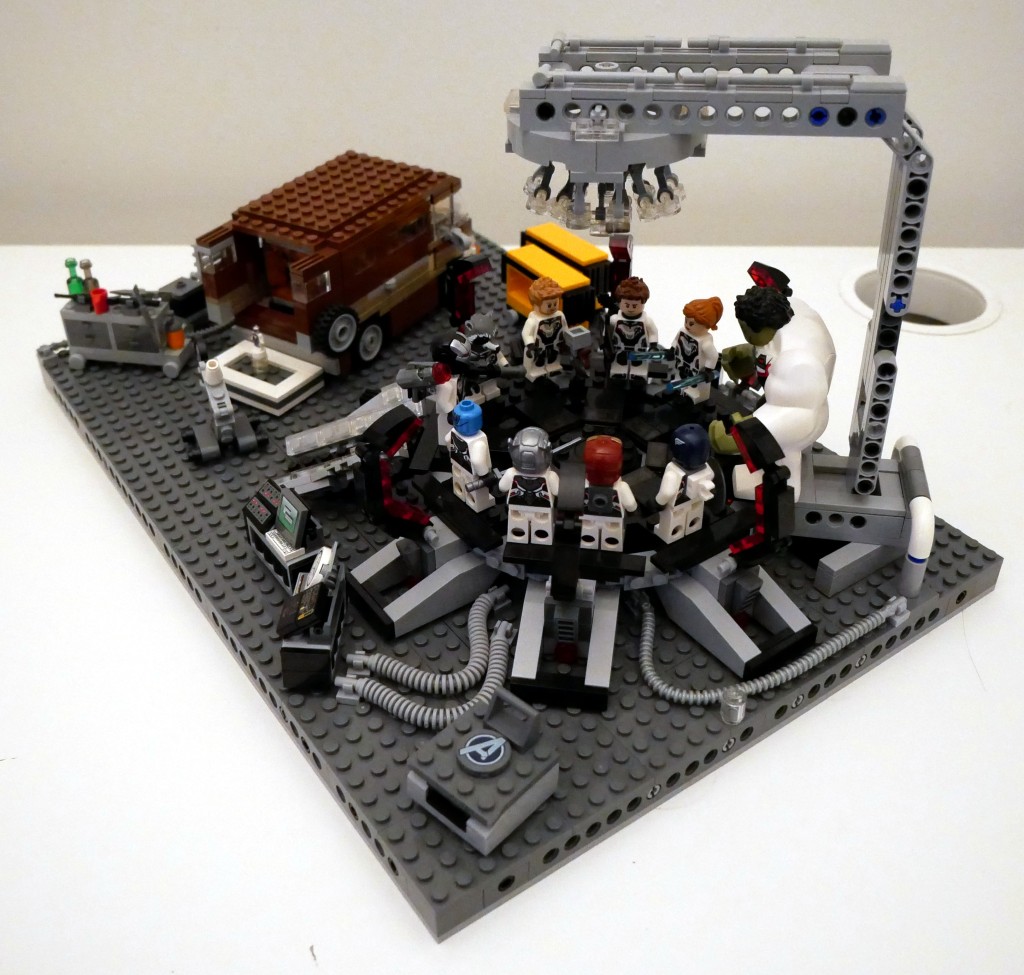
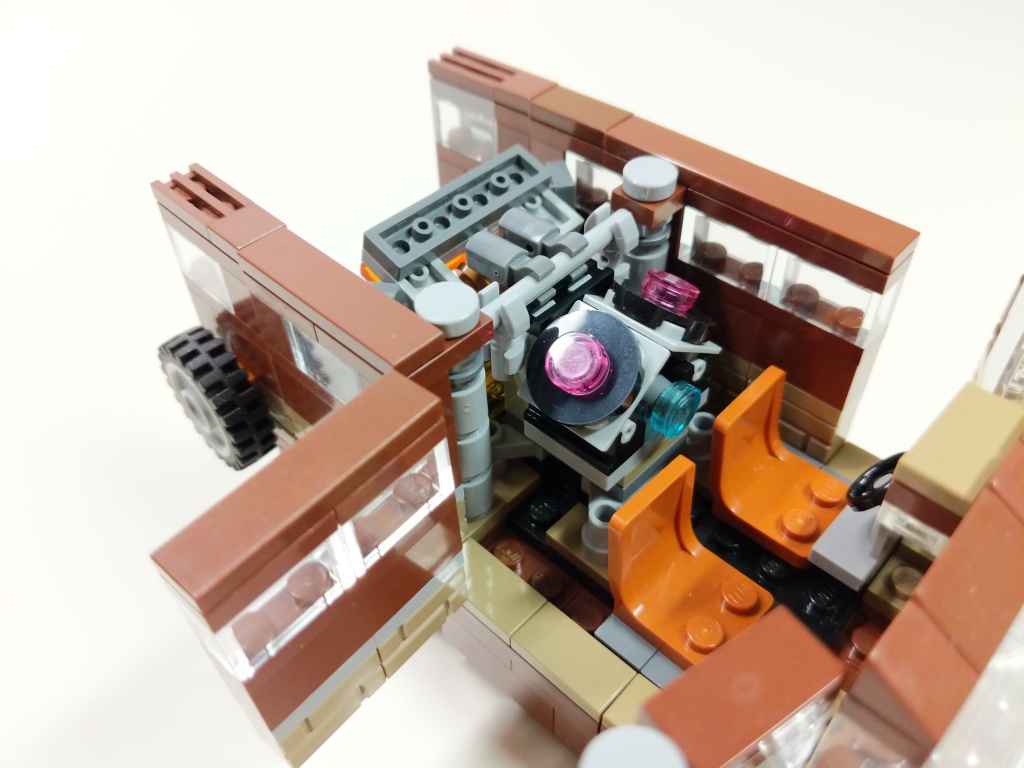
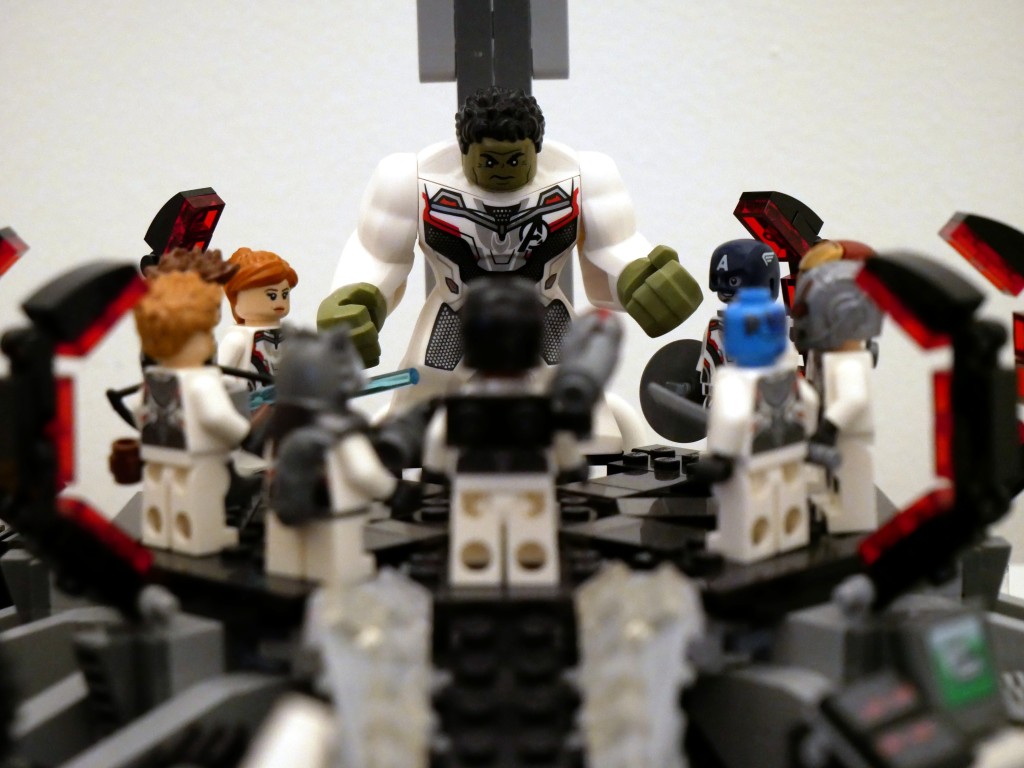
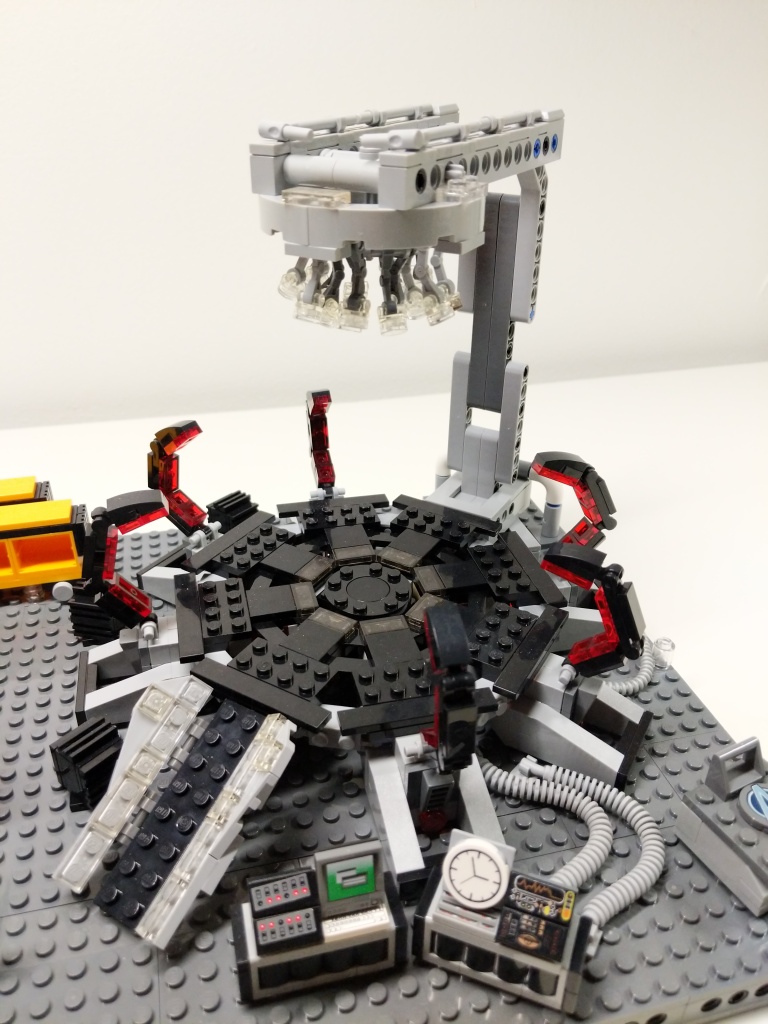
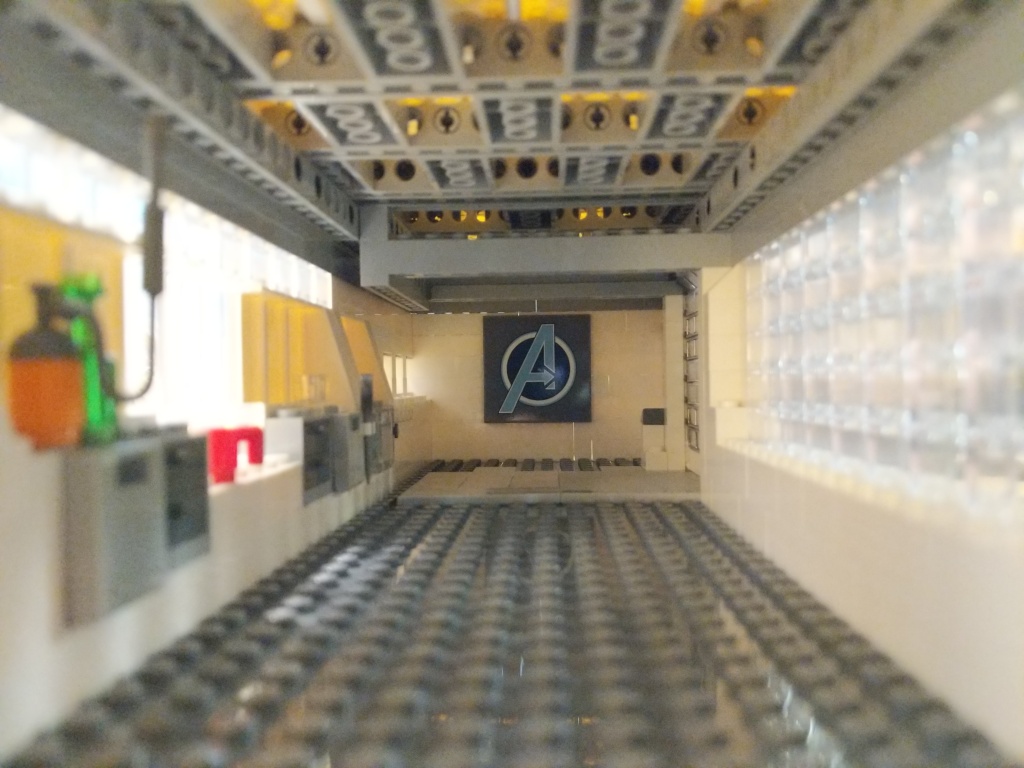
Shortly after watching that last film, I set to work on building this LEGO MOC (my own creation) scene from the Avengers Compound when they launch the “Time Heist” for a set of Infinity Stones. Unfortunately, I didn’t have enough bricks and elements to construct a proper superstructure of the hanger space that they used to build the time machine. Instead, I focused on elements found in the scene and incorporated some playability into the design. Rotated images of the full scene are below.
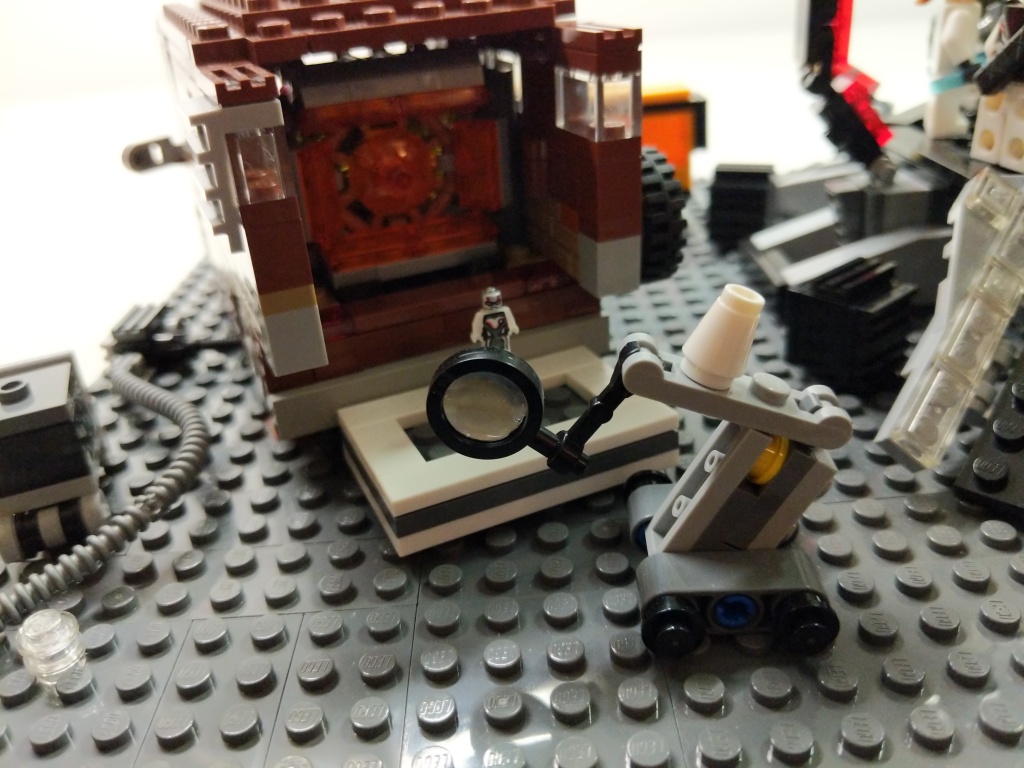
The key components of the set are the large quantum tunnel/time machine on the right, Luis’ van with the miniaturized quantum tunnel in the back, and a full set of Avengers wearing the Advanced Tech Suit (or Quantum Suit). The latter required purchasing LEGO sets 76124 War Machine Buster (for War Machine and Ant Man), 76144 Avengers Hulk Helicopter (Hulk and Black Widow), 76126 Avengers Ultimate Quinjet (Rocket, Thor, Hawkeye, and Black Widow), 76131 Avengers Compound Battle (mini Ant Man and Nebula), 76123 Captain America: Outriders Attack (Captain America), and 30452 Iron Man and Dum-E (Iron Man).
BTW: LEGO has ensemble film tie-in sets down pat by spreading characters across sets–including sets that don’t appear in the film–to maximize profile. I’ve experienced this before with Star Wars, Harry Potter, Lord of the Rings, and The Hobbit.
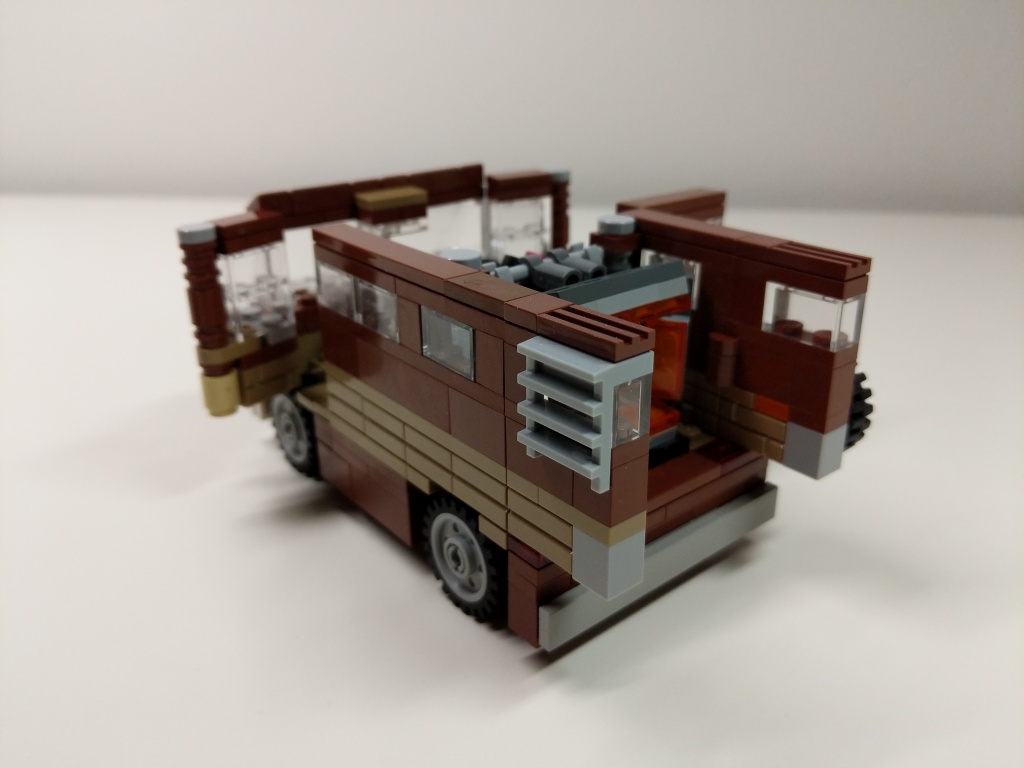
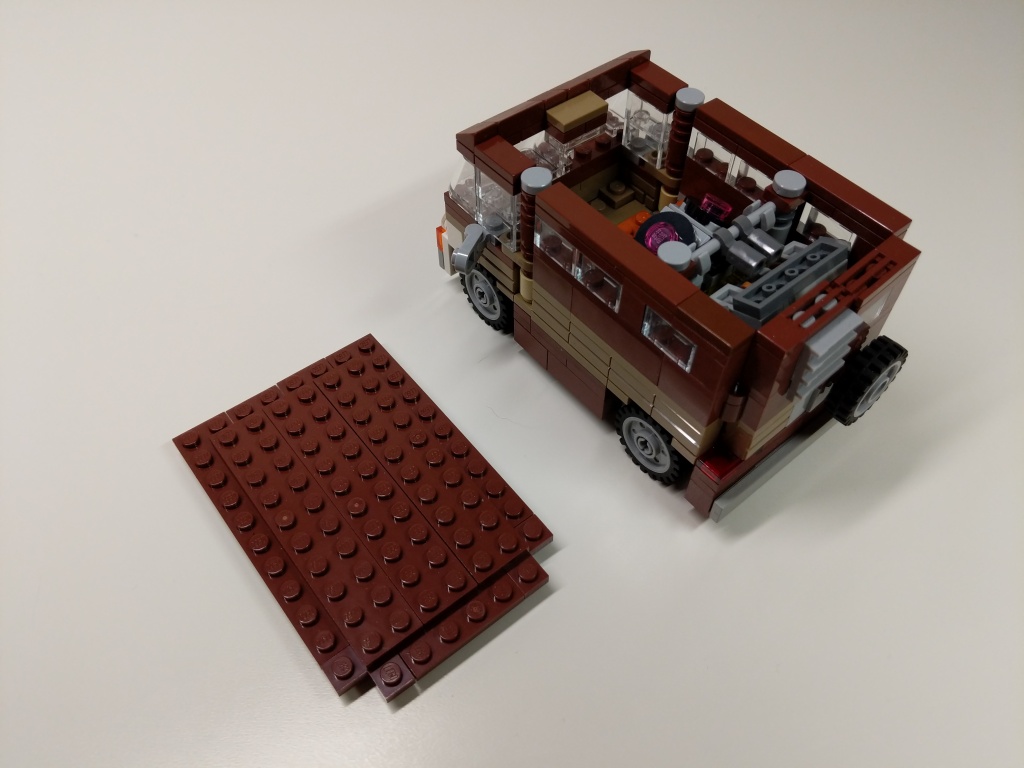
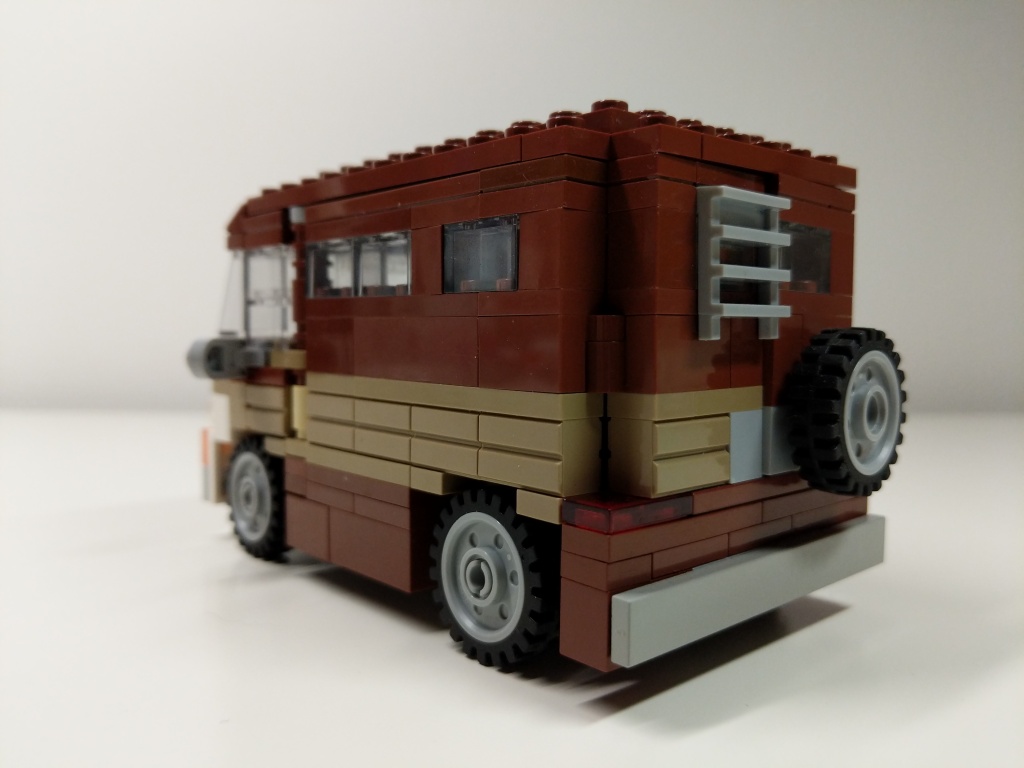
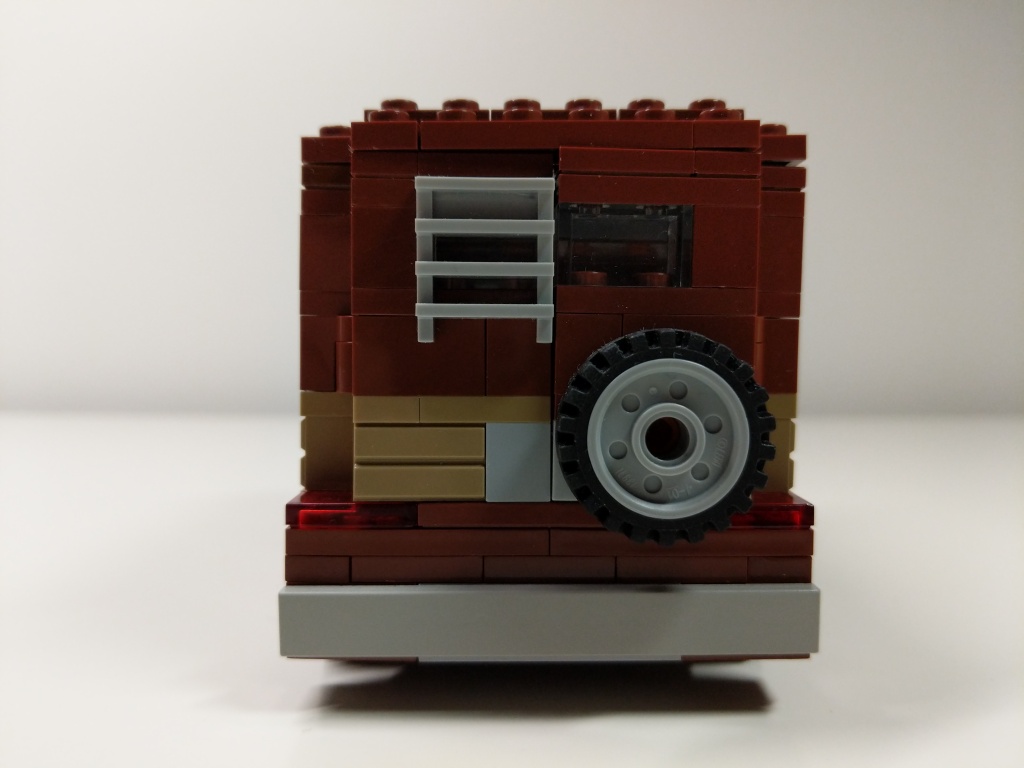
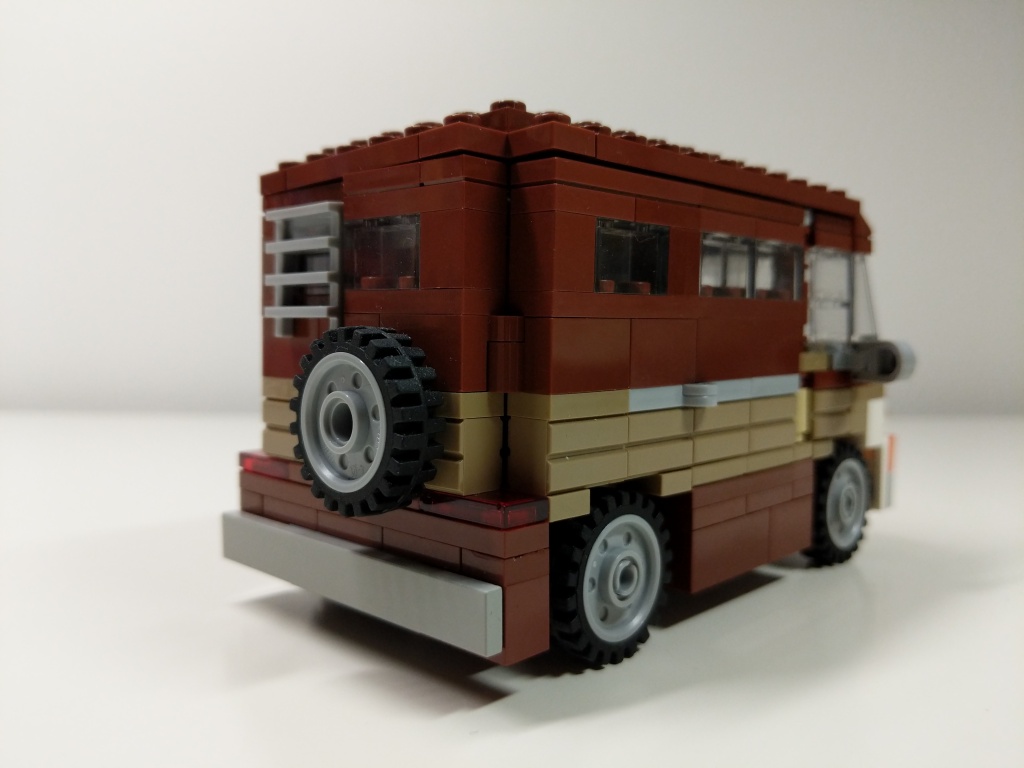
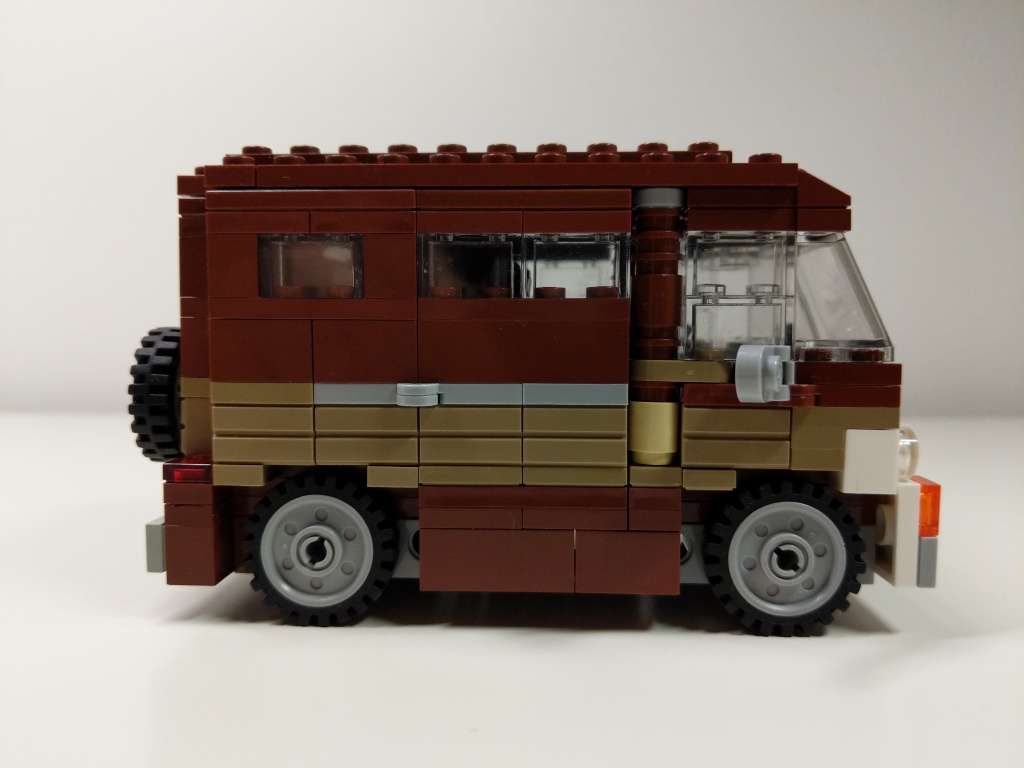
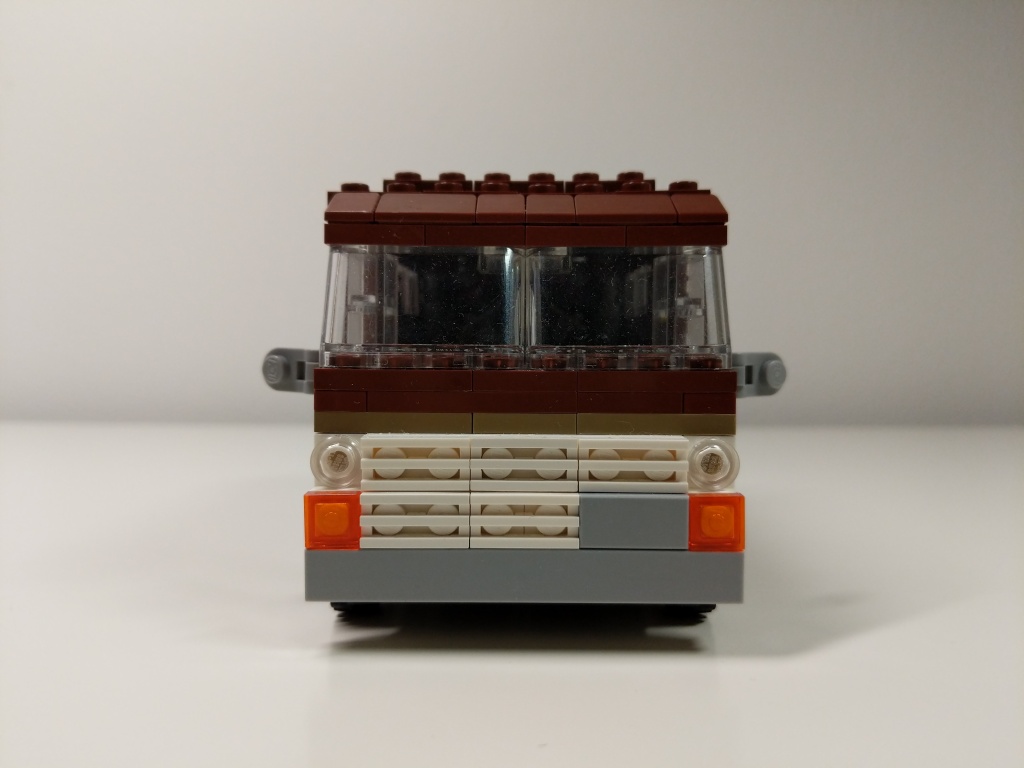
Luis’s Van
Luis’ van from Ant-Man (2015) and Ant-Man and the Wasp (2018) is a 1972 Ford Econoline. It held the miniaturized quantum tunnel that Scott Lang used to retrieve quantum energy to help stabilize Ava Starr/Ghost. After Scott returned from the Quantum Realm five years after Thanos’ snap via the Quantum Tunnel, he drove the van to the Avenger’s Compound where they used it to test Scott’s idea for a “Time Heist.” I designed this model of Luis’ van before LEGO released their 76192 Avengers: Endgame Final Battle set, which includes a 6-stud-wide version of Luis’ van. I wanted my version to be wide enough to sit 2 minifigures side-by-side comfortably, so I went with an 8-stud-wide design.
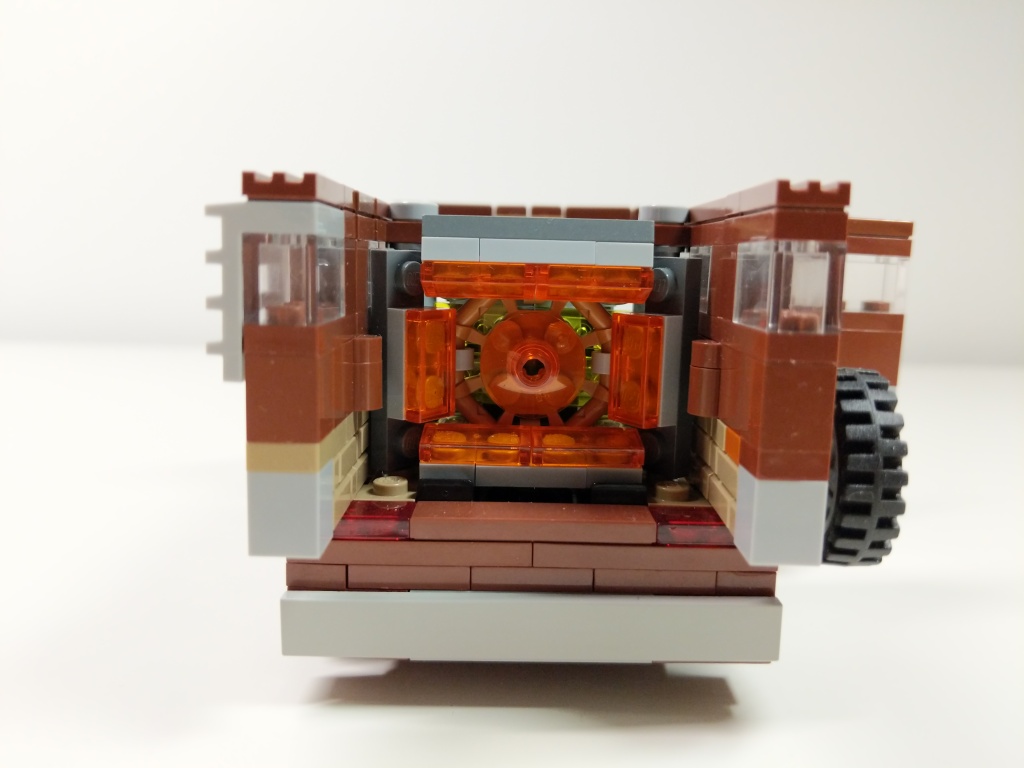
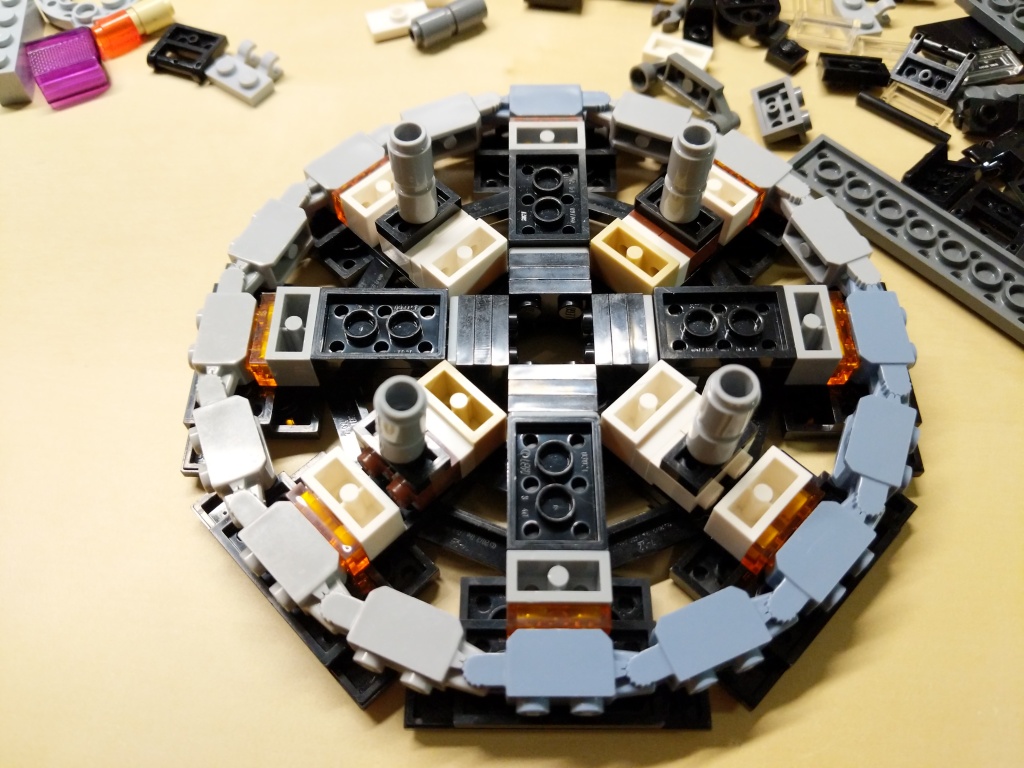
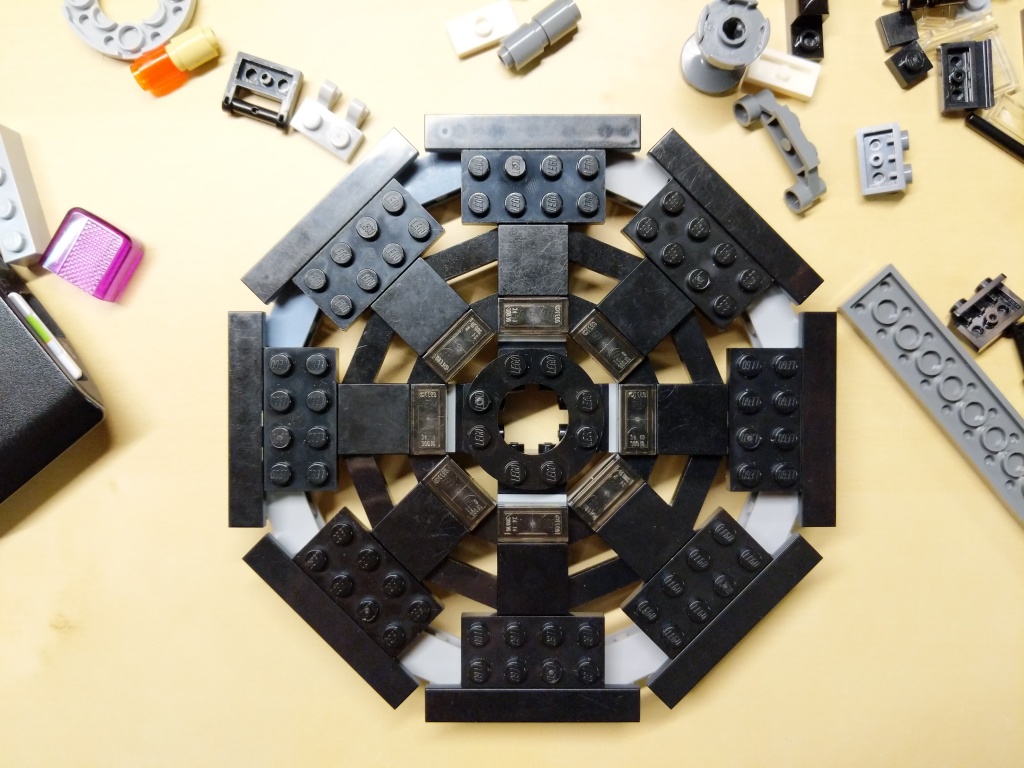
Quantum Tunnel
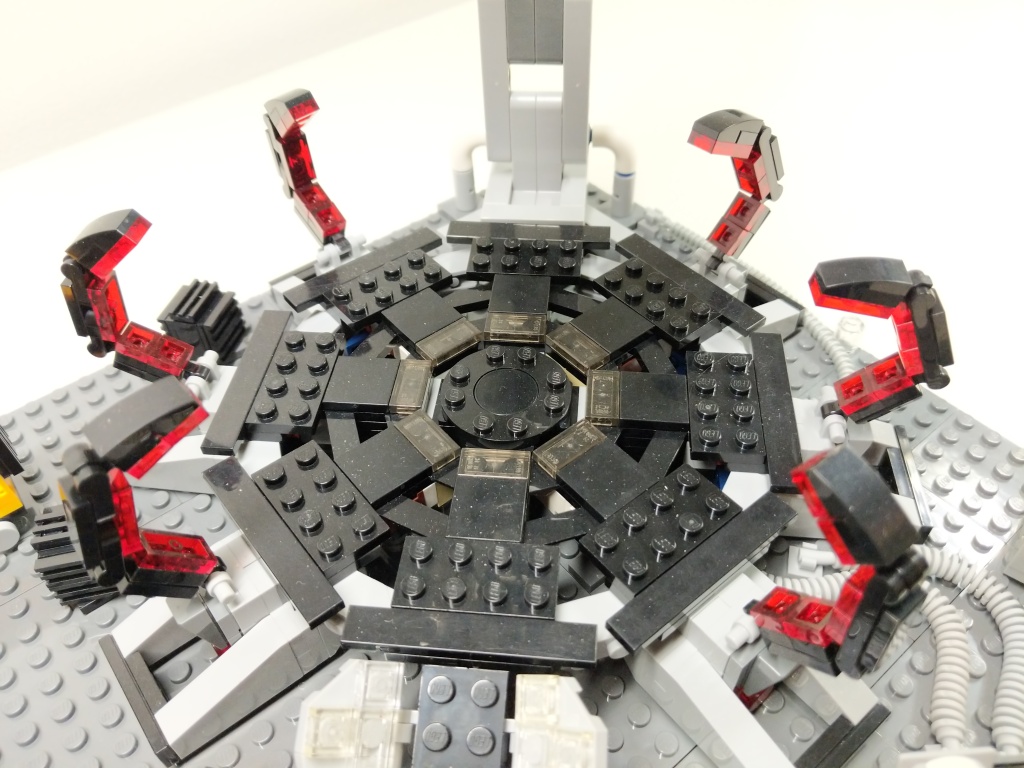
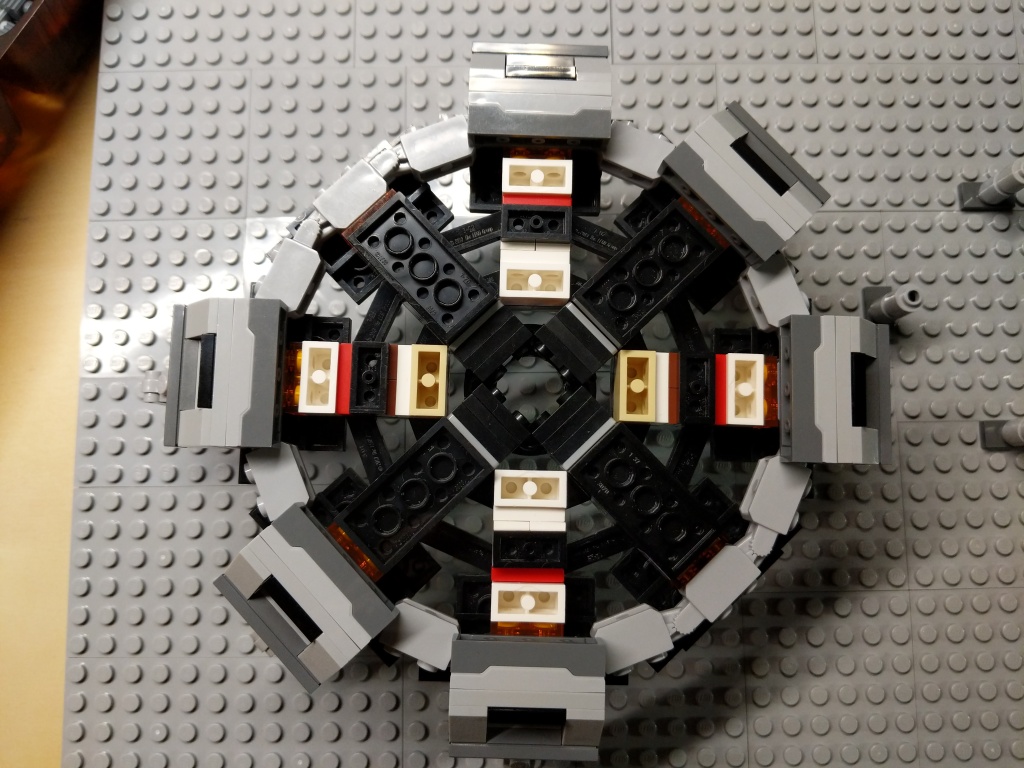
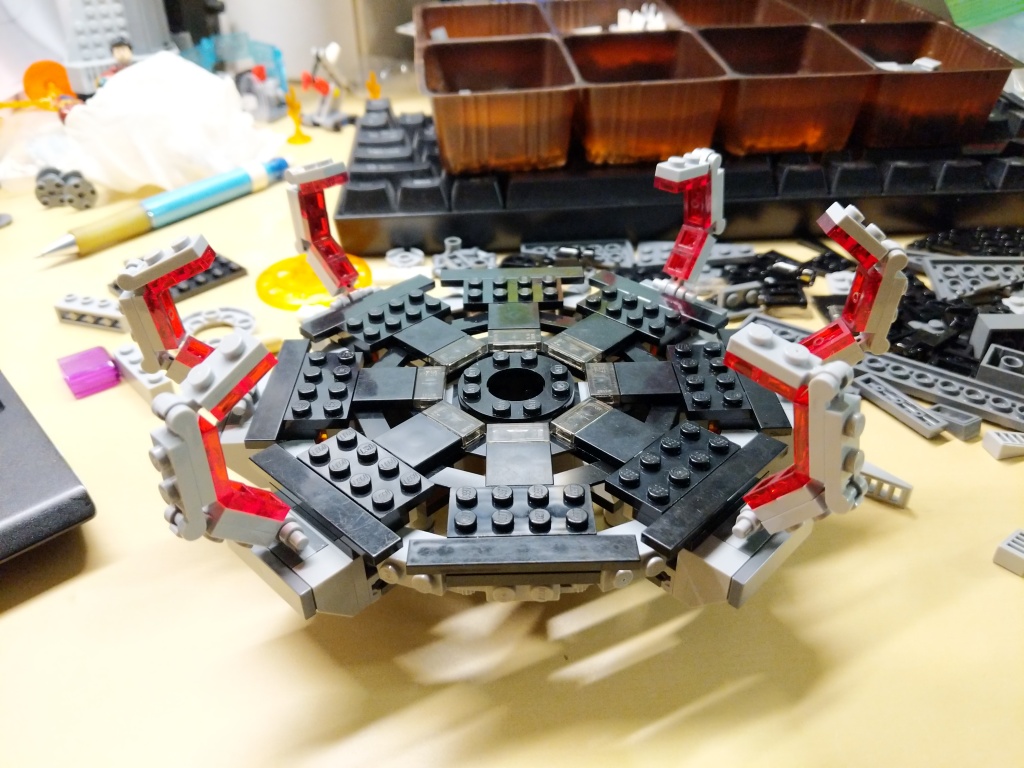
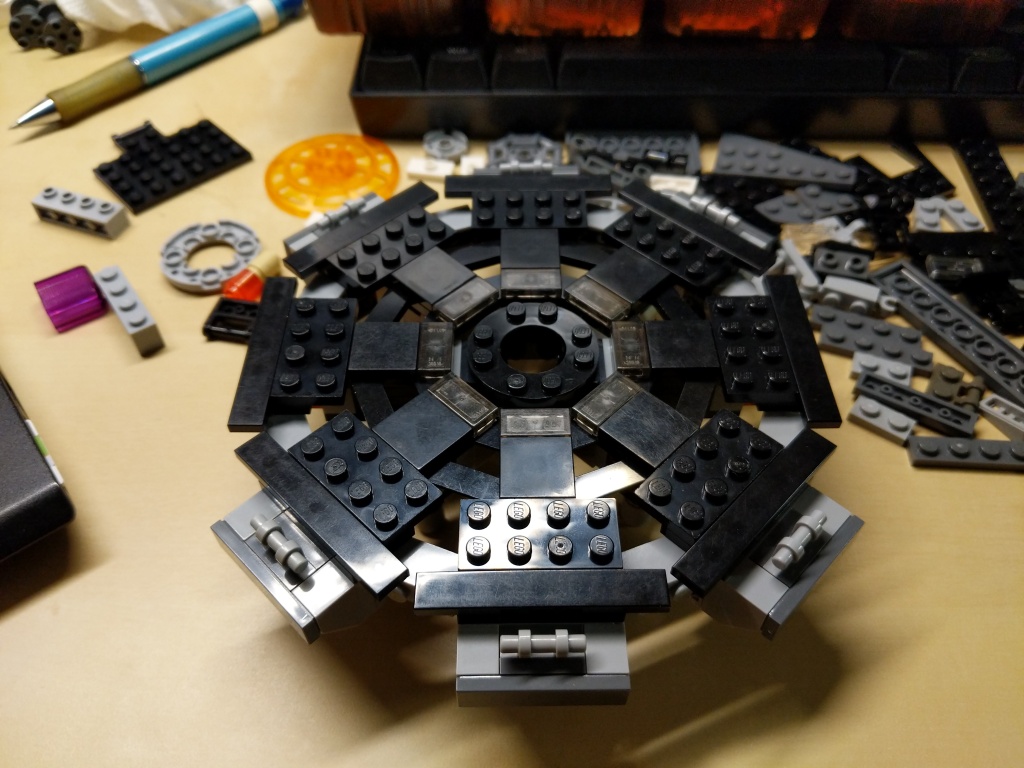
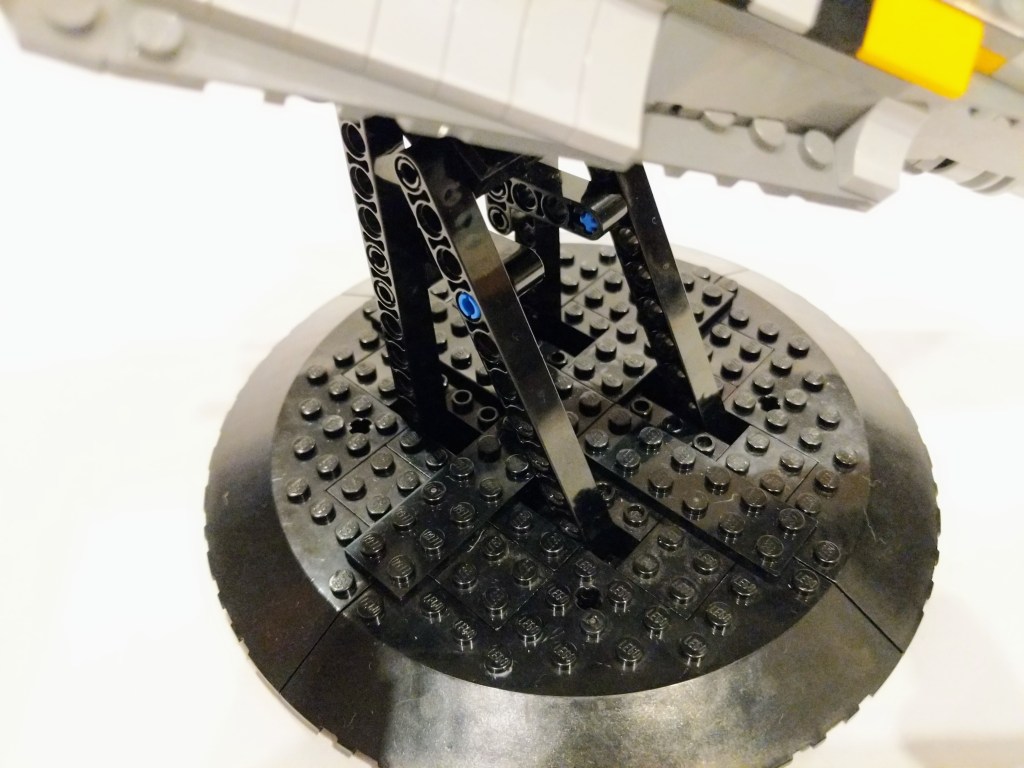
The Quantum Tunnel presented three challenges. First, it needed to be a circular platform. Second, it needed to accommodate all of the Avengers involved in the Time Heist (i.e., Captain America, Iron Man, Thor, Hulk, Hawkeye, Black Widow, War Machine, Rocket, Nebula, and Ant-Man). And third, it needed to resemble the thing in the film despite limitations of the LEGO medium and the number of available LEGO bricks.
Building the Quantum Tunnel made me rethink a lot of standard brick relationships and ratios to find the right combinations to create the round shape and have it line up with the stud pattern on the display base.
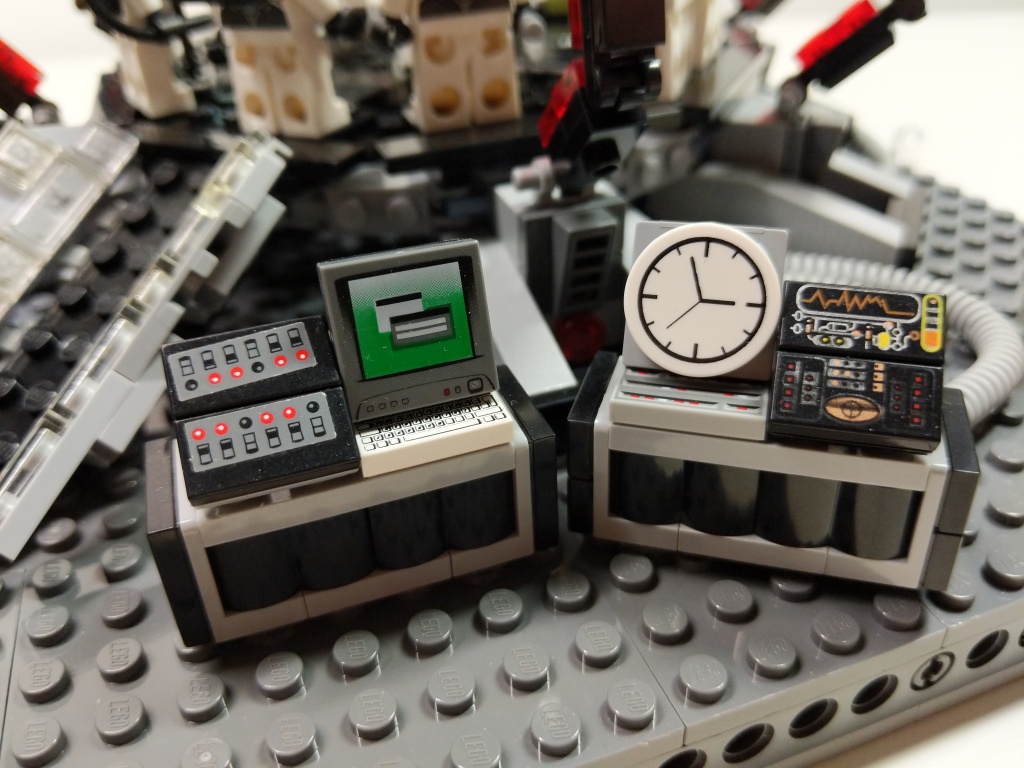
In a separate build, I created this interior model for the hanger portion of the Avenger’s Compound. It was wide enough to pull Luis’ van into it, but it wasn’t wide or tall enough to build the Quantum Tunnel. I wished that I had enough Technic elements to have built some kind of superstructure around the Quantum Tunnel model for the lensing component that goes into the ceiling of the Avenger’s Compound hanger. I had to compromise by building an armature to hang the lensing component over the Quantum Tunnel using all of the elements that I could scrounge.
Supporting Components
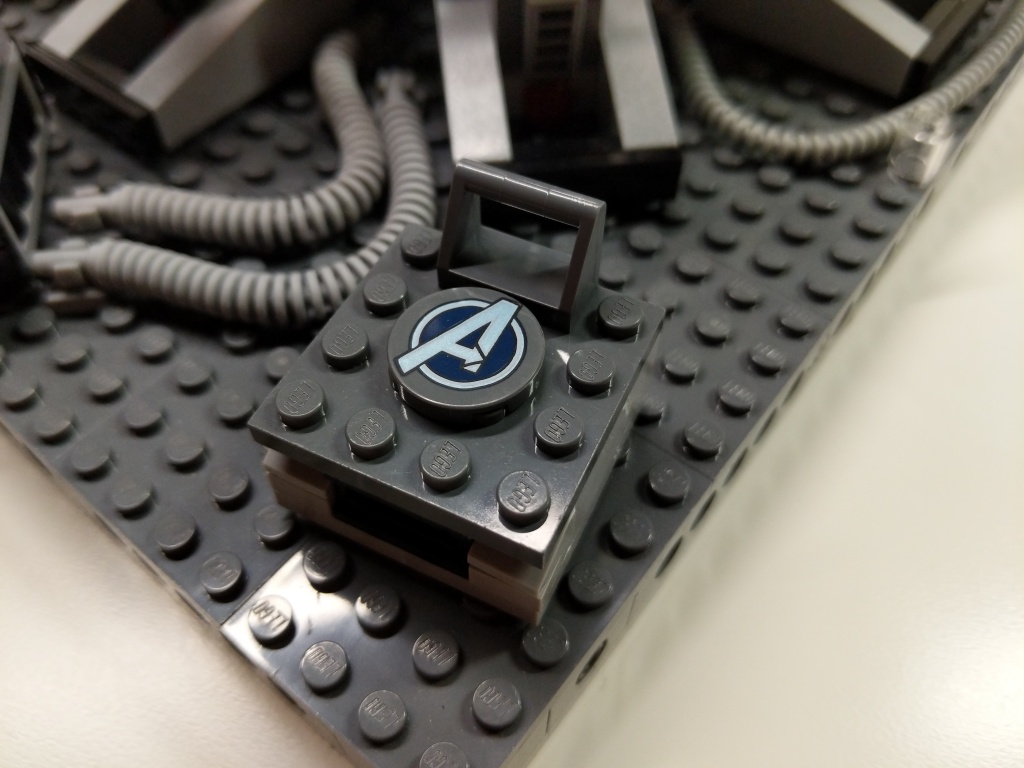
To complete the build, I watched the film closely to see what kinds of equipment the Avengers had laying around while building and using the Quantum Tunnel. I tried to replicate these–Dum-E, computers, power equipment, tool and storage racks, and cabling.
Reflection
It feels like a lifetime ago when I built this model in 2019. I invested hours across many days through iterative building while looking at film screen captures. While I wish that my LEGO building skill was on the artistic or photorealistic building level of elite builders, my building acumen is more in the realm of playability. I think, what can I do with this, how does it work, how can I use this to tell a story? Given more time, few distractions, and greater access to brick variety and quantity, I wonder if I could take my building skill to the next level. Absent those things, I will keep building and see what I can accomplish with what I have. I haven’t built a MOC in the past year due to a lack of time, but I have something in mind that I might build soon, which I will document here. In the meantime, I have some other MOCs from the past that I plan to share here, too. Stay tuned!
This past year, I’ve been using an 8″ Samsung Galaxy Tab Active3 tablet and its S-Pen for most of my reading and note taking. In particular, I use the Samsung Note app to annotate and highlight PDFs of research. When I’m copying quotes and citations into my writing, I have had trouble finding a good way to position the tablet on my desk so that I could read its screen while typing up quotes and my notes. Occasionally, I had been using Syncthing (I wrote about how to setup a Raspberry Pi Zero as a central hub for your documents synchronized with Syncthing here) to synchronize my annotated PDFs on the tablet with my PC, but its sometimes better to save my PC screen’s real estate for my writing and rely on the tablet screen for reading–essentially adding to my screen real estate.
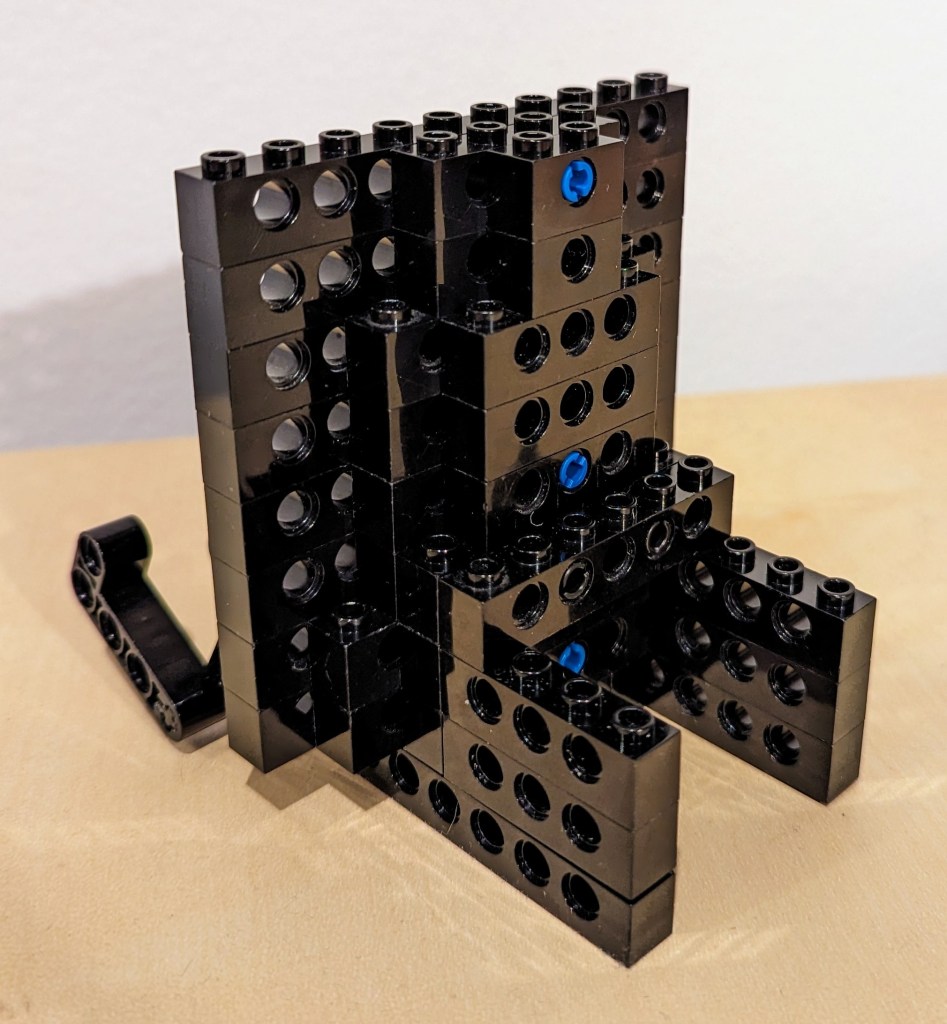
Today, I decided to pull out a tub of LEGOs to solve my problem about how to easily read and interface with the tablet while typing on my desktop computer’s keyboard, because LEGO is a versatile building medium that is great for play, art, and solving problems. Since I don’t often use all black bricks in my projects, I decided to build a tablet display stand using only black LEGO Technic bricks and elements.
I employed the 4-brick long L-shaped technic elements to create the place where the tablet is held by the display stand. It can rotate freely, but it is held in place against the vertical wall of 10-stud Technic bricks that support the back of the tablet when it is in the stand.
The rear support of the stand, which maintains the ~14 degree from the vertical position of the tablet holding pincers on the left of the photo above and supports the back of the tablet has several layers of Technic bricks held together by frictional force as well as 3-stud and 2-stud-long connector pegs. I don’t think the stand needs as much support as I provided on the right side of the photo above, but I wanted to use up as many black Technic bricks while building a stand that took up a minimum of desk space.
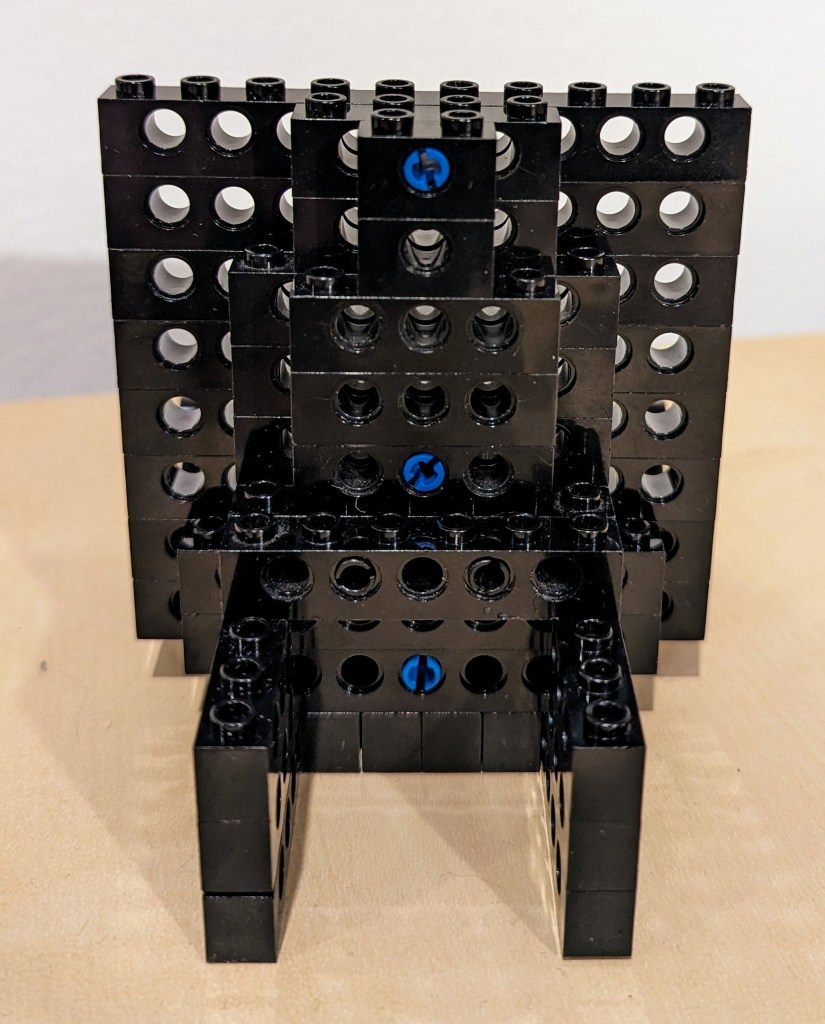
The photo above shows how the layers of bricks are arranged in the rear of the stand to support the height and weight of the tablet when it is in the stand.
The above photo shows the rear of the display stand. Note that the 6-stud Technic brick in the middle of the photo that connects to the perpendicular 4-stud Technic bricks beneath it is connected to the rear support layers with 2 x 2-stud connector pegs.
Finally, the bottom view of the display stand is shown above. Connector pegs are used to connect all bricks on the bottom most layer of the display stand.
I hope that the photos and descriptions above give you some ideas about how to use LEGO to solve a problem with holding something–in this case, a digital tablet. Not only can LEGO help you solve problems, but it can help you save money by allowing you to solve one problem and reconfigure the bricks to solve new problems as they arise and the old problems are no longer a concern (i.e., use LEGO over and over instead of buying solutions and trashing obsolete ones).
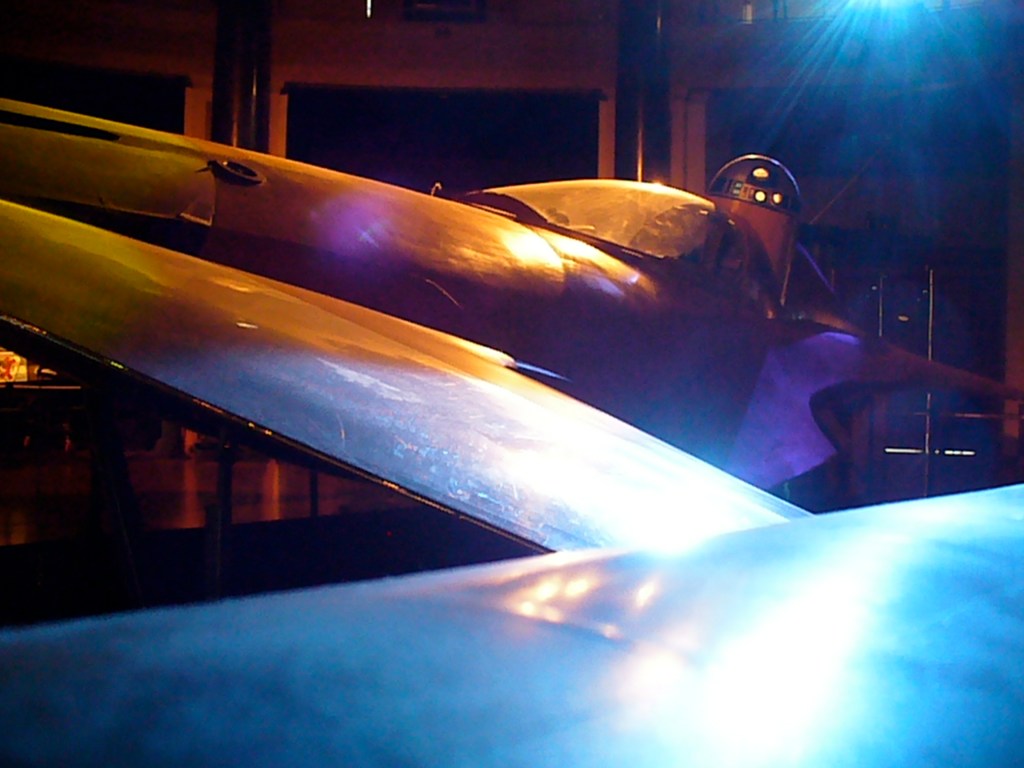
Following the destruction of the Mandoralorian’s Razorcrest, one of the happy surprises in The Book of Boba Fett was Mando’s new ship–a heavily modified Naboo N-1 Starfighter featured in The Phantom Menace and Attack of the Clones. So, when the LEGO version of Mando’s new ride debuted as set 75325, I picked it up at the local Costco for about 20% off MSRP.
The Naboo Starfighter is one of the redeeming elements for me from the Star Wars prequels.
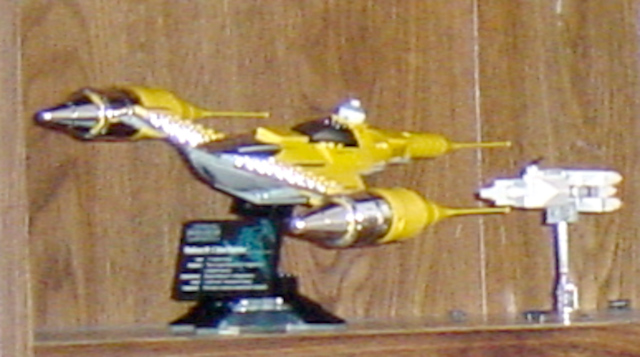
Years ago, I had the original LEGO 7141 Naboo Fighter from 1999, and I built set 10026 Special Edition Naboo Starfighter in 2002 as seen in the photo of my bookcase from that era above. The chromed parts made this an excellent build. If only it had been designed for minifigures!
Later, I got to see a life-size Naboo fighter at the Star Wars Exhibition in London in 2007. It was the exhibit’s centerpiece in the display space adjacent to the London Aquarium and the London Eye. Being in the same space made the starfighter seem real. It’s design detail evoked the craftsmanship of a Howard Hughes hand-built race plane. It was extraordinary to behold!
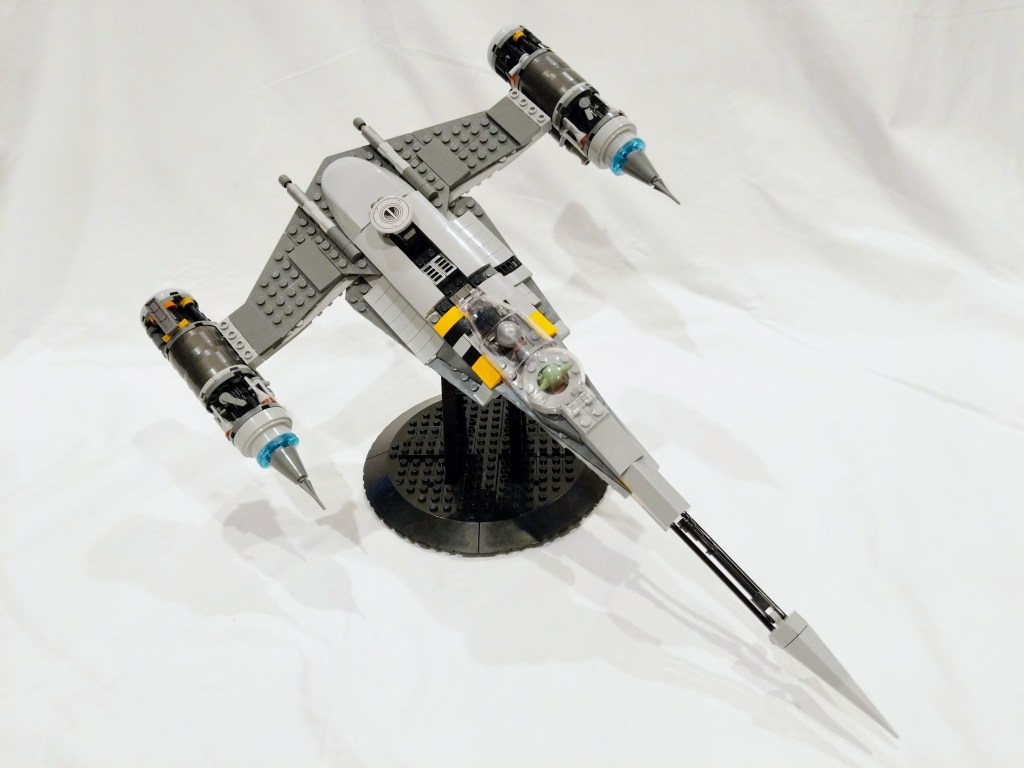
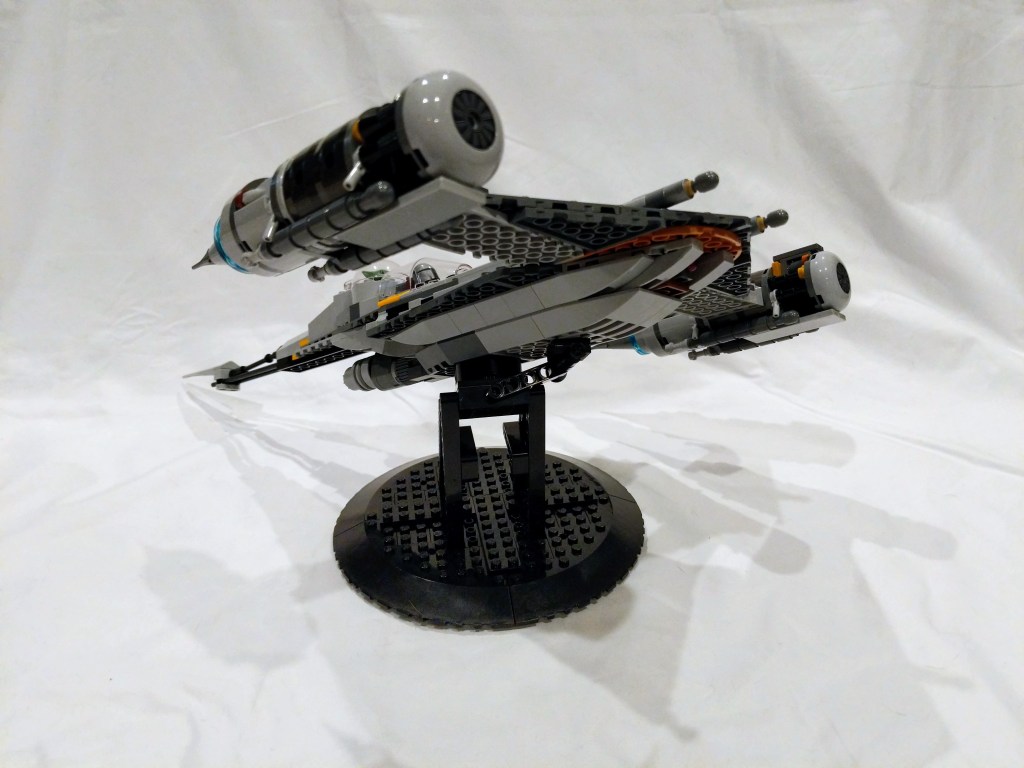
When I first assembled Mando’s modified N-1 LEGO set, I was impressed with its greebling details to the engine nacells and overall design. While there are limitations to the overall smoothness at the scale used for this set, it captures important details that mark it as an inspired model based on what we see on the screen.
The thing about the Naboo Fighter is that it deserves to be swooshed. It’s design implies motion and speed. It was that feeling about what the design inspires that pushed me to design and build a stand for it.
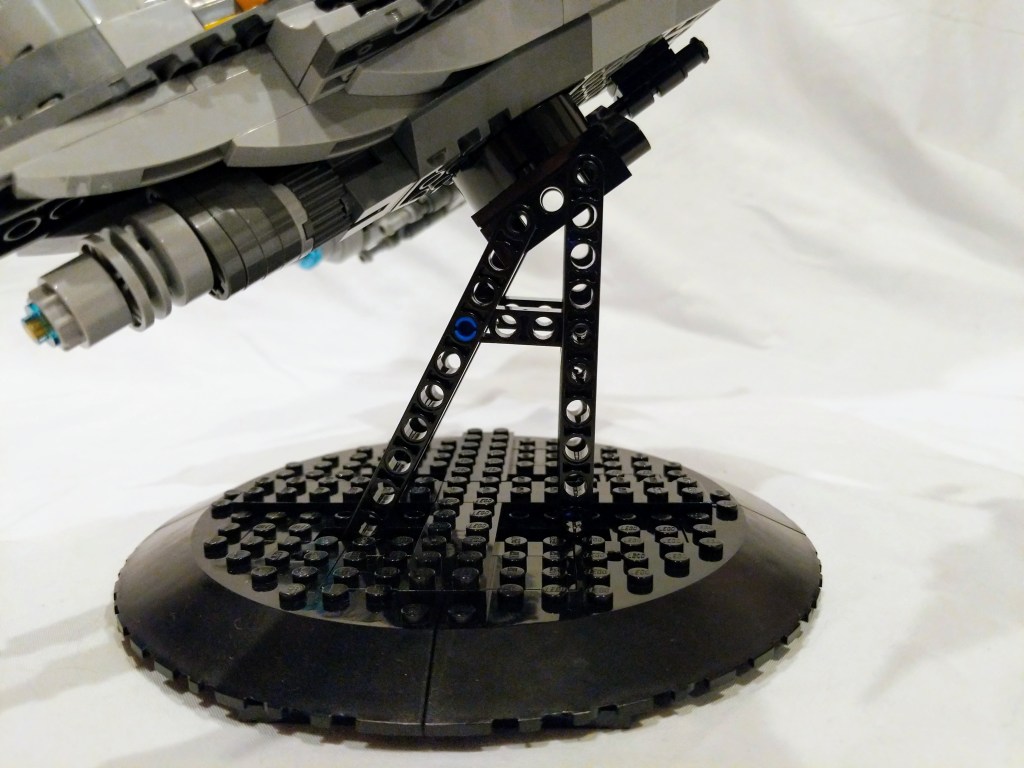
This presented some challenges, because Mando’s N-1 is larger than the 10026 set, which came with a display stand. The 75325 set is bigger than that set, which also implies that it is heavier. Using a rotational click ring supported by Technic beams does not provide enough friction to maintain the model in the orientation desired. I devised a secondary support arm with a 2×2 turntable plate to prevent the weight of the model from changing the desired orientation of the model.
In the photos above, you can get a sense of how to build a similar model display using Technic and other LEGO bricks.
I think the displayed version of the set brings the excitement and joy that Mando and Grogru feel when they open up the sublight thrusters!
While I have enjoyed reading Marvel comics for as long as I can remember, I have loved the Marvel Cinematic Universe films that brought together Captain America, Thor, and Iron Man to ultimately battle (two temporal versions) of Thanos with the gravitas and realism of live-action, moving pictures. This is probably because my deep love of Science Fiction is rooted in film and my memory of seeing the Millennium Falcon swoop and dive among the asteroids in a televised trailer for The Empire Strikes Back while watching television on my family’s console TV in Hortense, Georgia.
After visiting my parents in Georgia over the summer, one of the first things that I did when I was back in Brooklyn was to begin constructing this My Own Creation (MOC). Perhaps it was because I had rewatched some of the MCU films or because I picked up LEGO’s 76192 Avengers End Game Final Battle set.
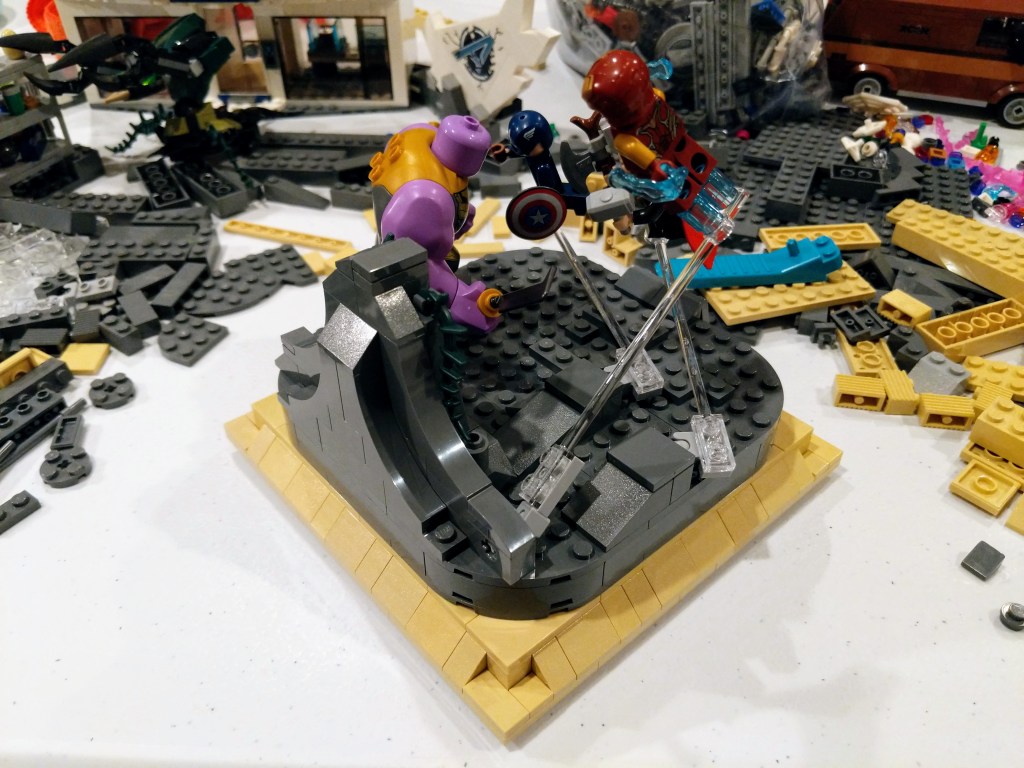
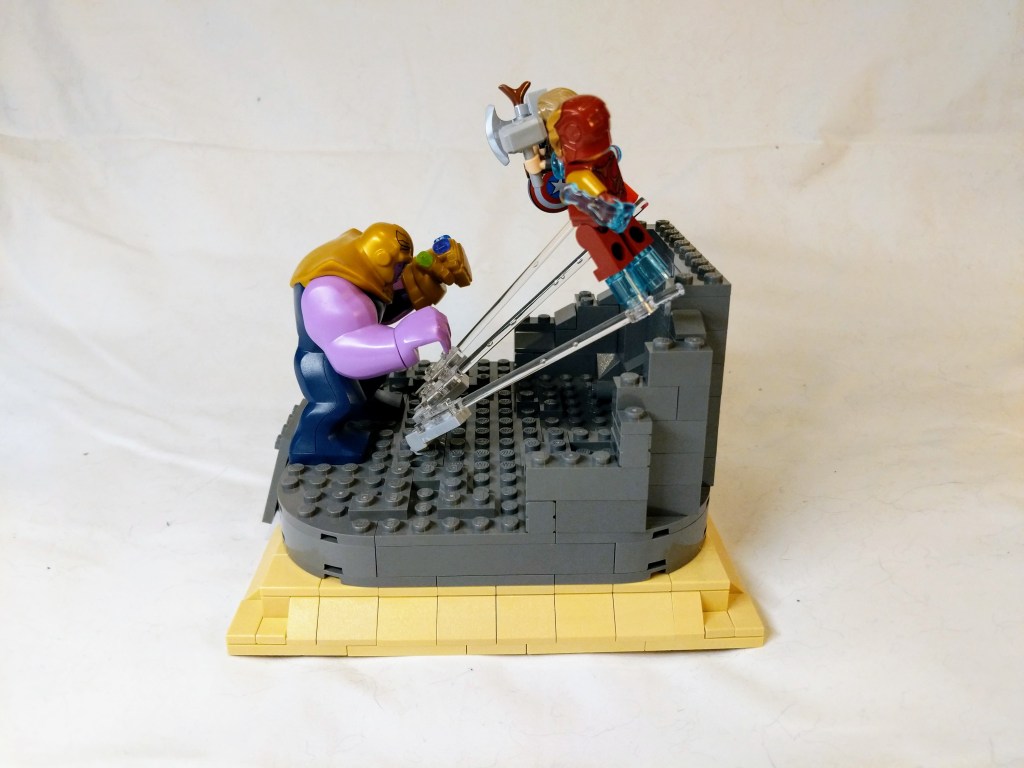
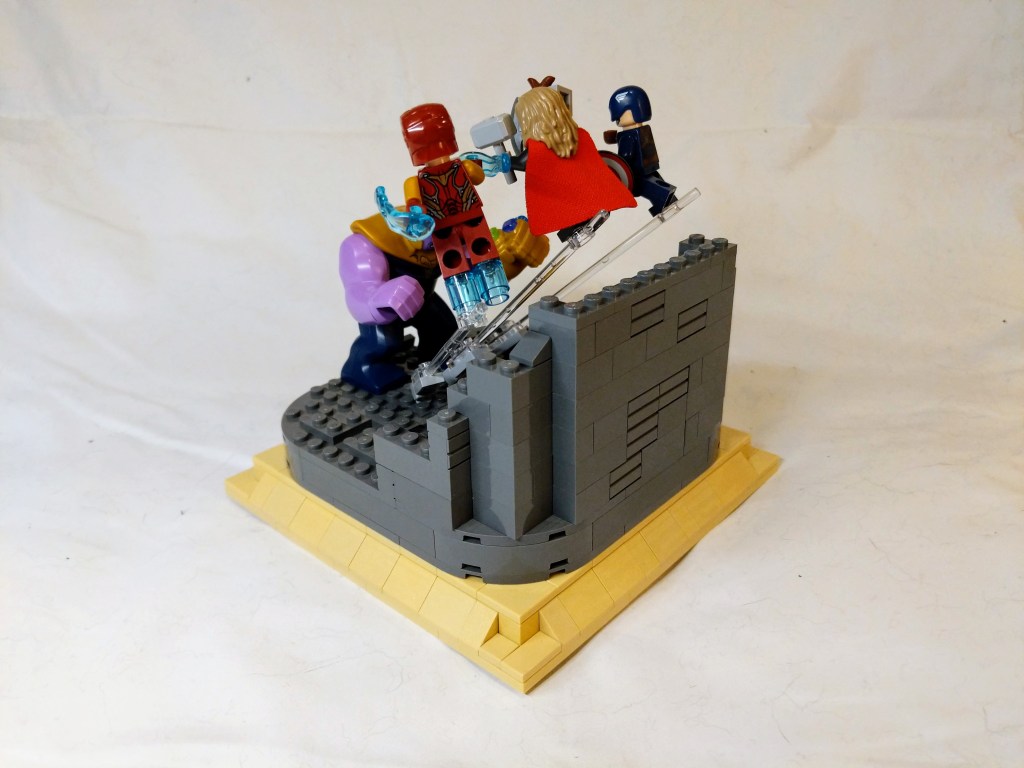
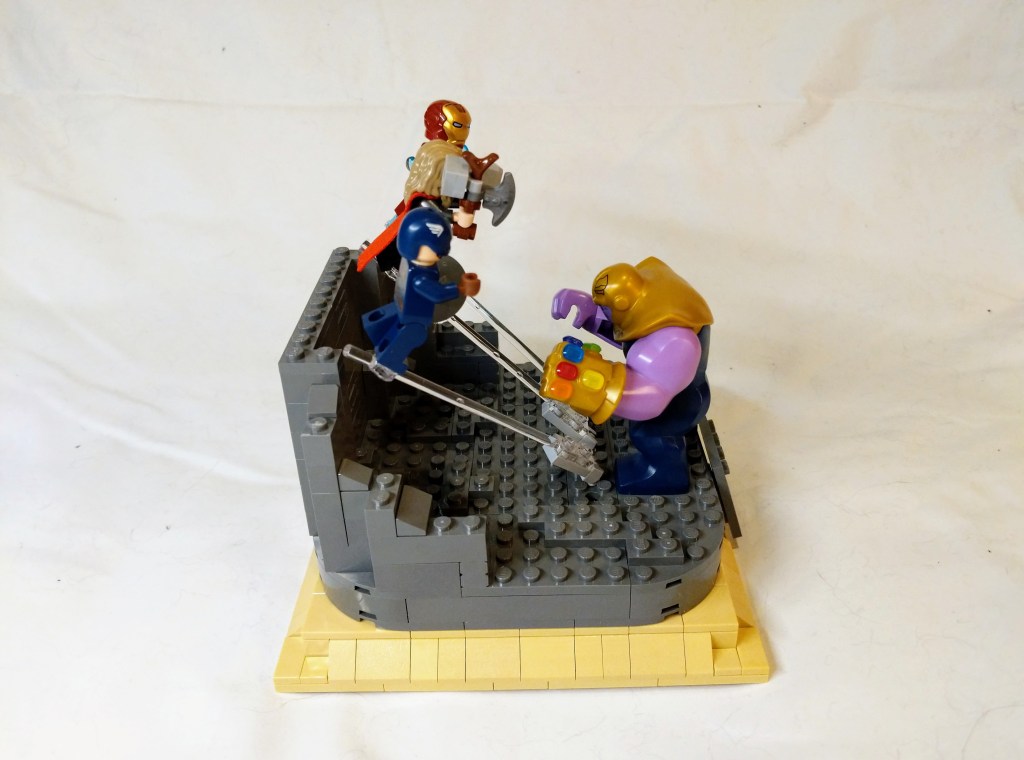
I built this MOC to capture the essence of the End Game battle but not as an accurate rendition of the beginning of that fight. Instead, I wanted to depict the essence of the confrontation akin to a movie poster or comic book cover.
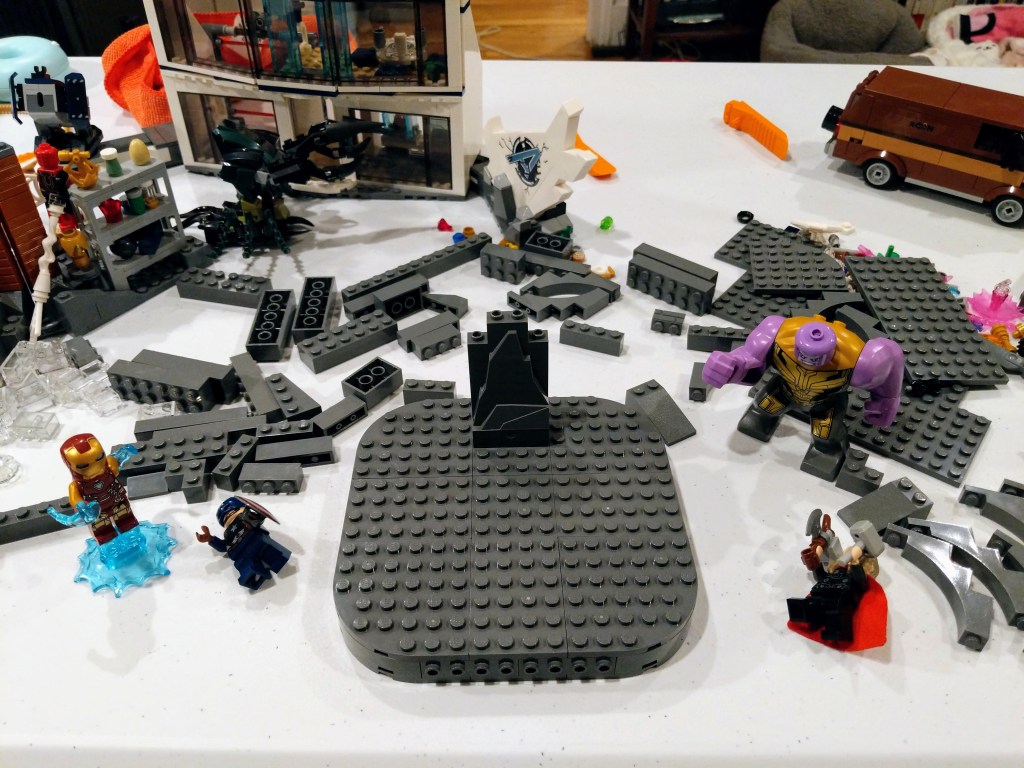
As with most of my MOCs, I built one version that I put aside for some months and returned to later.
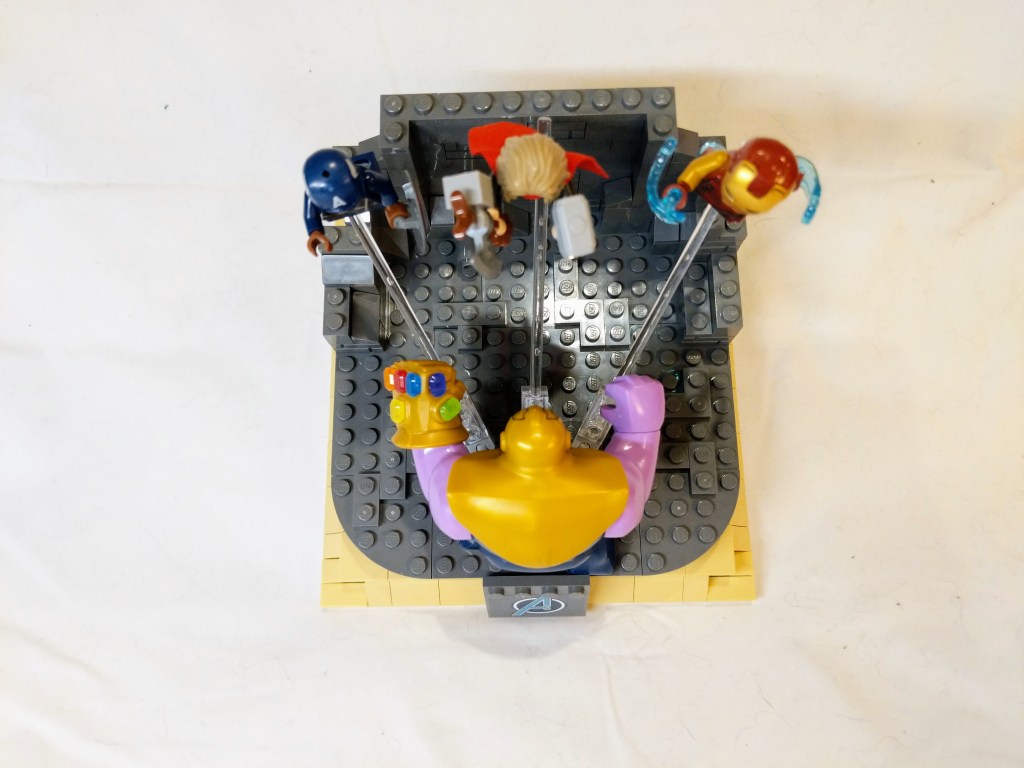
In the photos below, you can see that it began with a tan/light wood simulated base beneath a dark gray dais with curved corners. I positioned the heroes in a sweeping action with the villain facing them from the corner. The configuration implied action and energy. But, the positioning placed the heroes’ backs toward the viewer and the clear support rods cut through the scene.
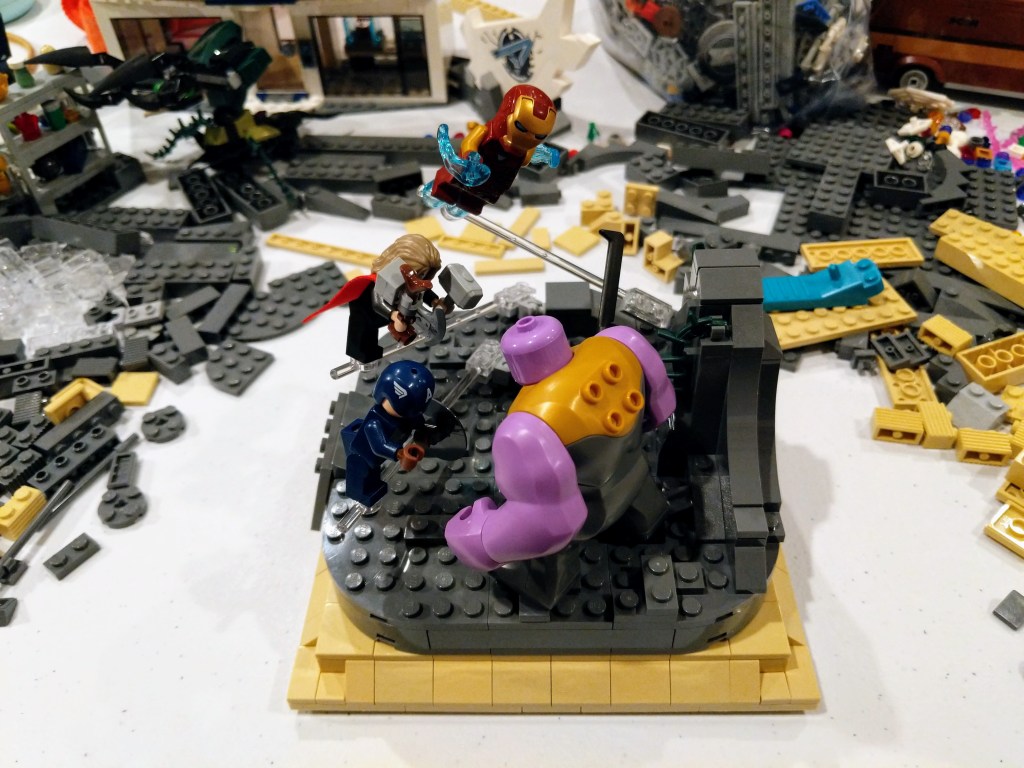
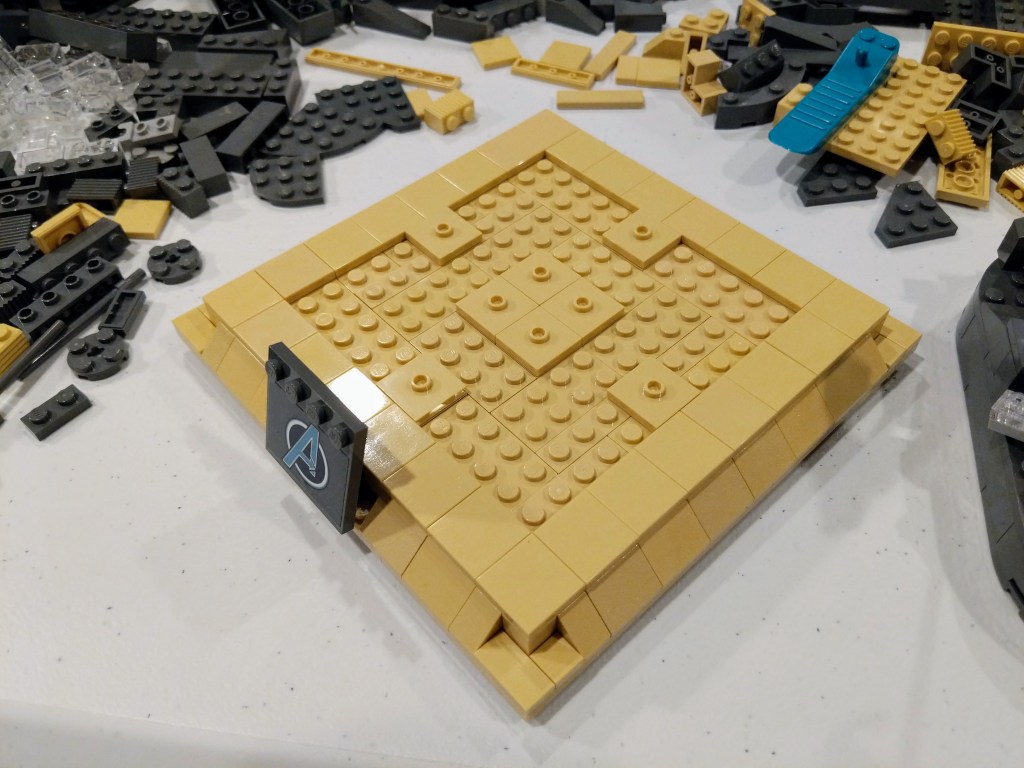
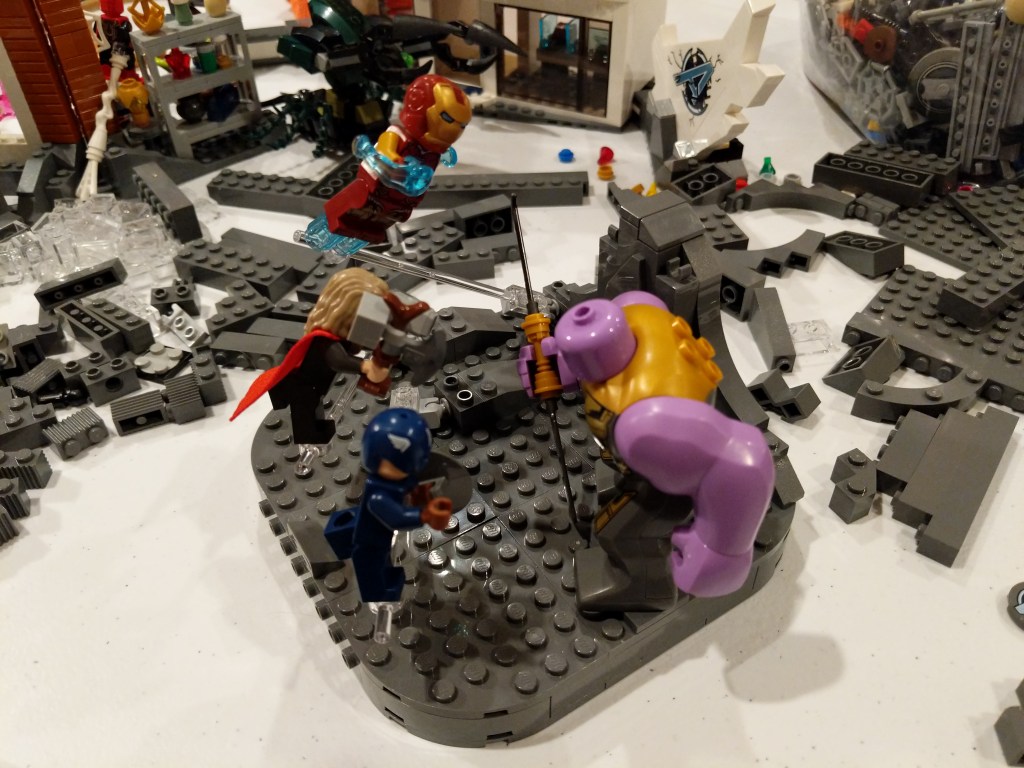
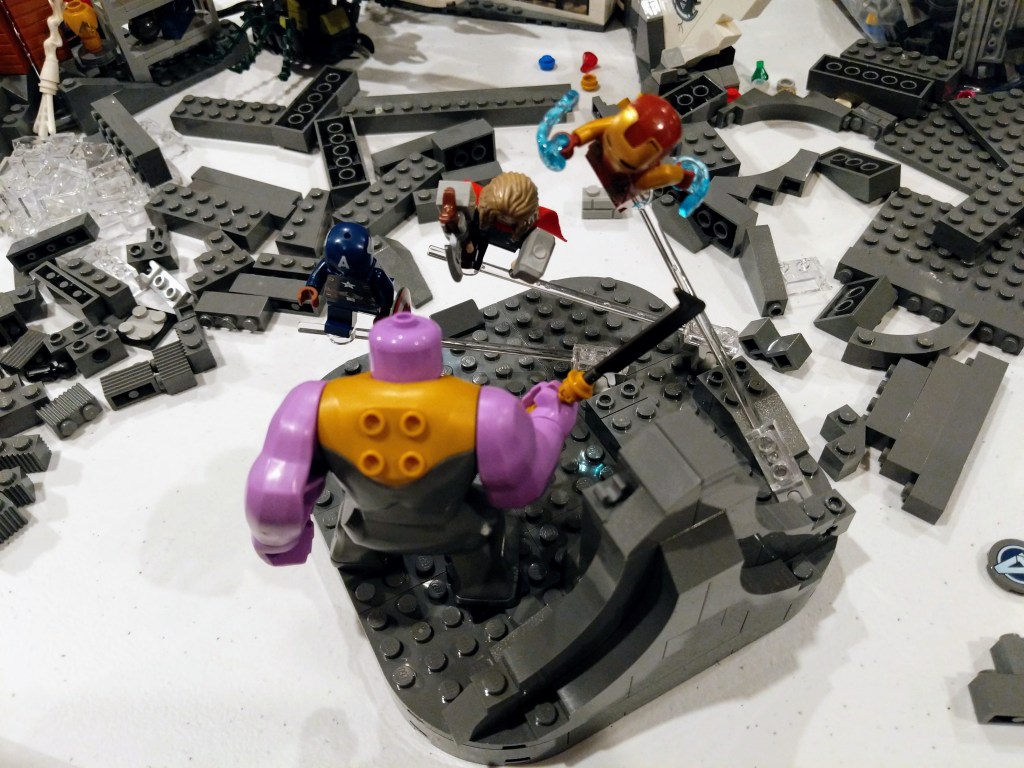
In the photo at the top of the post and in the photos below, you can see the second iteration of my MOC. About a week ago, I decided to return to the MOC after letting it rest on a bookshelf opposite my work area in our living room. My first concern was flipping the scene so that the villain’s back faces the audience and the heroes faces can be seen clearly from the front. This required a re-engineering of the Technic pin with ball joint assembly. Instead of having them project from bricks, I embedded the pins in the floor of the scene and I used Thanos’ body to obscure where the pins protrude from the ground. This also allowed for a more dramatic triangular positioning of the heroes so that they are focused toward a single point terminating at the figure of Thanos. Another reevaluation was with Thanos’ minifigure and weapon. In the first iteration, I used the newer Thanos minifigure from the 76192 set and a scaled down double sword weapon. In the revised version, I opted to use the minifigure from 76107 Thanos: Ultimate Battle equipped with the jewel-encrusted Infinity Gauntlet. Finally, I constructed a broken wall in the back of the scene to provide a backdrop and I built it with a tapering and cupped shape to envelop the scene and draw the eye back to the colorful figures of action in the scene.
While I have more ideas about how to further iterate this MOC, I’m happy with its current configuration. I’ll sit it on the bookshelf to look at it and let its presence feed into the percolating design ideas that might lead to a future revision.


