My current access to Azeroth is kind of convoluted. It’s a little bit like an incantation or prayer that my Undead priest Mordvar might have to speak in order to heal a comrade or hurt a foe.
I’m running World of Warcraft 1.12 via Wine in the foreground window where you see Mordvar flying a Tawny Wind Rider on a flight path. In the background on the right, I have Windows 7 Professional 32-bit (a copy that I received for free from a Microsoft event in Ohio some years back) running in Oracle VirtualBox. And in Windows 7, I have an old copy of SingleCore Vanilla, a WoW server emulator that I connect to on my local machine.
This weird assemblage allows me to explore Azeroth for research using admin tools that are otherwise unavailable to normal WoW players.
An exposed brick NYC apartment created with Stable Diffusion.
Having lived in apartments of one kind or another in different cities and countries over the past 30 years, there is one fact that is unavoidable: many tenants don’t care about others. This can take many forms–from leaving packages outside, leaving laundry in the on-site washer and dryer, not breaking down boxes for recycling, leaving trash outside of bins for the rats to tear apart, etc.
However, one of the worse offenses one apartment dweller can do to another is disturb another’s peaceful habitation through loud noise. This can include screaming babies, barking dogs, loud stereo music or movies, and perhaps worst of all, bass. It seems strange to me that other tenants, who must have heard their neighbors at one point or another, don’t think about that and consider how they can adjust their noise production and environment to lessen the chance that their clamor won’t bother someone else. You know, that whole golden rule thing. Though, I’m ready to admit that I’m naive about others’ motivations and their lack of concern about others.
Perhaps its the selfish orientation of some on the renting side of things is also an orientation on the landlord side of things. Observing the cheap construction of luxury apartment buildings near where I live, which are all glossy surface but shoddy underneath, I’m not surprised that the more modest abodes that Y and I can afford are of an equally poor construction. This selfishness on the part of building owners to cut costs by building apartments without a modicum of quality-of-life considerations, such as insulation filled walls (fiberglass or blown closed-cell), no soundproofing (e.g., loaded mass vinyl (LMV) or other dense lining), minimal concrete board except (perhaps) where code absolutely calls for it, or positive pressure ventilation in stairways (to keep odors out). Of course, these things cost money, but considering rental prices and the posh lifestyles of the most lucrative landlords, it’s obviously not for a lack of resources–it’s a lack of will to invest in the quality of life of those who pay exorbitantly for less than stellar accommodations to live in.
So, it’s down to the tenant to do what they can to improve their living environment that is bombarded by the sounds of neighbors and the city outside and the other byproducts of enclosed living spaces–odors of cooking and smoking.
I’ve tried a lot of tricks to keep others’ sounds and odors out of my living space, and in so doing, keep my sounds and odors in my space so as not to bother others. The following are a few of those things.
Apartment Entrance
The front door of an apartment is one of the worst offenders for allowing sound (and smells) into an apartment. This is especially true when the door is hung improperly or damaged (e.g., steel doors can be dented or bent). Also, less expensive doors are hollow, which allows sounds to pass into the apartment.
One of the easiest fixes for keeping out sound and smells is installing a door sweep that seals against the door’s threshold. The kind that I use slips on and has multiple sweeps to give a better seal. When I move, it is easily slipped off.
Another culprit is how well the door seals against the frame. The previous tenant where I now lives did a remarkable job installing weatherstripping around the exterior of the door–likely due to sound and odor issues that we’ve had to deal with. For this kind of installation, they would have had to drill pilot holes for each screw that holds the aluminum frame of the rubber weatherstripping insulation against the steel door frame. The only way that they could have improved upon this is adding a strip of caulk behind the weatherstripping frame before screwing it down. Otherwise, this has helped tremendously for keeping out sounds and smells.
Our neighbors across the landing from our door often slam their door (as did the previous tenants). Before, I hung moving blankets on the door and had a heavy curtain that I would pull over the door when Y and I were inside the apartment (to hide the blue blankets).
Recently, I figured out a better solution that keeps out far more noise to the point that we aren’t always aware of our neighbors comings and goings (as it should be!). I purchased a large roll of 2″ thick upholstery foam, neodymium magnets with countersunk holes, 3/16″ x 2″ long countersunk bolts, 1″ washers, and 3/16″ nuts. I ran the bolts through the magnets and attached the magnets to the steel entrance door. I cut the foam so that it overlapped the frame of the door (to cover where the door and frame meet). Then, I pushed the bolts through the foam–beginning at the bottom and working my way up–adding a washer and nut to each bolt as I went. I cut small holes around the handle, deadbolt, and peephole.
Interior Doors
When the source of sounds might be on the other side of closets, bathrooms, or bedroom, I’ve used those spaces as sound buffers when not in use. To do this, I applied weatherstripping to the inside edge of the door jamb for those interior doors and keep those doors shut as much as possible. This puts another barrier between me and the source of the sound.
Floors
Noise from neighbors–especially sounds from music, movies and television, parties, and shouting–often come through the floor from the unit directly beneath you. The more material that you can put down that can stop sound (e.g., mass loaded vinyl) or muffle it (e.g., felt underlayment and high pile carpet), the better. In my case, I covered as much of the floor with carpet with a felt underlayment (living room) and carpet with rubber backing (bedroom). I haven’t tried MLV under a carpet, but if I were, I would check it regularly to make sure that it doesn’t act as a moisture barrier and collect water underneath, which could ruin the floor that it was on top of. Breathable material like heavy felt and carpet is probably a safer bet.
Also, carefully inspect around the edges of rooms, doors, and closet interiors for any gaps or openings. I use caulk to fill these gaps–it can stop sound and odors from entering below. It can also stop insects from migrating into your unit. I use acrylic caulks so clean up is easy with soap and water. To apply caulk, use a small tube or a larger tube and caulk gun to apply. Then, wet the tip of your index finger and lightly pull it from the far end of where you applied towards you. This gives the caulk its bead and blends it into the two adjoining surfaces. Use a paper towel to carefully wipe up any excess and wash your hands with soap.
Walls
If you have neighbors on either side of your unit, you can add some barriers to muffle sound. These interventions have also helped with containing the sounds within my apartment and reducing echo (because there is no insulation in any of the exterior or interior walls, echo is far more noticeable than in solid construction). One type of sound blocker and absorber is bookshelves loaded with books. Though, remember to keep enough space behind the shelves for air circulation, which will keep your books healthy and free of mold.
Hanging fabric items–especially quilts and rugs–on the wall will help absorb some of our sound and muffle sound that might come in from outside the apartment. Like with anything that I put on the floor, I make sure that it is breathable and not a moisture barrier that can collect water and ruin the building material or promote mold growth in a wet environment.
Windows
A lot of noise originates from the sidewalk and street below our apartment. Besides ensuring the windows are properly sealed and closed, we also double hang sets of thick blackout curtains–one set fits inside the window frame on a tension rod and the second set is mounted on rods attached to the wall face and hangs to the floor. Pulled together, these muffle a lot of daily noise and they cut out all light when we’re trying to sleep at night.
White Noise and Air Filters
All noise can’t be eliminated, but it can be masked. This is especially important when we’re trying to sleep. As a final precaution, we turn on a large air cleaner set to its medium fan speed to create a background of white noise while recirculating and cleaning the air in the apartment–two birds, one stone.
Also, we keep another air cleaner on the kitchen counter running on low speed 24/7. It uses a charcoal filter to remove odors from the air–ours from cooking and any that might find their way into the apartment from outside.
Appliances
Some noise–like a film murder fiend–is already inside. Our wall insert air conditioner is a case in point. Occasionally, its front face will vibrate and sound like the whole apartment is shaking apart. Using a found object–like a toy foam disk–inserted between the frame and face eliminated the errant racket.
Other Options and Observations
The bed is a tough nut to crack when bass is involved. Pulling the bed away from the wall a few inches helps some with ambient pulses, but the low frequency vibration of bass will travel up the feet of the bed into the mattress, through the pillow, into your ear pressed against the pillow or your head lying back into the pillow. Reducing the surface area of the feet–where it contacts the floor–seems like it might reduce how much vibration is absorbed and transmitted. There are risers made out of dense rubber that might help, but reviews are typically not positive. I’ve read some inventive ideas online involving springs, fulcrums, and isolators–essentially turning your bed into a large turntable antivibration system–but it would require a lot of material, know-how, and capital to make that work correctly.
If I could afford it, I would like to try installing a floating floor: lay down a felt underlayment and snap together a Pergo-like laminated floor on top of it. Then, I would lay out a layer of MLV and then a carpet over that. This might improve sound blocking over just a carpet due to its mass. However, bass will easily penetrate even another floor.
Bass is probably the worst aspect of living near others. Audio manufacturers and the entertainment industry promote thumping bass as essential to almost any kind of music. I get that a beat can get you moving, but the fact that bass is an omnidirectional vibration that travels through most materials and at great distance, it would seem that some sense would prevail in how people enjoy it. Of course, I’m delusional in thinking that would be the case.
While lots of online discussions about noisy neighbors include voices that say, “just go talk to them,” I can attest that over the past 30 years I have never had a positive interaction or lasting change with any neighbor regarding noise despite being as nice and neighborly as possible to them. From those interactions, I have gathered that those folks just don’t like doing something counter to what they are already doing, and/or they don’t care because the problem isn’t theirs. However, I suspect that if someone caused them trouble they wouldn’t turn the other cheek. It’s not so much “do unto others as you would have them do unto you” as “do what you want and others be damned.”
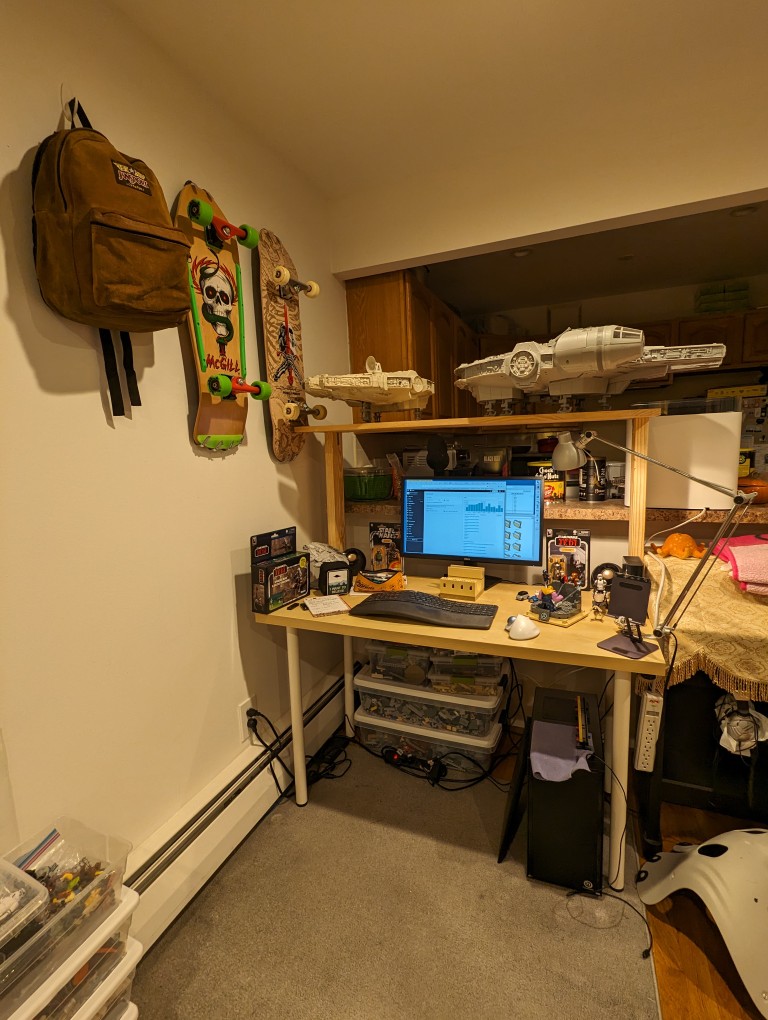
I have two big problems. One is a Kenner 1979 Millennium Falcon, which is 22″ long and a little over three pounds. The other is the much larger Hasbro 2008 Legacy Collection Millennium, which is 32″ long and weighs 15 pounds. Living with these hunks of junk in a small Brooklyn apartment presents a problem–where to put them?
For awhile, I’ve had two 4′ desks in an L-shape configuration. One is my ancient IKEA 47″ x 24″ artificial wood with metal legs desk, which had been holding the Falcons. The other is a Costco 48″ folding plastic desk, which I had setup to use my computer and laptop on. I wanted to put the Costco desk away to free up some living room floor space, so I thought about adding a shelf to the Ikea desk would be the solution.
I used to have a series of lightweight shelves on my Ikea desk to display LEGO sets, which I wrote about here. I discarded those when we moved from Carroll Gardens to Park Slope, which is fine as they were not wide enough or strong enough to support the two Falcons.
I already had screws, brackets, and support plates. I also had a 4″ x 12″ x 1″ board that I had used to extend the IKEA desk’s table top for lightweight objects. I took this board off the IKEA desk and intended to use it as my new shelf.
What remained needing were two supports for the shelf. Yesterday, I walked to the Brooklyn Lowes to buy two 2″ x 4″ x 2′ studs (total $4) for the shelf supports.
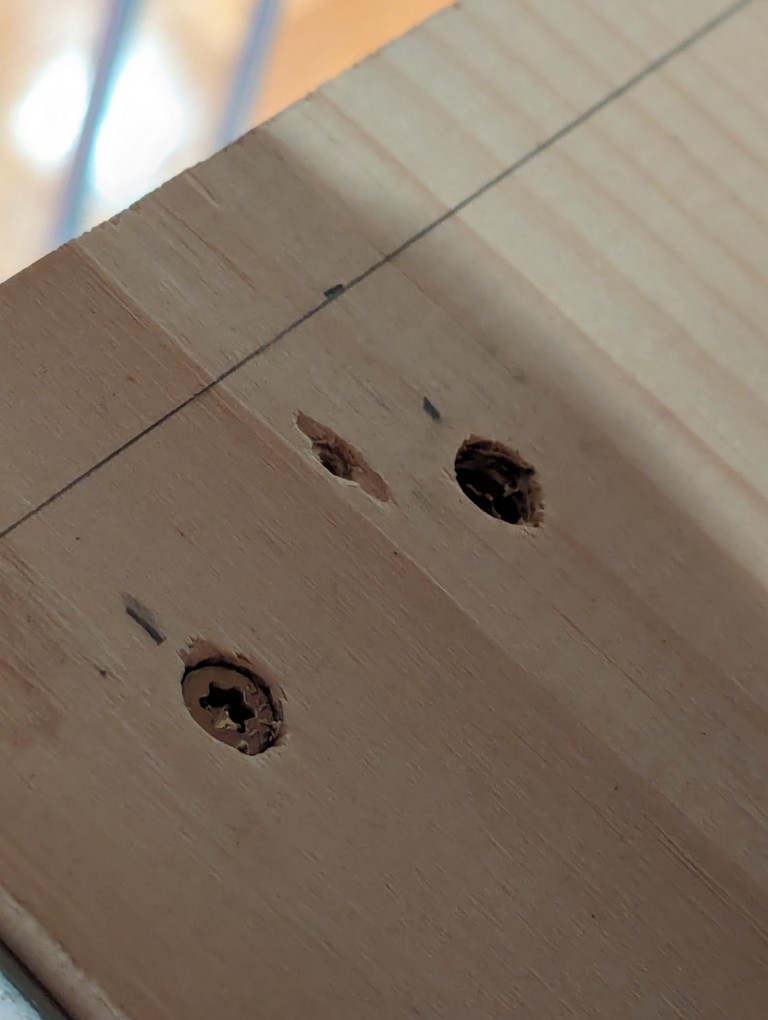
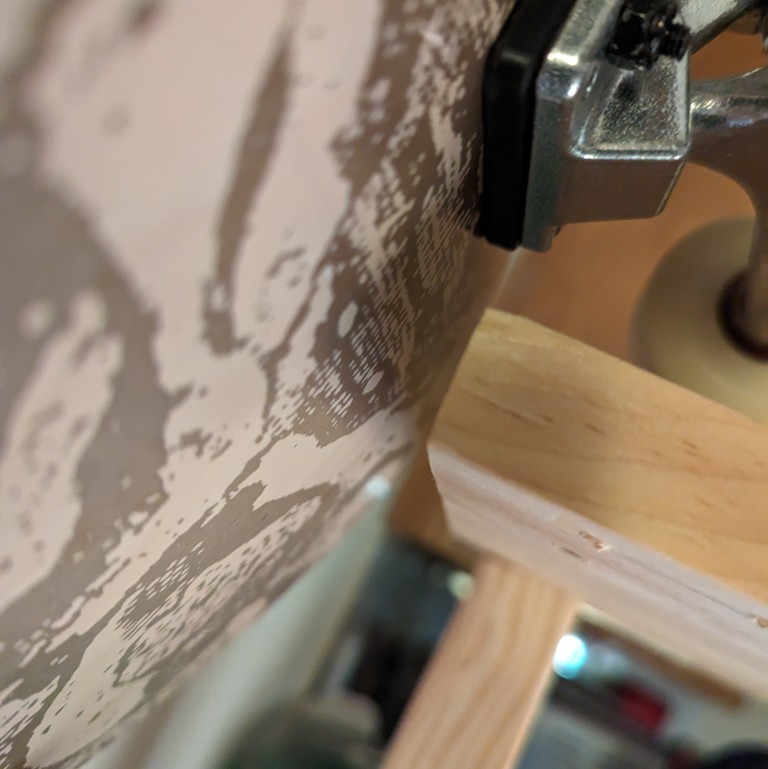
The corners of the IKEA desk are more substantial to support the installation of its four legs. Therefore, I wanted to mount the shelf’s two supports through that particle board instead of the weaker honeycomb core of the desk top. I drilled pilot holes 3/4″ from either side of the desk top at 1″ and 2 1/2″ from the back of the desk top to correspond with the pilot holes I centered on the 2″ x 4″ supports at the same measurements. I drove 3″ deck screws from the bottom of the desk top into the bottom of the 2″ x 4″ shelf supports.
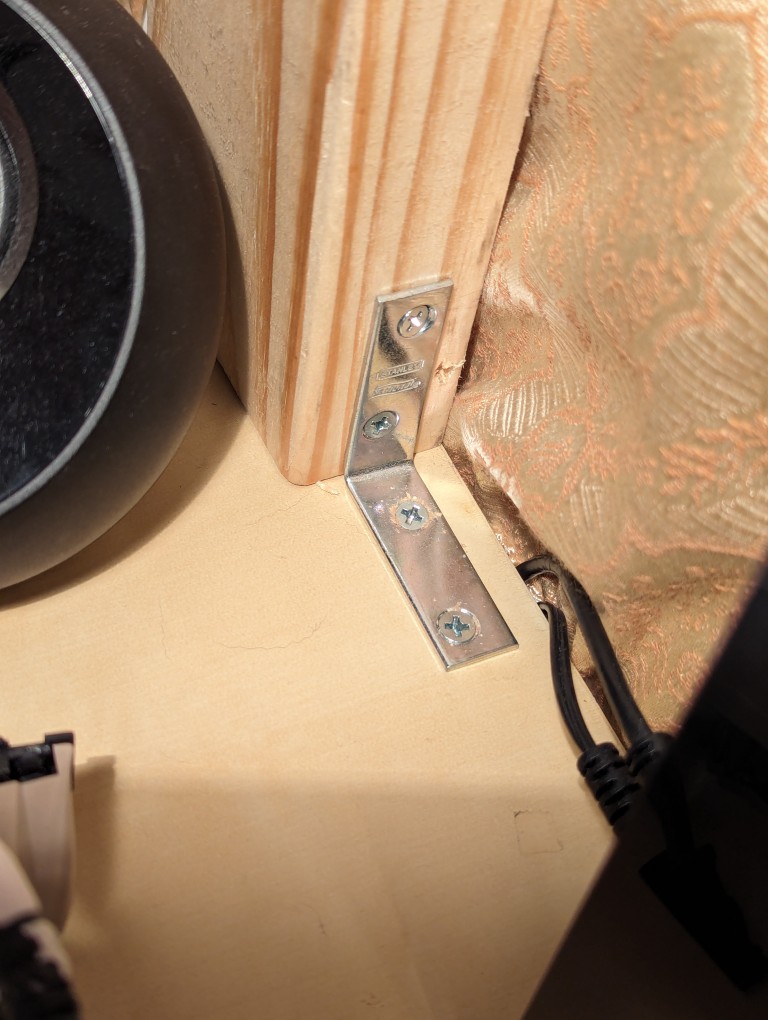
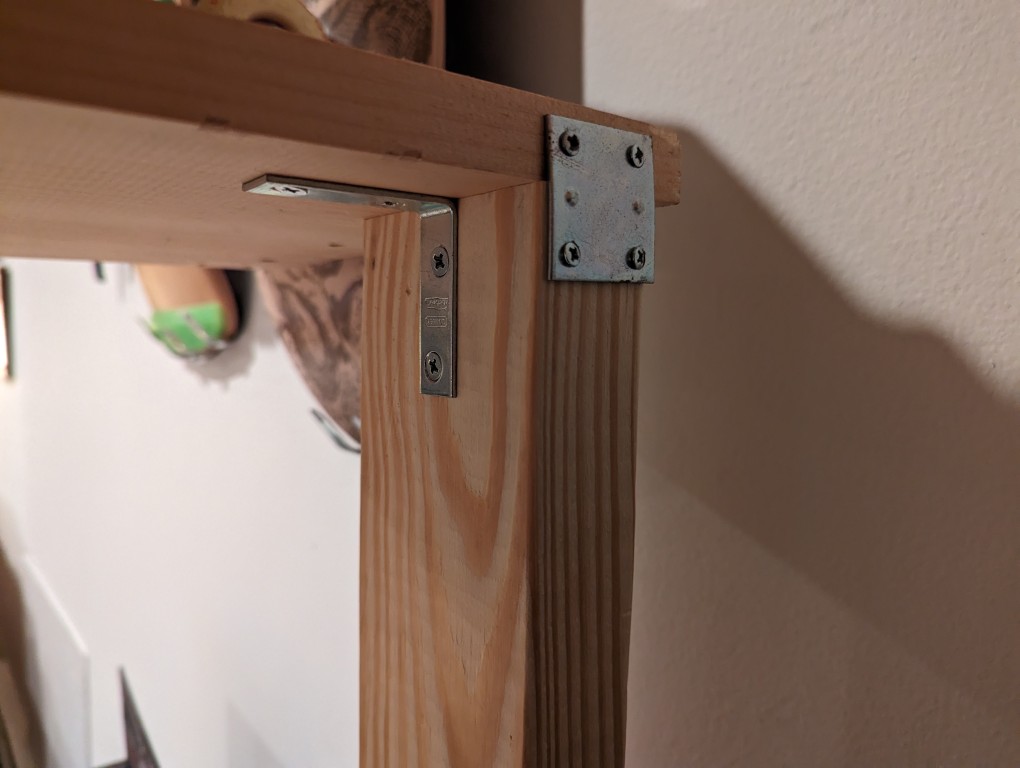
I provided extra support with a flat metal plate on the back and an L-shaped bracket on the front.
Taking the shelf, I measured and drilled pilot holes on its back end at 1 1/4″ from either side at 1″ and 2 1/2″. The shelf is 48″ long but the desk is only 47″ long, so the shelf hangs over its supports by 1/2″ on either side. To secure the shelf to the supports, I drove 1 7/8″ deck screws through the shelf into the support from the top.
I reinforced the shelf with a metal bracket on the back of each support and an L-shaped support on the inside under the shelf.
I had to slide Y’s electric piano over an inch to give my shelf about 1/2″ clearance from my Ray “Bones” Rodriguez Powell-Peralta skateboard hanging on the wall.
Looking at the “BIG” 2008 Millennium Falcon on the shelf, you can see that the landing gear comfortably fit on the 12″ (11 1/4″ actual) shelf when positioned longways. As you can see in the first photo on this post, the smaller 1979 Falcon can fit in any orientation and currently facing toward the front of the desk.
I’ll keep an eye on the shelf to see if it needs any additional support on the front with heavy duty shelf brackets. It was already warped as shown above. I positioned the warp side up, so it might not need any further work.
If you decide to build a similar back-mounted shelf on a lightweight desk like my IKEA one, be aware that the desk’s weight might not be enough to counterbalance the weight of objects that you put on the shelf, leading it to fall over backwards (if it isn’t positioned against a wall to halt it’s movement).
In NYC, I suppose desks and shelves are like buildings–if you want more space, you gotta go up!
Y sent me this photo of Syntrend Creative Park in Taipei, Taiwan. The whole complex is the funky, weird-ass building in the foreground and the highrise in the background.
Syntrend has across its many floors shopping (computers, gaming, pop culture, toys, music, etc.) and dining experiences. It has maker spaces, co-working spaces, and event spaces. It’s definitely on my list of places to visit when I get a chance to go to Taiwan again!
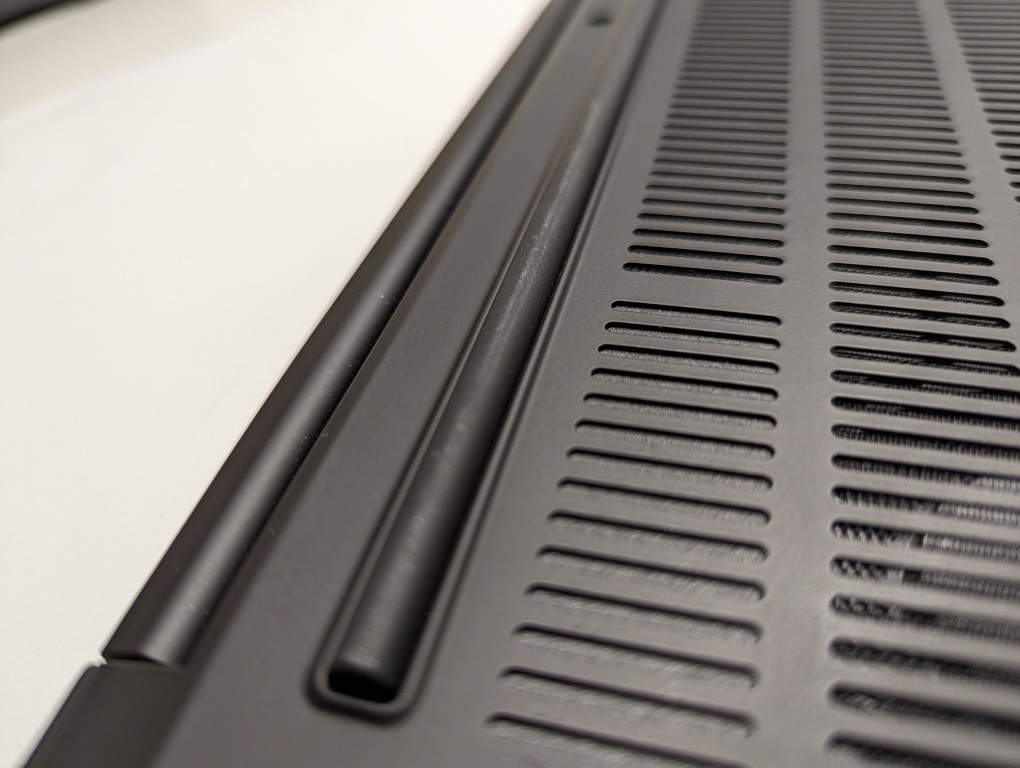
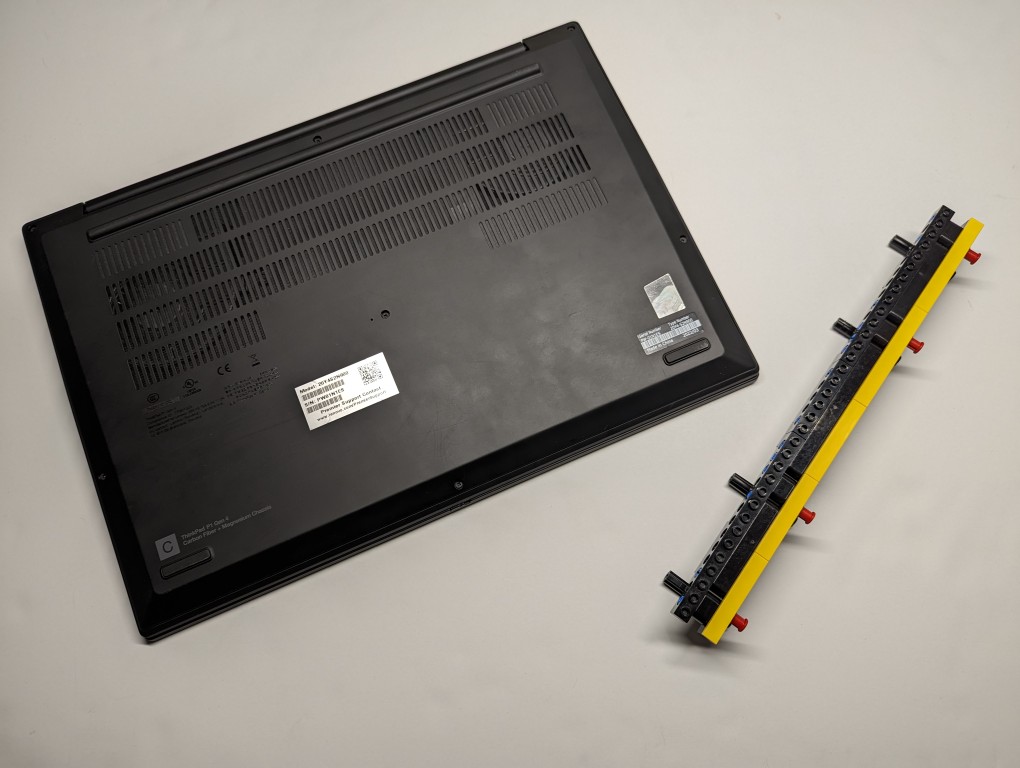
As I wrote about yesterday, my Lenovo ThinkPad P1 Gen 4 maintains lower temperatures when it has improved air flow under its body where the twin cooling fan intakes are. Without raising the laptop, the laptop’s support feet only give it about 3 mm of space underneath it, which chokes the intake fans. Since getting the laptop late last year, I’ve used a variety of at-hand objects–books and small boxes most often–to prop up the back of the laptop when I was stressing the laptop with a heavy workload.
I wanted a permanent solution, but the portable options available in retail are either bulky adjustable metal or plastic platforms or folding 4-point stands. The former takes up a lot of room and those with fans don’t always translate to lower temps, and the latter might not provide the support needed on the ThinkPad P1’s lengthy support foot at the rear of the laptop. So, I turned to LEGO to create a customized stand that gives the ThinkPad the support it needs while also being compact and easily carried in my backpack.
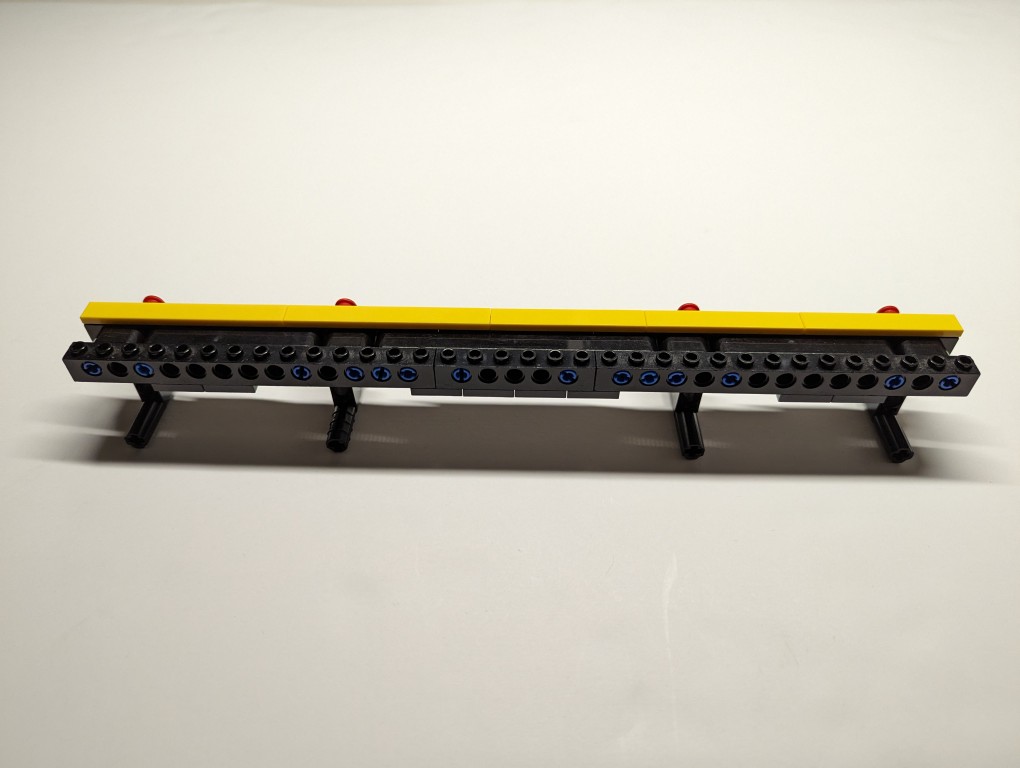
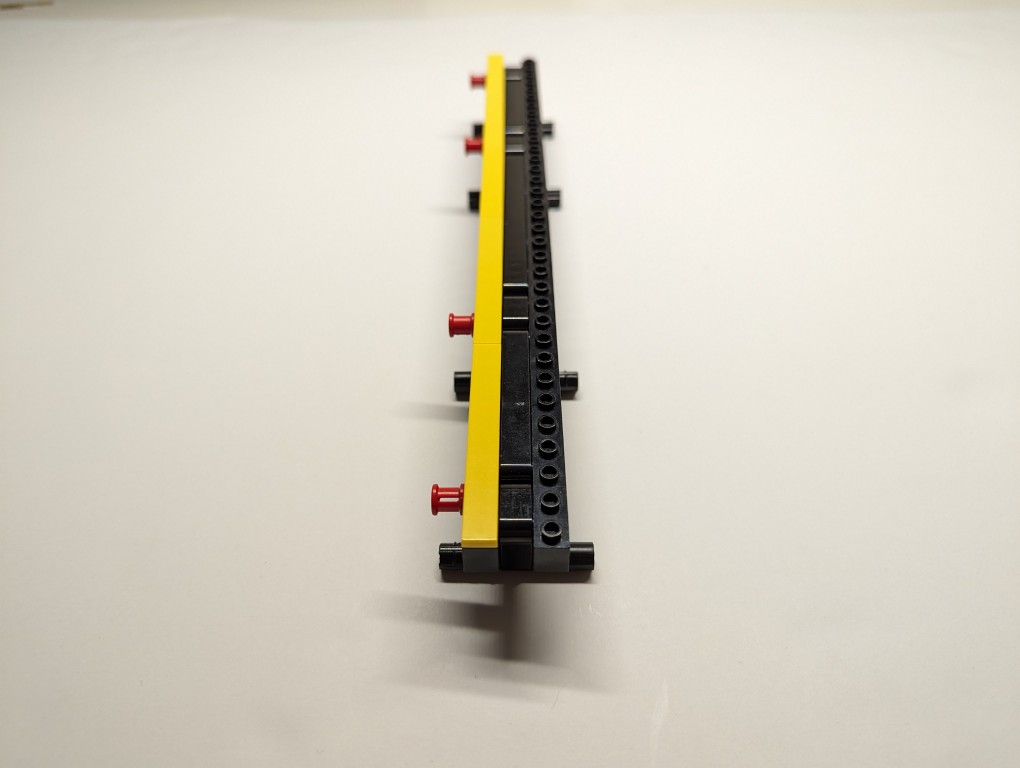
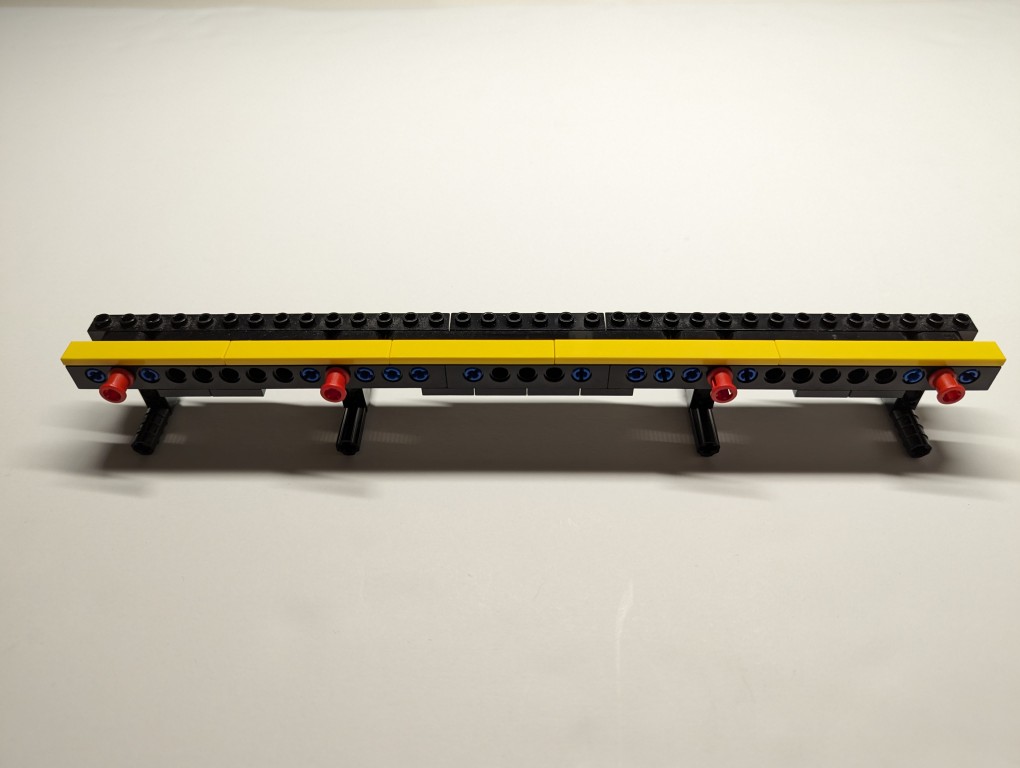
What I made to solve this problem mostly used LEGO Technic elements with some brick elements (plates to provide support underneath its joints and the bright yellow smooth plates on top to orient the stand and provide a stop against the ThinkPad’s support foot).
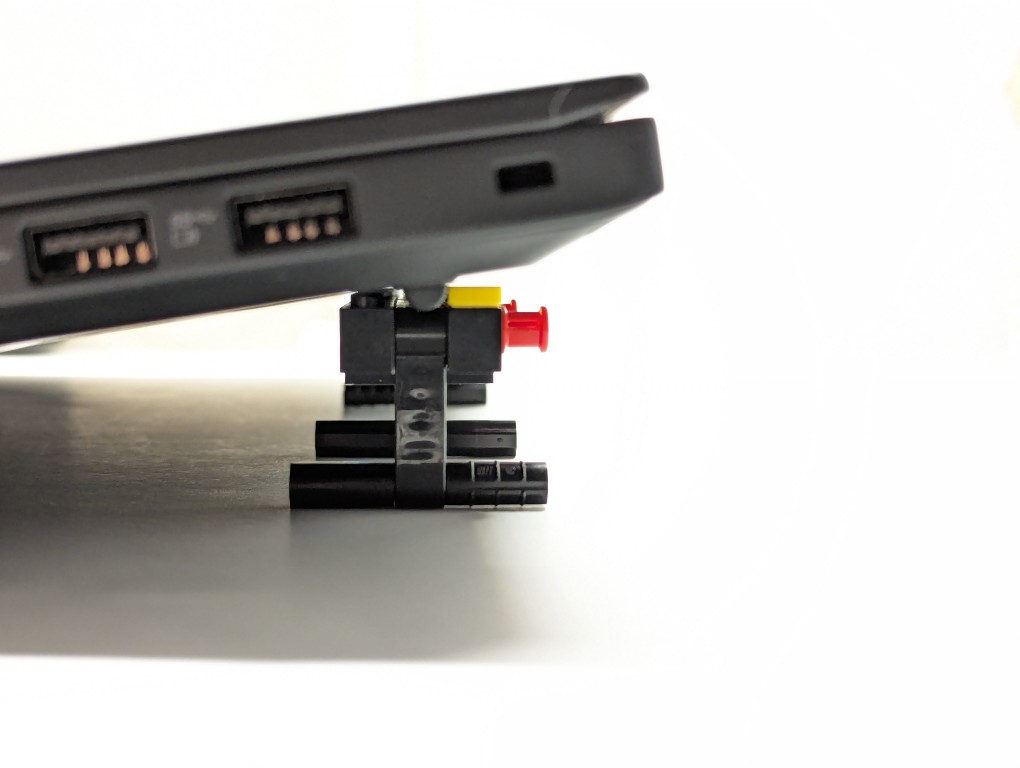
The ThinkPad’s support foot fits perfectly in the center of the stand without the studs toward the front or the flat plate in the back touching the laptop’s body.
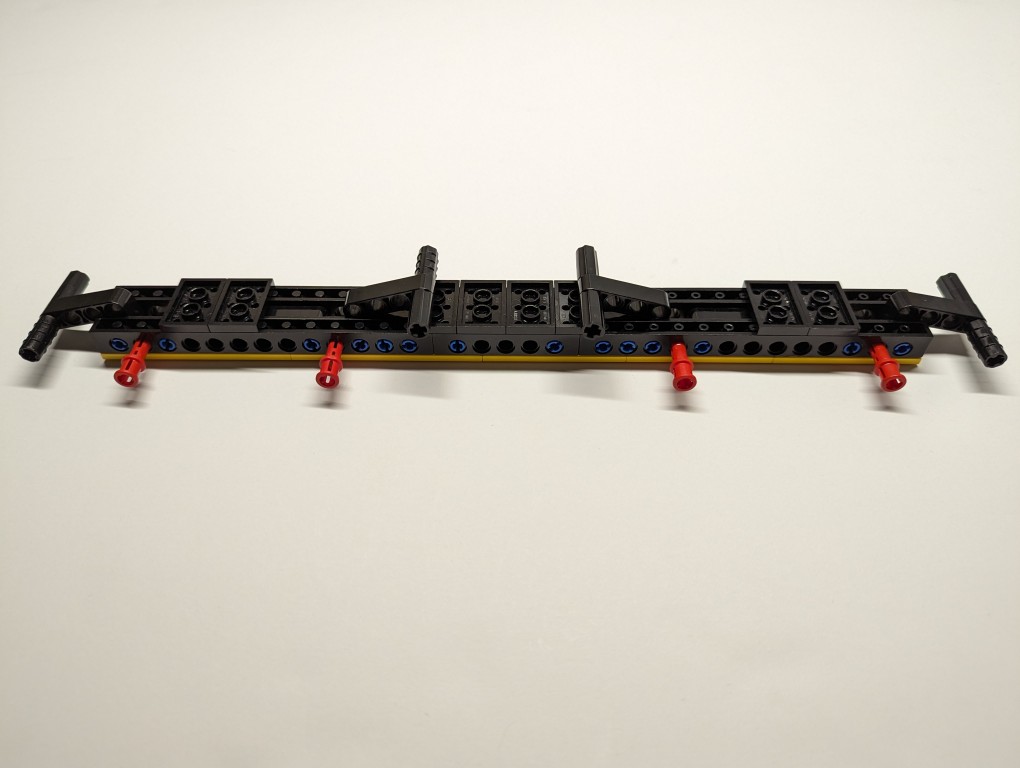
Essentially, the stand is built like a sandwich: the bread is the Technic bricks with holes on either side, and the filling is the Technic liftarms (straight and L-shaped). I used 3-stud wide pins to hold the sandwich together. The red pins are only used to provide stability to the support legs when they are deployed for use.
On the back of the stand, the red pegs can be partially pulled out and the feet folded.
The LEGO stand completely covers the support foot at the rear of the laptop (seen at the top of the photo above). When folded, it easily slips into the backpack that I use to carry this ThinkPad.
LEGO is a versatile, rapid prototyping medium for building art, expressing ideas, and in this case, creating something practical to solve a specific problem.
If you have some LEGO bricks laying around idle, you might stop and think about what problem they might be able to solve for you!