“In the early days of modern computers, the early 50s, one of the great optimistic hopes was to have automatic machine translation of text. It was thought that all you would have to do is have enough memory to store a dictionary. Today there are not many knowledgeable people who would make such a boast. The problem with writing a translating system is the immense complexity of natural language. . . . A related problem is natural language comprehension. Wouldn’t it be nice if we could converse with our processors in English instead of BASIC or assembly language? Unfortunately, the same problems are faced in this task” (Rosenbaum 56).
Also, I’ve made some updates to the Generative AI and Pedagogy Bibliography with some new books peppered throughout the list and news articles about the Biden administration’s push for AI regulation in the Ethics section.
If you make use of the bibliography in your research, please include a footnote or drop me an email–thank you!
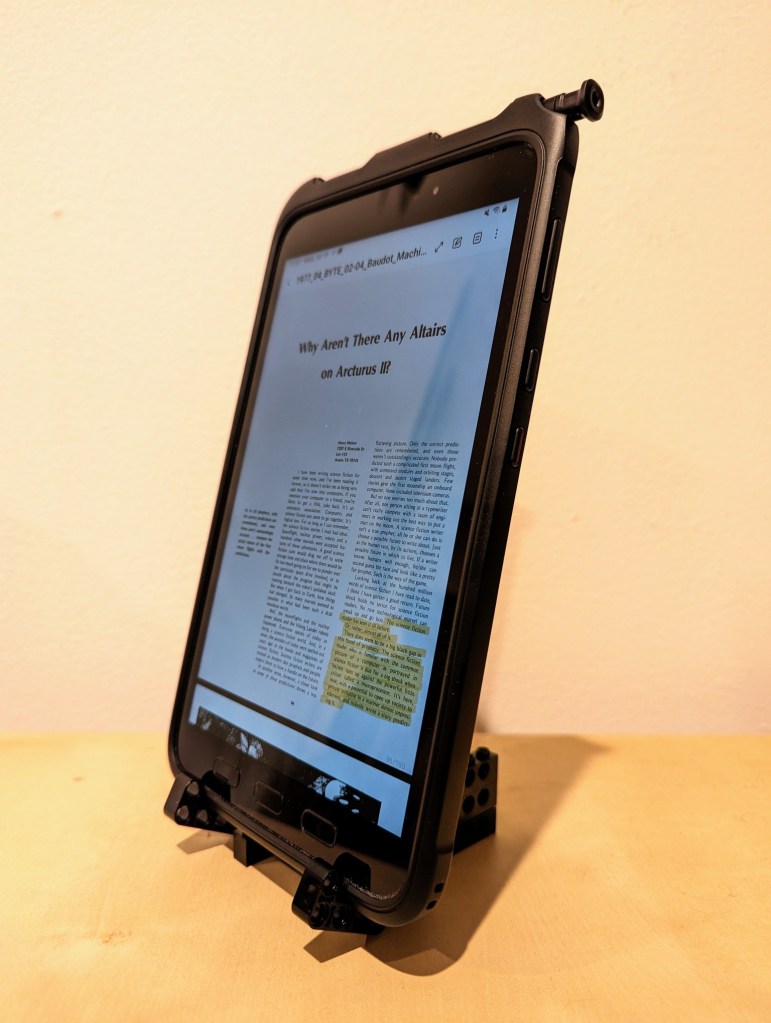
This past year, I’ve been using an 8″ Samsung Galaxy Tab Active3 tablet and its S-Pen for most of my reading and note taking. In particular, I use the Samsung Note app to annotate and highlight PDFs of research. When I’m copying quotes and citations into my writing, I have had trouble finding a good way to position the tablet on my desk so that I could read its screen while typing up quotes and my notes. Occasionally, I had been using Syncthing (I wrote about how to setup a Raspberry Pi Zero as a central hub for your documents synchronized with Syncthing here) to synchronize my annotated PDFs on the tablet with my PC, but its sometimes better to save my PC screen’s real estate for my writing and rely on the tablet screen for reading–essentially adding to my screen real estate.
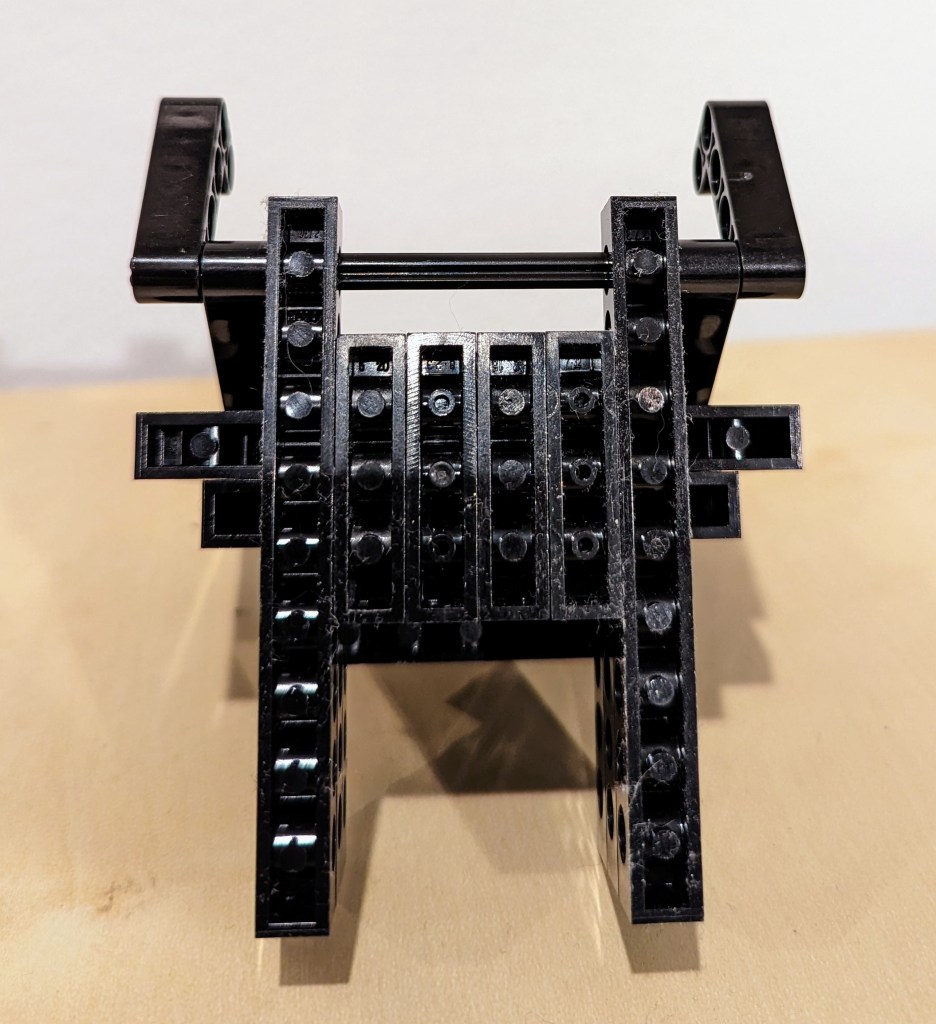
Today, I decided to pull out a tub of LEGOs to solve my problem about how to easily read and interface with the tablet while typing on my desktop computer’s keyboard, because LEGO is a versatile building medium that is great for play, art, and solving problems. Since I don’t often use all black bricks in my projects, I decided to build a tablet display stand using only black LEGO Technic bricks and elements.
I employed the 4-brick long L-shaped technic elements to create the place where the tablet is held by the display stand. It can rotate freely, but it is held in place against the vertical wall of 10-stud Technic bricks that support the back of the tablet when it is in the stand.
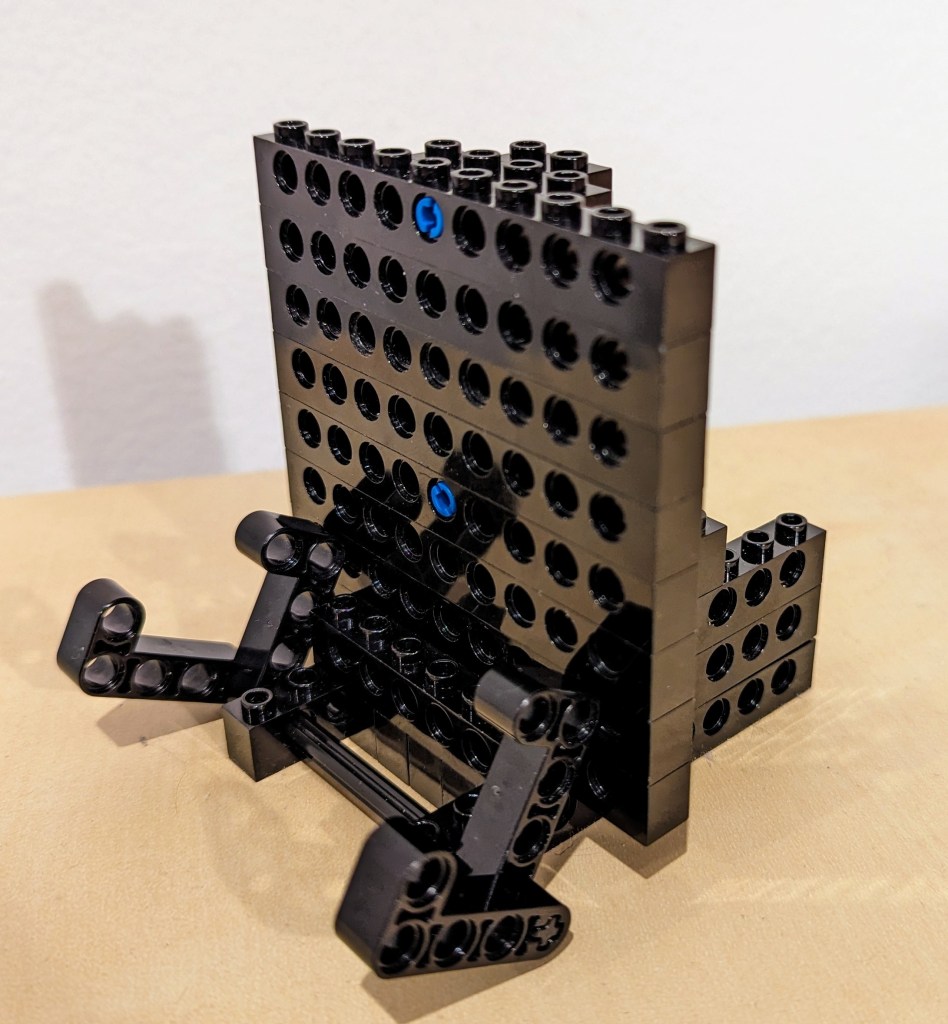
The rear support of the stand, which maintains the ~14 degree from the vertical position of the tablet holding pincers on the left of the photo above and supports the back of the tablet has several layers of Technic bricks held together by frictional force as well as 3-stud and 2-stud-long connector pegs. I don’t think the stand needs as much support as I provided on the right side of the photo above, but I wanted to use up as many black Technic bricks while building a stand that took up a minimum of desk space.
The photo above shows how the layers of bricks are arranged in the rear of the stand to support the height and weight of the tablet when it is in the stand.
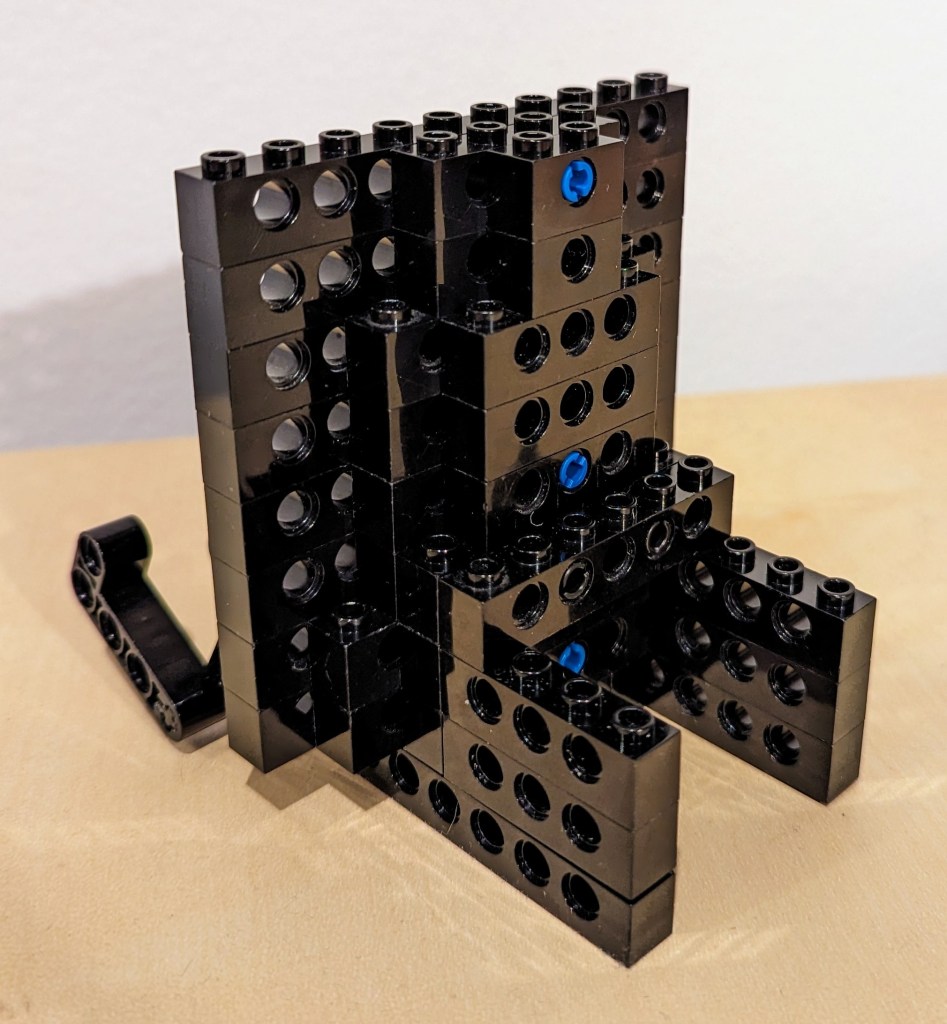
The above photo shows the rear of the display stand. Note that the 6-stud Technic brick in the middle of the photo that connects to the perpendicular 4-stud Technic bricks beneath it is connected to the rear support layers with 2 x 2-stud connector pegs.
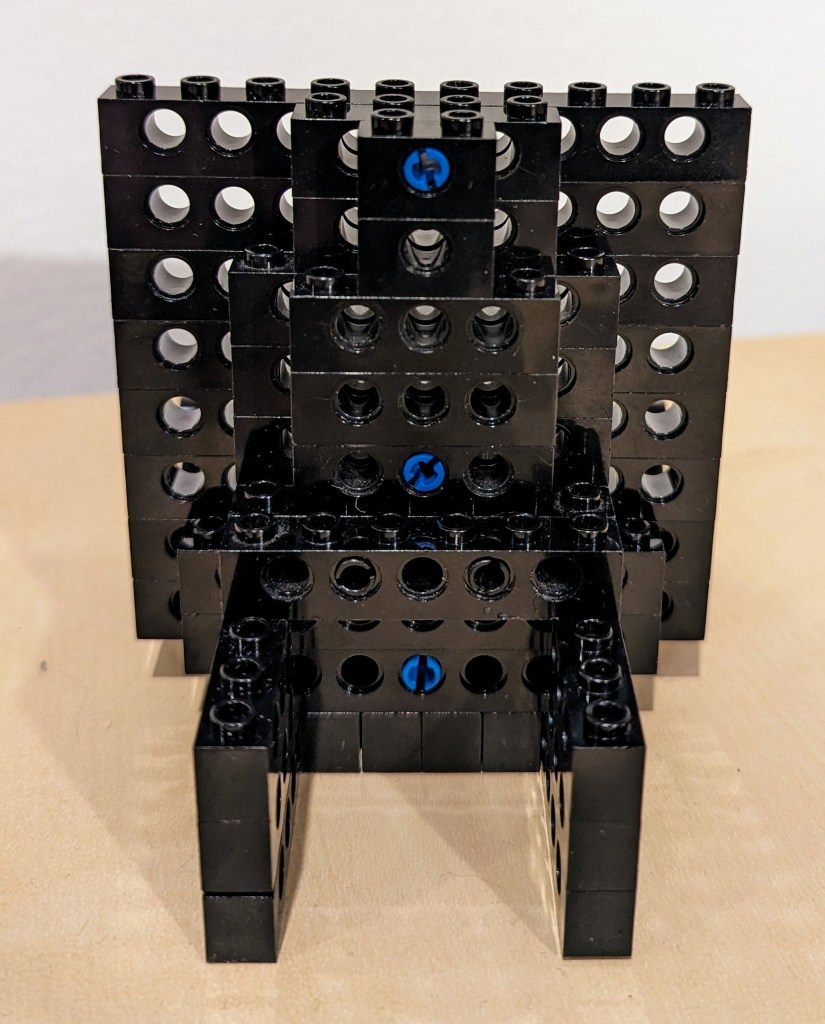
Finally, the bottom view of the display stand is shown above. Connector pegs are used to connect all bricks on the bottom most layer of the display stand.
I hope that the photos and descriptions above give you some ideas about how to use LEGO to solve a problem with holding something–in this case, a digital tablet. Not only can LEGO help you solve problems, but it can help you save money by allowing you to solve one problem and reconfigure the bricks to solve new problems as they arise and the old problems are no longer a concern (i.e., use LEGO over and over instead of buying solutions and trashing obsolete ones).
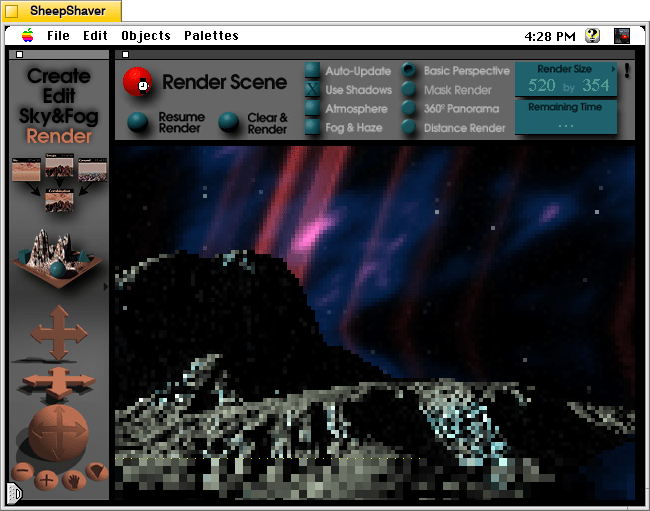
Outer space scene rendered in KPT Bryce 1.0.1 on Mac OS 7.5.5.
A conversation on LinkedIn yesterday with a former Professional and Technical Writing student about user experience (UX) and generative artificial intelligence (AI) technologies reminded me of the UX innovations around an earlier exciting period of potential for computers creating art: KPT Bryce, a three-dimensional fractal landscape ray trace rendering program for Mac OS released in 1994. It was one of the first programs that I purchased for my PowerMacintosh 8500/120 (I wrote about donating a similar machine to the Georgia Tech Library’s RetroTech Lab in 2014 here). Much like today when I think about generative AI, my younger self thought that the future had arrived, because my computer could create art with only a modicum of input from me thanks to this new software that brought together 3D modeling, ray tracing, fractal mathematics, and a killer user interface (UI).
Besides KPT Bryce’s functionality to render scenes like the one that I made for this post (above), what was great about it was its user interface, which made editing and configuring your scene before rendering in an intuitive and easy-to-conceptualize manner. As you might imagine, 3D rendering software in the mid-1990s was far less intuitive than today (e.g., I remember a college classmate spending hours tweaking a text-based description of a scene that would then take hours to render in POVRay in 1995), so KPT Bryce’s easy of use broke down barriers to using 3D rendering software and it opened new possibilities for average computer users to leverage their computers for visual content creation. It was a functionality and UX revolution.
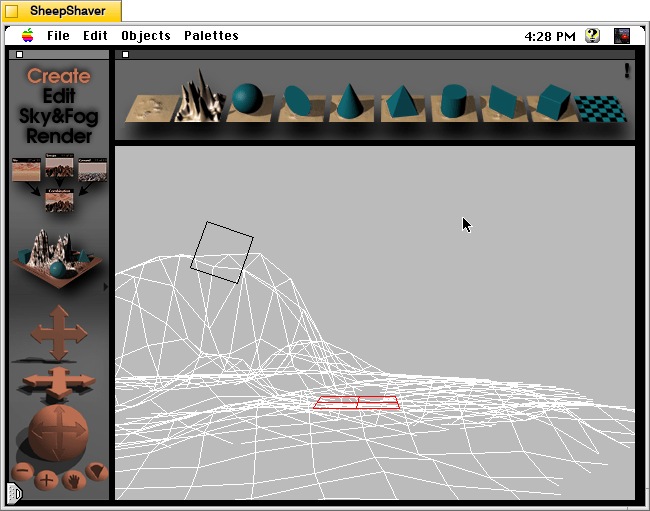
Below, I am including some screenshots of KPT Bryce 1.0.1 emulated on an installation of Mac OS 7.5.5 on SheepShaver (N.B. I am not running SheepShaver on BeOS–I’ve modified my Debian 12 Bookworm xfce installation to have the look-and-feel of BeOS/Haiku as I documented here).
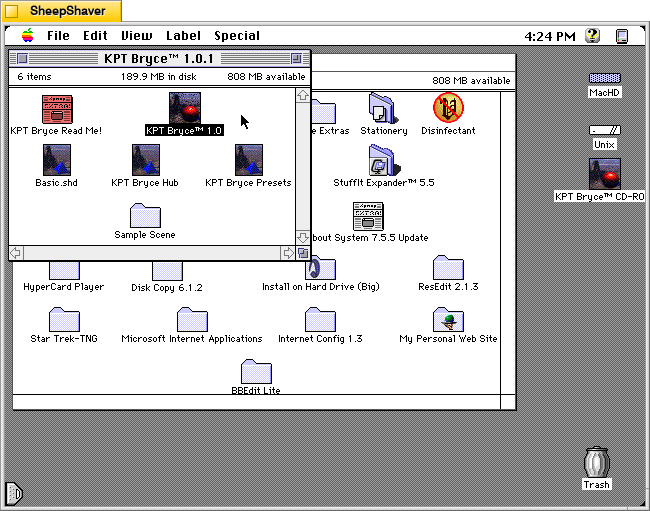
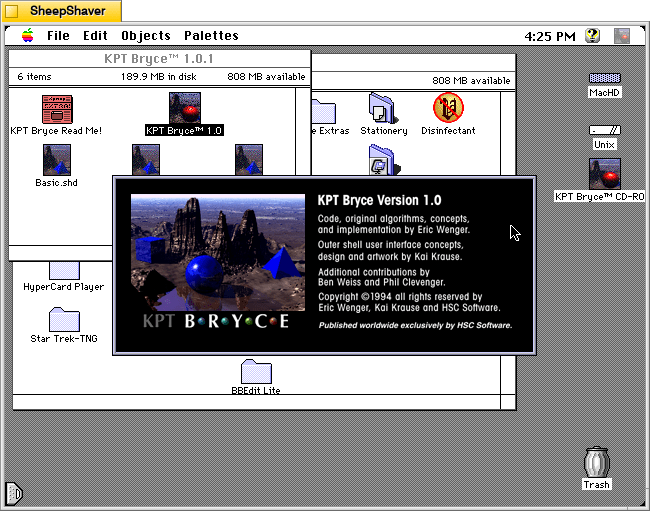
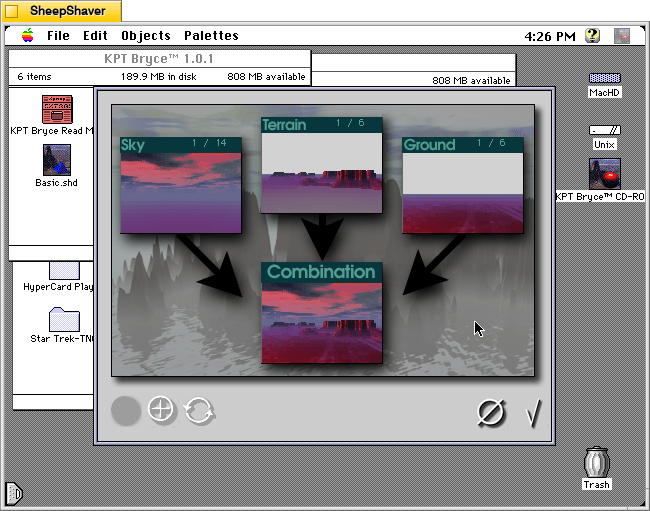
KPT Bryce 1.0 program folder copied to the computer’s hard drive from the KPT Bryce CD-ROM.KPT Bryce 1.0 launch screen.KPT Bryce initial scene randomizer/chooser. Note the UI elements on the lower window border.KPT Bryce’s scene editor opens after making initial selections. KPT Bryce’s rendering screen–note the horizontal dotted yellow line indicating the progression of that iterative ray tracing pass on the scene.KPT Bryce rendering completed. It can be saved as an image by clicking on File > Save As Pict.
An anthropomorphic cat wearing coveralls, working with advanced computers. Image generated with Stable Diffusion.
As I wrote about recently about my summertime studying and documented on my generative artificial intelligence (AI) bibliography, I am learning all that I can about AI–how it’s made, how we should critique it, how we can use it, and how we can teach with it. As with any new technology, the more that we know about it, the better equipped we are to master it and debate it in the public sphere. I don’t think that fear and ignorance about a new technology are good positions to take.
I see, like many others do, that AI as an inevitable step forward with how we use and what we can do with computers. However, I don’t think that these technologies should only be under the purview of big companies and their (predominantly) man-child leaders. Having more money and market control does not mean one is a more ethical practitioner with AI. In fact, it seems that some industry leaders are calling for more governmental oversight and regulation not because they have real worries about AI’s future development but instead because they are in a leadership position in the field and likely can shape how the industry is regulated through industry connections with would-be regulators (i.e., the revolving door of industry-government regulation in other regulatory agencies).
Of course, having no money or market control in AI does not mean one is potentially more ethical with AI either. But, ensuring that there are open, transparent, and democratic AI technologies creates the potential for a less skewed playing field. While there’s the potential for abuse of these technologies, having these available to all creates the possibility for many others to use AI for good. Additionally, if we were to keep AI behind locked doors, only those with access (legally or not) will control the technology, and there’s nothing to stop other countries and good/bad actors in those countries from using AI however they see fit–for good or ill.
To play my own small role in studying AI, using generative AI, and teaching about AI, I wanted to build my own machine learning-capable workstation. Before I made any upgrades, I maxed out what I could do with a Asus Dual RTX 3070 8GB graphics card and 64GB of RAM for the past few months. I experimented primarily with Stable Diffusion image generation models using Automatic1111’s stable-diffusion-webui and LLaMA text generation models using Georgi Gerganov’s llama.cpp. An 8GB graphics card like the NVIDIA RTX 3070 provides a lot of horsepower with its 5,888 CUDA cores and memory bandwidth across its on-board memory. Unfortunately, the on-board memory is too small for larger models or adjusting models with multiple LORA and the like. For text generation, you can layer some of the model on the graphic’s card memory and your system’s RAM, but this is inefficient and slow in comparison to having the entire model loaded in the graphics card’s memory. Therefore, a video card with a significant amount of VRAM is a better solution.
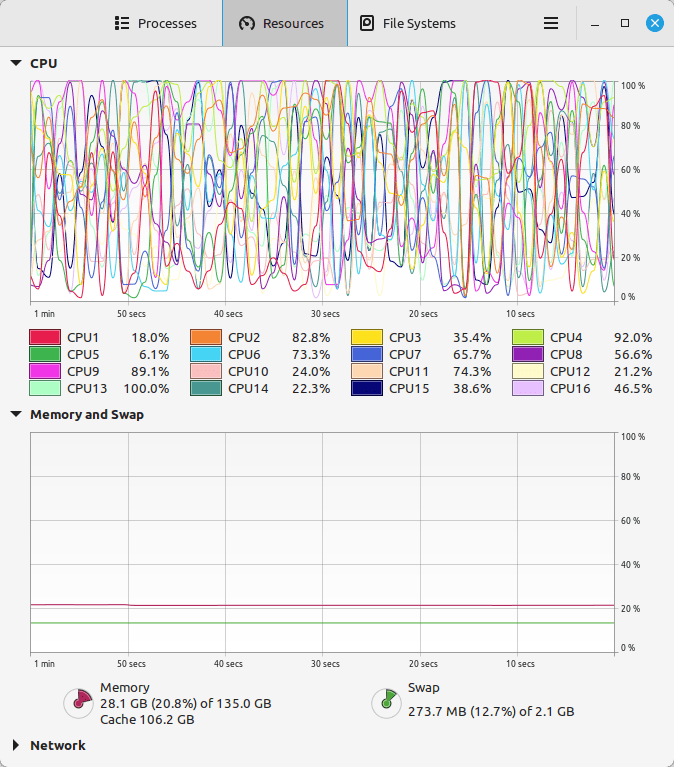
For my machine learning focused upgrade, I first swapped out my system RAM for 128GB DDR4-3200 (4 x 32GB Corsair shown above). This allowed me to load 65B parameters into system RAM with my Ryzen 7 5800X 8 core/16 thread CPU to perform the operations. The CPU usage while it is processing tokens on llama.cpp looks like an EEG:
While running inference on the CPU was certainly useful for my initial experimentation and the CPU usage graph looks cool, it was exceedingly slow. Even an 8 core/16 thread CPU is ill-suited for AI inference in part due to how it lacks the massive parallelization of graphics processing units (GPUs) but perhaps more importantly due to the system memory bottleneck, which is only 25.6 GB/s for DDR4-3200 RAM according to Transcend.
Video cards, especially those designed by NVIDIA, provide specialized parallel computing capabilities and enormous memory bandwidth between the GPU and video RAM (VRAM). NVIDIA’s CUDA is a very mature system for parallel processing that has been widely accepted as the gold standard for machine learning (ML) and AI development. CUDA is unfortunately, closed source, but many open source projects have adopted it due to its dominance within the industry.
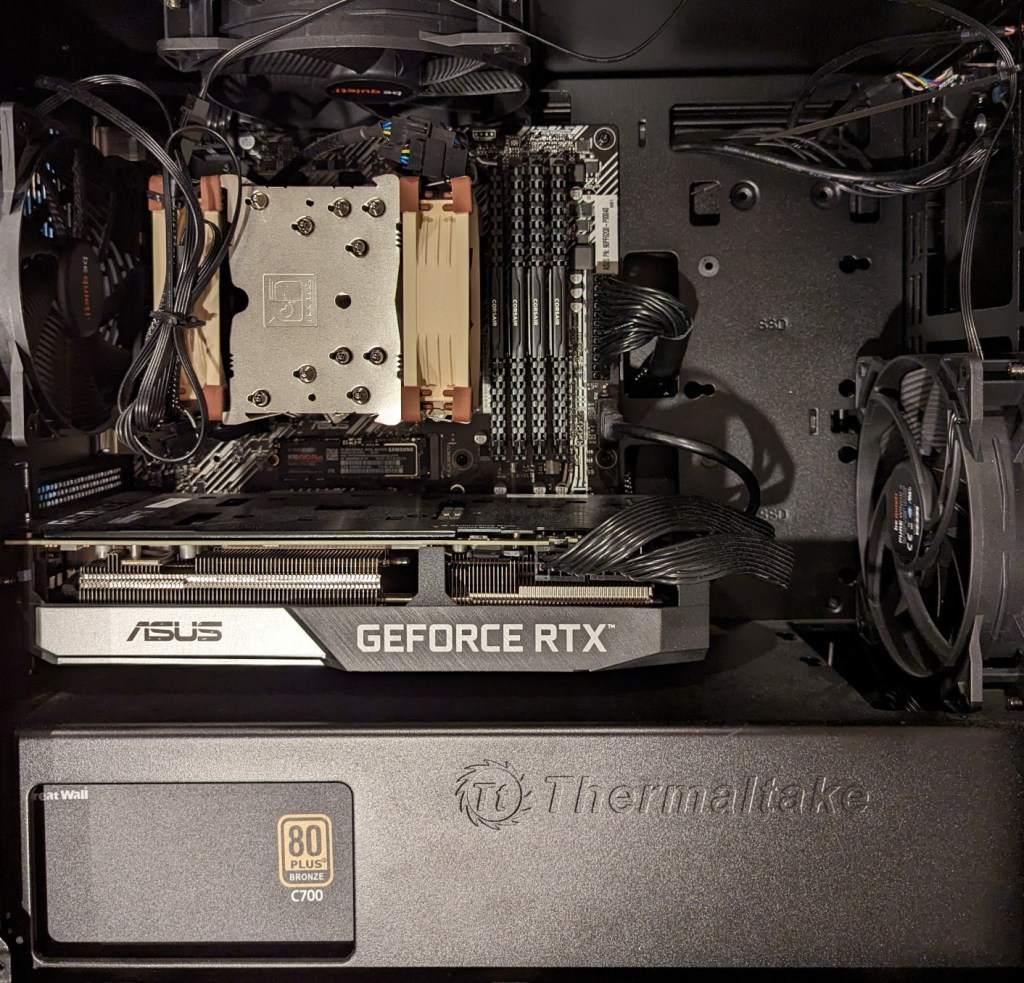
My primary objective when choosing a new video card was that it had enough VRAM to load a 65B LLaMA model (roughly 48GB). One option for doing this is to install two NVIDIA RTX 3090 or 4090 video cards with each having 24GB of VRAM for a total of 48GB. This would solve my needs for running text generation models, but it would limit how I could use image generation models, which can’t be split between multiple video cards without a significant performance hit (if at all). So, a single card with 48GB of VRAM would be ideal for my use case. Three options that I considered were the Quadro 8000, A40, and RTX A6000 Ampere. The Quadro 8000 used three-generation-old Turing architecture, while the A40 and RTX A6000 used two-generation-old Ampere architecture (the latest Ada architecture was outside of my price range). The Quadro 8000 has memory bandwidth of 672 GB/s while the A40 has 696 GB/s and the A6000 has 768 GB/s. Also, the Quadro 8000 has far fewer CUDA cores than the other two cards: 4,608 vs. 10,572 (A40) and 10,752 (A6000). Considering the specs, the A6000 was the better graphics card, but the A40 was a close second. However, the A40, even found for a discount, would require a DIY forced-blower system, because it is designed to be used in rack mounted servers with their own forced air cooling systems. 3D printed solutions that mate fans to the end of an A40 are available on eBay, or one could rig something DIY. But, for my purposes, I wanted a good card with its own cooling solution and a warranty, so I went with the A6000 shown below.
Another benefit to the A6000 over the gaming performance-oriented 3090 and 4090 graphics cards is that it requires much less power–only 300 watts at load (vs ~360 watts for the 3090 and 450 watts for the 4090). Despite this lower power draw, I only had a generic 700 watt power supply. I wanted to protect my investment in the A6000 and ensure it had all of the power that it needed, so I opted to go with a recognized name brand PSU–a Corsair RM1000x. It’s a modular PSU that can provide up to 1,000 watts to the system (it only provides what it is needed–it isn’t using 1000 watts constantly). You can see the A6000 and Corsair PSU installed in my system below.
Now, instead of waiting for 15-30 minutes for a response to a long prompt ran on my CPU and system RAM, it takes mere seconds to load the model on the A6000’s VRAM and generate a response as shown in the screenshot below of oobabooga’s text-generation-webui using the Guanaco-65B model quantized by TheBloke to provide definitions of science fiction for three different audiences. The tool running in the terminal in the lower right corner is NVIDIA’s System Management Interface, which can be opened by running “nvidia-smi -l 1”.
Y began using Postcrossing in 2013 when we still lived in Atlanta. She liked the concept of connecting with others around the world via mailed postcards.
The way Postcrossing works is you setup a profile with your mailing address. Then, you request an address of another Postcrossing user for you to send a postcard to. When that person whose address you just got receives and registers your postcard online, then another, different Postcrossing user will be given your address randomly to send a postcard to you. Some users offer to do direct swaps, but most do not. In some cases, you might make a connection with someone that leads to becoming pen pals (Y and I each have different pen pals in Germany).
I began helping Y with her Postcrossing account before the pandemic began. We share and trade off duties, which include requesting addresses, choosing a postcard that someone might like, selected and affixing the correct postage (in the past, we purchased unused stamps on eBay and at philatelic/stamp collecting shows at significant discounts), and of course, writing a message, the postcard ID, and recipient’s address.
As you can see below, we’ve had 6,866 sent cards (we’ve sent more than this–this number reflects the number that were successfully registered by their recipients), and 6,869 received cards (this is how many cards we’ve received and registered–as you can imagine that number would be higher if some cards sent to us had not been lost in the mail).
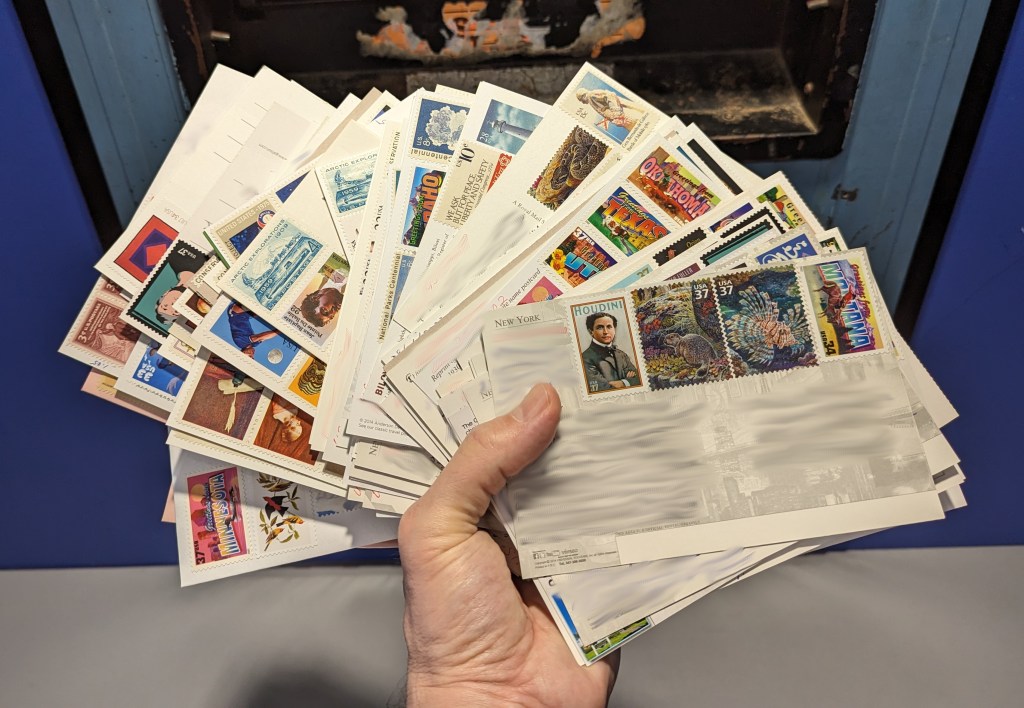
The picture at the top of this post is our most recent batch of 100 sent postcards. We had let the account go dormant during this past school year. Over the past few days, Y requested 100 addresses, selected cards, and affixed postage. As she would complete a small batch of cards, she handed them to me and I wrote the message to the recipient. For selecting the postcard and writing the message, Y and I would read the recipient’s profile and view their favorite postcards to get a sense of who they are and what we would like to send/say to them.
Of these 100 postcards, we sent 1 to Bulgaria, 2 to Canada, 13 to China, 1 to Czechia, 1 to Denmark, 1 to Finland, 23 to Germany, 1 to Ireland, 1 to Italy, 3 to Japan, 1 to Kazakhstan, 5 to Netherlands, 2 to Poland, 1 to Portugal, 1 to Spain, 1 to Taiwan, 41 to the United States, and 1 to Ukraine. The distribution depends on how many users there are in a given country and how many have just had cards registered. Postcrossing tries to balance the distribution across its user base. Also, you can select to not send cards to your own country. However, it’s worth noting that the price of sending a postcard overseas is about 3 times the price to send a postcard domestically.
I encourage my students to try out Postcrossing as a way to connect with others and practice their writing. Also, learning about others’ lived experience and sharing your own with others can serve to break down barriers to understanding and bridge arbitrary divisions between people.
Anyone can join and the service is free. The only costs are for postcards and postage. If you are interested in Postcrossing, you can get involved in whatever way suits you.