A cute humanoid robot writing at a desk with bookshelf in background. Image created with Stable Diffusion.
Over the weekend, I made some significant updates to the Generative AI and Pedagogy Bibliography and Resource List page, which includes background, debates, teaching approaches, applications, disciplinary research, and a list of online resources. I started it as a place to organize my own research while sharing it back out to others.
It now features a table of contents at the top of the page under the introduction.
I added about 50 articles and books to the bibliography, which now contains 232 sources.
And, I added three links to the resource list at the bottom of the page which brings it to 42 links.
I will periodically add more entries to the list as my own research progresses. But, it’s important to note that this bibliography isn’t meant to be exhaustive.
I wanted to make the most of this year’s Spring Recess. Below are a few things that I accomplished during this late semester respite: a computer storage upgrade, installing Mac OS X Leopard on QEMU, finding Star Wars action figures on eBay, beginning a generative AI and pedagogy bibliography, and spending time with Y.
Upgraded My Desktop Computer’s Boot Drive
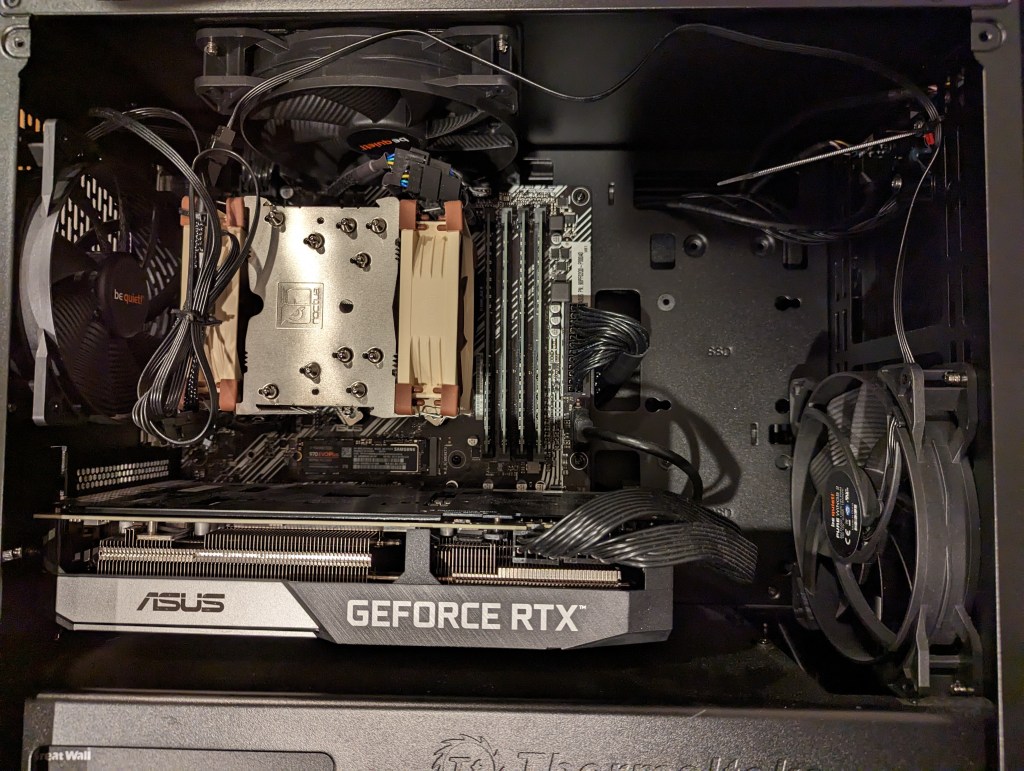
Inside my desktop computer after installing 2TB NVMe SSD.
I took advantage of a BestBuy deal on 2TB Samsung 970 EVO Plus NVMe SSDs to upgrade my desktop computer’s boot drive. Originally, I had a 512GB NVMe drive installed. I had pulled out the wifi card that was in the secondary M.2 slot awhile back. So, I moved the 512GB to that slot (under the video card as pictured above) and installed the 2TB Samsung drive into the primary M.2 slot (just above the video card as pictured above). With the hardware installation done, I reinstalled Linux Mint 21.1, which I run on my desktop and laptop computers.
Installing Mac OS X 10.5 Leopard on QEMU
Mac OS X 10.5 Leopard running in QEMU.
Since I reinstalled Linux Mint, I thought that it was a good opportunity to play around with QEMU. For most of my Macintosh emulation needs (mostly System 7.5.5 for Apple’s HotSauce and Voyager’s Expanded Books but occasionally earlier versions that best support some Hypercard stacks and other older software), I rely on SheepShaver and Basilisk II. QEMU-System-PPC supports Mac OS 9.x through Mac OS X 10.5. After Mac OS X 10.9 Mavericks, Mac OS X 10.5 Leopard was my favorite version of Mac OS X, so I picked it for QEMU. After grabbing an ISO from archive.org, it was a short order to install and use Leopard. I had hoped to use an older version of OsiriX to look at the MRI that I had at the University of Liverpool (contemporary DICOM viewers have trouble opening the files), but I should have read the documentation first and seen that OpenGL was a non-starter on the regular version of QEMU.
Star Wars Action Figures from eBay
Star Wars Vintage Collection and Kenner/Retro Collection action figures.
At the beginning of Spring Recess, I hit eBay and racked up some good deals with bidding and best offers on 3.75″ Hasbro Vintage Collection action figures, Hasbro Retro Collection action figures, and Kenner action figures. I don’t like to collect action figures in their packages. I like to create scenes with them for display. With these new acquisitions, I plan to create some Empire and Return of the Jedi scenes with my 1979 Kenner Millennium Falcon (not pictured) and 2008 Hasbro Legacy Collection Millennium Falcon (pictured above, aka the Big Falcon).
Compiling a Bibliography of Generative AI Technologies and Pedagogy Resources
I compiled all of my current research on Generative AI technologies and how they might be used in teaching on this page. It’s not an exhaustive list, but it has a lot of recent publications. It can help someone get up to speed on what’s going on now with ChatGPT, Stable Diffusion, and other AI tools to create text, images, and music from prompts.
Y and I also got to spend time catching up via video chat with my cousin Angie in Maryland and our graduate school friend Masaya in Japan. We enjoyed a walk in Green-Wood Cemetery just before we were awash in tree pollen. And, we watched a lot of Family Guy, too.
I’m holding my Distinguished Alumni Award while standing next to Georgia Tech’s mascot, Buzz.
On Mar. 29, 2023, Georgia Tech’s Ivan Allen College held its 2023 Distinguished Alumni Awards Ceremony. The Ivan Allen College’s six academic schools and its three ROTC branches give these awards to “celebrate excellence in the College community.” I was honored to receive a Distinguished Alumni Award from the School of Literature, Media, and Communication for my contributions as a teacher, scholar, and organizer. The award reads, “For outstanding achievements that inspire continued excellence and bring credit to the School of Literature, Media, and Communication, the Ivan Allen College of Liberal Arts, and the Georgia Institute of Technology.”
To honor all of the Ivan Allen College professors who made my success possible, I delivered these remarks after receiving the Distinguished Alumni Award:
I am honored and humbled to receive this Distinguished Alumni Award. I want to thank the Ivan Allen College, Dean Husbands Fealing, and all of the faculty, administrators, and staff who make the Ivan Allen College not only a indispensable and integral part of Georgia Tech but also a home for someone like me who is better at writing about science than doing science. It also feels like home, because I’ve spent so many years here—first, it took me 10 years to “get out” with my bachelor’s degree, and then, I returned as a postdoctoral Brittain Fellow for 2 years to give back to Tech as an instructor where I had received so much from my former professors. Throughout my career, all of the work that I have done as a scholar, an instructor, an organizer, and an administrator can be traced back to my education and professionalization in the Ivan Allen College. To name a few examples, when I was asked to help establish the City Tech Science Fiction Collection where I now work, I looked at the problem with the engineering mindset that Tech instills in its students. I drew on my experience working under Lisa Yaszek on research projects, public outreach, and donation runs for what was originally called the Bud Foote Science Fiction Collection and now the Georgia Tech Science Fiction Collection. After starting the collection, I inaugurated an annual Science Fiction Symposium to celebrate the collection and create a platform for scholars and students (including Lisa’s SciFi Lab undergraduate researchers) to interact and share their findings. That work over the past seven years was made possible by the experiences that I had with Lisa when she mentored me to create the schedules for the Monstrous Bodies Symposium in 2005 and the international Science Fiction Research Association Conference held in Atlanta in 2009. Lisa has had a profound influence on my career. She’s my hero and I strive to be like her.

Other faculty have also played outsized roles in my development. Carol Senf and Narin Hassan gave me kind and essential advice at key points in my undergraduate career, and they also gave me some of my first editing work by asking me to proofread their respective manuscripts, which helped tremendously in the editing and collaborative writing that I have done over the years since then. In my teaching, I observed and learned from some of the best practioners. I want to excite my students in the way that Hugh Crawford can when talking about William Carlos Williams and bombsights, as detailed as Steven Usselman is about steam engine locomotives, or as illustrative as Robert Wood is when he talks about 15th century Florence. And I show my students compassion when things go wrong as Rebecca Merrens did for me when my maternal grandmother died, foster my students passions as Lisa Holloway-Attaway did for me in the two required freshman college writing classes, give my students a chance like Patrick Sharp did for me by readmitting me in 2002, give my students opportunities to contribute to the life work of our campus communities as Ken Knoespel did for me, and give students an opportunity to be successful and demonstrate learning when the student stumbles on a project they are ill fitted to such as the late Thomas Lux did for me by asking me to produce a Poetry Out Loud DVD for Georgia public schools in place of my atrocious writing as a poet. And while I never had the opportunity to take a class with Jay Telotte or Jay Bolter, their work had a significant influence on my early research, and I teach their scholarship to my students now. Most recently, Rebecca Burnett, the former Writing and Communication Program Director, led the Technical Communication theory and pedagogy seminar that I volunteered to participate in so that I could earn the opportunity to teach Tech Comm as a Brittain Fellow. That experience directly led to my job at the New York City College of Technology and my current position as Director of City Tech’s Professional and Technical Writing Program. Rebecca has continued to selflessly mentor me throughout my directorship.

And lastly, I want to offer a special thank you to Professor Hanchao Lu, because his Asia in the Modern World class had a profound effect on my personal life. He encouraged me to research Taiwan for my final paper. Years later, when I met a Taiwanese girl in graduate school in 2007, I drew on what I had learned in Professor Lu’s class to talk about the KMT and DPP political parties hoping that she might notice me. And guess what? She did, and we got married two years later! Thank you, again!
I arrived in Atlanta a day early, because I wanted to walk around and see all of the changes around Georgia Tech’s campus during the 8 1/2 years since I was last there. Some things remained comfortably familiar, like the entrance to the School of Literature, Media, and Communication on the 3rd floor of the Skiles Building.
School of Literature, Media, and Communication, 3rd Floor of Skiles Building.
However, there were subtle changes like the addition of outdoor tables and seats on breezeway, which I utilized to finish writing my thank you remarks.
Outdoor seating on the 3rd floor breezeway in Skiles.
Besides the changes to buildings and the construction of new facilities, there are new pieces of art that convey important historical events as well as excite the senses.
“The Three Pioneers” by Martin Dawe.
Approaching Tech Tower, I was greeted by this striking bronze sculpture titled “The Three Pioneers” by Martin Dawe. It depicts the first three African American students to matriculate at Georgia Tech in 1961: Ford C. Greene, Ralph A. Long, Jr., and Lawrence M. Williams.
“Continuing the Conversation” by Martin Dawe.
Walking toward the foot of Tech Tower, I sat in this engaging bronze and granite piece titled “Continuing the Conversation.” The viewer sits between two versions of Rosa Parks–42 on the right and 92 on the left. While Parks had never visited Tech’s campus before, this art reflects her influence on change and how we should be a part of that change moving forward.
Me and Robert Berks’ Einstein.
Walking through the center of campus–the Library, Skiles Building, and the Student Center–I found Robert Berks’ Einstein installation. While some folks think the statue is out of place at Tech, it meant something personal to me. When I was in high school, I read Einstein’s Relativity: The Special and the General Theories, which among other works by Carl Sagan, Michio Kaku, Roger Penrose, and Stephen Hawking, directly led to my enrolling as a Physics major at Georgia Tech in 1995. That didn’t work out so well for me academically, but I love Physics and Mathematics despite my own deficiencies.
John C. Portman, Jr.’s KR+C Sculpture.
Walking from the Einstein statute toward the green space between the back of the Library and the School of Architecture I encountered John C. Portman, Jr’s imposing KR+C (for Knowledge and Research plus Creativity) sculpture. Walking around its circumference reveals how it reshapes and changes depending on your perspective. I found that you can walk up the back stairs of the Library and Clough Undergraduate Learning Commons to get a bird’s eye view of this magnificent sculpture.
“Jetson” in the Clough Undergraduate Learning Commons.
Walking into the Clough Undergraduate Learning Commons, I found art suspended between its the clean perspectival lines. The sculpture above titled “Jetson” is a collaborative team project initiated by former College of Architecture Professor Volkan Alkanoglu. Primarily constructed from water jet cut aluminum, this large, futuristic sculpture only weights about 110 pounds!
Walking through the Clough Commons into the Library, I met with my former colleague Wendy Hagenmaier, Digital Curation Archivist and RetroTech Manager, in the 3rd floor Data Vizualization Lab and RetroTech shared space. RetroTech is a working collection of born digital (and analog) art (and science) artifacts that students can use, support, and learn from. Before moving to Brooklyn, I donated four of my vintage computers (a Dell Dimension 4100, Apple Macintosh Perform 550, iMac DV, and Apple Power Macintosh 8500) to the Georgia Tech Library to help kickstart RetroTech, a lab for students to use and interact with older technologies–computers, video game consoles, cameras, slide rules, typewriters, etc. I was amazed at how much space RetroTech has in conjunction with the Data Vizualization Lab. Besides having equipment and space, Wendy is developing RetroTech into a sustainable initiative involving students and cross campus connections. I’m really happy to see how much RetroTech has developed under Wendy’s leadership.
Leaving the Library, I walked through Deanna Sirlin’s “Watermark” installation. The sunlight passing through the colored glass panes creates a changing projected artwork on the floor and surroundings inside this entrance to the Crosland Tower of the Library.
Kessler Campanile.
Walking back toward the Student Center, I stopped in front of the Kessler Campanile designed by Richard Hill for the 1996 Olympics. It was installed during my freshman year at Tech.
Spending almost a whole week in the ATL gave me a much needed boost. 99x is back on the air. I enjoyed not one but two meals at Del Taco. I talked computers with Grantley and Melanie. I met Carol Senf for brunch to talk teaching. I hung out with Lisa Yaszek and Doug Davis at the West End. Rebecca Burnett and Jeff Jeffries invited me over to their home for a wonderful dinner. I talked Doctor Who and Dirk Gently with Mark Warbington. I discussed books with Keith Magnes. And, I got to visit Mike Flanagan in his new house and see his wife Diana compete in a local tennis tournament. Unfortunately, I didn’t have enough time to see everyone I know there, but I hope to get back to Atlanta before another 8 1/2 years pass!
My Distinguished Alumni Award lit by candlelight. Photo by Rebecca Burnett.
My Apple PowerMacintosh 8500/120 and PowerBook 145B at home. August 1997.
Continuing the work that I started in 2014 when I wrote about the rediscovery of a set of isometric Macintosh icons that I had created and shared in 1997, I wanted to share another rediscovery from February and March 1997 that spans a defunct Macintosh-focused blog called the Power Macintosh Resource Page and Usenet that involves BeOS, winning a magazine, and writing about a hard drive partioning trick that I developed using free BeOS and MacOS applications.
This rediscovery came about after I sent a postcard to another computer enthusiast via Postcrossing.com. I wrote in my postcard about how great I thought BeOS was. She replied that she hadn’t used BeOS before but was interested in it.
I remembered that the way that I came to use BeOS for a time was thanks to a now-defunct technology blog called The Power Macintosh Resource Page. It was operated by Steve Tannehill.
Trevor Inkpen wrote to mention that the Complete Conflict Compendium is about to have its 500,000th visitor. That visitor will win an Apple watch and an Apple hat.
Not to be outdone… ;-)
In the next 2-3 weeks, the Power Macintosh Resource Page will hit the half-million mark. If you send me a legitimate screen shot of the 500,000th hit, I’ll send you a copy of the January MacTech magazine, complete with the BeOS for the Power Mac demo CD-ROM!
Power Macintosh Resource Page, Feb. 1997 Archive, Archive.org Wayback Machine.
There are a few things to unpack here. First, Tannehill mentions Trevor Inkpen’s site visitor context for “an Apple watch and an Apple hat.” That Apple watch prize was not for what we think of as an Apple Watch today. It was an Apple-branded watch that Apple sold through their campus gift shop in Cupertino.
Second, website operators used to pride themselves on how many site visitors they had. This was usually calculated with a public-facing counter enabled by a bit of code offered by a provider that logged page loads containing the code and presented a gif-based numerical counter of the number of page loads. Many of these counters only provided a simple calculation of page loads rather than the more granular information provided by webserver logs and the more advanced metrics of unique visitors, engagement, etc. used today.
Third, like Inkpen’s website with a counter nearing 500,000, Tannehill’s Power Macintosh Resource Page’s counter was also nearing that number. So, he devised a contest to reward the person who was the 500,000th visitor. Unlike Inkpen, Tannehill offered what I considered a greater prize, a copy of the January 1997 issue of MacTech Magazine, which included a CD-ROM installer for the Preview Edition of BeOS.
Before Tannehill offered this prize, I had heard about BeOS from articles in Mac magazines like MacUser, Macworld, and MacAddict. With the burgeoning world of online reporting and news, I had gleaned even more information about it. It sounded like the next big thing, especially in light of Apple’s financial troubles of that era.
Also, I had gotten my PowerMacintosh 8500/120 only a year before, so I had a computer that was capable of running the PowerPC-based BeOS Preview Edition that came with the MacTech Magazine.
After learning about Tannehill’s contest, I first thought that there is no way that I would be lucky enough to be the 500,000th visitor to his site. So, the practical solution was to find a copy of the magazine. I was attending Georgia Tech in Atlanta at the time, so I had access to bookstores with nice magazine selections–the best being Tower Records next Lenox Square Mall in Buckhead.
Unfortunately, I was unable to find a copy of the magazine anywhere. Stores that sold MacTech said that they were sold out. Therefore, my only alternative to obtain a copy of BeOS was to be a super visitor to the Power Macintosh Resource Page. Thankfully, my efforts paid off on 13 Feb. 1997 after I revisited the page late that night and took the required screenshot of my browser window:
13 February 1997:
Jason Woodrow Ellis is the official 500,000th visitor to the Power Macintosh Resource Page! Jason sent the screen shot, so he gets the January MacTech magazine. Congratulations Jason, and thanks to everyone for making this page a success!
Power Macintosh Resource Page, Feb. 1997 Archive, Archive.org Wayback Machine.
Tannehill mailed the magazine to my campus address at Georgia Tech, and after receiving it, I promptly began partitioning my PowerMac’s 2GB SCSI hard drive so that I could boot into Mac OS or BeOS (more on this further below).
And, I would be remiss not to remark on how grateful that I am to Tannehill for offering that magazine as a prize on his website. It was a touchstone in my memories of that era of my life and an important moment in my learning more about computers in general and Macs in particular. I owe him a debt of thanks!
While reading the February 1997 archive page of the Power Macintosh Resource Page, I discovered that I had sent in a report about a presentation by an Apple Representative at the Georgia Tech campus:
25 February 1997:
Jason Woodrow Ellis wrote an interesting note regarding a recent presentation at Georgia Tech on the future of Mac OS:
“Apple Computer, Inc.’s Higher Education Account Executive Steve VanBrackle” gave us a very good outlook for the upcoming Rhapsody and MacOS releases. Mr. VanBrackle told us about the NeXT engineers and how “cocky” they were. He explained that these guys say that they could get the NeXT OS to run on a cellular phone! The point was that they are able to port their OS to anything. …if Mr. VanBrackle is correct the engineers will have an easy time of creating it. First, NeXT had ported their OS to PowerPC several years ago to run on 601’s. Second, the Apple AU/X team had already figured out how to run System 7 apps on top of UNIX. Third, 80% of Copland’s old code will be used with Rhapsody, so Apple did not “totally” scrap those several years of research. Now their task lies in combining these things together which in effect is the “easy” part. …I asked him about Jobs and Wozniak’s role at Apple in respect to all of the rumors about Jobs “taking over.” According to Mr. VanBrackle, they are “10 hour per week advisors to Amelio.” They have no managerial responsibilities and no “code time.”
Power Macintosh Resource Page, Feb. 1997 Archive, Archive.org Wayback Machine.
I vaguely remember this presentation only because I recall receiving a copy of the first Mac Advocate CD-ROM, which contained useful software updates, Apple information, and Apple-related media, and Apple rainbow logo stickers, which I later applied to the rear window of my dad’s Toyota pickup truck that I often drove when I was back home (and earned me vulgar responses from homophobic locals who were not only bigoted but also apparently lived under a rock during the first 20 years of Apple Computer’s existence).
It was exciting to me to find this email excerpt that I had taken the time to write and send to Tannehill. I have no memory of what I reported Steve VanBrackle talking about during his presentation, but the points about what would eventually become MacOS X are very intriguing. Behind these points there were a number of important developments. Apple scrapped Copland, the code-named operating system originally intended to become System 8, Apple’s consideration of purchasing Jean-Louis Gassée’s BeOS as the basis of its next-generation operating system, and Apple’s ultimate decision to purchase NeXT and bring Steve Jobs back to the company.
As a side note, I often signed my online posts using my full name at that time, because I had discovered that there are a lot of Jason Ellis’s in the world. Even in my youth, I had to fight accusations of not having had all of my vaccines or needing additional dental work–things that applied to another guy who shared my first and last names and happened to be a patient at my doctor and dentist. When I got online, I found even more people with my name, and I tried to create an identity distinct from others. Eventually, I settled on Jason W. Ellis.
Returning to an earlier point about multi-booting MacOS and BeOS, I found an old Usenet post (thanks to the remnants of Google Groups, which is unfortunately a poor instance of its former glory) that I had made on 13 Mar. 1997–a month to the day after I had won the MacTech Magazine with the BeOS Developer Preview CD-ROM. I cross-posted this short write-up called “Slick Disk Tricks” to comp.sys.mac.hardware.storage and comp.sys.mac.systems (I just didn’t know any better).
Slick Disk Tricks
Mar 13, 1997, 3:00:00 AM
I was a crazy risk taker. I loaded up the BeOS for Power Macintosh on my 8500/120 with only one hard disk drive. Luckily I already had partitioned it when I first bought the computer. I created three partitions: HD1=340MB, HD2= 830, HD3= 830, and an allotment of 33MB of free space.
When I installed the BeOS, I repartitioned HD1 as a BeOS˛ partition. Because I quickly found that I did not find enlightenment from using Be, I wanted to get rid of it. I just as quickly noticed that Apple’s DriveSetup application would not let me repartition without reformatting. This was not an option. Luckily Be came through.
In order to reclaim my first partition I used Be’s included Mac application called BeOS Partition Utility˛ to rename the BeOS˛ partition to an Apple_HFS partition. Then I restarted my computer and a dialogue comes up at the desktop for me to choose to initialize the new partition or eject it. I opted to initialize it (which took all of five seconds) and suddenly I have my first partition back! No special programs or extra drivers necessary. Just as a precaution, I did use Norton’s Wipe Info application to do a nice government˛ sweep of all previously stored data. (OK, so I cheated a little bit!)
I am about to loose my internet connection at Georgia Tech, so I have been trying to download everything under the sun to play with when I go back home this month. This need of space reminded me of my 33MB of free space. This takes a little bit more time and effort than regaining a BeOS˛ partition (but it is exactly the same procedure, almost). These are the steps that I used. First, I used the BeOS Partition Utility˛ to rename the Apple_Free to BeOS. Next I launched the BeOS from the CD-ROM and initialized this the free˛ partition for use by the BeOS (this gives the partition a name). Next I rebooted my computer after _not_ installing the BeOS and again used BeOS Partition Utility˛ to rename the BeOS˛ partition to Apple_HFS.˛ Now one can see that this is similar to the previous instructions. However when I restarted nothing happened! Well, undaunted, I used Apple’s DriveSetup app to update the disk driver. I rebooted and now my free space is a new partition asking to be initialized. I now have my full hard disk drive available for storage purposes.
One should realize that what I did was very perilous and down right horrific. I don’t have any kind of backup solution or another disk drive to keep files on. Please use caution if you try this technique to reclaim disk space! And, remember, I am loosing my email address shortly so you have no ability for flames or other such nonsense.
While I wrote this with the intent of sharing a neat way to use the BeOS Partition Utility and Apple’s DriveSetup programs to resize and reclaim hard drive space without the need of paid partitioning software, it is an embarrassing piece of writing. However, I try to remind myself that it was something that I wrote about 25 years ago, which puts it in its proper context.
Also, I’m saddened to read that I wrote, “I quickly found that I did not find enlightenment from using Be.” I don’t recall exactly why I didn’t find it enlightening. From my viewpoint now, BeOS was exciting to use and had an excellent user interface (UI). But, I can imagine how it might not have been a daily driver OS due to its development stage and a fewer application options than MacOS. Also, hard drive space cost a premium, so I probably wanted to have the drive space back for other projects that I was working on at the time. So, while my 1997-self might have not found enlightenment from BeOS, my present self recognizes BeOS as something that had the potential to be insanely great (Steve Jobs would probably not appreciate my borrowing his phrase for this case, but I think it applies nevertheless). And I do know that despite my not keeping BeOS installed on my PowerMacintosh, I enjoyed using Greg Landwebber’s BeView to reskin MacOS as BeOS (and, I alternated between BeView and Aaron, for a Copland look–later, I switched to Kaleidoscope). And, I am certain that BeOS left an indelible imprint on my mind for me to think of it to this day, including its incredible design choices–isometric interface icons, tabbed windows, the application dock, and the finger pointer, as well as its amazing under-the-hood developments with its microkernel, preemptive multitasking, multithreading, etc.
I am curious about the phrase that I used: “did not find enlightenment.” It makes me wonder if an advertisement or article about BeOS used that kind of language to describe using it. When I have some time, I’ll look into that with what’s available on archive.org, Google Books, and other places online that might have digital copies of mid-to-late 1990s Macintosh magazines.
A few final notes: Haiku OS is trying to build something new that captures what BeOS once was and could have been. I haven’t had a chance to try it out yet, but I certainly intend to! And, I owe a great deal of thanks to the Internet Archive for the Internet Wayback Machine and Google Groups (despite Google’s mishandling of this invaluable resource), both of which made this personal exploration possible. While many of our digital traces seem to linger, others disappear without the dedicated and important work of digital preservationists.
For the most part, I have been happy with the AR11’s cooling performance in most of my workflow. However, there were occasional temperature spikes as high as 80C, especially when running software that utilizes all eight cores. And, when higher temperatures were reached after a sustained workload, it took some time before a lower idle temperature in the 30-40C range was reached.
I hypothesized that the AR11 could perform better if it had more airflow (the AR11 comes with a Silverstone-branded 92mm x 92mm x 15mm fan that has straight blades and is nearly silent) and if it had better thermal conductivity (I had used the included disposable packet of thermal grease) between the CPU lid and the AR11’s four heat pipes.
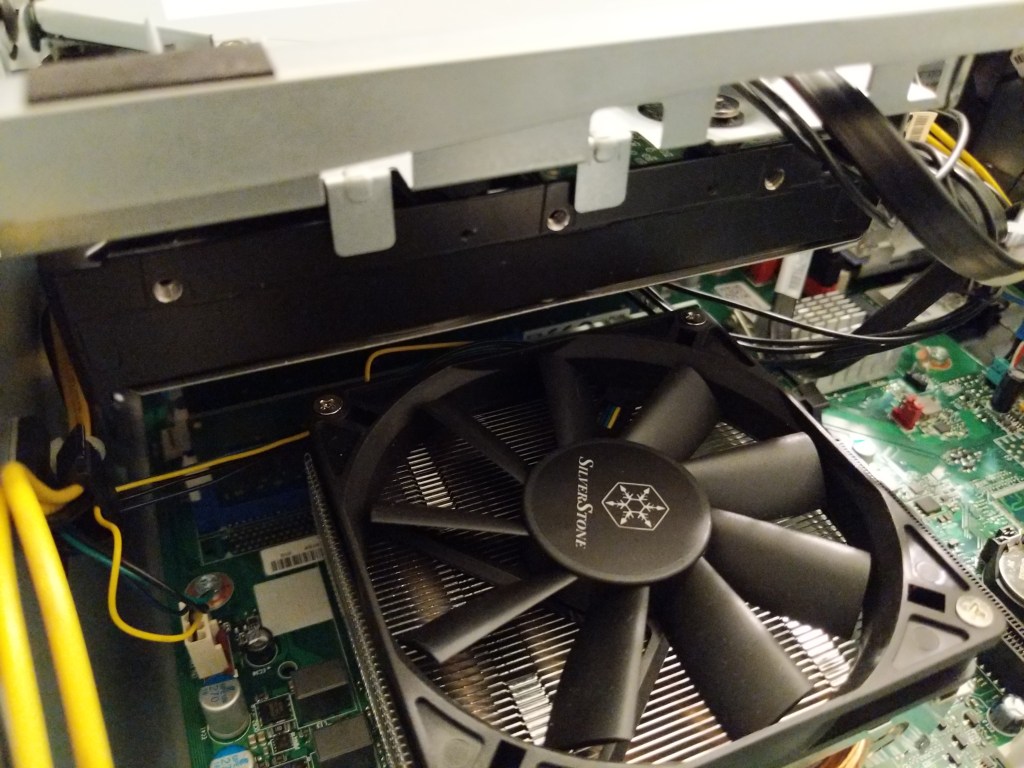
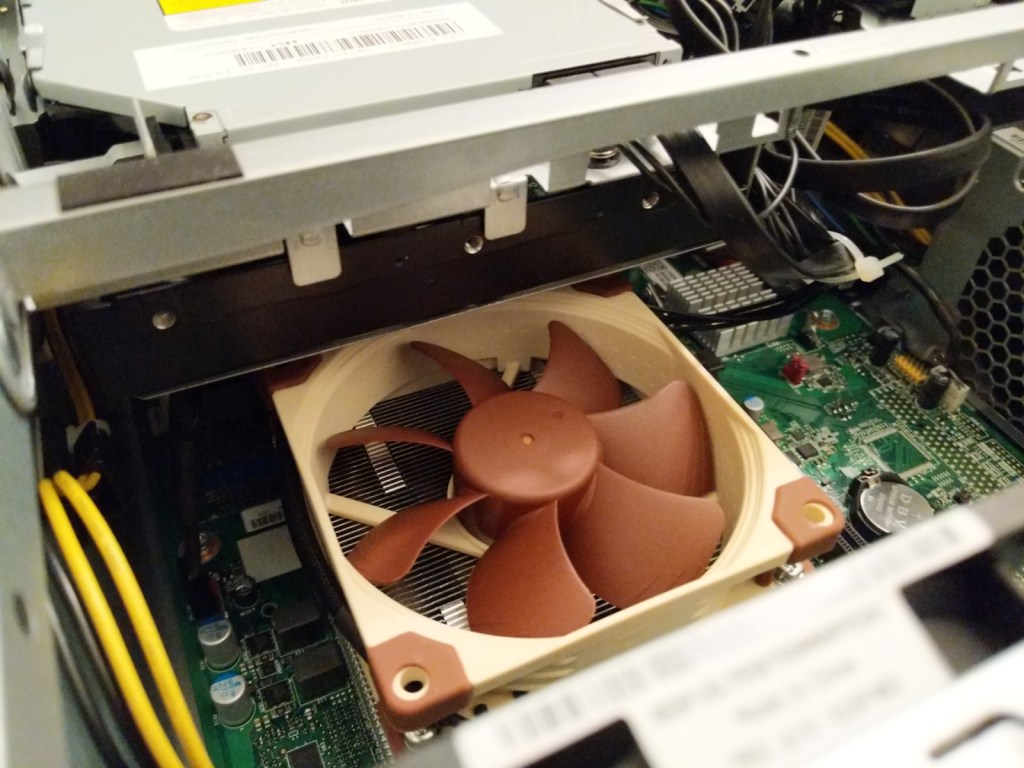
However, I had some limitations to consider. As you can see below, there is only about 15mm of space between the stock AR11 fan and my 3.5″ Western Digital hard disk.
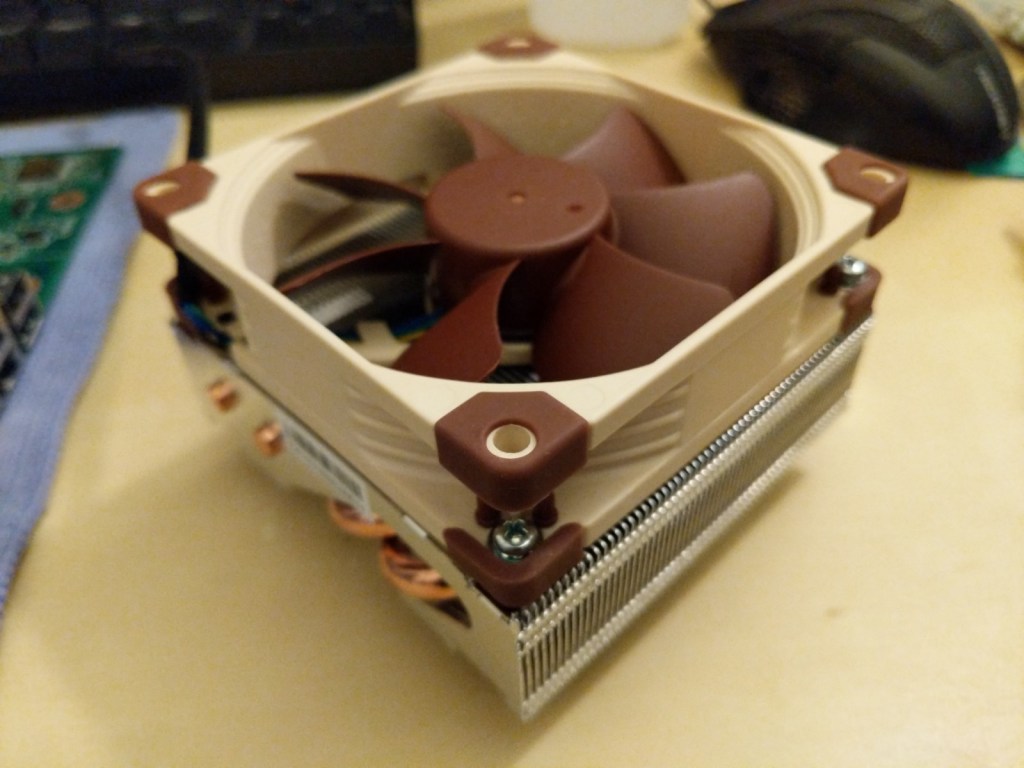
This amount of space would permit me to replace the 15mm tall Silverstone fan with a larger 25mm tall fan. I chose the Noctua NF-A9 PWM after reading so many people sing their praises for Noctua’s products and considering how this fan’s maximum airflow of 78.9 m³/h and static pressure of 2.28 mm H₂O, which make it a good fan for moving air over a heatsink.
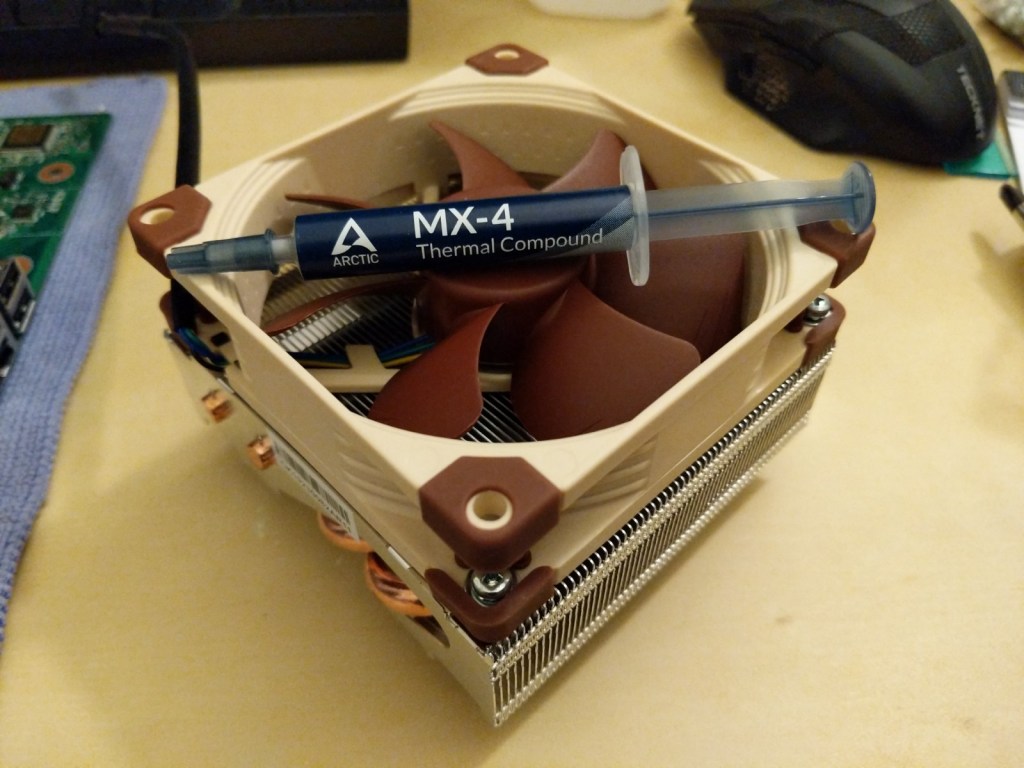
After removing the four screws holding the Silverstone fan to the top of the AR11 heatsink, I attached the Noctua NF-A9 with four fine-thread 3/8″ screws that I had on-hand. I attached the fan so that it would push air down and through the fins of the heatsink.
When I had first removed the stock AR11, I had to clean the Silverstone thermal compound off. First, I wiped off the excess with a paper towel, and then, I used cotton swabs dipped in isopropyl alcohol to clean off any residue. I continued cleaning until the swabs remained clean and the metal surfaces of the Ryzen 7 lid and AR11 heatpipes were immaculately clean. With these contact surfaces clean, I applied a very small pea sized amount of Arctic MX-4 thermal compound, which I had read performed very well and was on sale at the time, to the top of the Ryzen 7 lid. I painted the top of the lid with the thermal compound using an old credit card so that there was a very, very thin layer of compound across the top. Finally, I placed the AR11 on top of the Ryzen 7 CPU and affixed the nuts under the motherboard to pull the two together. As you can see in the image above, there is no excess thermal compound extruding out and absolutely no space left between the cooler and the CPU.
After reassembling the Ideacentre, there is about 5mm of space between the Noctua fan on the AR11 and the 3.5″ hard drive (see image above).
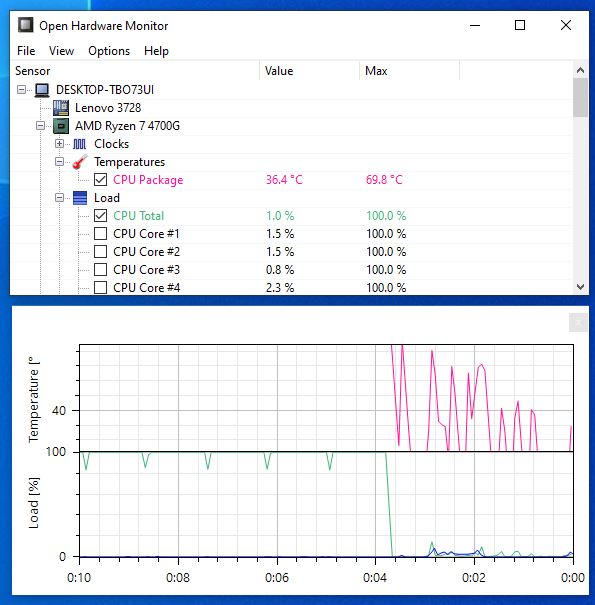
After rebooting, I ran Cinebench r23‘s multicore benchmark to max out the CPU. Before replacing the fan and thermal compound, Open Hardware Monitor reported a max temperature of 80C and the Cinebench score was 11,352. After replacing the fan and thermal compound, the max temperature was 69.8C and the Cinebench score was 11,446!
Needless to say, I am happy about the results of this inexpensive upgrade to my computer’s cooling system.
There are three caveats that I should mention in closing.
First, Lenovo’s BIOS has only two fan control settings for its PWM fan headers on the motherboard. These are “Performance,” which I have been using since I first got it–on the stock cooler and the AR11, and “Experience,” which should adjust system fan speeds according to rising or lowering temperatures. Since I want maximum cooling, I am leaving it on the “Performance” setting, but this has the side effect of an audible difference between the Silverstone (virtually silent) and Noctua (noticeable fan noise).
Second, some folks online recommend applying the thermal compound to the AR11’s heatpipes instead of the CPU lid. I didn’t do this, because the heatpipes extend across the Ryzen 7 CPU on two sides. Also, the milled fins between the heatpipes should make contact with the CPU lid, too. I wanted to make sure there was as much heat transfer as possible over the entire face of the Ryzen 7’s lid. Therefore, I applied the thin layer of thermal compound to the entire lid before installing the AR11.
Third, and finally, the AR11 is made for Intel 115x applications. I’m only using it with my Ryzen 7, because Lenovo seems to use the Intel 115x cooling solution hole pattern on both their Intel and AMD motherboards. Also, Lenovo’s chassis-integrated CPU backplate limits what kinds of headsinks that I can easily install. The AR11 uses bolts that don’t require a backplate. When I purchased it, I was unsure if another impressive cooler, the ID-Cooling IS-60, would fit (I think it would not). However, other low profile coolers that might fit within the IdeaCentre 5’s tight interior, such as the Noctua NH-L9x65 and Scythe Big Shuriken 3, use a backplate for installation. The built-in chassis backplate can be removed–the top part is glued down but removable, and the chassis ‘bump’ that hold it in place potentially could be cut out with a Dremel-type tool (but this might not be necessary depending on the thickness of the backplate used.