Y began using Postcrossing in 2013 when we still lived in Atlanta. She liked the concept of connecting with others around the world via mailed postcards.
The way Postcrossing works is you setup a profile with your mailing address. Then, you request an address of another Postcrossing user for you to send a postcard to. When that person whose address you just got receives and registers your postcard online, then another, different Postcrossing user will be given your address randomly to send a postcard to you. Some users offer to do direct swaps, but most do not. In some cases, you might make a connection with someone that leads to becoming pen pals (Y and I each have different pen pals in Germany).
I began helping Y with her Postcrossing account before the pandemic began. We share and trade off duties, which include requesting addresses, choosing a postcard that someone might like, selected and affixing the correct postage (in the past, we purchased unused stamps on eBay and at philatelic/stamp collecting shows at significant discounts), and of course, writing a message, the postcard ID, and recipient’s address.
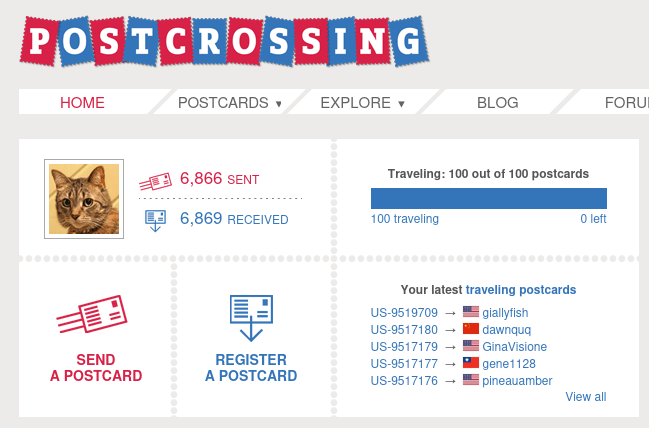
As you can see below, we’ve had 6,866 sent cards (we’ve sent more than this–this number reflects the number that were successfully registered by their recipients), and 6,869 received cards (this is how many cards we’ve received and registered–as you can imagine that number would be higher if some cards sent to us had not been lost in the mail).
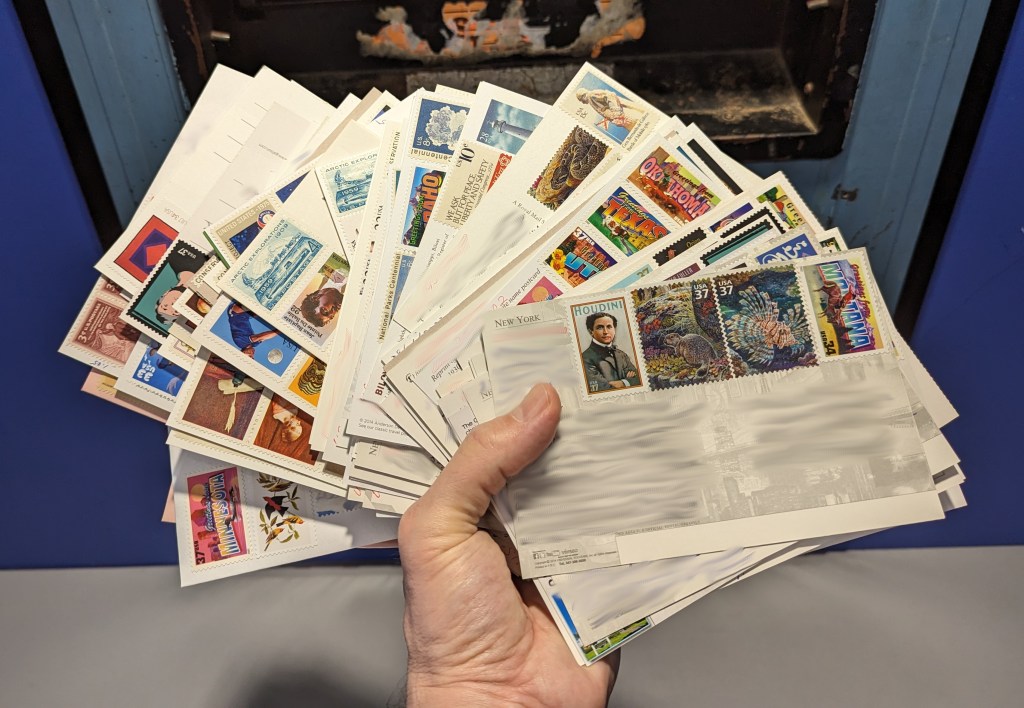
The picture at the top of this post is our most recent batch of 100 sent postcards. We had let the account go dormant during this past school year. Over the past few days, Y requested 100 addresses, selected cards, and affixed postage. As she would complete a small batch of cards, she handed them to me and I wrote the message to the recipient. For selecting the postcard and writing the message, Y and I would read the recipient’s profile and view their favorite postcards to get a sense of who they are and what we would like to send/say to them.
Of these 100 postcards, we sent 1 to Bulgaria, 2 to Canada, 13 to China, 1 to Czechia, 1 to Denmark, 1 to Finland, 23 to Germany, 1 to Ireland, 1 to Italy, 3 to Japan, 1 to Kazakhstan, 5 to Netherlands, 2 to Poland, 1 to Portugal, 1 to Spain, 1 to Taiwan, 41 to the United States, and 1 to Ukraine. The distribution depends on how many users there are in a given country and how many have just had cards registered. Postcrossing tries to balance the distribution across its user base. Also, you can select to not send cards to your own country. However, it’s worth noting that the price of sending a postcard overseas is about 3 times the price to send a postcard domestically.
I encourage my students to try out Postcrossing as a way to connect with others and practice their writing. Also, learning about others’ lived experience and sharing your own with others can serve to break down barriers to understanding and bridge arbitrary divisions between people.
Anyone can join and the service is free. The only costs are for postcards and postage. If you are interested in Postcrossing, you can get involved in whatever way suits you.
An anthropomorphic cat taking notes in a lecture hall. Image created with Stable Diffusion.
I tell my students that I don’t ask them to do anything that I haven’t done or will do myself. A case in point is using the summer months for a learning boost. LinkedIn Learning offers new users a free trial month, which I’m taking advantage of right now.
While I’ve recommended students to use LinkedIn Learning for free via the NYPL, completion certificates for courses don’t include your name and they can only be downloaded as PDFs, meaning you can’t easily link course completion to your LinkedIn Profile. Due to the constraints with how library patron access to LinkedIn Learning works, I opted to try out the paid subscription so that it links to my LinkedIn Profile. However, I wouldn’t let these limitations hold you back from using LinkedIn Learning via the NYPL if that is the best option for you–just be aware that you need to download your certificates and plan how to record your efforts on your LinkedIn Profile, your resume, and professional portfolio.
For those new to online learning, I would make the following recommendations for learning success:
Simulate a classroom environment for your learning. This means find a quiet space to watch the lectures while you are watching them. Don’t listen to music. Turn off your phone’s notifications. LinkedIn courses are densely packed with tons of information. Getting distracted for a second can mean you miss out on something vital to the overall lesson.
Have a notebook and pen to take notes. While watching the course, pause it to write down keywords, sketch charts, and commit other important information to your notes. The act of writing notes by hand has been shown to improve your memory and recall of learned information. Don’t keep notes by typing as this is less information rich learning than writing your notes by hand.
Even though a course lists X hours and minutes to completion, you should budget at least 50% more time in addition to that time for note taking, studying, quizzes, and exams (for those courses that have them).
While not all courses require you to complete quizzes and exams for a completion certificate, you should still take all of the included quizzes and exams. Research shows that challenging ourselves to recall and apply what we’ve learned via a test helps us remember that information better.
After completing a course, you should add the course certificate to your LinkedIn Profile, post about completing the course (others will give you encouragement and your success might encourage others to learn from the same course that you just completed), add the course certificate to your resume, and think about how you can apply what you’ve learned to further integrate your learning into your professional identity. On this last point, you want to apply what you’ve learned in order to demonstrate your mastery over the material as well as to fully integrate what you’ve learned into your mind and professional practices. This also serves to show others–managers, colleagues, and hiring personnel–that you know the material and can use it to solve problems. For example, you might write a blog post that connects what you’ve learned to other things that you know, or you might revise a project in your portfolio based on what you’ve learned.
Bring what you’ve learned into your classes (if you’re still working toward your degree) and your professional work (part-time job, internship, full-time job, etc.). Learning matters most when you can use what you’ve learned to make things, solve problems, fulfill professional responsibilities, and help others.
Illustration of skateboarders skating a halfpipe, surrounded by night sky. Created with Stable Diffusion.
While working on the Generative AI and Pedagogy Bibliography the other day, I realized that I had neglected the Skateboarding Studies Bibliography for the past few years. To bring it up to speed, I updated it with some new rigorous books and articles along with some lighter, reference works for the would-be skateboarder (or researcher who needs the name and steps for a particular trick). The book section more than doubled in size to 33 sources, and the articles and book chapter section grew by a handful to number 87 now. Going forward, I plan to break the bibliography into focused sections as I did on the Generative AI and Pedagogy Bibliography. I’ll post an update when that gets done. In the meantime, I hope that you find something useful to read on the list!
A Victorian cat writing a letter. Image created with Stable Diffusion.
I often get asked by my Professional and Technical Writing (PTW) students at City Tech how they can improve their writing. As I tell them, there are no shortcuts. Improvement comes from work spread out over time. If you are willing to put in the work over time, you’ll begin to see results in the quality of your writing and the ease with which you write.
Below are my tips for improving your writing with an emphasis on PTW, Technical Communication, and Professional Writing. They are: find an excuse to write; beg, borrow, and barter for feedback; read as if your life depended on it (because it does); layer your learning; check out Science Fiction; pick up a style guide; and finally, be patient.
Find an Excuse to Write: Give yourself an excuse to do more writing. Research shows that doing more writing automatically improves your writing ability. You can write privately in a journal, but a public-facing blog gives you a record that you can incorporate into your job search materials and professional portfolio (two birds, one stone). Also, you can create YouTube videos that rely on an outline and script that you write as a part of the production process. Any writing–whether for a written deliverable or part of a multimodal composition process–contributes to developing your abilities. Giving yourself a reason to write will make you much more productive and you might even find enjoyment in the practice. For example, I started dynamicsubspace.net as a place to write about what I learned in graduate school and to give myself regular writing practice. I set goals for myself early on: write a post at least once a week, and later, when my writing had improved, write a post once a day. Pick your own goals for writing frequency, and pick your own writing development goals (are you wanting to learn more about a topic–write content about what you learn, are you wanting to develop a particular writing style–mimic the style of writing demonstrated in a source text–see below, or both).
Beg, Borrow, and Barter for Feedback: Revising and editing your writing is not as simple as swapping adjectives or changing a few words. Real revision happens when you’re willing to rewrite whole swaths of your work; rethink the overall organization of a document, a paragraph, or a sentence; and begin again with just your idea in mind. Take professional literary writers for example: Many rewrite a single novel from scratch not just once but several times. Each iteration generates new ideas, creates better expression and imagery, and improves the overall narrative. It seems that if a novelist is willing to put in the work to rewrite a whole novel, then it is a small order for us to put in similar efforts of revision into those documents that matter the most to us (especially those documents that make their way into our professional portfolios!). Each of us can revise our own work by returning to it with a critical eye, but there’s a lot that we might miss in our own writing even with this approach. It’s best to ask your classmates, mentors, and family members to read your work and give you constructive critical feedback. What I mean by constructive critical feedback is not just an identification of issues with the writing but also ideas about how to improve it. Since you are asking for someone to give you their time and advice, it’s a good practice to offer something in return–for example, offer to give them feedback on their writing or sweeten the deal with a coffee or slice of pizza. It can be difficult to hear someone trash your writing, but always ask for advice about making it better with the understanding that their feedback is meant to help you improve as a writer. And the fact is that all of us–me included–can improve our writing skills. Improving as a writer is a lifelong task!
Read As If Your Life Depended On It (Because It Does): Reading in general is good for exercising your mind, learning new things, and observing how others write. But, it is especially important for technical communicators and professional writers to read writing that is like the kinds of writing that they want to be doing. Furthermore, you need to reflect on not just what is written (content) but how it is written (style), and imitate the latter in your writing practice (above). While he’s primarily focused on literary writing, Ray Bradbury’s points about how to become an accomplished writer in his book Zen in the Art of Writing has many relevant points to make if instead of thinking about writing as only by literary artists but also by professionals who write for other purposes, such as providing the right information to the right audience at the right time. Other places to learn content and style in the specialization that you’ve selected in the major: books (can be technical or written for a lay audience), journals (peer-reviewed and research-based publications), trade publications (like magazines but focused on topics of interest to professionals in that field), and magazines (less technical than trade publications but with a similar focus).
Layer Your Learning: It’s important for technical communicators and professional writers to learn how to use the tools of writing and multimodal composition inside-and-out. Pick a tool that you might not know well or at all, and learn how to do specific things with it. For example, watch tutorials on YouTube or LinkedIn Learning (free through the NYPL) about tracking changes in Microsoft Word. Practice what you’ve learned on some of your existing documents that you want to revise. Then, write a blog post with screenshots that summarize some of the techniques that you’ve learned. Meet up with some friends in the PTW Program to teach them what you have learned. Then, you and your friends can plan out and shoot your own YouTube video teaching others how to use the basics of Word’s Track Changes. So, what’s going on here? First, you gain theoretical knowledge about Word’s Track Changes. You gain practical skill or application of that knowledge by practicing those techniques on your own documents. You begin integrating what you’ve learned by writing a guide or instructional blog post. You fully integrate what you’ve learned by teaching it to others. Finally, you help your friends gain their own mastery over Track Changes by planning (script, storyboard) and shooting a YouTube video with the additional bonus of you taking leadership of a project that you can mention in your professional portfolio.
Check Out Science Fiction: Many technical communicators and technical writers also enjoy reading Science Fiction (SF). SF is a literature that explores the effects of science and technology on human beings and society. It’s written for non-specialist audience, so the SF writer has to communicate technical topics in a way that a broad range of readers are able to understand those topics and how they relate to the story. Communicating complex topics to different audiences is key to the work that we do in PTW, so there are techniques and approaches that we can learn from SF if we pay attention to how those writers accomplish those tasks, reflect on how they do it, and practice what we observe in our own writing. There are many ways to experience SF literature: books (check out for free from the library or purchase a novel from a bookstore–2nd hand bookstores are a great resource for this!), magazines (look on the magazine racks at the big bookstores for Analog Science Fiction and Fact, Asimov’s Science Fiction Magazine, The Magazine of Fantasy and Science Fiction, Amazing Stories, and Clarkesworld), and online (strangehorizons.com, lightspeedmagazine.com, tor.com, and freesfonline.net).
Pick Up a Style Guide: There are many professional style guides that provide rules about how to write in that field, cite sources, and format documents. You’ve probably heard about the style guides of the Modern Languages Association (MLA) or the American Psychological Association (APA). Each have their own rules that govern writing, formatting, and documenting. In the professional world, you can’t mix and match style guides. If you are writing for a publication that states you must use MLA style, then you have to follow MLA or you risk your article being rejected. Also, workplaces and some publications might have their own style guide–an internal document that borrows from other styles but with significant and important changes that you will have to apply to your writing. As you learn more about your specialization, you’ll identify what style guide or guides are the most used. Those are the ones that you want to learn as much about. Thinking about writing practice, you should apply those styles to your writing so that you memorize perhaps not everything about the style but enough of the most important aspects of it. In addition to style guides that you can buy from a bookstore or check out from the library, there are simplified online guides that can help you get started but be aware that these online guides likely don’t cover everything that is contained in the printed guide! A good starting point is the Purdue Online Writing Lab (Purdue OWL), expand the menu items on the left for Research and Citation (for style guides) and Subject-Specific Writing (for stylistic concerns in different fields).
Be Patient. It takes time and effort before you begin to see results. What’s going on is that your brain is rewiring itself in response to your life and its experiences. If you choose to spend more time writing, reading, and learning, then your brain will develop to support those kinds of experiences (what you write is clearer and audience directed, it gets easier to write more than in the past, you have more things to write about from what you’ve learned, etc.). If you choose instead to spend more time playing World of Warcraft, then your brain will develop to support that experience instead (perhaps improving your memory of where to complete quests, how to maximize your armor, improve your team playing skills, etc.). One experience isn’t necessarily better than the other. It’s just that they are different choices and priorities. If you want to improve as a writer, then you should choose to do things, such as what I suggest above, that engage you as a writer, thinker, learner, and collaborator. Throughout this process of making choices to support your writing skill, you will need to be patient. While our brain is constantly changing in response to our experiences, it takes time for those experiences to solidify into memories and heuristics that support our writing activities. Improvement will happen–just keep at it over time.
Due to COVID-19, City Tech (and all of CUNY) shifted its in-person classes to online, distance learning instruction. In this post, I reflect on my current class’s transition to distance learning, show how I have configured my office and computer for screencasting and video conferencing, describe some software and services that support distance learning, and give instructions for uploading a video to YouTube.
My Transition to Distance Learning
For my current Science Fiction (ENG2420) class, this was not too much of a disruption, because I was already leveraging online technologies to support student learning and course material accessibility. I designed the course as a zero textbook cost class, meaning I find resources that I can make available to students via PDFs and handouts, and choose readings that are available freely online, such as the unparalleled Archive.org.
Also, I redesigned some of the course assignments to emphasize the importance of note taking by teaching good note taking practices and evaluating students on the quality of their notes. To support this, I recorded each lecture during our earlier in-person classes and posted them on YouTube after class ended, so that students could use the videos to fill in gaps in their notes and allow those students who missed a class to make their own notes based on the video lectures.
I collect student work via email and on OpenLab, “an open-source, digital platform designed to support teaching and learning at City Tech (New York City College of Technology), and to promote student and faculty engagement in the intellectual and social life of the college community.” I joined the OpenLab team as a co-director of the project this year, but I have been using OpenLab in all of my classes since joining City Tech in 2014.
Now with classes meeting asynchronously online, I have tweaked assignments and the schedule to accommodate students accessing materials and completing their assignments. I hold office hours once a week at a regularly scheduled time via Google Hangouts, and I can hold private office hours by appointment with students. I use email to respond to questions and concerns on a daily basis.
Now that I have reconfigured a space in my apartment to support my class and the many other online meeting responsibilities that I have with OpenLab and other projects, I wanted to share some tips and ideas to help others transitioning to facilitating their classes with distance learning.
Office Configuration
I know how easily distracted I am by busy backgrounds, I wanted to provide as neutral a space for my lectures and online meetings. To this end, I appropriated my apartment’s closet as a distance learning and video conferencing studio.
I positioned the Logitech C615 webcam so that I am centered in the frame when video conferencing or recording myself lecture. Above the camera, I positioned a white light to illuminate my face.
I arranged the desk so that my back would be against a solid white wall as pictured above looking from behind my monitor towards where I would be sitting facing the monitor and webcam.
Notice that I taped a small piece of cardboard above the webcam. This blocks glare on the camera lens from the light above that illuminates my face. I was careful to cut and position it so that it is out of frame of the camera lens. Depending on your webcam, be careful not to cover the microphone if you build a similar lens shade.
To the side of my desk, I have a larger lamp that points against the wall and behind me. This reduces my shadow from the desk lamp in front of me.
The end result looks like this:
Software and Online Services for Distance Learning
As mentioned above, I use email and the OpenLab for interacting with students, disseminating materials, and collecting student work. And, I am using Google Hangouts for regular office hours since it is a far easier lift for students than official CUNY supported video platforms like Skype and WebEx.
To create my class lectures, I do the following things.
First, I create a presentation slide deck using Slides in Google Docs.
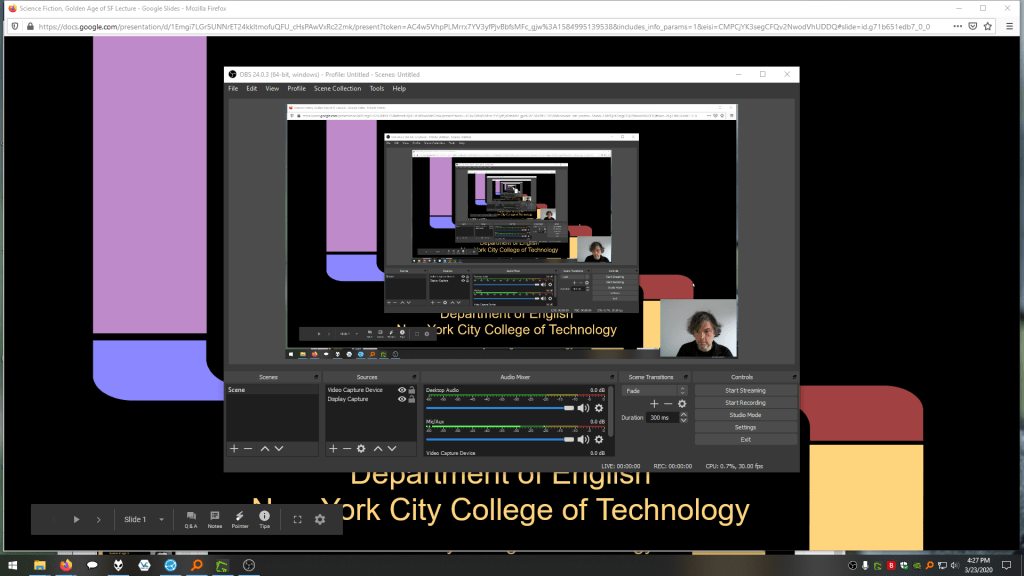
While presenting my slides in full screen mode, I use OBS Studio, a “free and open source software for video recording and live streaming” that supports Windows, Mac, and Linux, to record a video of my desktop (the Slides presentation) and my webcam video and audio in a smaller picture-in-picture that positioned in the lower right corner of the screen, which produces a video like my recent lecture embedded below.
Before I can post the video to YouTube, I like to edit it (though, editing isn’t absolutely necessary). I like to use Shotcut, a “a free, open source, cross-platform video editor.” After trimming the video, I then upload it to YouTube, get the video’s sharable link, and embed the video with the link in my class’ OpenLab site.
OBS Studio and Shotcut have steep learning curves, but each have extensive online documentation and there are communities of users online who share tips and advice about how to setup and use these powerful tools.
In some cases, you might not even need a computer. iPhones with iOS and Android phones can use video recording software that’s built-in or with an app to record and edit video, and there’s a YouTube app for both platforms that you can use for uploading the resulting video.
In the next section, I will show you step-by-step instructions for uploading a video made on a computer to YouTube.
Uploading a Video to YouTube
Once you have a video ready to share with students, the following step-by-step guide for uploading your video to YouTube shows you how to upload and share a link to your video.
First, navigate to YouTube.com and login to your account. Then, click on the camera icon in the upper right corner and then click “Upload Video.”
Second, drag-and-drop your video from your computer into the center of the window that opens, or click on “Select File” to navigate to and select your video file on your computer.
Third, while your video is uploading and processing (updates are shown along the bottom edge of this window shown above), fill out the Title and Description boxes and choose a thumbnail for how the video will initially display before the play button is pressed. Then, scroll down the window.
To comply with the COPPA law, select if your video is for kids or not. Then, click Next in the lower right hand corner.
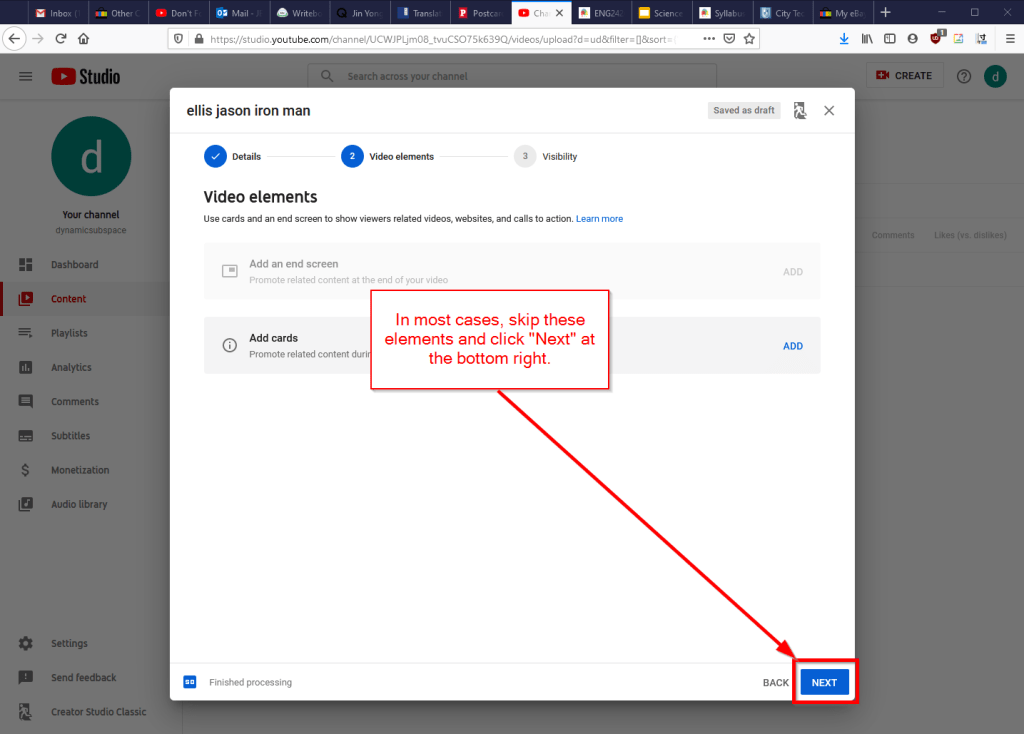
Fourth, you can skip the options on the Video Elements screen and click Next in the lower right corner.
Fifth, select the Visibility option for your video. The most versatile choices are Public (this is what I choose) and Unlisted. In these cases, you will have a sharable video link that you can send via email or easily embed in a webpage. Private is also an option, but you have to choose who is permitted to see the video, which requires students having a Google account and you knowing those accounts to grant permission to each one. After making your selection, click Publish in the lower right corner.
Finally, highlight and copy the video link on the resulting screen, or click on the copy icon on the right to automatically copy the video link to the Clipboard. Click “Close” on the lower right to return to your list of videos on YouTube. With the link on your Clipboard, you can go to email, OpenLab, or another platform to paste and share the video link with your students.
On OpenLab and WordPress-based sites, pasting the link into a post or page will automatically embed the video so that students can simply navigate to your class site and watch the video on the class site instead of going over to YouTube as an additional step.
If you’re working on transitioning your classes to distance learning, it’s okay to feel overwhelmed and frustrated like Miao Miao below. Just don’t give up. We’re doing good work for our students, and it takes time to think through and implement distance learning. Also, it’s okay to let your students know that this is a work-in-progress and things might change based on what works and what doesn’t.